I Built a Blog with RemixJS so You Don't Have To (You're Welcome)
My first impressions of RemixJS as a fullstack framework

RemixJS is in every React developer’s mouth right now, as they seem to be the new kid in the block. But how good are they? Instead of reviewing other people’s experiences, I went ahead and followed their quick start guide to build my own mini static blog and then added some dynamic behavior. Was it good? Does it live up to the hype?
Let’s find out.
The getting started step
Getting started with Remix is relatively easy, although their one-liner didn’t exactly work as planned. I guess that’s because I’m on a Windows box and NPM had some trouble installing some dependencies. I’m assuming this is something they’ll work on in the future.
So according to them, all you have to do to create and then start your project is:
$ npx remix-create@latestAnd then answer the questions. My problems:
- The CLI didn’t let me choose JavaScript as an option. I ended up working with TypeScript, which is not necessarily a problem, but I wanted JavaScript.
- The
npm installstep failed due to OS incompatibilities with some of the optional dependencies being installed. - Because of the above, the project never auto-started.
Mind you, this is not a big deal, but just so you know, if this happens, the best alternative for you is to then execute:
$ npm run devThat will boot up the dev server and it’ll watch on any changes you perform to the files while working on your code.
What went right?
Everything else, to be honest. Once I managed to get the dev server up and running (meaning, once I understood the script I had to run), it just worked. The generator worked properly and created every file it needed and even though I had a bunch of errors during the dependency installation step, the needed ones were there, so it all worked.
The watch feature also was great because both the server and the UI were updated before I could finish ALT+TABing into the browser.
So far, let’s give it an 8 out of 10.
The coding your routes part
Any basic blog will have 2 types of routes:
- The static home route, where you list all your blog posts.
- And the dynamic routes for each post to read the details.
Additionally, as part of the tutorial, you’ll also create an “Admin” section, which will allow you to create articles directly from the UI. This is interesting because it covers an aspect that the first 2 don’t: client-server communication.
Routes are the bread and butter of everything you’ll do with Remix. Not because this is a framework for designing APIs, but rather because there is no distinction between back-end and front-end code while you’re writing it. The communication between both parts is done by the framework as long as you follow some standards:
- Each route that needs to gather information (i.e read it from somewhere else, such as the hard drive, an external API, your database, or some other source) will export a “loader” function.
- Each route that needs to transform data somehow, whether by saving it into your storage layer, or whatever, will have to define an “action” function which will be called before the loader.
The route’s loader
For example, if you want to create a page that will list all your blog posts, you’d write somethign liek this:
import { Link, useLoaderData } from "remix";
import type {Post} from '../../posts'
import {getPosts} from '../../posts'

export const loader = getPosts;

export default function Posts() {
  const posts:Post[] = useLoaderData();
  return (
    <div>
      <h1>Posts</h1>
       <ul>
        {posts.map(post => (
          <li key={post.slug}>
            <Link to={post.slug}>{post.title}</Link>
          </li>
        ))}
      </ul>
    </div>
  );
}
There are several things to note here:
- This file is the
index.tsxfile living insideapp/routes/postsand that by default will associate it withhttp://localhost:3000/posts. You don’t have to define anything else (neat!). - By providing a “default export”, then this function is the one that will be used as the route handler. You could export more things (in fact, we are), but the default one is the handler in charge.
- Notice how we’re calling the function
useLoaderDatato get the list of posts to render. That one is provided by Remix, and how does it know where to get the posts from? Because we’re exporting theloaderfunction.
This makes it possible for you to provide the required data on the server-side the first time this page is rendered, and then to provide the dynamic content, requested directly by the UI using the fetch API.
That’s right, the framework is doing all the internal wiring for you. This is very powerful.
The route’s action
As already mentioned, actions are functions that you defined (and export) when you have to do some data transformation. Routes that respond to POST, PUT, PATCH or DELETE will have their action function called before the loader and whatever the first one returns, that’ll be the result of the request.
Let’s see what an action function looks like following the blog example. In this case, this action takes care of receiving the “crate new blog post” request and saving the data to disk:
export const action: ActionFunction = async ({ request }) => {
  const formData = await request.formData();

  const title = (formData.get("title") || "").toString();
  const slug = (formData.get("slug") || "").toString();
  const markdown = (formData.get("markdown") || "").toString();

  await createPost({ title, slug, markdown });

  return redirect("/admin");
};
Now, here are several interesting bits:
- Since I was using TypeScript, I had to define the type of the function using the already provided
ActionFunctionfrom Remix. This allowed TypeScript to understand the parameters this function is receiving. - The request already comes with a handy
formDatamethod, which simplifies the whole ordeal of having to parse and capture the data sent from a FORM. - We then capture the required data and call the
createPostfunction. This function is defined somewhere else and it deals with the actual creation of the file. Nothing interesting or relevant here. - Finally, the returned value is a redirect to the ‘/admin’ route.
Now, there is one interesting bit I didn’t mention so far: this action is part of the /posts/new route. And the default function on the route is the following:
export default function NewPost() {
  return (
    <Form method="post">
      <p>
        <label>
          Post Title: <input type="text" name="title" />
        </label>
      </p>
      <p>
        <label>
          Post Slug: <input type="text" name="slug" />
        </label>
      </p>
      <p>
        <label htmlFor="markdown">Markdown:</label>
        <br />
        <textarea id="markdown" rows={20} cols={80} name="markdown" />
      </p>
      <p>
        <button type="submit">Create Post</button>
      </p>
    </Form>
  );
}
What I’m trying to show you here is that both, the above function and the action are part of the same file. Now, notice how the form element doesn’t have an action attribute. That means that when you hit the “Create Post” button, it’ll post its content onto itself.
Thanks to the fact that you defined the action, our function will be called once the method goes from GET to POST (because of the form) and the redirect will prevent it from displaying the same form again.
The wiring of actions and routes is so transparent that you don’t really have to worry about writing front-end or back-end code. You just have to worry about your business logic.
This part worked great, and I while my old web dev brain had some trouble at first, it wasn’t the framework’s fault. So I would rate this part with a 10 out of 10.
Open Source Session Replay
OpenReplay is an open-source, session replay suite that lets you see what users do on your web app, helping you troubleshoot issues faster. OpenReplay is self-hosted for full control over your data.

Start enjoying your debugging experience - start using OpenReplay for free.
Nested routes
Now, this is where things started to get interesting. Once I had the basic routes working and some static content generation ready, the tutorial took me out for a spin with the “Admin” section, because it very quickly created a dynamic interface that would partially update depending on what I was doing.
Here is a quick example of what I mean:
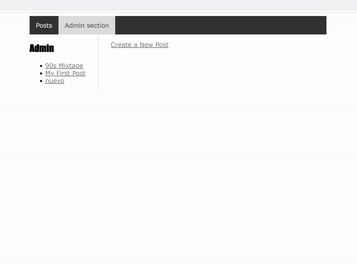
The left-hand side always stays the same, just listing the blog posts on the system (the ones returned by the first loader I showed you before). And the right-hand side goes from showing a link, to the form from before and then back to the link.
Now, this is not something unseen, however, the fact that it was so easy to implement is that mind-boggling part of this whole thing. Let’s take a look.
The admin section
The key to the above behavior are “nested routes”, which essentially allow you to define sub-routes. Something like /posts and /posts/new or /posts/edit/1234. The last 2 are nested within the first one.
The interesting aspect from Remix though, is that nested routes map directly to nested UI components.
So if you want to achieve this partial update on your UI, you’ll define a “wrapper” route inside your “routes” folder, like this:
//routes/admin.tsx
import { Outlet, Link, useLoaderData } from "remix";
import { getPosts } from "../posts"
import type { Post } from "../posts"
import adminStyles from "~/styles/admin.css";

export const links = () => {
  return [{ rel: "stylesheet", href: adminStyles }];
};
export const loader = getPosts;

export default function Admin() {
  const posts = useLoaderData<Post[]>();
  return (
    <div className="admin">
      <nav>
        <h1>Admin</h1>
        <ul>
          {posts.map(post => (
            <li key={post.slug}>
              <Link to={`/posts/${post.slug}`}>
                {post.title}
              </Link>
            </li>
          ))}
        </ul>
      </nav>
      <main>
          <Outlet />
      </main>
    </div>
  );
}
There are 2 main points to notice here:
- We’re using the same
getPostsas our loader. That means we’re using exactly the same code we used before to list all articles inside our blog. - The HTML returned has a special component called “Outlet”, which is where our partial routes will be rendered.
From now on, you can define a set of routes within the routes/admin folder (notice how the name of the folder and the above file match). And all those routes will be rendered within the Outlet component.
I’ve already shown you the /routes/admin/new.tsx file, it was the one with the form.
The cool thing to notice here, is that the form is only saving a file to disk. That’s it, the left-hand section of our page, which is controlled by the above code is automatically pulling the updated data without us having to worry about any of it. Did you catch that? Go back to the GIF and notice how the left-hand side is updated after I save my new article.
If we’re talking about ratings, I would rate this feature with an 11 out of 10.
The part about styling your UI
I’m not big on CSS, however, the way Remix handles the styling of components is quite simple. If you see the above code snippet, you’ll notice the links function being exported.
Every route can export its own links and these functions will return an array of stylesheets for the framework to merge and render.
And you can just import the CSS file into a variable and then use that as part of the return of the links function:
//...
import adminStyles from "~/styles/admin.css";

export const links = () => {
  return [{ rel: "stylesheet", href: adminStyles }];
};
//...
This is all you need to worry about, the nested routes will share the routes from their parents as well as their own. It’s a simple, yet powerful solution to understanding how to load what on each section and prevents you from having to worry about modifying the actual root template depending on each section.
I personally found this quite easy and simple, so it’s a 9 out of then, considering the class attributes on the HTML code doesn’t work (you need to use className instead).
Overall
Remix is a very easy-to-use framework as long as you’re the type of developer that is OK with the Convention over Configuration principle. This means that as long as you abide by their rules, a lot of things happen automatically and simplify your life (like nested routes and dynamically updated sections of the UI, or the UI-Backend connection happening without you writing a single line of code). And on top of that, the documentation, while not yet finished, is great and filled with useful examples.
If you’re wondering whether or not you should try it, RemixJS needs a chance, so the answer is “yes, you should try it right now”.
Finally, in case you’re wondering about the rest of the code, you can get the full source for my example here. Just clone it, and run npm install && npm run dev, it should work.