How to integrate React with Slack
Create a React Feedback Component that posts to a Slack channel

Feedback channels can be comment sections, feedback widgets, or email forms on a website. In this article, you will learn how to create a feedback widget that posts messages to a dedicated Slack channel - and you’ll create that component using React.

Discover how at OpenReplay.com.
Feedback provides a channel of communication between clients and organizations. Clients use feedback channels to communicate their satisfaction or dissatisfaction with a product or service. Feedback provides valuable insight into clients’ needs and enables organizations to make decisions that give customer satisfaction a priority.
Feedback is important in software development and technical documentation. Developers use feedback channels to direct attention to the part of technical documentation that is unclear or a feature that is missing or poorly implemented in a web application or software. Let’s see how to use React to build a feedback component.
Set up a Slack App
In this section, readers will learn how to create a Slack app and install the app on an existing Slack channel. The section consists of two sub-sections. The first sub-section gives a step-by-step description of how to create a feedback channel. The second sub-section explains how to create a Slack app and how to link the app with the feedback channel.
Creates a channel to receive feedback
Open the Slack desktop app or point your browser to https://slack.com/signin to access your Slack account. In your current workspace, go to the left panel as shown below.
 Click the “Add Channel” menu to create a channel. In the pop-up menu, select “Create new channel”.
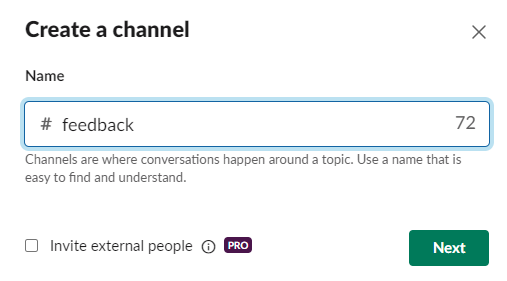
Name the channel “feedback” as shown above. Click the “Next” button, and choose “Public”, as shown below.
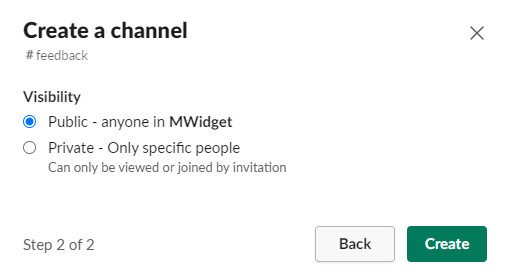
Click the “Create” button shown above. The newly created feedback channel will appear in the list of channels in the current workspace.
Create a Slack App and install it to the feedback channel
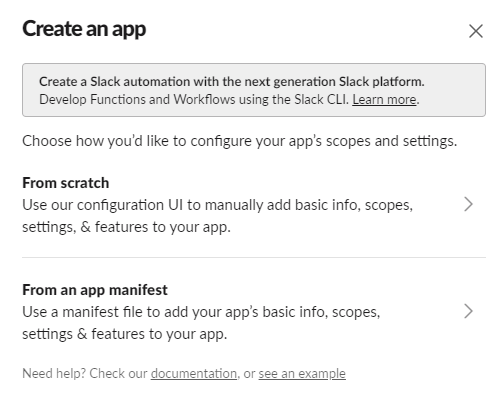
Open the https://api.slack.com/apps/new website in your web browser. Click on “Create New App”. Choose “From scratch” from the pop-up menu that appears, as seen in the image below.
Fill in the name of your app as shown below. Select the workspace to develop your app.
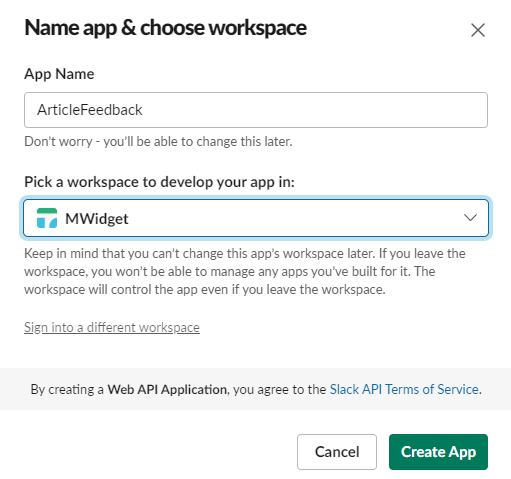
Click the “Create App” button. On the new page, scroll down and select “Install to Workspace”. Input the name of the channel you created earlier in the text box, as shown below.
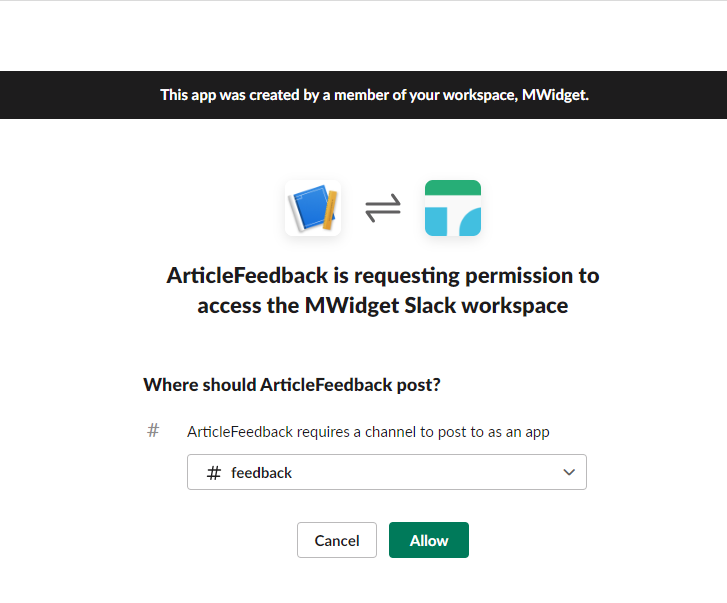
Click “Allow”. Next, click on “Add Features and Functionality”, and select “Incoming Webhooks”. Scroll down, then copy the webhook URL to a safe place. Next, we will create a React component that will use the webhook URL to post messages to the feedback slack channel.
React feedback component
This section explains how to create a Feedback component using React. The reader will learn how to scaffold a React project using Vite and install dependencies. It also describes how to create a feedback component that permits users to input text.
Create a react app and install dependencies
We will use Vite to scaffold the React project. Open your favorite CLI, run the command below, and follow the prompts.
npm create vite@latest feedback-app -- --template reactThe above code creates a React project with the name feedback-app. Run the code below to install dependencies for the project.
cd feedback-app
npm install
npm install react-icons
You should see a folder structure like the one below.
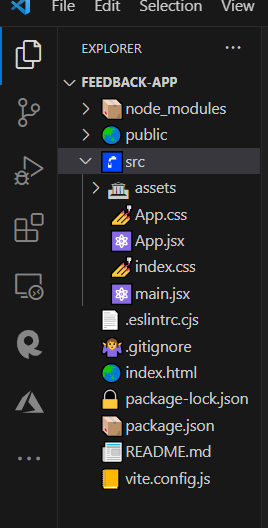
Launch your favorite code editor to edit the files in the feedback-app folder. For this article, we will use VS Code. Open the feedback-app folder in VS Code.
To test the installation. Run the code below.
npm run devA “Vite + React” page should be available at http://localhost:5173/. In the VS Code, open the App.jsx file. Delete all the content within the div tag. The page in the browser becomes blank. Also, open the App.css and index.css files and delete their contents. Open the index.html file, and change the title to Feedback.
Creates a feedback component
In the src folder, create two sub-folders:
- components
- scripts
In the components sub-folder, create two files:
- Form.jsx
- Feedback.jsx
Open the Form.jsx file, and write the code below.
import React, { useState } from 'react';
import { FaEnvelope, FaComment, FaSmile } from 'react-icons/fa'
The code above imports the required packages. Create a component and name it Form as shown below.
const Form = () => {
  return <div>Form</div>;
};
export default Form;
Within the return statement, create a form element. The form element will contain a text input, textarea, and a button element as children. Give each element a class name for CSS styling, as shown below.
const Form = () => {
  return (
    <form className="feedback-form">
      <div className="formelement-container">
        <label className="formlabel">
          <FaSmile style={{ marginRight: 3 }} />
          Is this page useful?
        </label>
      </div>
      <div className=" formelement-container">
        <label htmlFor="email" className="formlabel ">
          <FaEnvelope style={{ marginRight: 3, padding: 3 }} />
          Email Address
        </label>
        <input
          type="email"
          name="email"
          className="form-input element-border"
          required
        />
      </div>
      <div className="formelement-container">
        <label htmlFor="msg" className="formlabel">
          <FaComment style={{ marginRight: 3 }} />
          Your Feedback:
        </label>
        <textarea
          className="element-border"
          id="msg"
          name="msg"
          rows="4"
          cols="20"
          required
        ></textarea>
      </div>
      <button className="form-button element-border" type="submit">
        Submit{" "}
      </button>
    </form>
  );
};
export default Form;
Create two state variables in the Form component as shown below to store the value from the input element and textarea.
const [comments, setComment] = useState(" ");
const [email, setEmail] = useState(" ");
To handle inputs, implement two functions in the Form component, handleEmail and handleTextArea. The function handleEmail will set the value of the email and handleTextArea will set the value of the comments. To handle form submission, implement a submitForm function. The function will pass the email and comments to the props from the parent component. See the implementation below.
import React, { useState } from "react";
import { FaEnvelope, FaComment, FaSmile } from "react-icons/fa";

const Form = ({ handleSubmit }) => {
  const [comments, setComment] = useState(" ");
  const [email, setEmail] = useState(" ");

  const handleTextArea = (e) => {
    setComment(e.target.value);
  };
  const handleEmail = (e) => {
    setEmail(e.target.value);
  };
  const submitForm = (e) => {
    e.preventDefault();
    const data = { email: email, comments: comments };
    handleSubmit(data);
    setEmail(" ");
    setComment(" ");
  };

  return (
    <form onSubmit={submitForm} className="feedback-form">
      <div className="formelement-container">
        <label className="formlabel">
          <FaSmile style={{ marginRight: 3 }} />
          Is this page useful?
        </label>
      </div>
      <div className=" formelement-container">
        <label htmlFor="email" className="formlabel ">
          <FaEnvelope style={{ marginRight: 3, padding: 3 }} />
          Email Address
        </label>
        <input
          type="email"
          name="email"
          className="form-input element-border"
          value={email}
          required
          onChange={handleEmail}
        />
      </div>
      <div className="formelement-container">
        <label htmlFor="msg" className="formlabel">
          <FaComment style={{ marginRight: 3 }} />
          Your Feedback:
        </label>
        <textarea
          className="element-border"
          value={comments}
          id="msg"
          name="msg"
          rows="4"
          cols="20"
          required
          onChange={handleTextArea}
        ></textarea>
      </div>
      <button className="form-button element-border" type="submit">
        Submit{" "}
      </button>
    </form>
  );
};
export default Form;
To style the Form component, open the App.css and style accordingly as shown below.
.feedback-form {
  display: flex;
  flex-direction: column;
  width: 100%;
  padding: 4px;
  row-gap: 10px;
}

.formelement-container {
  display: flex;
  flex-direction: column;
  text-align: left;
}

.formlabel {
  display: flex;
  flex-direction: row;
  padding: 2px;
  font-size: 17px;
}

.form-input {
  height: 40px;
  padding: 2px;
}

.element-border {
  border: 2px solid #d5d0d0;
  border-radius: 4px;
}

.form-button {
  background-color: #ff0000;
  height: 40px;
  width: 100%;
}
Next, create a file in the components sub-folder. Name the file Feedback.jsx. In the file, import the needed packages and theForm component as shown below.
import React, { useState } from 'react';
import { FaWindowClose } from 'react-icons/fa';
import Form from './Form';
Create a component and name it Feedback as shown below.
const Feedback = () => {
  return <div>Feedback</div>;
};
Create a state variable and set the initial value to false as shown in the code below.
const [showForm, setShowForm] = useState(false);Within the return statement of the Feedback component, create a button element and div element. The div element will contain the Form component created earlier. When you click the button element, a form pops up.
To display and close the Form component, we will implement two functions in the Feedback component, openPopUp and closePopUp. The openPopUp will set the state variable showForm to true while closePopUp will set the variable to false. We will then attach a click event listener to the button to trigger the openPopUp.
To close the popup, we will attach a click event listener to a close icon. Next, create a handleSubmit function in the Feedback component. Pass this function as props to the Form component to process form data. See the code implementation below.
import React, { useState } from "react";
import { FaWindowClose } from "react-icons/fa";
import Form from "./Form";

const Feedback = () => {
  const [showForm, setShowForm] = useState(false);

  const openPopUp = () => {
    setShowForm(true);
  };

  const closePopUp = () => {
    setShowForm(false);
  };
  const handleSubmit = (data) => {};

  return (
    <div>
      <button className="feedback-button element-border" onClick={openPopUp}>
        Feedback
      </button>
      {showForm && (
        <div className="feedback-modal ">
          <FaWindowClose
            onClick={closePopUp}
            className="feedback-closewindow "
          />

          <Form handleSubmit={handleSubmit} />
        </div>
      )}
    </div>
  );
};
export default Feedback;
Add the styles below to the App.css file.
.feedback-button {
  position: fixed;
  top: 50%;
  bottom: 50%;
  left: 45%;
  background-color: #ff0000;
  height: 40px;
  width: 100px;
  color: #ffffff;
  padding: 2px;
}
.feedback-modal {
  display: flex;
  flex-direction: column;
  z-index: 3000;
  width: 50%;
  position: fixed;
  top: 30%;
  left: 30%;
  background-color: rgb(254, 255, 255);
  box-shadow:
    0 4px 8px 0 rgba(0, 0, 0, 0.2),
    0 6px 20px 0 rgba(0, 0, 0, 0.19);
  padding: 10px;
  border-radius: 4px;
  row-gap: 2px;
}
.feedback-closewindow {
  align-self: flex-end;
  margin: 2px;
}
@media screen and (min-width: 999px) {
  .feedback-modal {
    width: 30%;
  }
}
The CSS code above styles the elements in the Feedback component.
To view what has been done so far, open the App.jsx file, import the Feedback component, and render within the return statement of the App component as shown below.
import React, { useState } from "react";
import Feedback from "./components/Feedback";
import "./App.css";
function App() {
return (
<>
<div>
<Feedback />
</div>
</>
);
}
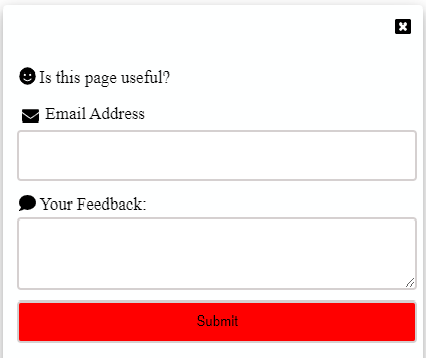
export default App;A button centered at the center of the page should be visible, the button when clicked should display a feedback form like the one below.
Send messages from the feedback component to a Slack channel
This section describes how to use the Slack API to post a message from the feedback component to the Slack channel.
Create a file in the scripts folder and name it slack.js. Open the slack.js file and create an async function as shown below.
const slackCall = async (url, data) => {
  const response = await fetch(`${url}`, {
    method: "POST",
    body: JSON.stringify({ text: `${data.comments}  by ${data.email}` }),
  });
  return response;
};
The slackCall function in the code above takes two parameters, url and a data object. The function makes a POST call to the URL endpoint with the data parameter as the body. The request body must have a text field for the message to appear in the Slack channel.
In the root of the feedback-app folder, create a .env file. Open the .env file and write
VITE_HOOK_URL= "WEBHOOK_URL"
replace the WEBHOOK_URL with the webhook URL of the Slack app.
import slackCall from "../scripts/slack";Create a variable as shown below.
const api_url = import.meta.env.VITE_HOOK_URL;Vite permits the import of environmental variables with import.meta.env.
In the submitForm function, pass the api_url and data returned from the Form component as parameters to the slackCall function. To handle the response from the Slack API call, create two state variables as shown in the code below.
const [success, setSuccess] = useState(false);
const [error, setError] = useState(false);
Next, update the Feedback component as shown below.
import React, { useState } from "react";
import { FaWindowClose } from "react-icons/fa";
import Form from "./Form";
import slackCall from "../scripts/slack";

const api_url = import.meta.env.VITE_HOOK_URL;

const Feedback = () => {
  const [showForm, setShowForm] = useState(false);
  const [success, setSuccess] = useState(false);
  const [error, setError] = useState(false);

  const openPopUp = () => {
    setShowForm(true);
  };

  const closePopUp = () => {
    setShowForm(false);
  };
  const handleSubmit = async (data) => {
    const response = await slackCall(api_url, data);
    if (response.status == 200) {
      setSuccess(true);
    } else {
      setError(true);
    }
  };
  return (
    <div>
      <button className="feedback-button element-border" onClick={openPopUp}>
        Feedback
      </button>
      {showForm && (
        <div className="feedback-modal ">
          <FaWindowClose
            onClick={closePopUp}
            className="feedback-closewindow "
          />
          {success && <p>Your feedback has been submitted successfully</p>}
          {error && <p>An error occurred</p>}

          <Form handleSubmit={handleSubmit} />
        </div>
      )}
    </div>
  );
};
export default Feedback;
Go to the browser and post a message with the feedback form. A message should appear in the Slack channel.
Conclusion
Feedback is a channel of communication between clients and organizations. Feedback directs organizations’ attention to specific clients’ problems that need attention. This article has demonstrated how to create a feedback component that posts messages into a Slack channel. The article demonstrated how to create a Slack app and how to use the Slack API.