Integrating OpenReplay with Slack in a Web Application
Send Slack notifications from OpenReplay with this very easy-to-follow integration!

Session replay is a powerful tool to be able to get user’s insights from a web application. It provides a way to replay a user’s journey in a web application and investigate errors the user faced while using the application. OpenReplay is an open-source session replay tool that makes it easier to replay user sessions and troubleshoot issues. In this article, we will be looking at how to share sessions recorded by OpenReplay in a web application with teammates on Slack.
This tutorial assumes you know how to deploy OpenReplay to a platform of your choice, if not you can follow any of the guides listed here to get started. You will also need the below elements to follow along:
- Knowledge of JavaScript and React
- Node.js v12 or greater
- npm
- Access to a Slack workspace
Creating a Web Application
We will be creating a basic web application to fetch data from an API using React. To get started open a terminal and run the code below
npx create-react-app sample-appThe above command bootstraps an application with Create React App. After the process is complete. Navigate to the created app folder and run the command below to start the application
npm startWe will be creating a little application that guesses the age of a user based on the name. Open up the App.js file in a code editor and replace the code with the code below
import React, { useState } from 'react';
import './App.css';
function App() {
const [name, setName] = useState('');
const [age, setAge] = useState(0);
const [isLoading, setIsLoading] = useState(false);
const [isError, setIsError] = useState(false);
const handleSubmit = async () => {
try {
setIsLoading(true);
setIsError(false);
const response = await fetch(`https://api.agify.io/?name=${name}`);
const { age } = await response.json();
setIsLoading(false);
if (age === null) {
setIsError(true);
throw new Error('Error fetching age');
}
setAge(age);
return;
} catch (error) {
setIsLoading(false);
setIsError(true);
console.log(error);
throw new Error('Error getting data');
}
};
return (
<main>
<h1> Guess your Age</h1>
<input
type="text"
aria-label="Enter your name"
placeholder="Enter your name"
value={name}
onChange={(e) => setName(e.target.value)}
required
/>
<button onClick={handleSubmit}>Submit</button>
{isLoading && <p>Guessing age...</p>}
{!isLoading && isError && <p>Error guessing age</p>}
{!isLoading && age > 0 && age !== null && (
<p>Your are {age} years old.</p>
)}
</main>
);
}
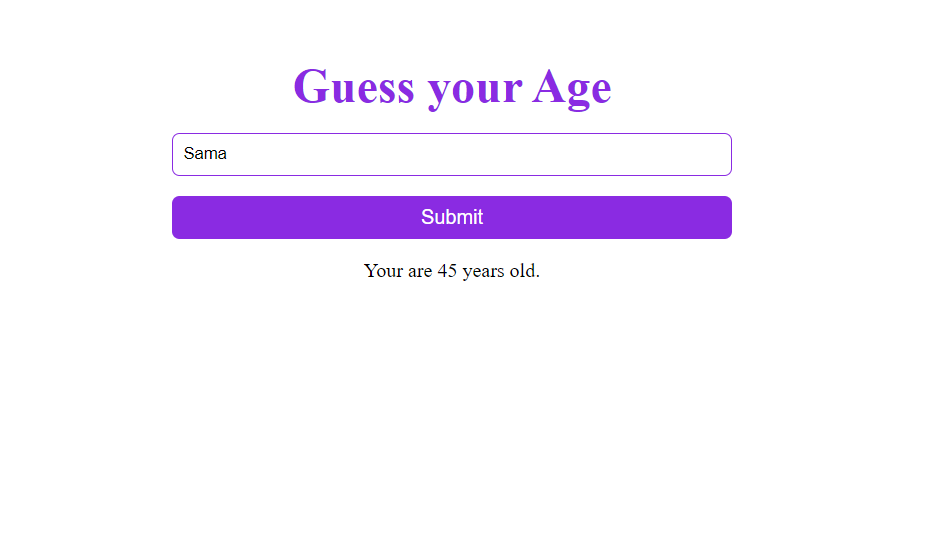
export default App;The code above accepts a value as input and when a user clicks on the submit button. It makes a call to an api to guess the age based on the input available. Save and view the application in your browser.
Open Source Session Replay
OpenReplay is an open-source, session replay suite that lets you see what users do on your web app, helping you troubleshoot issues faster. OpenReplay is self-hosted for full control over your data.

Start enjoying your debugging experience - start using OpenReplay for free.
Connecting OpenReplay to a Web Application
Now that we have a working application the next step is integrating OpenReplay so we can start replaying the activities performed by users on the application. OpenReplay provides a JavaScript library that makes integration into web applications easy. Open a terminal in the root of your application and run the code below to install the OpenReplay SDK
npm i @openreplay/trackerAfter installation :
-
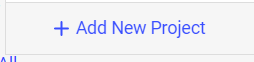
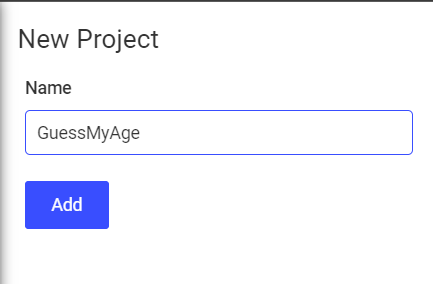
Go to your deployed OpenReplay instance and click on “Add New Project”
-
Enter the name of the project in the modal that comes up and click on Add to create the project
-
Click the Settings icon to go to Preferences

- Select Projects
- Click on the “Tracking code” button for the Project created
- Copy the code in the usage section
- Open the
App.jsfile and paste the copied code before the begininning of theAppfunction
Our App.js file should now look like the code below
import React, { useState } from 'react';
import Tracker from '@openreplay/tracker';
import './App.css';

const tracker = new Tracker({
  projectKey: "your project key",
  ingestPoint: "your injest point url",
});
tracker.start();
function App() {
  const [name, setName] = useState('');
  const [age, setAge] = useState(0);
  const [isLoading, setIsLoading] = useState(false);
  const [isError, setIsError] = useState(false);
  const handleSubmit = async () => {

//... the rest of the original code
The next step after this is deploying your app as OpenReplay’s tracking only works on a live environment, so commit your code to a repository and deploy the app to platforms like Netlify and Vercel (here is a quick tutorial on how to deploy your app on Netlify)
After deploying, visit the deployed app and perform some operations so OpenReplay can track and record the session.
Note: You have to close the window or tab of the deployed app when you’re done so OpenReplay can finish recording that particular session.
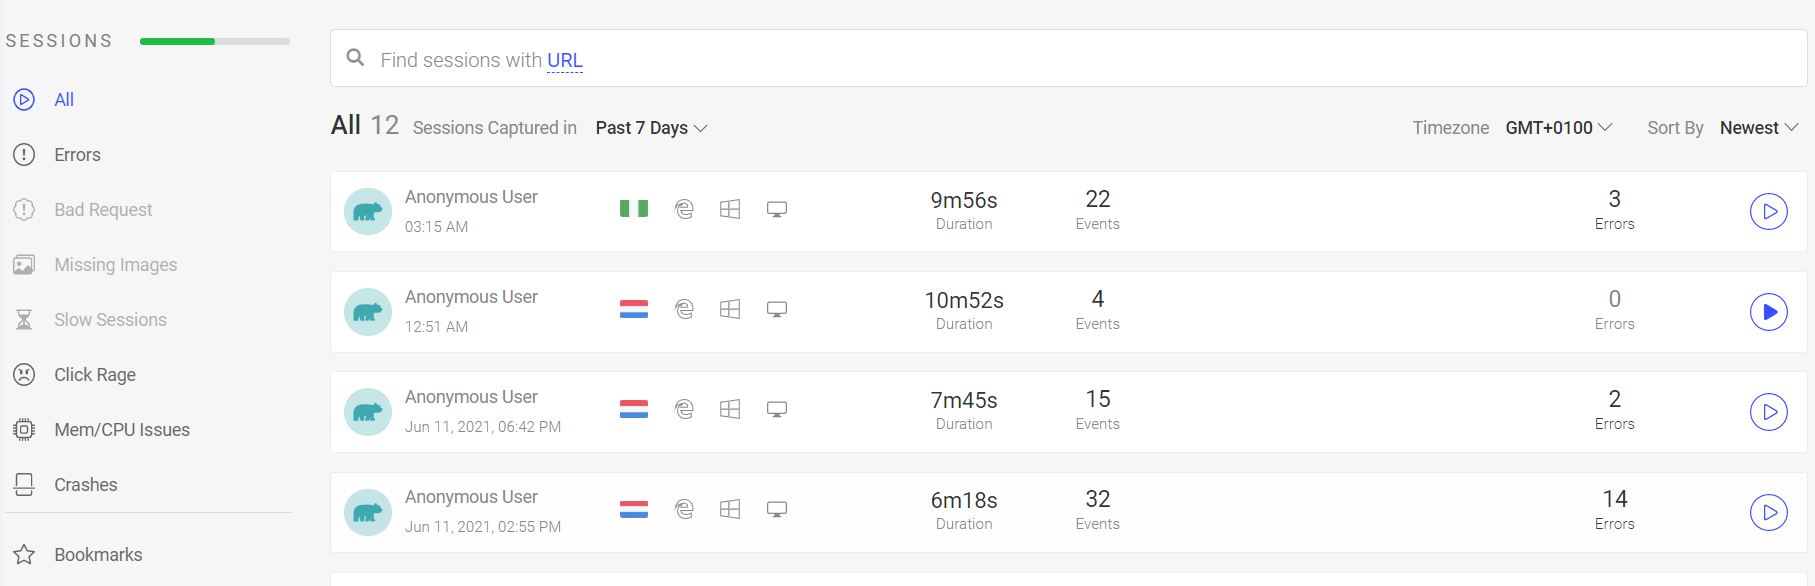
After recording a session, visit your OpenReplay dashboard to check the recorded session, it usually takes about 4 minutes after terminating a session for it to reflect on the OpenReplay dashboard so be patient if you don’t see the recorded session immediately.
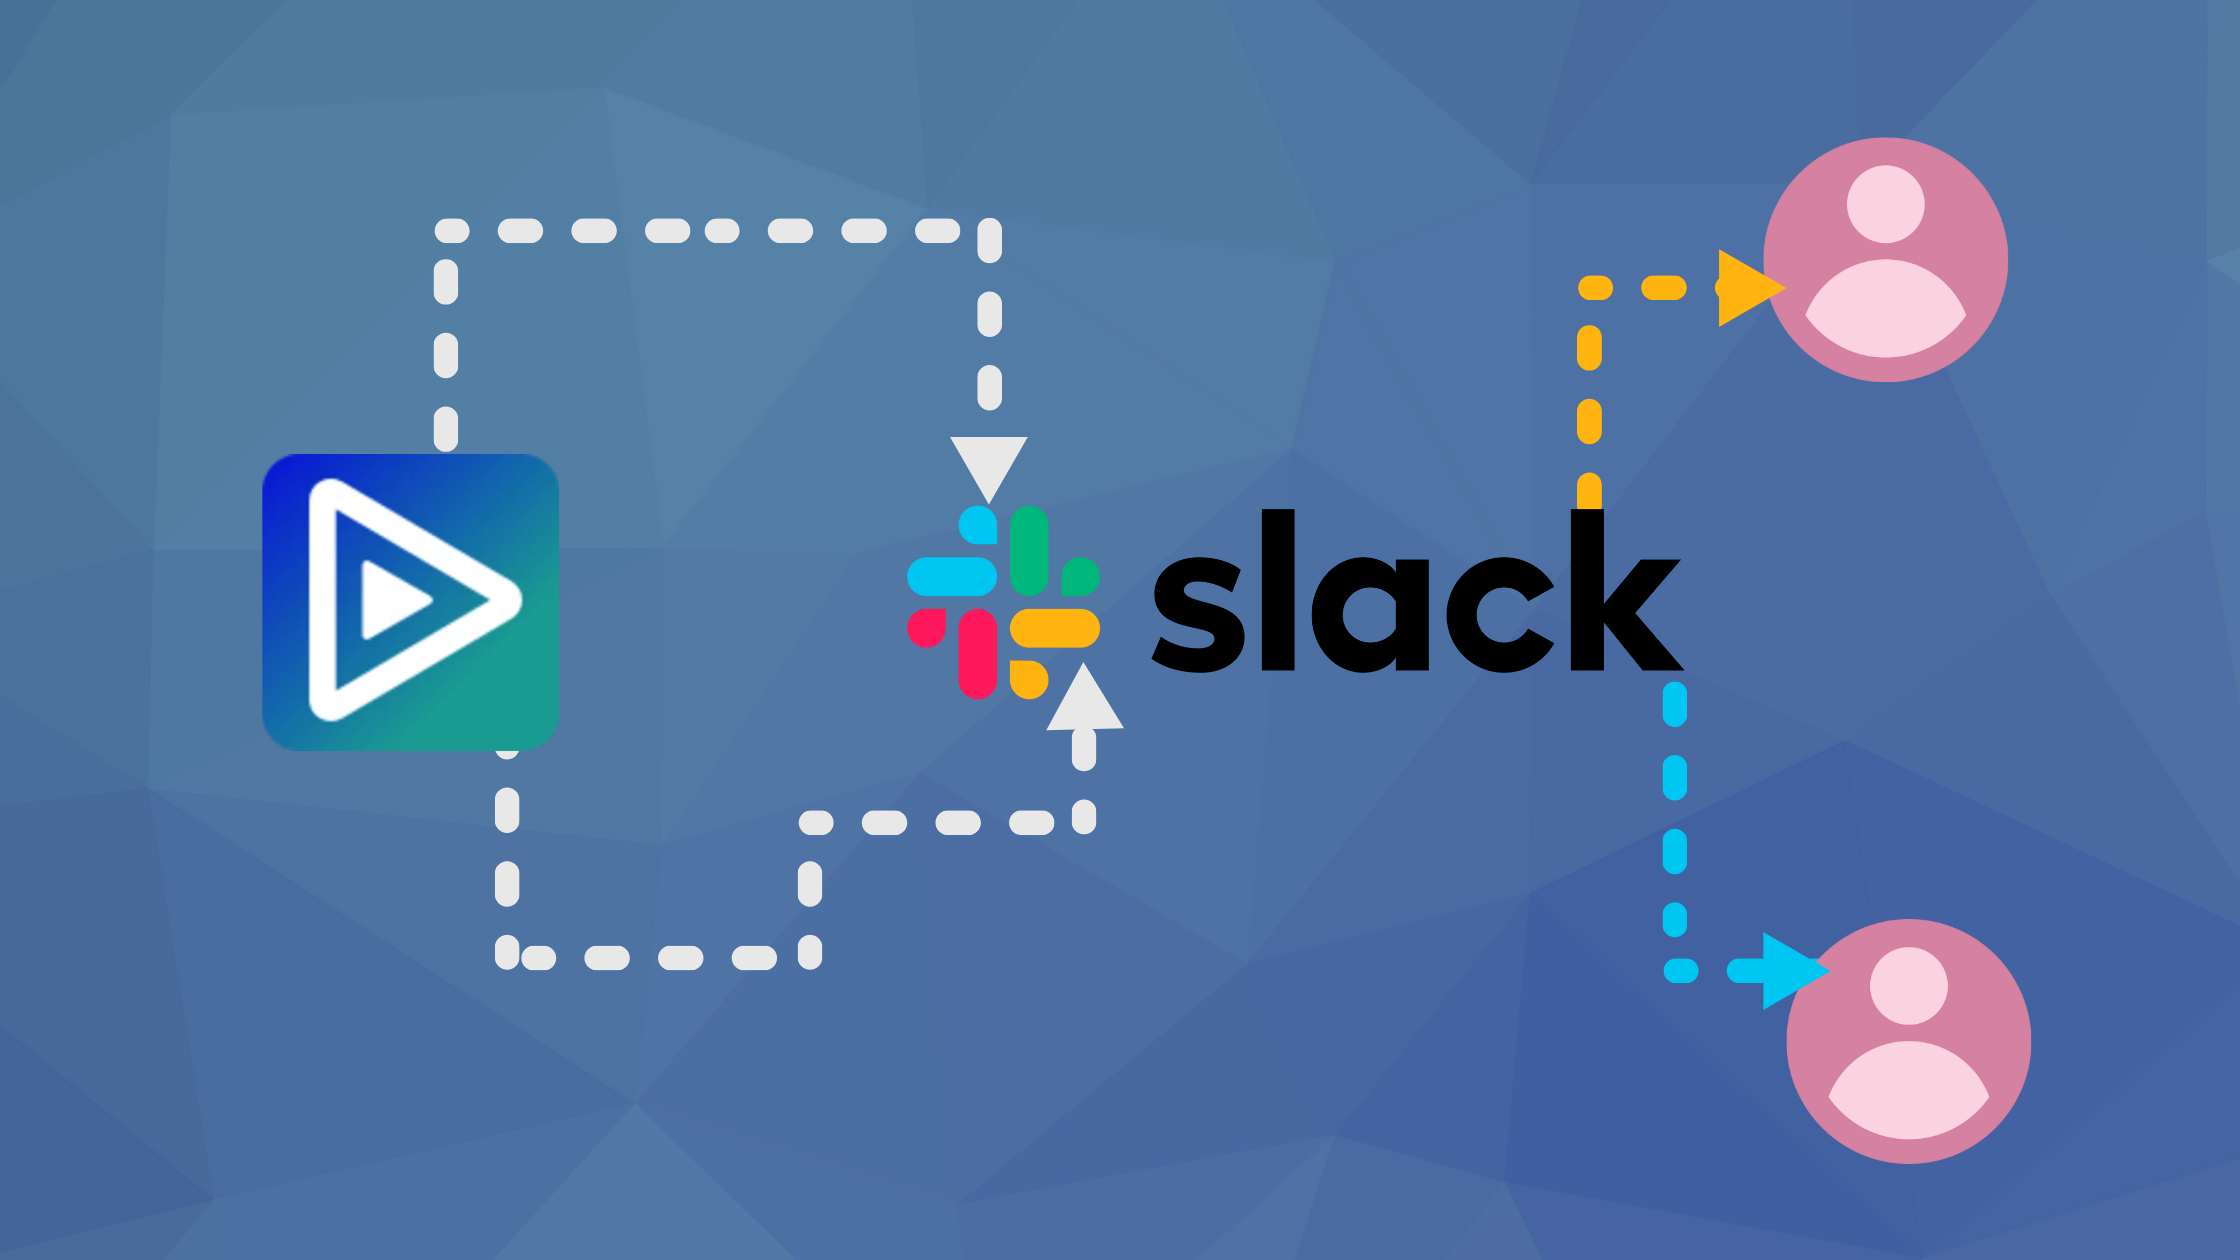
Connecting OpenReplay to Slack
At this point, we have successfully integrated OpenReplay into our application and can now replay user sessions to view actions performed and errors that occurred. The next step is connecting OpenReplay with Slack so you can share these recorded sessions with teammates in a Slack group.
-
Sign in to your Slack workspace and go to the app creation page
-
Click on “Create new app”
-
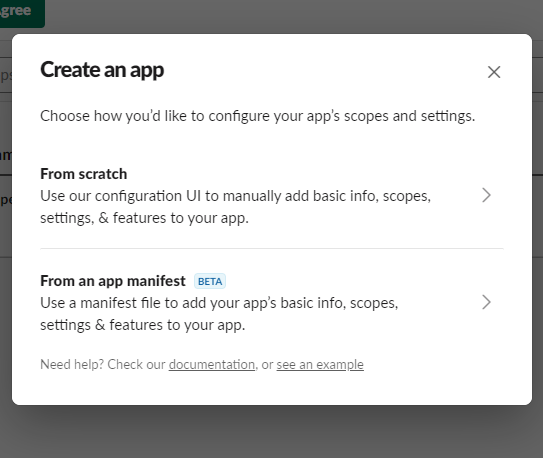
Select “From scratch” on the modal that pops up
-
Enter “OpenReplay” as the name of the app
-
Select the workspace and save
-
Select Incoming Webhooks from the sidebar of the created app
-
Switch on the “Activate Incoming Webhooks”

-
Click on “Add new Webhook” and select the channel to share the recorded sessions to
-
Click “Allow” and copy the webhook URL
-
Go to OpenReplay dashboard then ‘Preferences > Integration’
-
Select Slack and paste the copied Webhook URL before clicking ‘Add’
-
You should get a welcome message similar to the screenshot below

We are done connecting Slack to OpenReplay to share a recorded session to a Slack Group:
- Go to the OpenReplay dashboard
- Click on the recorded session
- Click on the Share button on the top right corner of the page
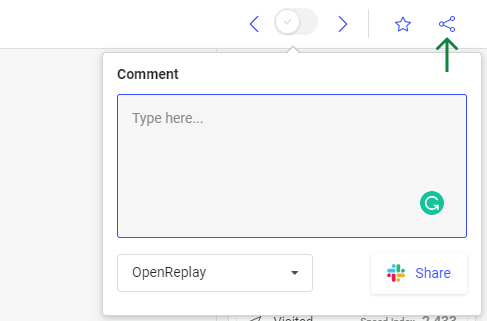
You can now share recorded sessions with team mates in a Slack group. The message will be similar to the screenshot below.

Conclusion
In this article, we’ve looked at how to connect OpenReplay to a web application and integrate slack with OpenReplay. This makes it easy for you to share recorded sessions of users who use your application with teammates on slack to foster collaboration and help resolve issues quickly.
OpenReplay also has a supportive community on Slack to help you with issues you come across.