Perform CRUD operations in Flutter with Hive
Check out Hive, a lightweight key-value DB for Flutter.

CRUD, an acronym for Create, Read, Update, Delete, represents four basic operations a mobile application should be able to perform. It is an essential paradigm common in both web and mobile applications. In this article, readers will learn how to perform and implement CRUD operations in a Flutter application using Hive.
Hive is a lightweight, key-value database written in pure Dart. It is a NoSQL database that can be used to store data locally, either on mobile applications or Web applications.
You’d want to use Hive as database storage for many reasons. Here is a list of a few reasons:
- It includes a powerful encryption system.
- There are no native dependencies
- It has the best performance of any database.
Setting Up Flutter Project
To start building our app, click here to clone the starter files. We will build a basic Todo Application to show how to implement CRUD functionalities. On your terminal, run the command below to add the missing dependencies to your project.
>>> flutter create .This will add all missing dependencies to the project.
Project Overview
In our project, we have three buttons, each of which transitions the screen to its respective screen.
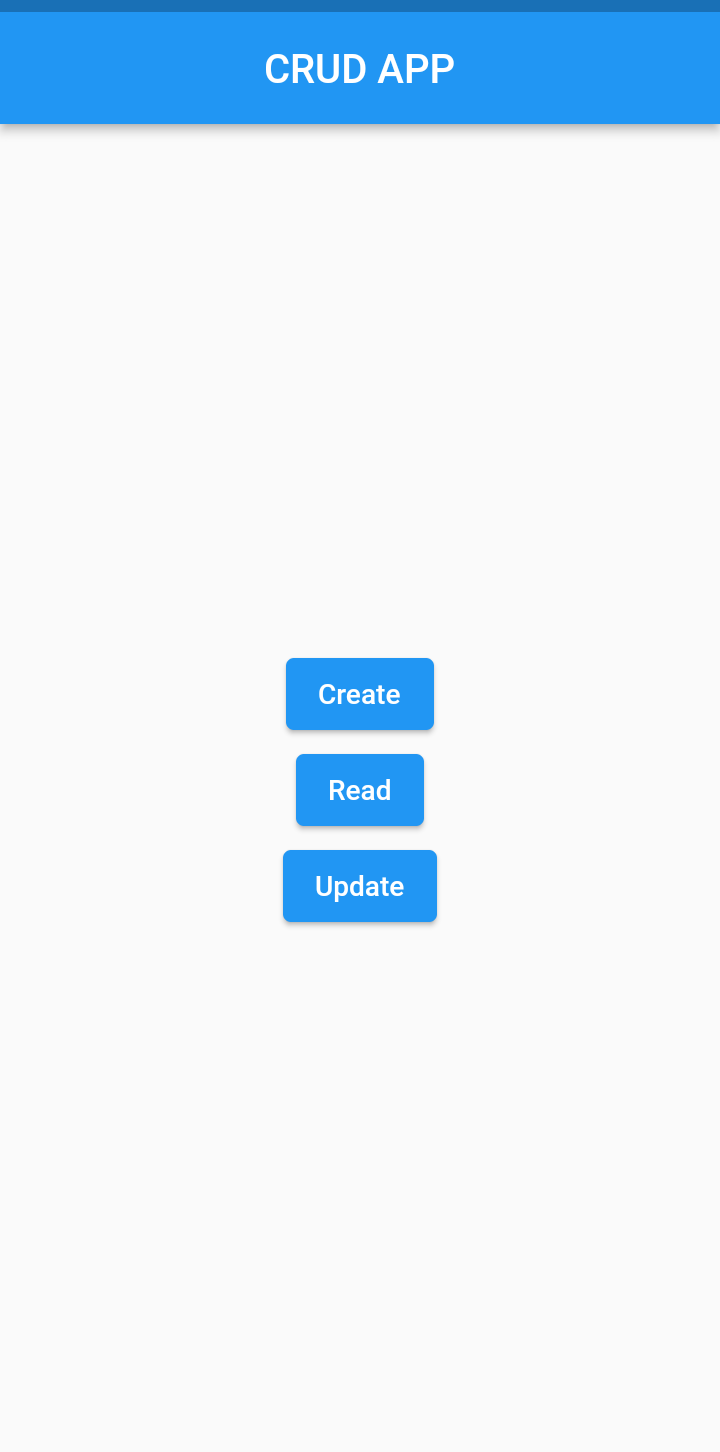
We also have a Screens folder where we can create, read, and update. The delete functionality of our CRUD app will be handled on the read screen.dart file.
Adding Hive Dependencies To Our Pubspec.yaml File.
To access the Hive database and its features, we must add them to our pubspec.yaml file. On your terminal, run the command below:
>>> flutter pub add hive

>>> flutter pub add hive_flutter

>>> flutter pub add build_runner
This will add the Hive database and other dependencies to our flutter project.
Initialize Hive
Since we are done adding dependencies to our pubspec.yaml file, let’s import and initialize our database.
import 'package:hive_flutter/hive_flutter.dart';


void main() async {
  WidgetsFlutterBinding.ensureInitialized()
  await Hive.initFlutter();
  await Hive.openBox('data_box');

  runApp(const MyApp());
}
We initialize our Hive database using the .initFlutter(); next, we open a box called 'data_box' because Hive stores data in boxes. Boxes can be compared to tables in SQL.
Session Replay for Developers
Uncover frustrations, understand bugs and fix slowdowns like never before with OpenReplay — an open-source session replay tool for developers. Self-host it in minutes, and have complete control over your customer data. Check our GitHub repo and join the thousands of developers in our community.
Creating Our Model
Before developing our CRUD techniques, let’s create a model. On your lib folder, create a new folder called Model. In the model folder, create a new file called model.dart and paste the code below:
class Data {
  String title;
  String description;

  Data({
    required this.title,
    required this.description,
  });
}
With that out of the way, let’s begin creating our CRUD methods; we will take each of these methods step by step.
Step 1: Creating / Adding Data to Our Database
First, let’s make a reference to our already opened box and also create our controllers:
import 'package:hive_flutter/hive_flutter.dart';
//....

 late final Box dataBox;
 final TextEditingController _titleController = TextEditingController();
 final TextEditingController _descriptionController = TextEditingController();

  @override
  void initState() {

    super.initState();
    dataBox = Hive.box('data_box');
  }
Next, we write and implement our create method.
  _createData() {
    Data newData = Data(
      title: _titleController.text,
      description: _descriptionController.text,
    );

    dataBox.add(newData);
  }
Here, we called the Data class, passing each controller to its respective parameters. Then we called the add() method, which adds our newData variable to the database. Next, we call the method in our onPressed parameter as such:
ElevatedButton(
    onPressed: () {
        _createData();
        Navigator.push(
            context,
            MaterialPageRoute(
                builder: (context) => const ReadScreen(),
            ),
        );
    },
    child: const Text('ADD DATA'),
)
Step 2: Reading The Data
Our read screen is currently empty, so we’ll build the UI and add the read functionality.
read_screen.dart
import 'package:flutter/material.dart';
import 'package:hive_flutter/adapters.dart';
import '/screens/create_screen.dart';
import '/screens/update_screen.dart';
class ReadScreen extends StatefulWidget {
const ReadScreen({super.key});
@override
State<ReadScreen> createState() => _ReadScreenState();
}
class _ReadScreenState extends State<ReadScreen> {
late final Box dataBox;
@override
void initState() {
super.initState();
dataBox = Hive.box('data_box');
}
@override
Widget build(BuildContext context) {
return Scaffold(
appBar: AppBar(
title: const Text('Read Screen'),
centerTitle: true,
actions: [
IconButton(
onPressed: () => Navigator.push(
context,
MaterialPageRoute(
builder: (context) => const CreateScreen(),
),
),
icon: const Icon(Icons.add),
),
],
),
body: ValueListenableBuilder(
valueListenable: dataBox.listenable(),
builder: (context, value, child) {
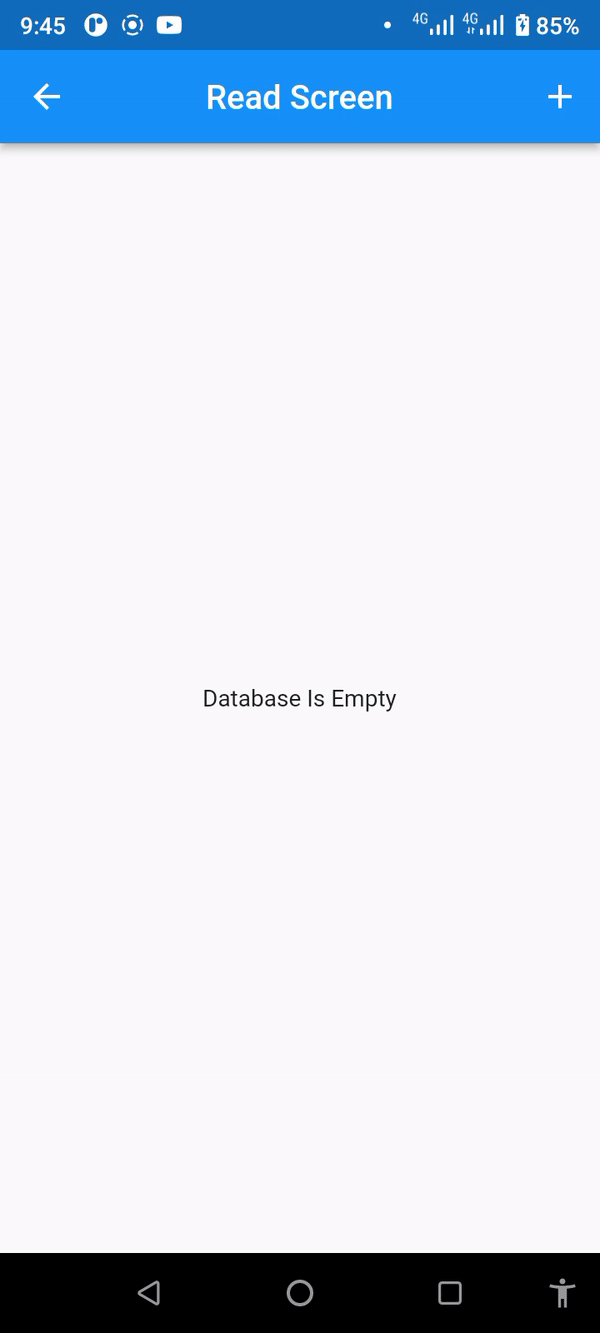
if (value.isEmpty) {
return const Center(
child: Text('Database Is Empty'),
);
} else {
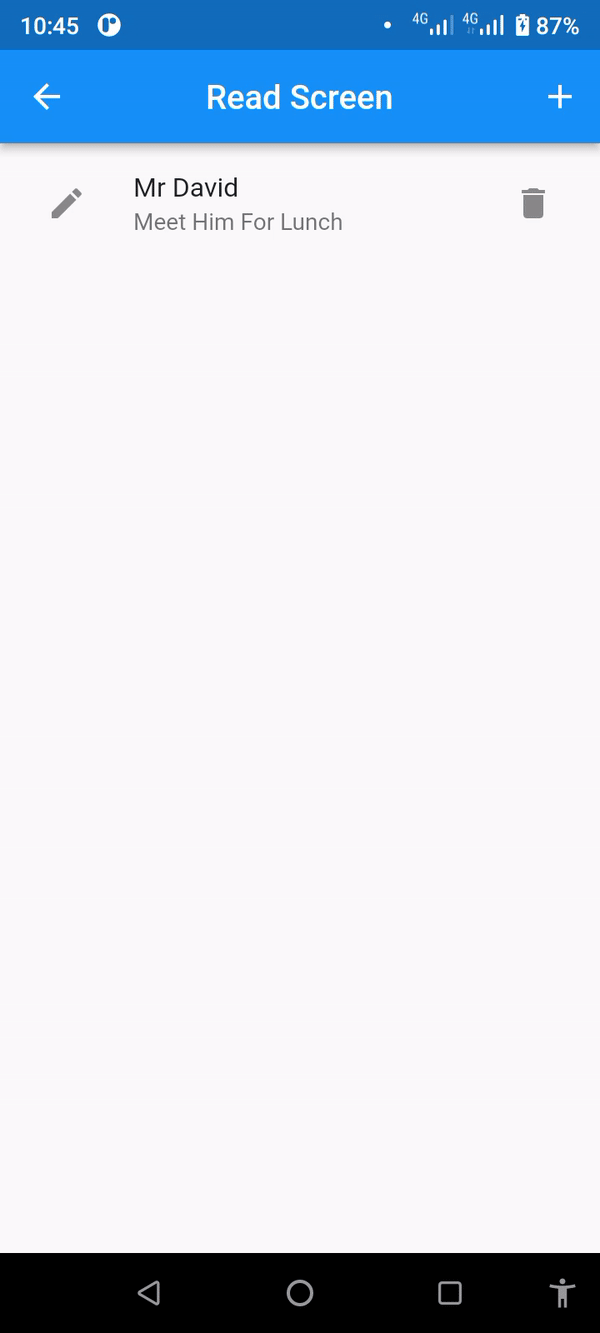
return ListView.builder(
itemCount: dataBox.length,
itemBuilder: (context, index) {
var box = value;
var getData = box.getAt(index);
return ListTile(
leading: IconButton(
onPressed: () {},
icon: const Icon(Icons.edit),
),
title: Text(getData.title),
subtitle: Text(getData.description),
trailing: IconButton(
onPressed: () {},
icon: const Icon(Icons.delete),
),
);
},
);
}
},
),
);
}
}
Let’s explain what we have above. First, we made a reference to our already opened box as we did on the Create Screen. For us to be able to read data in our database, we use the ValueListenableBuilder() widget. This widget will be used to read and refresh our widgets based on the data in the database. Lastly, we made an ‘if check’ to determine whether the database is empty or has data.
Before we read the items in our database, we must register a TypeAdapter. Hive supports all data types (Maps, List, etc.), and if we want to store any of these objects, we need to register a TypeAdapter, which will be used to convert the object from and to binary form.
On your Flutter project, head over to the model.dart file and update the code as seen below:
import 'package:hive/hive.dart';

part "model.g.dart";

@HiveType(typeId: 1)
class Data {
  @HiveField(0)
  String title;
  @HiveField(1)
  String description;

  Data({
    required this.title,
    required this.description,
  });
}
In our code above, we imported the hive package; also, we annotated our Data class with the @HiveType and provide a type id. Our Data class extends the HiveObject. The part "model.g.dart"; will be generated automatically for us
On your terminal, run the command below:
>>> flutter packages pub run build_runner buildThis will generate a model.g.dart file in your Model folder.
To register our generated file, go to your main.dart file, and add the code below on your main() function:
import 'model/model.dart';
//....

void main() async {
    WidgetsFlutterBinding.ensureInitialized();

    await Hive.initFlutter();

    Hive.registerAdapter(DataAdapter()); // Add this line

    await Hive.openBox('data_box');

    runApp(const MyApp());
}Note: If the file does not generate, on your terminal run the command below:
>>> flutter pub add hive_generatorThen try running the previous command.
With all that completed, the read screen should look like this:
Step 3: Update / Editing Data
For us to be able to update data in our database, we need certain things:
- First, a means to pass the data already stored in our database and read in our app.
- Secondly, we need to get a reference to our already opened box.
First, let’s create constructors to get data passed from the ReadScreen to the UpdateScreen.
class UpdateScreen extends StatefulWidget {
  final int? index;
  final Data? data;
  final titleController;
  final descriptionController;

  const UpdateScreen({
    super.key,
    this.index,
    this.data,
    this.titleController,
    this.descriptionController
  });

  @override
  State<UpdateScreen> createState() => _UpdateScreenState();
}
To pass data we need to make changes to our readscreen.dart file. On your read_screen.dart file, add the code below On the leading parameter of the ListTile widget:
leading: IconButton(
    onPressed: () {
        Navigator.push(
            context,
            MaterialPageRoute(
                builder: (context) => UpdateScreen(
                    index: index,
                    data: getData,
                    titleController: getData.title,
                    descriptionController: getData.description,
                ),
            ),
        );
    },
    icon: const Icon(Icons.edit),
),
Here we passed certain parameters needed by our update screen: The index at which the data is stored, the title text, and the description text.
Back to our update screen, let’s reference our already opened box and add the text controllers needed.
late final Box dataBox;
late final TextEditingController titleController;
late final TextEditingController descriptionController;

@override
void initState() {
    super.initState();

    dataBox = Hive.box('data_box');
    titleController = TextEditingController(text: widget.titleController);
    descriptionController =TextEditingController(text: widget.descriptionController);
  }
Next, we create our update function as such:
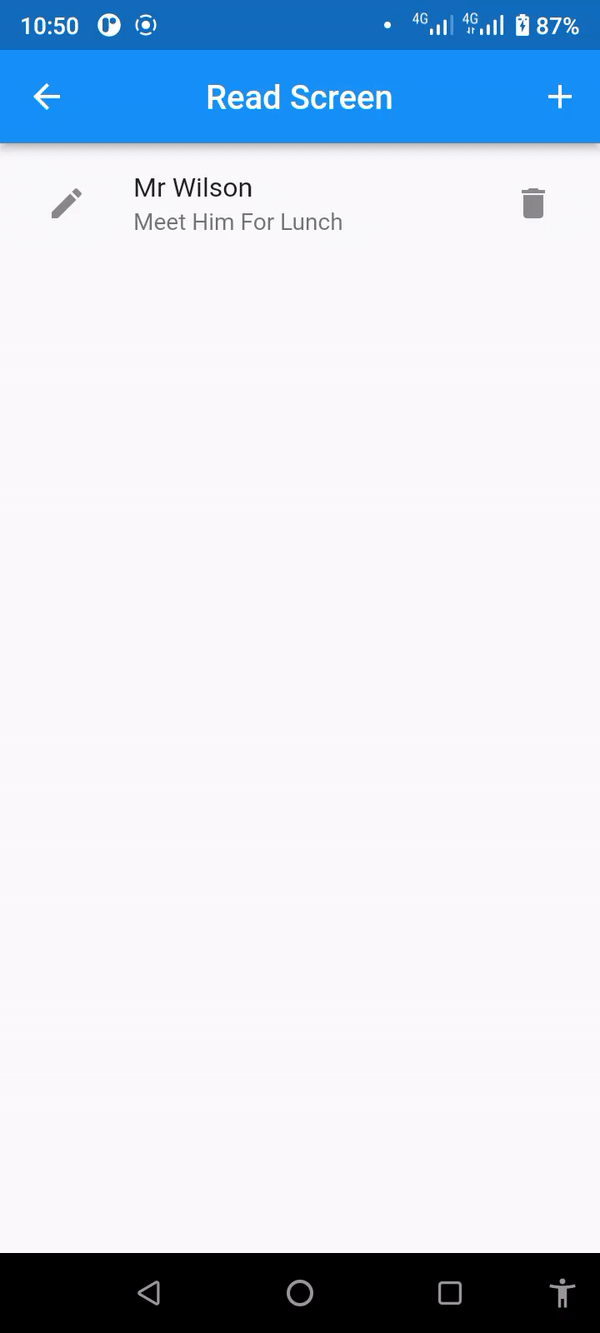
_updateData() {
    Data newData = Data(
      title: titleController.text,
      description: descriptionController.text,
    );
    dataBox.putAt(widget.index!, newData);
  }
This will get the data from the read screen and display it on the text fields.
Lastly, we call the _updateData()function in our onPressed parameter
ElevatedButton(
    onPressed: () {
        _updateData();
        Navigator.push(
            context,
            MaterialPageRoute(
                builder: (context) => const ReadScreen(),
            ),
        );
    },
    child: const Text('UPDATE DATA'),
)
The Update Screen should look like such:
Step 4: Deleting The Data
As we stated earlier, the delete function will be done on the ReadScreen.
We begin by creating a function to handle the delete functionality of our app.
  _deleteData(int index) {
    dataBox.deleteAt(index);
  }
Lastly, we call the method on our delete icon:
trailing: IconButton(
    onPressed: () {
        _deleteData(index);
    },
    icon: const Icon(Icons.delete),
),
With all that complete we have successfully added and implemented our CRUD operations.
< CTA/>
Adding Final Touches To Our Application
Here, we’ll make minor changes to our main.dart UI to improve user experience.
On the main.dart file:
import 'package:flutter/material.dart';
import 'package:hive_flutter/hive_flutter.dart';
import 'package:todo_app/model/model.dart';


import 'screens/read_screen.dart';

void main() async {
  WidgetsFlutterBinding.ensureInitialized();
  await Hive.initFlutter();

  Hive.registerAdapter(DataAdapter());
  await Hive.openBox('data_box');

  runApp(const MyApp());
}

class MyApp extends StatelessWidget {
  const MyApp({super.key});

  @override
  Widget build(BuildContext context) {
    return const MaterialApp(
      home: HomePage(),
      debugShowCheckedModeBanner: false,
    );
  }
}

class HomePage extends StatelessWidget {
  const HomePage({super.key});

  @override
  Widget build(BuildContext context) {
    return const Scaffold(
      body: Center(child: ReadScreen()),
    );
  }
}
Testing the App
With all that completed, we can now test our app.
On your terminal, run the command below:
>>> flutter runThis will build and install the apk file on your emulator or device.
Conclusion & Resources
In this tutorial, we learned how to perform CRUD (Create, Read, Update, and Delete) operations using the Hive database.
Here is the link to the GitHub Source Code, and here’s a video showing how the app works.
Gain Debugging Superpowers
Unleash the power of session replay to reproduce bugs and track user frustrations. Get complete visibility into your frontend with OpenReplay, the most advanced open-source session replay tool for developers.