Recognizing Speech with vanilla JavaScript
How to add speech recognition to any JavaScript app


Before we start our project, I’d like to discuss the concept of speech recognition. What is speech recognition? Speech recognition, also known as automatic speech recognition (ASR), computer speech recognition, or speech-to-text, is a capability that enables a program to process human speech into a written format. In today’s world, big companies, especially big tech companies, use AI’s such as Alexa, Cortana, Google Assistant, and Siri, which all have the Speech recognition feature, a key component of their performance.
In this tutorial, we will learn how to use JavaScript to add a speech recognition feature to any web app. We will be using the speech recognition Webkit API to achieve this; the chat app should look and function like this:
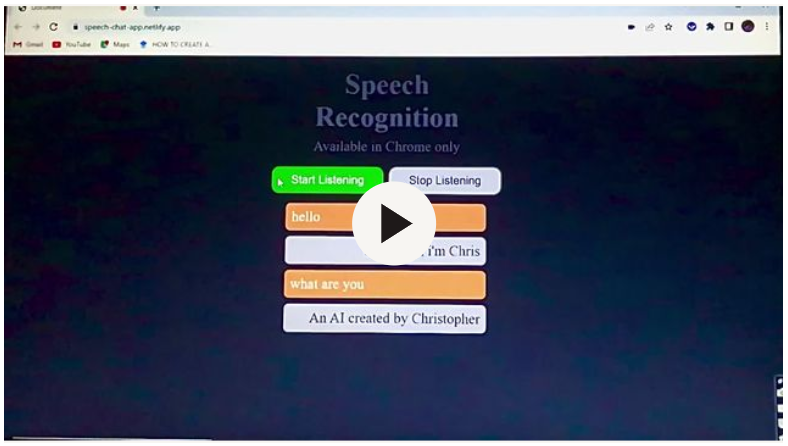
The chat app will be able to access your microphone when the start listening button is clicked and will have a response to specific questions asked. The chat app is only available on a few browsers on Desktop and Android.
Web Speech API is used to incorporate voice data into web apps. It provides two distinct areas of functionality — speech recognition and speech synthesis (also known as text to speech, or TTS) — which open up interesting new possibilities for accessibility and control mechanisms. It receives speech through a device’s microphone, which is then checked by a speech recognition service against a list of grammar. When a word or phrase is successfully recognized, it returns a result or results as a text string, and other actions can be launched as a result or results.
So to get started, we need to create a chat section structure with HTML and style it with CSS. Our primary focus is on the functionality of the chat section so that you can get the HTML structure and CSS styling in my GitHub repository or for practice purposes, you can create and style a chat section of your choice and follow along for the functionalities in this article.
Setting Up our JavaScript file
Head straight into the JS section, the first thing to do is grab a text container where all messages and replies will be in and the buttons that start and stop the speech recognition process, and then we set up the window speech recognition WebKit API. After setting that up, we will create a variable that will store the speech recognition constructor and set the interim results to true.
// grab the texts div tag and the button tags
const texts = document.querySelector(".texts");
const button1 = document.querySelector("#btn1");
const button2 = document.querySelector("#btn2");

//set up the speech recognition WebKit
window.SpeechRecognition =
  window.SpeechRecognition || window.webkitSpeechRecognition;
const recognition = new SpeechRecognition();
recognition.interim results = true;
The interim results seen on line 10 allow us to get the results when we speak, so it is something like real-time. If we set it to false, it will simply wait till we are done speaking and then return the result, but for this tutorial, we want to have our results while we speak.
After setting up the window WebKit above, we can create a new element. We will create a p tag, then create an event listener below for our recognition and pass in (e) as a parameter and log (e), so we can test what we have done so far.
//creating a new p tag
let p = document.createElement("p");

//create an event listener for our recognition
recognition.addEventListener("result", (e) => {
  console.log(e.results)
}

recognition.start()
We added recognition.start on line 9 to allow the web browser to start listening. When you head to the web browser and hit the refresh button, you should get a pop-up request to allow your microphone access. Click on the allow button and open your browser’s terminal while you speak. You will observe that while you speak, you’ll get some events in your terminal, and if you open any of them, you’ll see some options, including results, which we need. If you also look closely, you’d observe that most events have a length of 1 while some have a length of 2. If you open the results property with a length of 2, you’d see it contains two separate words like in the picture below.
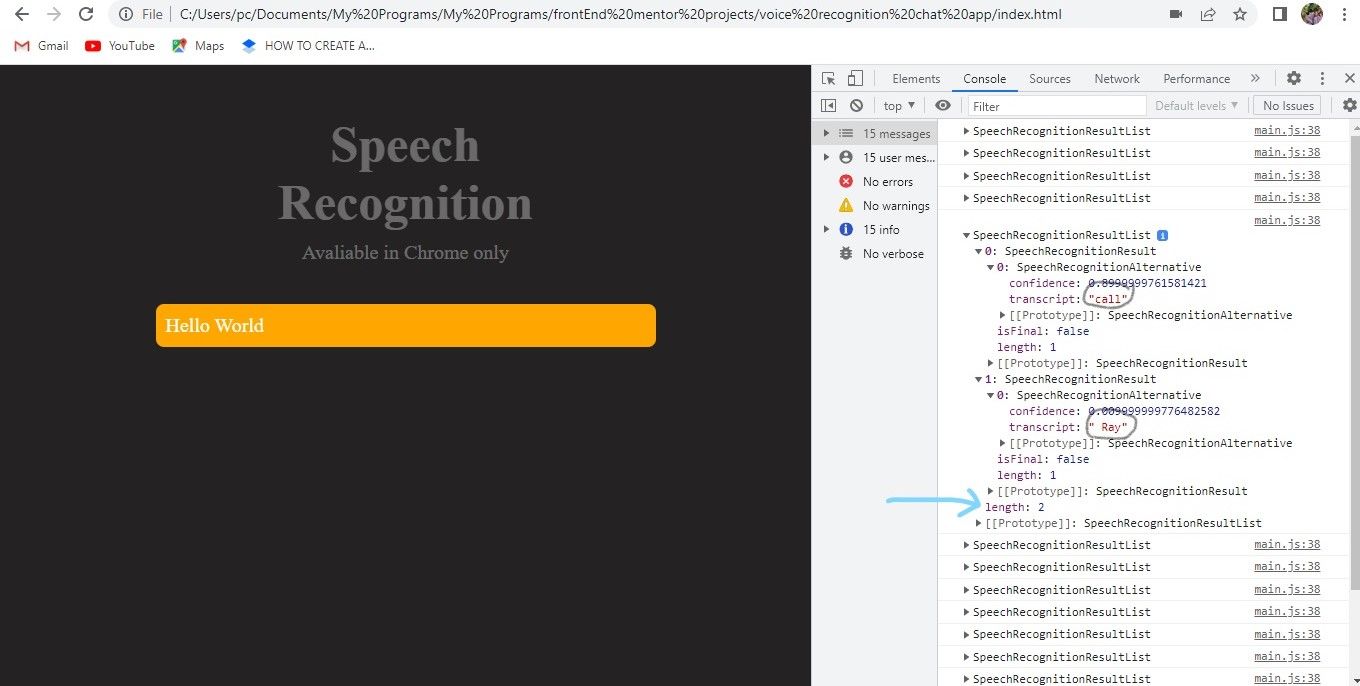
Looking at the image above, it has a length of 2 because it contains two words that I highlighted. The words are meant to be in a single sentence, and to correct that we will need to map through each of our results and put them together in one sentence. For that to happen, we will make a variable; let’s call it texts. Then we need to make the results property an array. We’ll use Array. from and then insert (e.results), and that will give us an array.
Now we need to map through the results array and target the first speech recognition result, which has an index of zero. Then we target the transcript property that holds the words, map them through, and then join both transcripts to put both words together in a sentence. If you log text and head to the terminal in your browser and start speaking, you will see our words are forming sentences, although it is not 100% accurate yet.
  recognition.addEventListener("result", (e) => {
  //mapping through the speech list to join words together
  const text = Array.from(e.results)
    .map((result) => result[0])
    .map((result) => result.transcript)
    .join("");

    console.log(text)
}
Open Source Session Replay
OpenReplay is an open-source, session replay suite that lets you see what users do on your web app, helping you troubleshoot issues faster. OpenReplay is self-hosted for full control over your data.

Start enjoying your debugging experience - start using OpenReplay for free.
Adding our speech to our chat section
Now that we have successfully shown the sentences in our terminal, we need to add them to our chat section. To show them in the chat section, we need to add the text variable from above to the p tag we created earlier. Then we append it to a container div element that holds the p tag in our HTML. If you check your web browser, you’d see our results are now showing in the chat section, but there is a problem. If you start speaking again, it will keep adding the sentences to just one paragraph. This is because we need to start over a new session in a new paragraph when the first session ends.
To resolve this, we will need to create an event listener with an “end” event to stop the last session and a function containing a recognition start, to begin a new session. If you speak in your browser, you will still notice that new sentences or words are overriding the old sentences or words contained in the paragraph tag, and we don’t want that too. To handle this, we also need to create a new paragraph for a new session, but before we do that, we will need to change the isFinal value, as seen below.
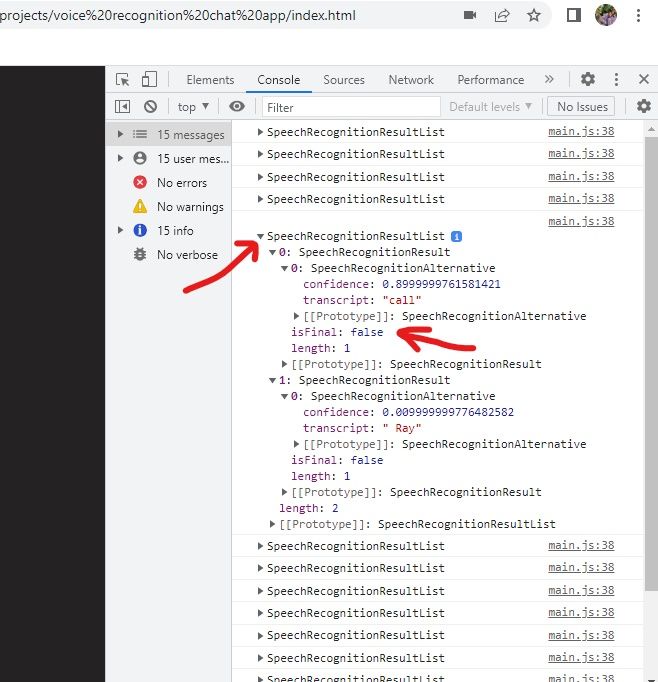
The isFinal property is located in the speech recognition results as seen above. It is set to false by default, meaning we are in our current session, and whenever it is true, we have ended that session. So going back to our code, we will need to check the isFinal results with a conditional statement, as seen below. When we set the isFinal property to true, a new paragraph tag will be added below with the content of the new session, and that is all.
recognition.addEventListener("result", (e) => {
  //mapping through the speech list to join words together
  const text = Array.from(e.results)
    .map((result) => result[0])
    .map((result) => result.transcript)
    .join("");

  //to then show the content in our chat section
  p.innerText = text;
  texts.appendChild(p);
  console.log(text);

  //to start a new paragraph
  if (e.results[0].isFinal) {
      p = document.createElement("p");
  }
  console.log(e)
});

//ending the old session to start a new one
recognition.addEventListener("end", () => {
  recognition.start();
});
Adding some Custom replies to our Chat-app
We have successfully set up our chat app to listen with our browser’s microphone and display what was heard in written format. I will also show you how to set the buttons to start and stop the listening process below. We can also do something exciting and create custom replies based on the texts displayed. To do this, we will have to go into our last conditional statement before the p tag and add another conditional statement. This will check if the text variable we created earlier contains a particular word like “hello”. If true, we can create a p tag, give it a class name for styling and then add a custom reply to the p tag.
We can also perform specific tasks like opening another page and a lot more. I have added a couple of replies to my code below.
  if (e.results[0].isFinal) {
    //adding custom replies
    if (text.includes("hello") || text.includes("hi")) {
      p = document.createElement("p");
      p.classList.add("reply");
      p.innerText = "Hey there, I'm Chris";
      texts.appendChild(p);
    }
    //performs specific tasks like opening a new browser page
    if (text.includes("open a YouTube page")) {
      p = document.createElement("p");
      p.classList.add("reply");
      p.innerText = "Opening a random YouTube page";
      window.open(
        "https://www.youtube.com/playlist?list=PLClGsOKgoNybeYXj8ZFlnPKUIHgDEQFYC"
      );
      texts.appendChild(p);
    }
    p = document.createElement("p");
  }
});

//ending the old session to start a new one
recognition.addEventListener("end", () => {
  recognition.start();
});
button1.addEventListener("click", () => {
  recognition.start();
});
button2.addEventListener("click", () => {
  recognition.abort();
});
The window method, as seen above, is a JS method that tells the browser to open a certain path or link. Ensure you maintain the letter casing while setting your task if needed. Once all is done, if you head to your browser and speak, for instance, say “open a YouTube page”, you should be redirected to a random page on YouTube in your browser. If this doesn’t work, check your browser settings and allow page pop-ups, which should then work. So when the start button is clicked, the chat app starts the listening process, and when the stop button is clicked, it aborts the current session.
Conclusion
In this tutorial, we have successfully created a chat app that listens and translates what’s heard into text format. This can be used to perform different tasks like responding with custom replies and assisting in page redirections by implementing speech recognition using JavaScript. To improve on this, feel free to challenge yourself using the speech recognition API to perform complex tasks and projects like creating a translator or a mini Ai with custom replies.
GitHub repo: https://github.com/christofa/Speech-recognition-chat-app.git
A TIP FROM THE EDITOR: For solutions specific to React, don’t miss our Make your app speak with React-Speech-kit and Voice enabled forms in React with Speechly articles.