
Sending Emails from your React App


How do you send emails from a React app? This article shows how to integrate the React-Email package and the Resend platform to simplify the task.

Discover how at OpenReplay.com.
Traditionally, email design has been a laborious chore, juggling HTML code and inconsistent rendering across platforms. React-Email changes the game. This forward-thinking library leverages the power of React and TypeScript to offer a streamlined, component-based approach to crafting beautiful, responsive emails. With its intuitive interface and pre-built components, React-Email empowers developers to easily build emails, ensuring consistent rendering across devices and clients.
Imagine crafting personalized emails that land flawlessly in inboxes, nurturing leads, and driving conversions. Resend, the next-generation email platform, unlocks this magic. Say goodbye to spam folders and hello to automated workflows, powerful analytics, and an intuitive interface that empowers you to design irresistible email experiences. Resend transforms email from a chore to a strategic weapon, propelling your business forward.
The combination of both React-Email and Resend helps developers build captivating email templates that seamlessly send transactional emails and forge genuine connections with their audience. Leverage advanced automation, dynamic content, and data-driven insights to deliver relevant, timely emails that resonate with your recipients. Simplifying React-Email integration with Resend transforms email marketing into relationship building, driving engagement and growth for any brand.
Getting Started With React-Email
Use create-next-app to launch a new Next.js application, as it takes care of your setup. To start a project, execute:
npx create-next-app@latestYou’ll notice the following prompts during installation:

N/B: Will be using Pages Router instead of App Router. After this, the Next App will be created with the project name.
Customizing Email With React-Email
There are two methods for customizing email with React-Email i.e:
- The Automatic Setup
- The Manual Setup
But we’ll proceed with the manual setup since we already have our Next app running. The manual setup sits well with integration compared to the automatic setup. So, we’ll start by installing some components for the setup.
Install Dependencies
Install a few components and the React Email package locally.
npm install react-email @react-email/components -EAdd the Script
Add the script below to your package.JSON file.
{
  "scripts": {
    "dev": "email dev"
  }
}
Create the Template
Create a new folder called emails in the root of your Next App, create a new file inside called index.tsx, and add the following code:
import { Button, Html } from "@react-email/components";
import * as React from "react";

export default function Email() {
  return (
    <Html>
      <Button
        href="https://example.com"
        style={{ background: "#000", color: "#fff", padding: "12px 20px" }}
      >
        Click me
      </Button>
    </Html>
  );
}
Launch the development server:
npm run devTo see the changes, go to localhost:3000 and modify index.tsx.
From here, you can create, modify, and design the email template however you see fit, but React-Email has provided us with some example templates to choose from for this tutorial.
So from here, we’ll modify our template to our taste, just like the example below, before integrating Resend API for easy communication.

Integration with Resend
Resend is an email marketing platform that helps businesses design, automate, and send targeted email campaigns. It offers a variety of features to help you create effective email marketing campaigns, including:
- Drag-and-drop email builder: You can easily create beautiful and responsive emails without writing any code.
- Email automation: Automate your email marketing with workflows that trigger emails based on specific events, such as when someone signs up for your newsletter or abandons their cart.
- Personalization: Use dynamic content and segmentation to send personalized emails relevant to your subscribers.
- Analytics: Track your email marketing results with detailed reports showing your campaigns’ performance.
- Deliverability: Resend has a high deliverability rate, so you can be sure your emails reach your subscribers’ inboxes.
By integrating Resend with React-Emails, we can send targeted emails, personalize our emails, and track emails from the point of creation to the point of receiving them.
Prerequisite
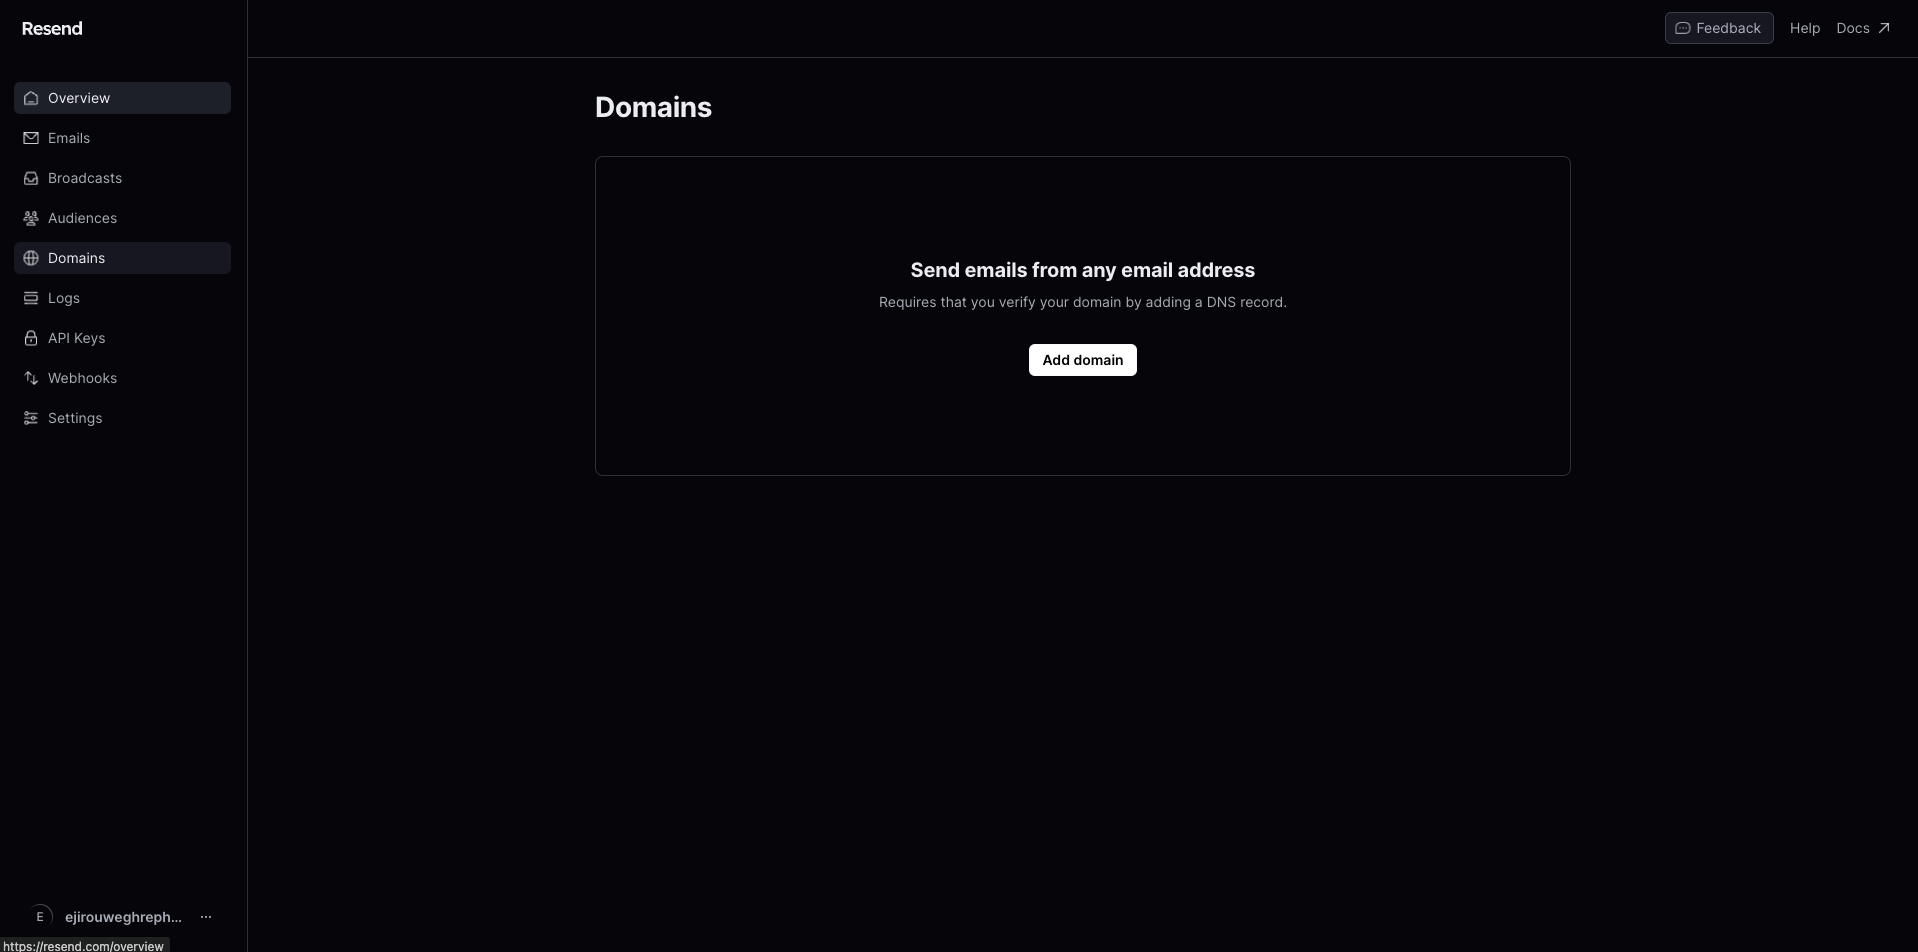
If your Next App is ready, we’ll need to create an account, an API key, and a domain on the Resend platform.
Firstly, we need to create an account with Resend to gain access to their platform. Although they’re a paid platform, they also have a free package.
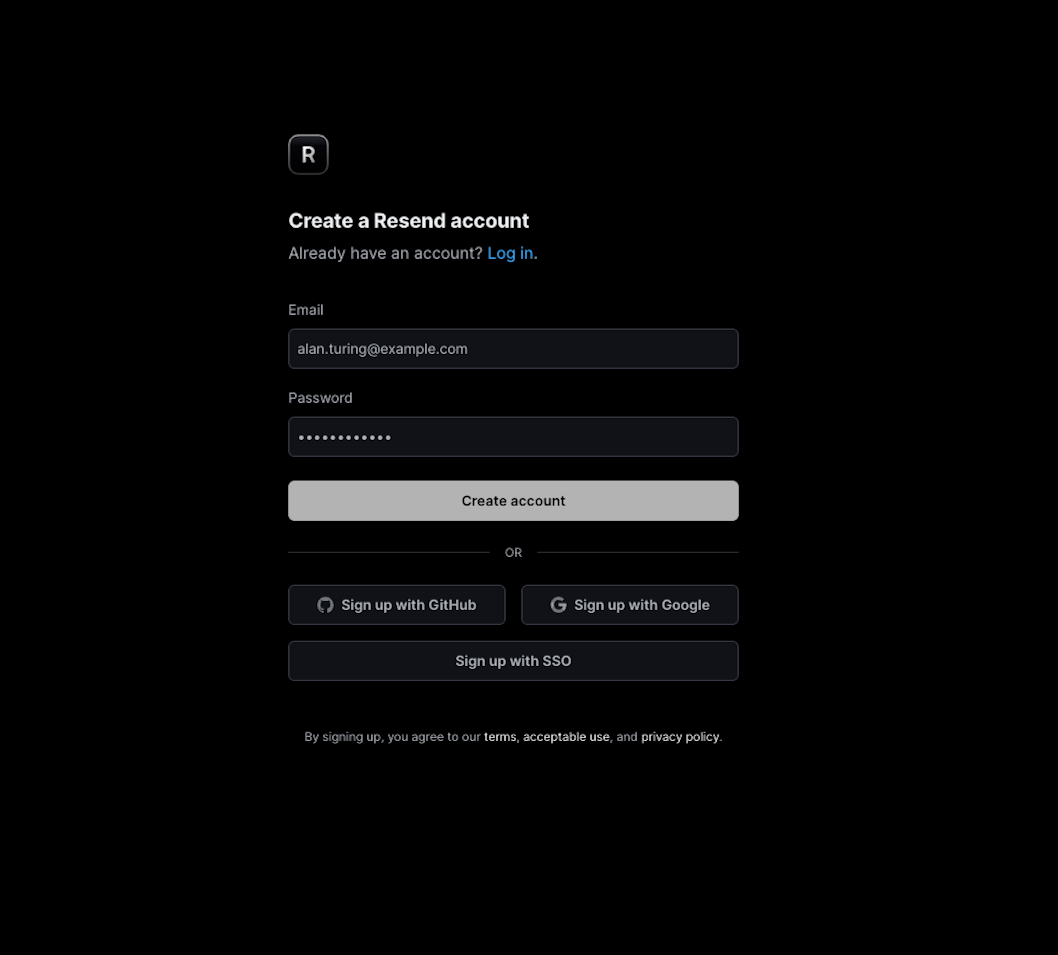
You can sign up with either Github or Google or click the Create Account button. After creating an account, you’ll create an API key to initiate the Resend API.
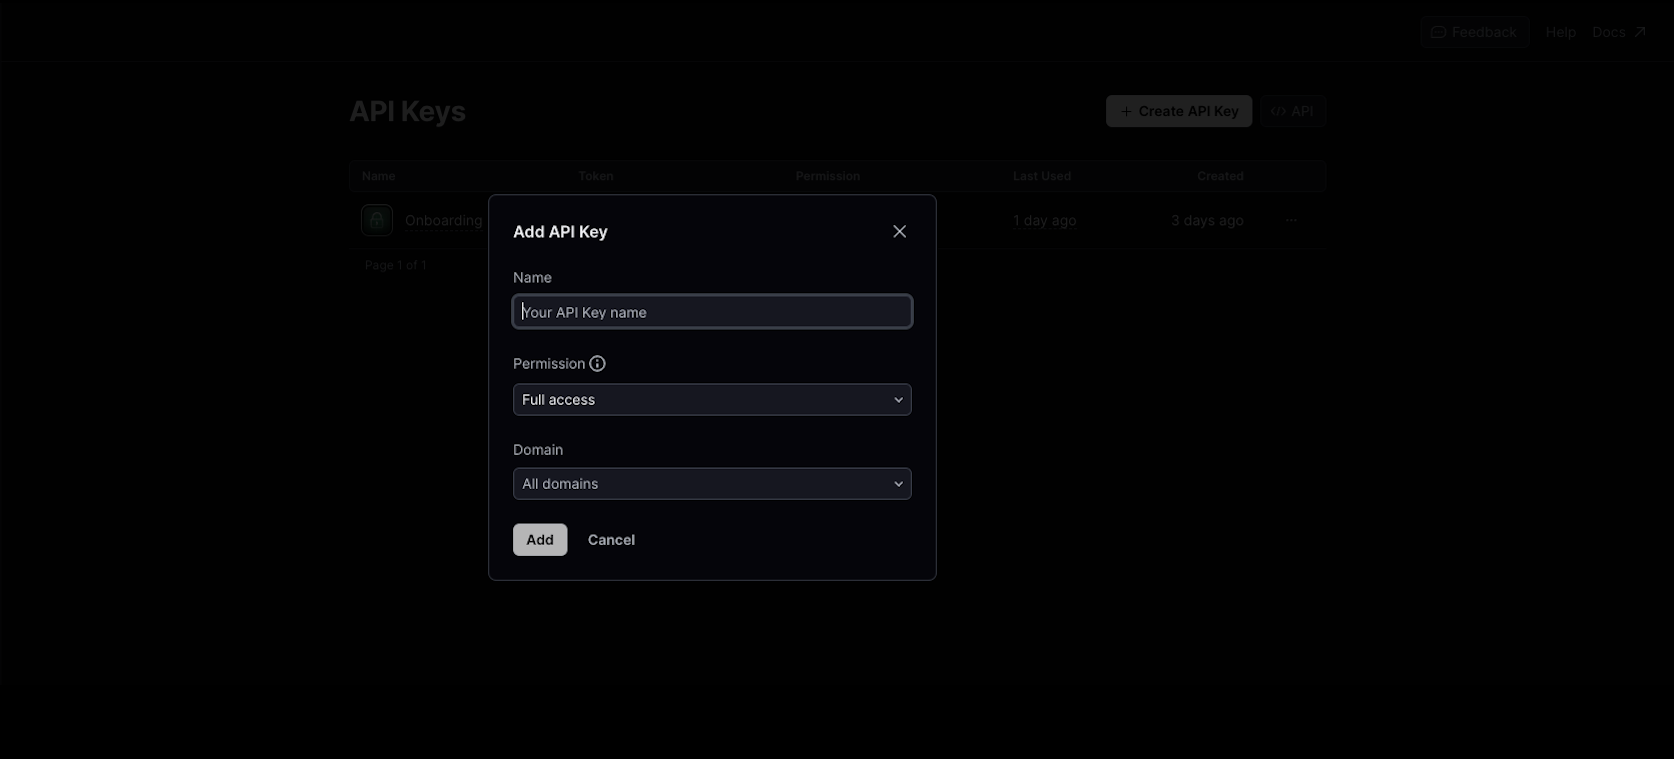
To create the API key, input the name, select Full access or Sending access, and select the domain. If you don’t have one, just click on Add, and the key is created.
You can create a domain that helps you send emails from any email address, although it’s free for one domain with limited features that you can upgrade to its full potential.
Install Dependencies
Let’s start by installing some dependencies for the integration. Install the Resend Node.JS SDK dependency.
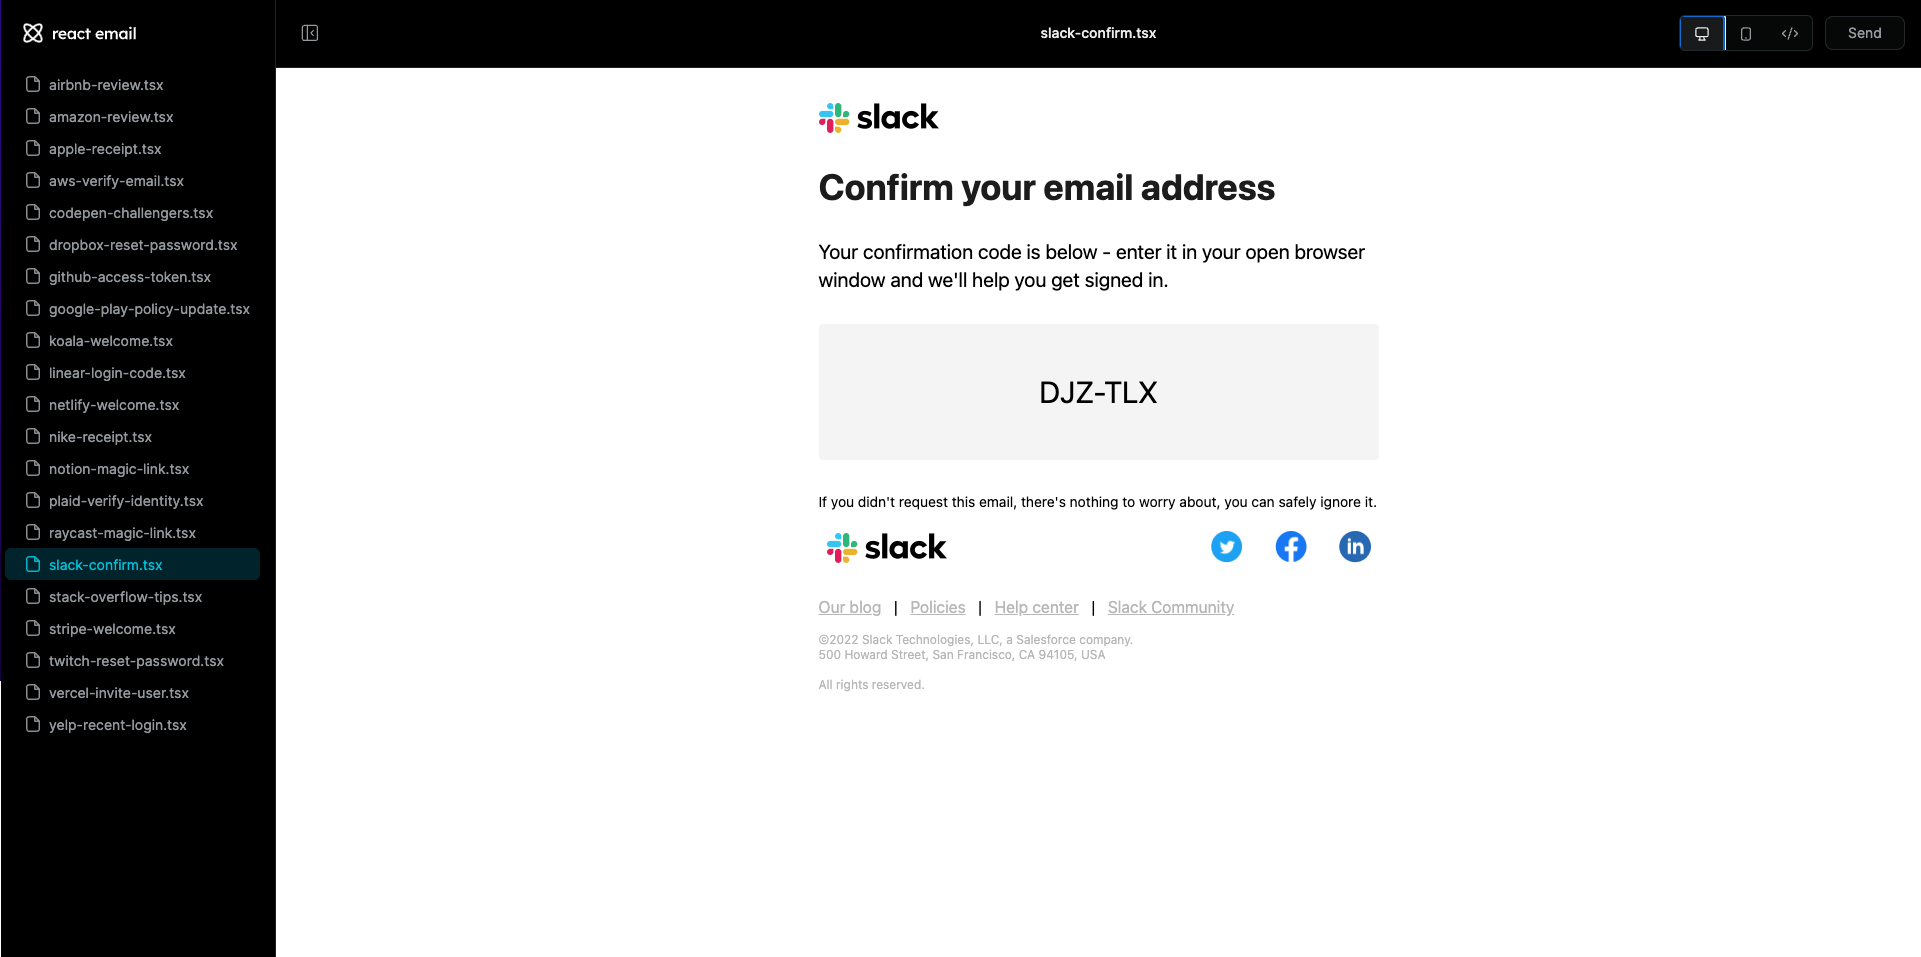
npm install resendCreate Email Template
Modify the code base in the emails folder at the root of our Next app with the redesigned Slack email template from the initial Slack template.
/emails/index.ts;
import {
Body,
Container,
Column,
Head,
Heading,
Html,
Img,
Link,
Preview,
Row,
Section,
Text,
} from "@react-email/components";
import * as React from "react";
interface SkyConfirmEmailProps {
validationCode?: string;
}
const baseUrl = process.env.VERCEL_URL
? `https://${process.env.VERCEL_URL}`
: "";
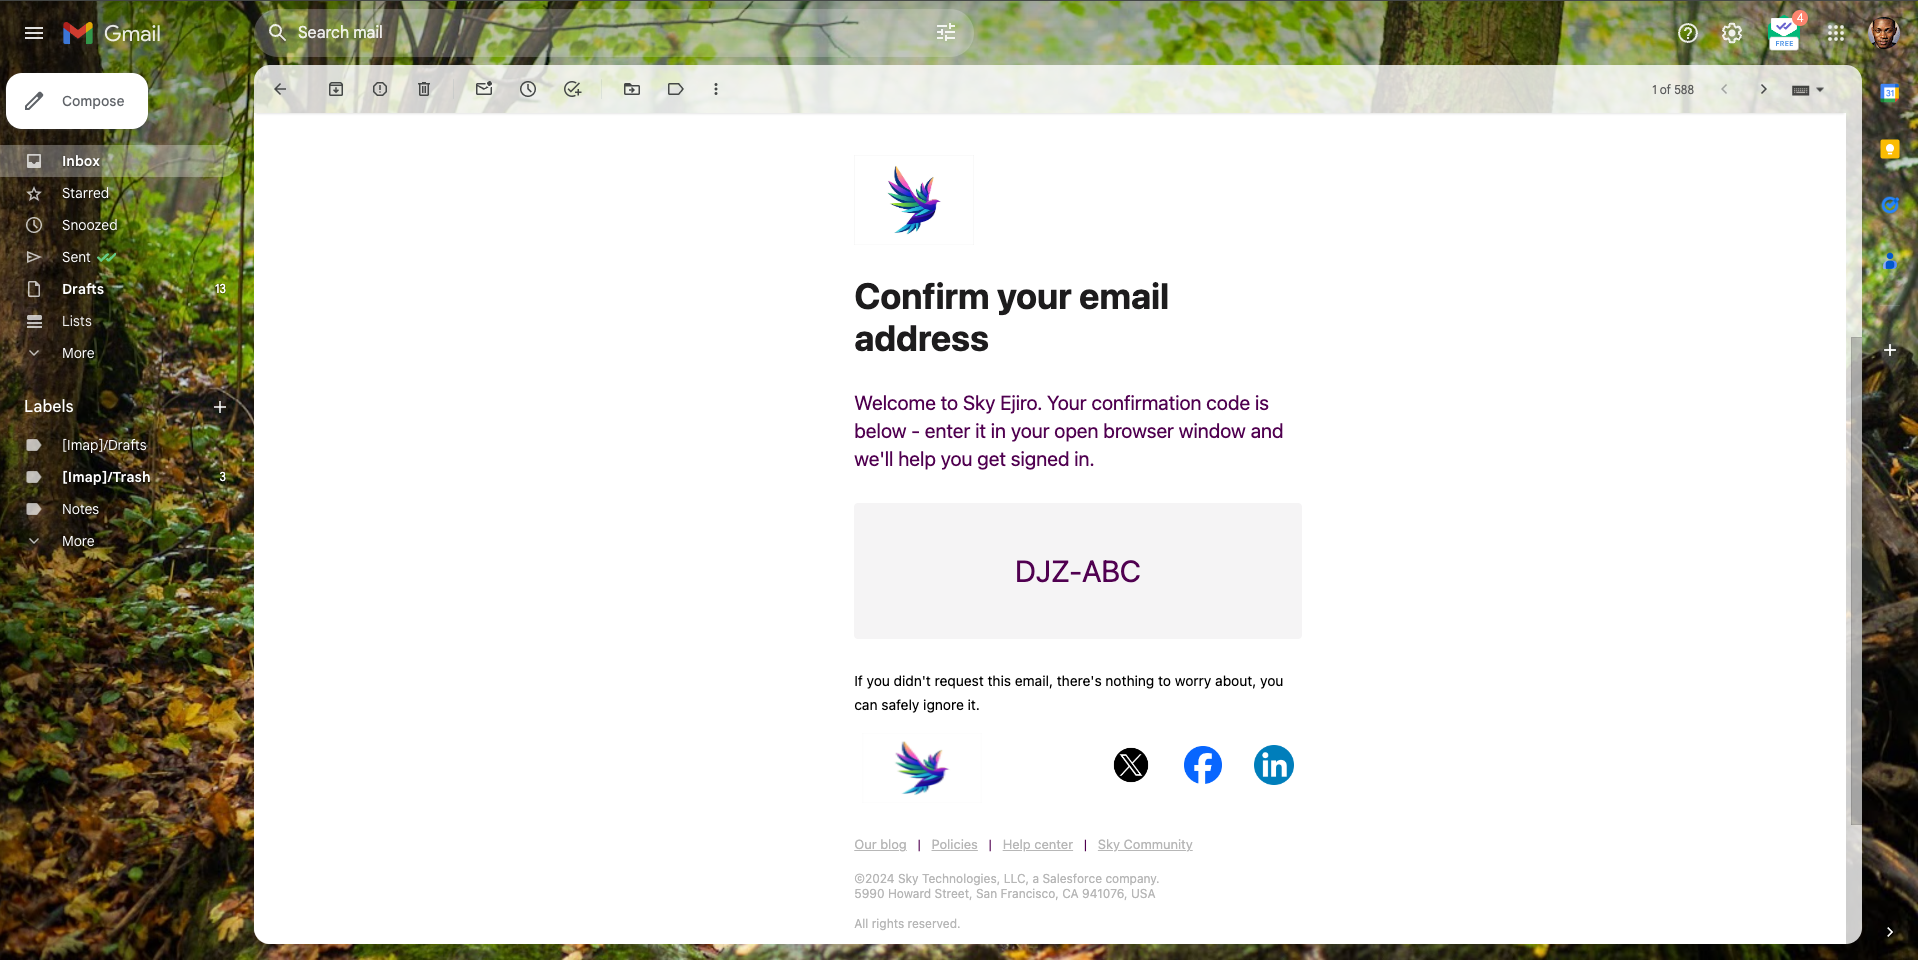
export const SkyConfirmEmail = ({ validationCode }: SkyConfirmEmailProps) => (
<Html>
<Head />
<Preview>Confirm your email address</Preview>
<Body style={main}>
<Container style={container}>
<Section style={logoContainer}>
<Img
src={`https://img.design-vector_343694-2506.jpg`}
width="120"
height="90"
alt="Sky"
/>
</Section>
<Heading style={h1}>Confirm your email address</Heading>
<Text style={heroText}>
Welcome to Sky Ejiro. Your confirmation code is below - enter it in
your open browser window, and we'll help you get signed in.
</Text>
<Section style={codeBox}>
<Text style={confirmationCodeText}>{validationCode}</Text>
</Section>
<Text style={text}>
If you didn't request this email, there's nothing to worry about; you
can safely ignore it.
</Text>
<Section>
<Row style={footerLogos}>
<Column style={{ width: "66%" }}>
<Img
src={`https://img.freepik.com/free-vector/bird-colorful-gradient-design-vector_343694-2506.jpg`}
width="120"
height="70"
alt="Sky"
/>
</Column>
<Column>
<Section>
<Row>
<Column>
<Link href="/">
<Img
src={`https://img.twitter-x-logo-official.jpg`}
width="42"
height="42"
alt="Sky"
style={socialMediaIcon}
/>
</Link>
</Column>
<Column>
<Link href="/">
<Img
src={`https://upload.Facebook_Logo_2023.png`}
width="38"
height="38"
alt="Sky"
style={socialMediaIcon}
/>
</Link>
</Column>
<Column>
<Link href="/">
<Img
src={`https://upload.LinkedIn_icon_circle.svg.png`}
width="40"
height="40"
alt="Sky"
style={socialMediaIcon}
/>
</Link>
</Column>
</Row>
</Section>
</Column>
</Row>
</Section>
<Section>
<Link
style={footerLink}
href="https://skyhq.com"
target="_blank"
rel="noopener noreferrer"
>
Our blog
</Link>
|
<Link
style={footerLink}
href="https://sky.com/legal"
target="_blank"
rel="noopener noreferrer"
>
Policies
</Link>
|
<Link
style={footerLink}
href="https://sky.com/help"
target="_blank"
rel="noopener noreferrer"
>
Help center
</Link>
|
<Link
style={footerLink}
href="https://sky.com/community"
target="_blank"
rel="noopener noreferrer"
data-auth="NotApplicable"
data-linkindex="6"
>
Sky Community
</Link>
<Text style={footerText}>
©2024 Sky Technologies, LLC, a Salesforce company. <br />
5990 Howard Street, San Francisco, CA 941076, USA <br />
<br />
All rights reserved.
</Text>
</Section>
</Container>
</Body>
</Html>
);
SkyConfirmEmail.PreviewProps = {
validationCode: "DJZ-ABC",
} as SkyConfirmEmailProps;
export default SkyConfirmEmail;Create a .env file in the root folder of the Next app, copy the generated API Key, and paste it into the .env file.
RESEND_API_KEY="Generated API Key here!!!"Send Email With React Parameter
If using the Pages Router, create an API file in pages/api/send.ts.
Import the React email template, then send an email with the React argument.
/pages/api/send.ts;

import { SkyConfirmEmail } from "../../emails/sky-confirm";
import type { NextApiRequest, NextApiResponse } from "next";
import { Resend } from "resend";

const resend = new Resend(process.env.RESEND_API_KEY);

export default async (req: NextApiRequest, res: NextApiResponse) => {
  const { data, error } = await resend.emails.send({
    from: "Sky <onboarding@resend.dev>",
    to: ["ejirouweghrepha@gmail.com"],
    subject: "Welcome to Sky Ejiro!",
    react: SkyConfirmEmail({ firstName: "John" }),
  });

  if (error) {
    return res.status(400).json(error);
  }

  res.status(200).json({ message: "Email sent successfully!" });
};
The code above sets up a Next.js API endpoint that, when called, uses the Resend service to send a confirmation email with the specified template and handles the response accordingly.
Modify Script
Modify the "dev": "email dev" script to "email": "email dev" below in the package.json file.
"scripts": {
        "email": "email dev",
      },
Launch the development server for both Next and React-Email.
npm run dev // For Next app to run on http://localhost:3000

npm run email // For react-email to run on http://localhost:3001
Note: After running the first server on http://localhost:3000, open another terminal, and run a second server, you’ll be prompted to initiate a port on http://localhost:3001 since the Next App uses the first port.
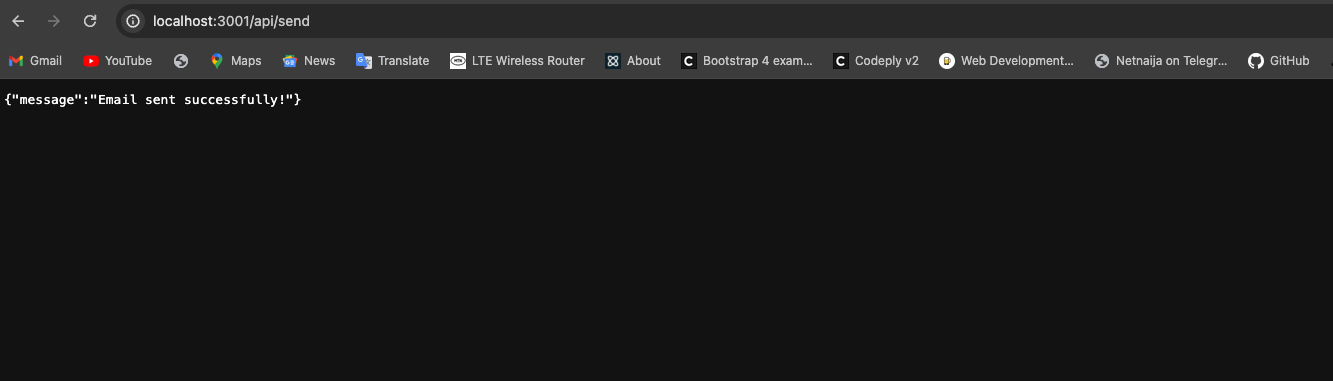
If we route to localhost:30001/api/send, we’ll automatically initiate the POST request, which sends our message “Email sent Successfully!”
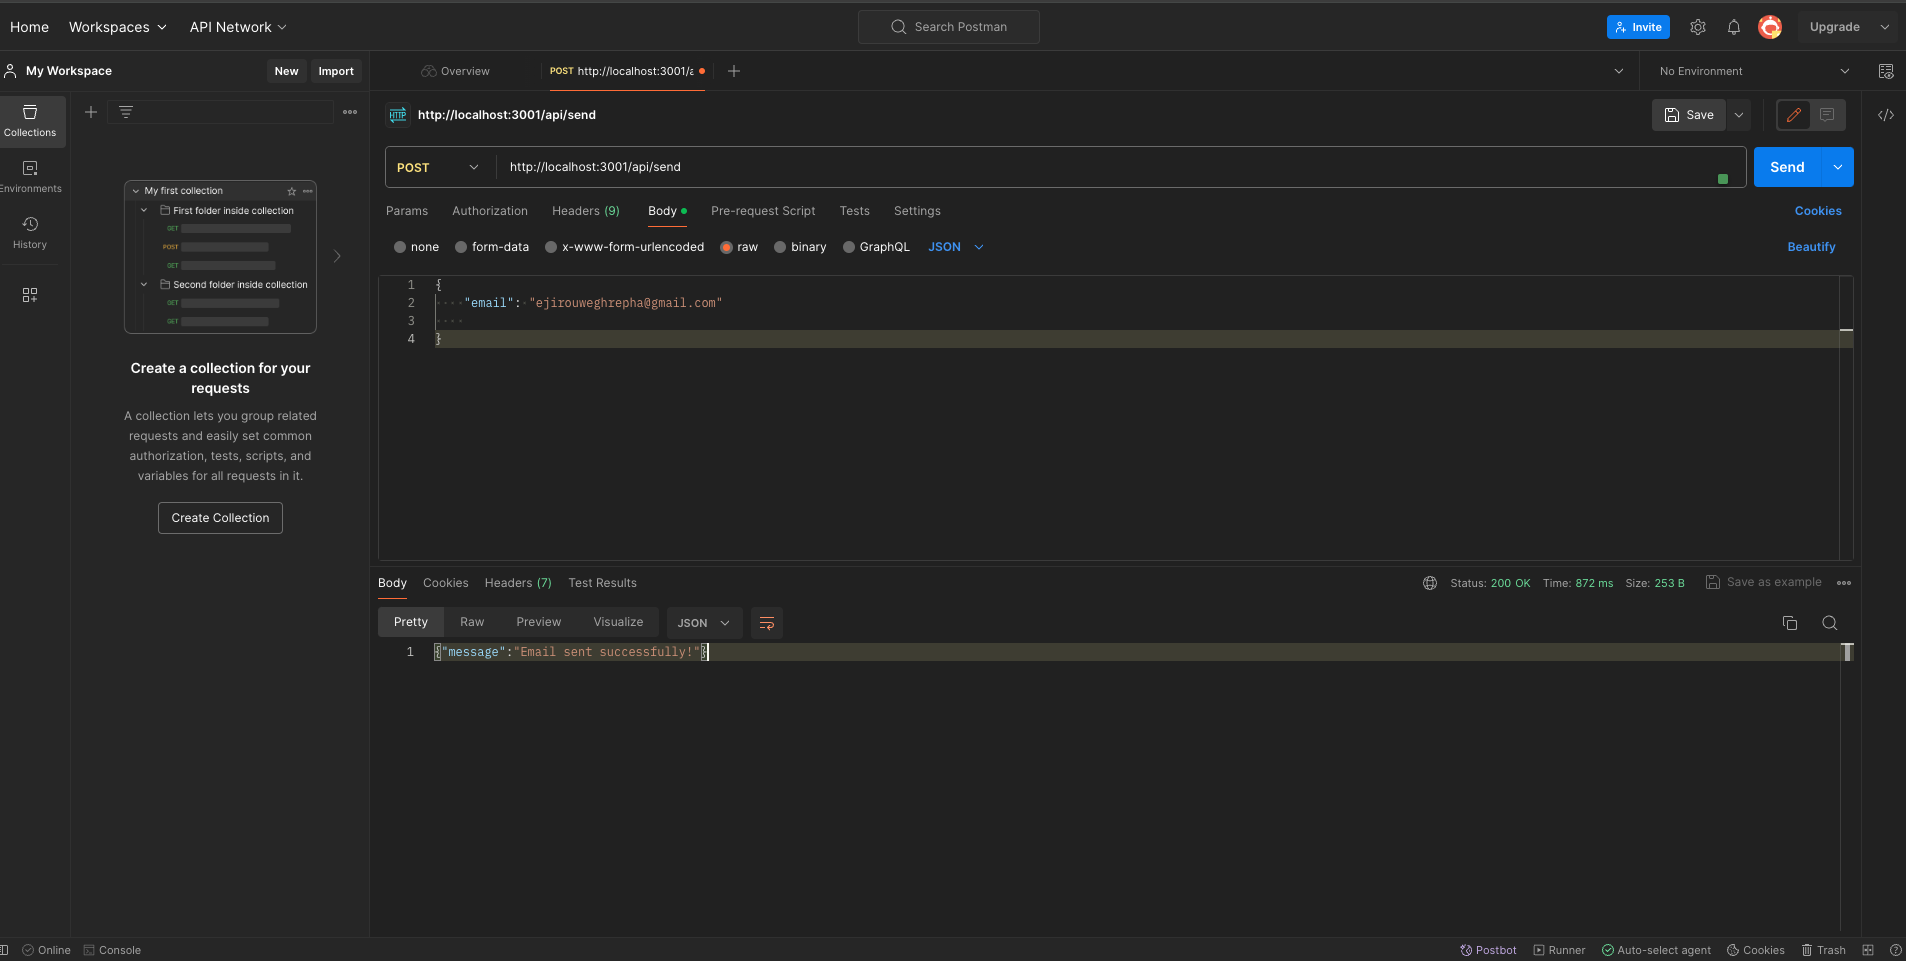
Likewise, we get a successful message if we use Postman to send a post request.
After which, if we move to our mailbox, we’ll see a confirmation mail as we have designed.
Conclusion
Integrating Resend with React-Email into your Next project allows you to compose emails more efficiently and effectively, as you are no longer limited to utilizing rigid templates and encountering inconsistent rendering. With the combination of React-Email and Resend, you can now design dynamic, visually stunning emails that captivate audiences and drive results. This powerful partnership paves the way for a future where email development is as intuitive and enjoyable as any other UI, pushing the boundaries of engagement and driving your business forward.
Resources
Gain Debugging Superpowers
Unleash the power of session replay to reproduce bugs, track slowdowns and uncover frustrations in your app. Get complete visibility into your frontend with OpenReplay — the most advanced open-source session replay tool for developers. Check our GitHub repo and join the thousands of developers in our community.
