Unleashing the Potential: Server-Side Rendering in React 18
Take advantage of SSR in the latest React version


React 18 introduces substantial SSR performance improvements, mostly behind the scenes, with a few opt-in options, especially for non-framework users. The most interesting idea is server-side rendering to improve performance, and this article will teach you all about it.

Discover how at OpenReplay.com.
Server-side rendering (SSR) is a technology that enables React apps to render on the server rather than in the browser. This improves performance and improves the user experience. It involves producing the HTML on the server and showing it to the client, while JavaScript handles the interactions.
Without SSR, there is client-side rendering, in which the browser fetches and renders HTML. When indexing does not handle JavaScript correctly, this strategy may be useful for search engine optimization (SEO). It could also be handy while downloading a huge JavaScript package over a slow network.
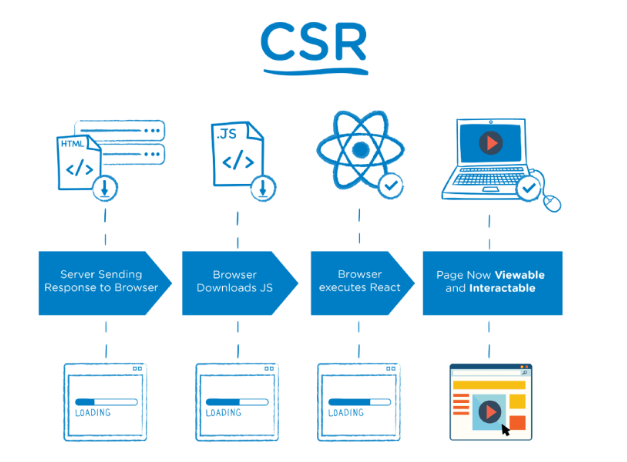
Client-Side Rendering (CSR)
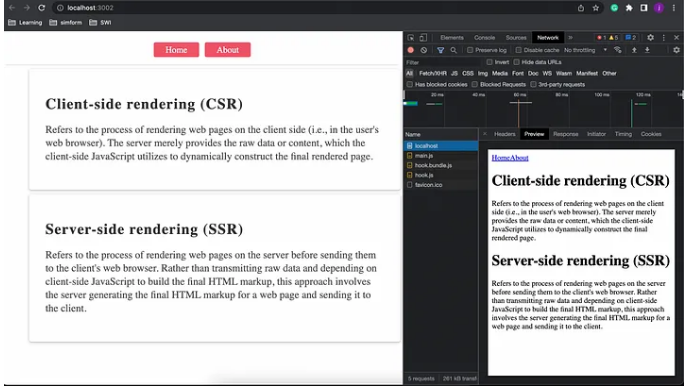
Client-side rendering (CSR) is rendering web pages on the client side (i.e., in the user’s web browser). The server merely provides the raw data or content, which the client-side JavaScript utilizes to construct the final rendered page dynamically.
Instead of sending complete HTML content, the server sends minimal HTML with JS files. The initial load may be slow, but subsequent loads are faster without new HTML for each route.
Client-rendered sites handle logic and data retrieval independently. Every page and URL are constructed dynamically, so the page becomes available after code execution.
When a user requests a page, the server sends the initial HTML and required JavaScript files. The client uses JavaScript to update the page when necessary, avoiding full-page reloads.
The following is the CSR process:
- In the address bar, the user types the URL they want to visit.
- A data request is made to the server provided by the URL.
- The server sends the static files (CSS and HTML) to the client’s browser on the first request for the site.
- HTML loads first, followed by JavaScript. HTML files connect to JavaScript, displaying developer-defined loading symbols. The website remains invisible to the user.
- After downloading the JavaScript, the material is dynamically created on the client’s browser.
- As the client navigates and interacts with the website, the web content becomes apparent.
CSR Advantages
- Because of full-page refreshes, the app feels more responsive, and users do not see the flash between page navigations.
- Fewer HTTP requests are sent to the server because the same assets are not downloaded again with each page load.
- There is a clear separation of concerns between the client and the server; you can quickly construct additional clients for different platforms (e.g., mobile, chatbots, smartwatches) without modifying the server code. As long as the API contract is not breached, you can modify the technology stack on the client and server independently.
CSR Disadvantages
- Initial page load time is increased due to the loading of the framework, app code, and assets necessary for many pages.
- On your server, you must also set it to route all requests to a single entry point and allow client-side routing to take over from there.
- In most circumstances, an external library is required.
- During crawling, all search engines execute JavaScript, and they may detect empty content on your page. This unwittingly harms your app’s Search Engine Optimization (SEO).
When should you use Client-Side Rendering?
- The user interface of an application is extremely complicated, with numerous pages and functionalities.
- An application has a vast amount of dynamic data.
- The site’s priority is for writing rather than reading.
- The emphasis is on rich sites with a large number of users.
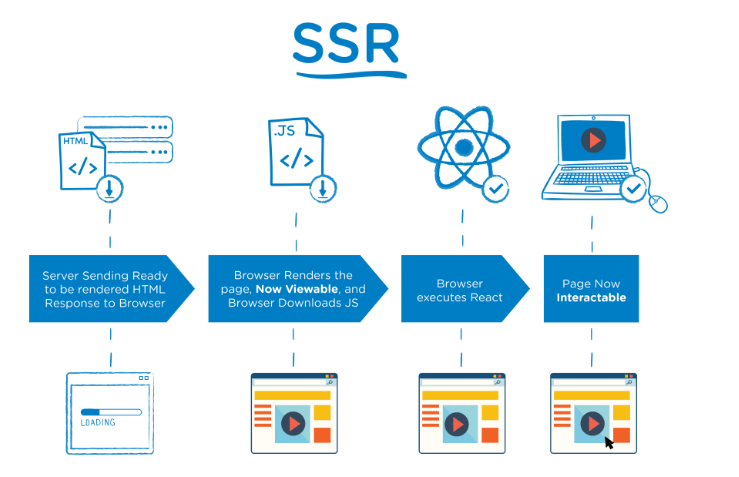
Server-Side Rendering (SSR)
Server-side rendering (SSR) refers to rendering web pages on the server before sending them to the client’s web browser. Rather than transmitting raw data and depending on the client side, this approach involves the server generating the final HTML markup for a web page and sending it to the client.
The web browser sends a request to the server for information, retrieving user-specific data to populate and sending a fully rendered HTML page to the client. The server will repeat the entire process every time the user accesses a new page on the site.
The SSR process is outlined below in detail:
- In the address bar, the user types the URL they want to visit.
- The server sends the browser a ready-to-render HTML response.
- The browser displays the page (which is now viewable) and downloads JavaScript.
- The browser runs React, making the page interactive.
SSR Advantages
- Because there is less code to render, the first page of the website loads faster.
- Ideal for simple and static websites.
- For improved SEO, search engines can crawl the site.
SSR Disadvantages
- SSR needs more infrastructure and development effort than conventional client-side content presentation.
- SSR adds complexity to a program by requiring separate layers of code for server-side rendering and browser-side scripting.
- A high number of users can cause bottlenecks.
When should you use Server-Side Rendering?
- An application has a simple user interface with few pages/features.
- There is less dynamic data in an application.
- The site’s preference is to read rather than write.
- The emphasis is not on rich sites, with few users.
Major Differences Between Client-Side Rendering and Server-Side Rendering
-
Performance: Client-side rendering can slow initial load times due to JavaScript fetching and execution. Server-side rendering yields a fully rendered HTML, often resulting in faster loading and a smoother user experience, particularly on slower networks or devices.
-
SEO: Another difference is SEO. Client-side rendering can hinder search engine crawling and indexing since it relies on JavaScript. Server-side rendering makes content readily available for proper indexing.
-
Development Setup: Client-side rendering is easier to start with and needs less server-side code but can become challenging to maintain as the app grows. Server-side rendering demands more server-side code and can be trickier to implement, but it offers a better user experience and SEO benefits.
Implementing Server-Side Rendering with React 18
Step 1: Create a new React application using the create-react-app command line tool. Open your preferred terminal and type the following command.
npx create-react-app server-api-demo-appStep 2: Change to your newly created React app.
cd server-api-demo-appStep 3: To manage routing, add react-router-dom to the project
npm install react-router-domStep 4: Include some pages in your application. You can include the following sample routes in app.js:
(i) Homepage
(ii) About
const App = () => (
  <div>
    <Routes>
      <Route path="/" element={<Home />}></Route>
      <Route path="/about" element={<About />}></Route>
    </Routes>
  </div>
);
Step 5: Fill in the blanks on both pages with content. Click [here] for reference.
Step 6: Make a new folder called server at the root level, and then add the files index.js and server.js to it. Copy and paste the code below into that file.
// server/index.js
require("ignore-styles");

require("@babel/register")({
  ignore: [/(node_modules)/],
  presets: ["@babel/preset-env", "@babel/preset-react"],
});

require("./server");
This code snippet configures Babel for code translation, excludes specific files, such as those in “node_modules,” and starts the server by importing the “server” module. In React server-side rendering, this parameter is typically used to allow the server to process and serve React components.
// server/server.js
import express from "express";
import React from "react";
import ReactDOMServer from "react-dom/server";
import { StaticRouter } from "react-router-dom/server";
import App from "../src/App";

const app = express();

app.get("/*", (req, res) => {
  const entryPoint = ["/main.js"];

  const { pipe, abort: _abort } = ReactDOMServer.renderToPipeableStream(
    <StaticRouter location={req.url}>
      <App />
    </StaticRouter>,
    {
      bootstrapScripts: entryPoint,
      onShellReady() {
        res.statusCode = 200;
        res.setHeader("Content-type", "text/html");
        pipe(res);
      },
      onShellError() {
        res.statusCode = 500;
        res.send("<!doctype html><p>Loading...</p>");
      },
    }
  );
});

app.listen(3002, () => {
  console.log("App is running on http://localhost:3002");
});
Using app.get ("/*",...), the code creates a route handler for all routes. This indicates that this route handler will deal with any incoming server requests. Within the route handle:
-
The value
main.jsis assigned to the entryPoint array. This identifies the JavaScript file that was used to bootstrap the client-side code. -
ReactDOMServer.renderToPipeableStream()takes two arguments: aReact Nodefor HTML rendering and anoptionsobject with streaming parameters, which is optional. It gives back an object with two methods: pipe and abort. Thepipemethod writes HTML to the Node.js stream given. To allow streaming, we use pipe inonShellReady.onAllReadycan also be used for static generation and crawlers. -
When the rendering process is finished and the HTML is ready for client transmission, the
onShellReady()function is called. It sets the response status code to200, defines the content type header astext/html, then uses the pipe function to pipe the rendered HTML to the response. -
the
onShellError()callback is executed when an error occurs during rendering. It sets the response status code to500and delivers an HTML-encoded simple error message.
Step 7: On the client side, we need to update ReactDOM.createRoot with ReeactDOM.hydrareRoot in the index.js file to make the server-generated HTML interactive.
// index.js
import React from "react";
import ReactDOM from "react-dom";
import { BrowserRouter } from "react-router-dom";
import App from "./App";

ReactDOM.hydrateRoot(
  document,
  <React.StrictMode>
    <BrowserRouter>
      <App />
    </BrowserRouter>
  </React.StrictMode>
);
Step 8: To run the code on the server, include the following script in the package.json file.
"ssr": "npm run build && node server/index.js" This command will build your project, execute the code on the server, and output the results to localhost:3002
Step 9: To see the output, use the npm run ssr command.
React Server Components (RSC)
React Server Components (RSCs) extend React’s foundations beyond just being a rendering library by including data-fetching and remote client-server interactions into the framework.
React was designed for modularity and gradual integration into existing codebases. Responding to a world that craved rich interactivity, it detached client and server concerns, making the front end far more flexible to construct. This was especially important for teams: two React components created by distinct developers would only operate together because they shared the same foundation.
It had to innovate on top of pre-existing Web standards to achieve this. The goal has stayed consistent during the last decade of evolution between multi-page applications (MPA) and single-page applications (SPA), between client-side and server-side rendering: supply fast data, provide rich interactivity, and maintain a wonderful developer experience.
RSCs fetch data and render entirely on the server, and the resulting HTML is streamed into the client-side React component tree, interleaving as needed with other Server and Client Components.
This method avoids the requirement for client-side re-rendering, resulting in improved performance. Because the computational load is shared between client and server, hydration can occur concurrently with RSCs flowing in for any Client Component.
Conclusion
With the new server APIs, React components can now be rendered as server-rendered HTML using either Node.js or Web streams. Some frameworks like Next.js, Remix, and Gatsby automate this process, enhancing initial load times, SEO, user experience, and security against XSS attacks.
While SSR offers advantages, it comes with complexities and increased server load and may not suit real-time applications like chat or multiplayer games. Evaluate your requirements to ensure SSR aligns with your needs.
Gain Debugging Superpowers
Unleash the power of session replay to reproduce bugs, track slowdowns and uncover frustrations in your app. Get complete visibility into your frontend with OpenReplay — the most advanced open-source session replay tool for developers.
Star on GitHub12k