
Setting up a signature canvas in React Native

User signatures can be captured without following the signing on paper and scanning method. With a signature canvas feature in-app, users can quickly sign and attach their signatures or sign onto files right on their phones.
In this tutorial, I want to demonstrate how this signature canvas can be set up in an Android and iOS app using React Native. The app will capture the user’s signature and save it as an image to the user’s storage. The complete source code for this tutorial is at Github.
To follow it, basic knowledge of React Native is essential, and you should have React Native set up on your computer. An Android and an iOS simulator should also be set up for testing the application. You can learn how to set up React Native and how to set up Android and iOS emulators on your computer here.
Initialize React Native Project
The first step for this tutorial is to initialize a React Native project. This initialization involves running a command in your terminal, and an empty project will be set up. After running the initialization command, you will need to download the necessary iOS dependencies and build the project in Android and iOS emulators. The commands for these processes are below.
#Initialize React Native Project
npx react-native init RNDigitalSig

# Navigate to the ios folder and Install iOS dependencies
cd ios && pod install

#Navigate back to the Project root folder
cd ..

#Run on Android Emulator
npx react-native run-android

#Run on iOS Simulator
npx react-native run-ios
If this sequence was correctly executed, your Android and iOS emulators should show up like this:
Setting up Signature Canvas
The React Native project has been successfully initialized, and the next thing is to get right into the core of this tutorial which is setting up a signature canvas.
The features of this digital signature project will be:
- Signing functionality
- Undo and Redo functionality
- Preview signature
- Pen Color change
- Saving signature to device
For all these features to be set up, I will be working with some React Native Libraries. For the Signing functionality, I will be using the react-native-signature-canvas then, rn-fetch-blob will be used to save the signature image to the device. The react-native-webview also needs to be installed because react-native-signature-canvas depends on it.
Creating Signing Functionality with React Native Signature Canvas
Right now, you should install the following libraries react-native-signature-canvas library and react-native-webview. To install it, run the following command in your terminal. Ensure you are running it in the project’s root folder.
#install library
npm i react-native-signature-canvas react-native-webview rn-fetch-blob
Once complete, install the necessary iOS dependencies and build on Android and iOS Emulators. The commands for these are already stated above.
Next, open up app.js, and at the top of the page, import react-native-signature-canvas like so:
import SignatureScreen from 'react-native-signature-canvas'Now, for the declared SignatureScreen to render correctly, some functions will have to be declared and assigned to the SignatureScreen using the accompanying props. You can get complete details of the props and methods associated with this library here.
Insert the code below within the app component.
const App = ({ text, onOK }) => {
const ref = useRef();
// Called after ref.current.readSignature() reads a non-empty base64 string
const handleOK = (signature) => {
console.log(signature);
onOK(signature); // Callback from Component props
};
// Called after ref.current.readSignature() reads an empty string
const handleEmpty = () => {
console.log("Empty");
};
// Called after ref.current.clearSignature()
const handleClear = () => {
console.log("clear success!");
};
// Called after end of stroke
const handleEnd = () => {
ref.current.readSignature();
};
// Called after ref.current.getData()
const handleData = (data) => {
console.log(data);
};
return (
<SignatureScreen
ref={ref}
onEnd={handleEnd}
onOK={handleOK}
onEmpty={handleEmpty}
onClear={handleClear}
onGetData={handleData}
autoClear={true}
descriptionText={text}
/>
);
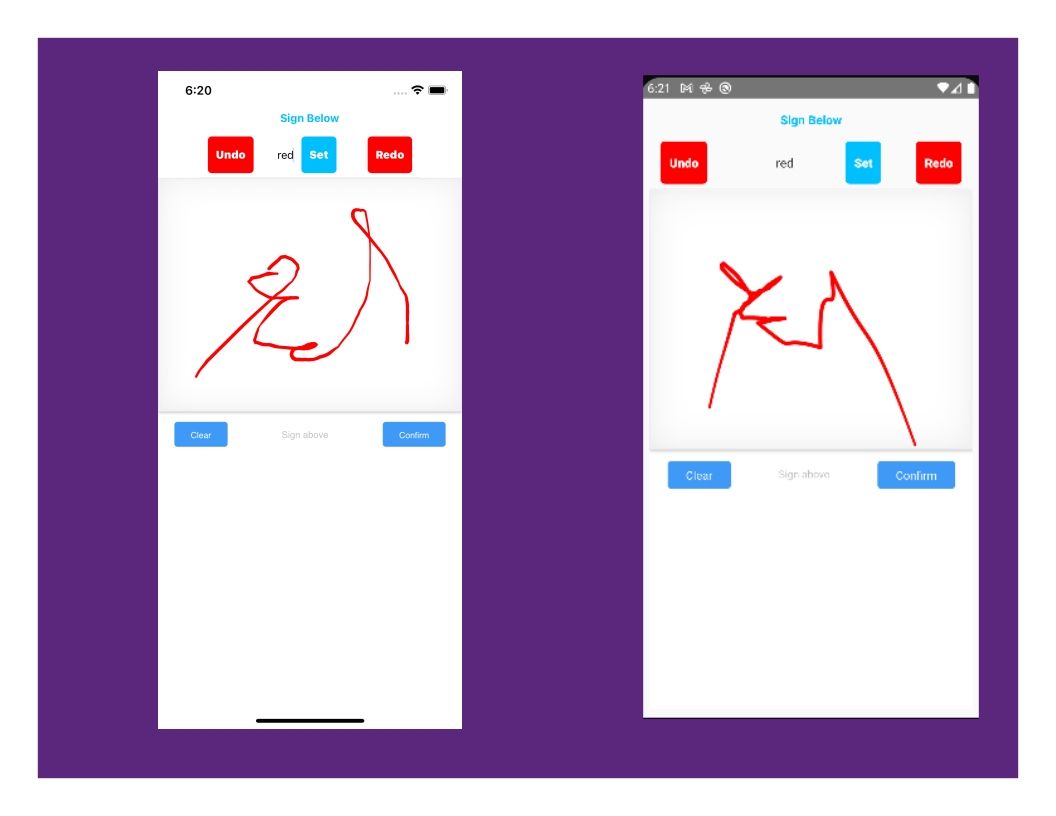
};Your Android and iOS emulators should show up like this:
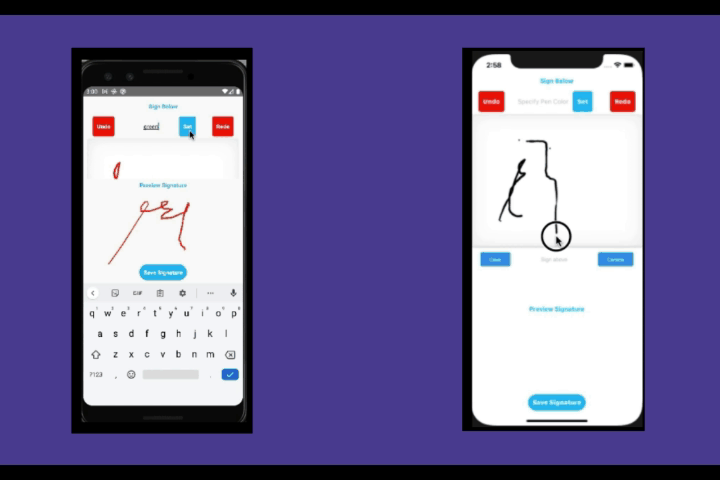
As shown, SignatureScreen works with the React useRef hook and thus should be imported at the top of the page. You will also notice the presence of props like onEnd, onOk, onEmpty, onClear, onGetData, autoClear, and descriptionText. These are basic props of the react-native-signature-canvas, and some can have functions assigned to them. These functions will be triggered when any of the conditions are met. For instance, the onClear prop is assigned to the handleClear function. This function will be executed when you click to clear the signature canvas. A simple instruction is to log “clear success” to the console when a user clears the canvas. You can implement anything you want or alert a message to the user.
To further demonstrate how the props and methods of this library can be used, I will use the changePenColor() method to execute a color change with a specified color from a state. Then, the penColor prop will take the value of the state and change the pen color to the specified color. Also, I will create an undo and redo functionality that will make it possible for the users to undo or redo an action instead of just clearing the canvas or being unable to retrieve an undone signature.
To create this functionality, I will modify the UI of the app. The UI will contain the field where the color will be specified and the buttons for undo and redo. Kindly update your app.js with the code.
const App = ({ text, onOK }) => {
  const [colorText, setPenColor] = useState("");
  const ref = useRef();

  const handleOK = (signature) => {
    console.log(signature);
    onOK(signature); // Callback from Component props
  };

  const handleClear = () => {
    console.log("clear success!");
  };

  return (
    <SafeAreaView style={styles.container}>
    <Text style={styles.textSign}>Sign Below</Text>
    <View style={styles.row}>
    <TouchableOpacity
      style={[styles.setButton, {marginRight: 30, backgroundColor: 'red'}]}
      onPress={handleUndo}
      >
      <Text style={styles.text}>Undo</Text>
      </TouchableOpacity>
    <TextInput
      placeholder= "Specify Pen Color"
      style={styles.textInput}
      autoCapitalize="none"
      value={colorText}
      onChangeText={setPenColor} />
      <TouchableOpacity
      style={styles.setButton}
      onPress={handleColorChange}
      >
      <Text style={styles.text}>Set</Text>
      </TouchableOpacity>
      <TouchableOpacity
      style={[styles.setButton, {marginLeft: 30, backgroundColor: 'red'}]}
      onPress={handleRedo}
      >
      <Text style={styles.text}>Redo</Text>
      </TouchableOpacity>
    </View>

    <SignatureScreen
      ref={ref}
      onEmpty={handleEmpty}
      onClear={handleClear}
      penColor={colorText}
      />
    </SafeAreaView>
  );
};

export default App;
Endeavor to add the styles below to the app.js file:
const styles = StyleSheet.create({
container: {
  flex: 1,
  alignItems: "center",
  justifyContent: "center",
  height: 250,
  padding: 10,
},
row: {
  flexDirection: 'row',
  marginTop: 10,
  borderBottomWidth: 1,
    borderBottomColor: '#f2f2f2',
    paddingBottom: 5
  },
  textSign: {
    color: 'deepskyblue',
    fontWeight: 'bold',
    paddingVertical: 5,
  },
  text: {
    color: '#fff',
    fontWeight: '900',
  },
  textInput: {
    paddingVertical: 10,
    textAlign: 'center'
  },
  setButton: {
    backgroundColor: 'deepskyblue',
    textAlign: 'center',
    fontWeight: '900',
    color: '#fff',
    marginHorizontal: 10,
    paddingVertical: 15,
    paddingHorizontal: 10,
    borderRadius: 5,
  }
});
Now the UI and the state where the input field will update are ready. I will declare the handleColorChange function so that when the Set button is clicked, the changePenColor() method will change the pen color to the color specified in the input field. The code is below:
const handleColorChange = () => {
  ref.current.changePenColor(colorText);
};
Using the undo() and redo() methods, I will implement the undo and redo functionalities. The functions are below:
#Function to handle Undo
const handleUndo = () => {
  ref.current.undo();
};

#Function to handle Redo
const handleRedo = () => {
  ref.current.redo();
};
Now, the drawings on the signature canvas can be undone and redone.
Session Replay for Developers
Uncover frustrations, understand bugs and fix slowdowns like never before with OpenReplay — an open-source session replay tool for developers. Self-host it in minutes, and have complete control over your customer data. Check our GitHub repo and join the thousands of developers in our community.
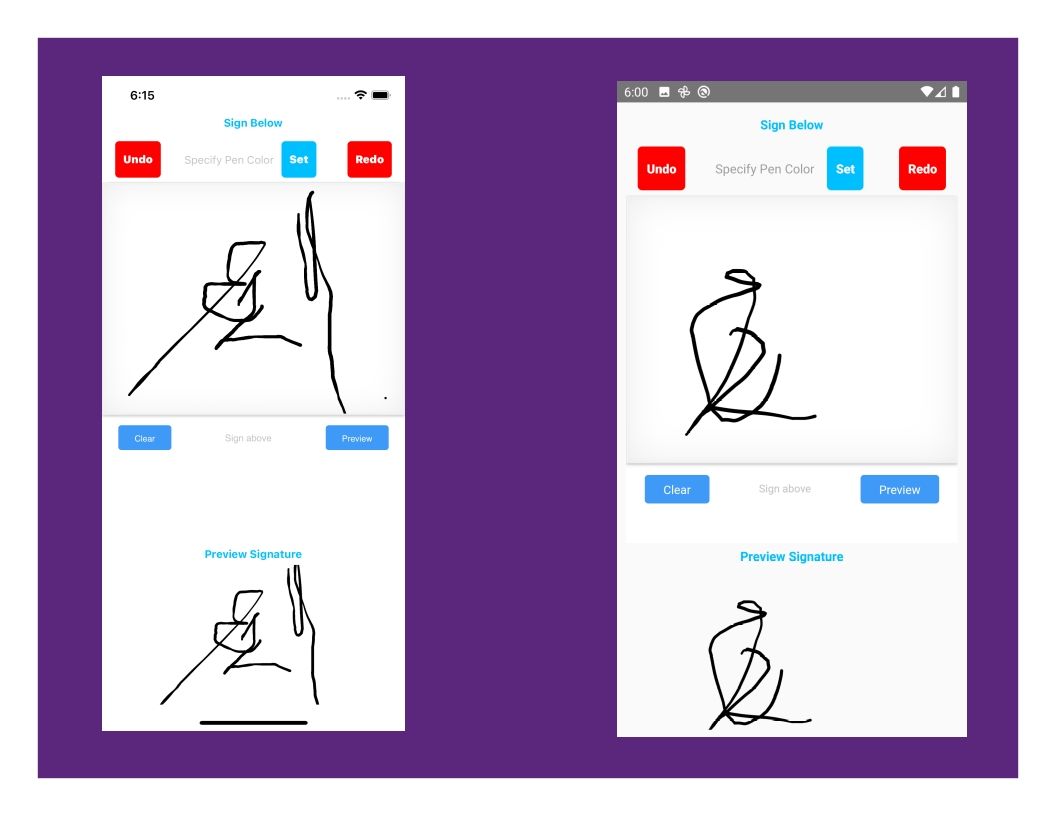
Creating Preview Feature
After a signature is drawn, the image is stored as a base64 string by default. This string can be rendered as an image; this preview feature is just a way to demonstrate that. For this to happen, I will create a state where the base64 string will be stored. When the preview button is clicked, the base64 image stored in the state will be rendered as the URI of an image within an Image component and then displayed.
First, I will modify the app.js file to incorporate the Image component alongside other components. The code is below:
<SignatureScreen
      ref={ref}
      onOK={handleOK}
      onEmpty={handleEmpty}
      penColor={colorText}
      onClear={handleClear}
      confirmText="Preview"
      />
      <Text style={styles.textSign}>Preview Signature</Text>
    <Image
    resizeMode={"cover"}
    style={{ width: 300, height: 180, paddingBottom: 20 }}
    source={{ uri: "https://placeimg.com/140/140/any" }}/>
    </SafeAreaView>
  );
};
You should also add the following styles.
...
preview: {
width: 335,
height: 114,
backgroundColor: "#F8F8F8",
justifyContent: "center",
alignItems: "center",
marginTop: 15,
},
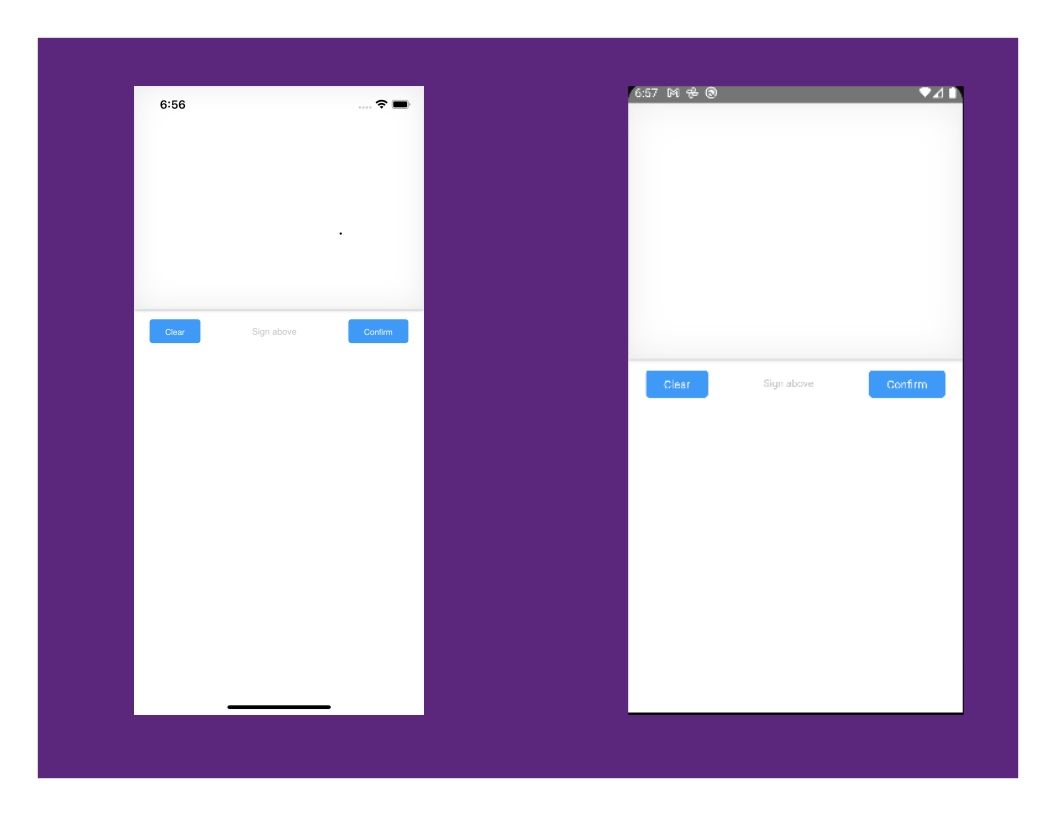
...If you noticed, using the confirmText prop, I updated the confirm text value to “Preview”. Moving on, I will create a state that will store the drawn signature. Then, I will modify the handleOk function so that when the “Preview” button is clicked, it will update the state with the base64 image string.
const [signature, setSign] = useState(null);

//onOk Function  update
const handleOK = (signature) => {
    setSign(signature);
  };
Finally, for the preview functionality, I will pass the base64 image into the image component like so:
...
<Image
    resizeMode={"cover"}
    style={{ width: 300, height: 180, paddingBottom: 20 }}
    source={{ uri: signature }}/>
    ..
The drawn signature is displayed in the image component when the preview button is clicked.
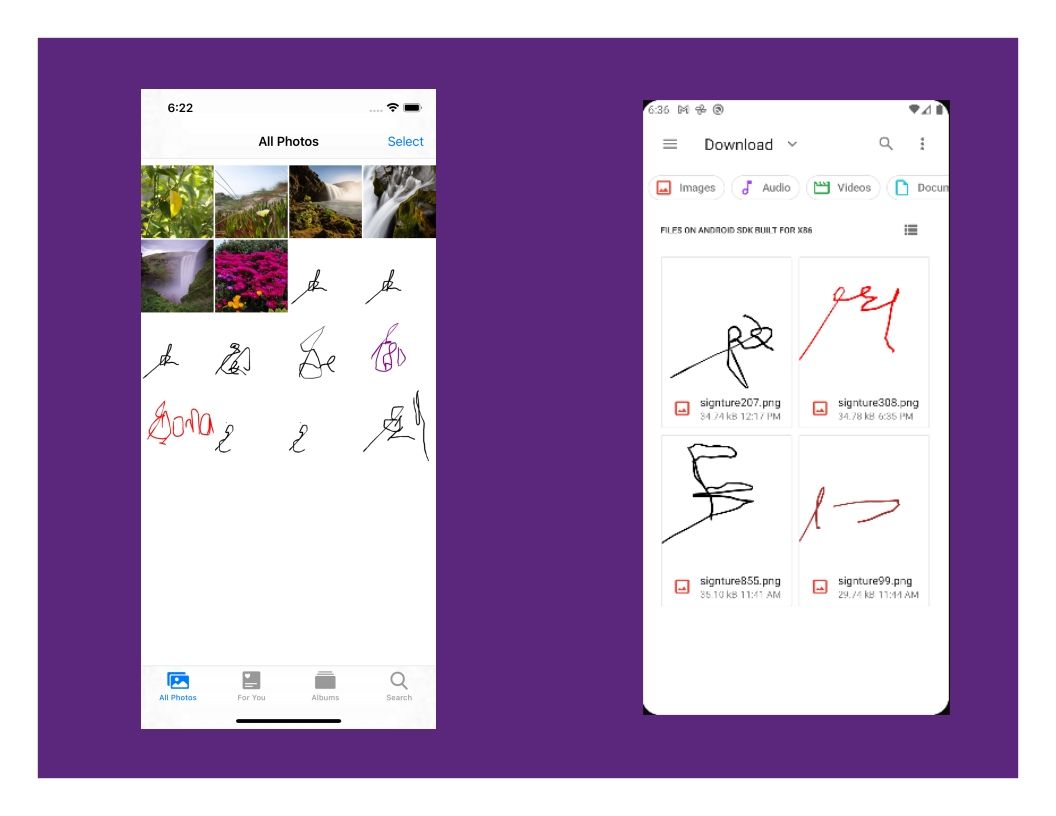
Saving Base64 Image as PNG into Device
The signature functionality and some other utilities of this library have been demonstrated and implemented, and now the drawn signature needs to be saved to the device. For this to be possible, the app has to have permission to write into the device’s storage on Android and iOS, and with the rn-fetch-blob library, the saving will be implemented.
Setting up Permission for Android
Navigate to RNDigialSig/Android/app/src/main/AndroidManifest.xml and add the permission below:
<uses-permission android:name="android.permission.WRITE_EXTERNAL_STORAGE" />
<uses-permission android:name="android.permission.READ_EXTERNAL_STORAGE" />


<application
...
android:requestLegacyExternalStorage="true">
After this, build the project in your Android emulator. If you are unsure how to do this, the command is above.
Setting up Permission for iOS
Navigate to RNDigitalSig/ios/RNDigitalSig/info.plist and add the permission below:
<key>NSPhotoLibraryAddUsageDescription</key>
<string>This app would like to save images to your device.</string>
<key>NSPhotoLibraryUsageDescription</key>
<string>This app would like to save images to your device.</string>
Run the command to build the project in your iOS simulator.
Now the permissions are set, the next thing is to add a button such that onclick, the signature will be saved to the device’s storage. Add the code below after closing the image component to create a button.
<TouchableOpacity
    style={styles.saveButton}
    onPress={handleSave}
    >
    <Text style={styles.text}>Save Signature</Text>
    </TouchableOpacity>
The style below should also be added.
saveButton: {
    backgroundColor: 'deepskyblue',
    textAlign: 'center',
    fontWeight: '900',
    color: '#fff',
    paddingVertical: 10,
    paddingHorizontal: 10,
    borderRadius: 20,
  },
Now, I will declare the handleSave function such that it checks for permission, and if granted, it will, with the help of the rn-fetch-blob library, take the base64 image and save it to the Downloads folder for Android and the Documents folder for iOS. The code is below:
#Add Import Statement at the Top
import RNFetchBlob from "rn-fetch-blob";


const handleSave = async () => {
    if (Platform.OS === 'android') {
    var isReadGranted = await PermissionsAndroid.request(
        PermissionsAndroid.PERMISSIONS.WRITE_EXTERNAL_STORAGE,
      );
    }
    if (isReadGranted === PermissionsAndroid.RESULTS.GRANTED) {
      const dirs = RNFetchBlob.fs.dirs
      var image_data = signature.split('data:image/png;base64,');
      const filePath = dirs.DownloadDir+"/"+'signture'+new Date().getMilliseconds()+'.png'
      RNFetchBlob.fs.writeFile(filePath, image_data[1], 'base64')
      .then(() => {
        console.log("Successfuly saved to"+ filePath)
      })
      .catch((errorMessage) =>{
        console.log(errorMessage)
      })      }

      if (Platform.OS ==='ios') {
      const dirs = RNFetchBlob.fs.dirs
      console.log(dirs)
      var image_data = signature.split('data:image/png;base64,');
      const filePath = dirs.DocumentDir+"/"+'signature'+new Date().getMilliseconds()+'.png'
      RNFetchBlob.fs.writeFile(filePath, image_data[1], 'base64')
      .then(() => {
            RNFetchBlob.ios.previewDocument("file://"+filePath)
            console.log("Successfully saved to"+ filePath)
              })
      .catch((errorMessage) =>{
        console.log(errorMessage)
      })
      }
    }
Once this is implemented, you should have your signature canvas take signatures and store them in the device’s storage as png images.
Conclusion
This straightforward tutorial will enable you to set up a digital signature canvas in your React Native projects. If you followed duly, you should have the same result, but if you followed through and are experiencing any challenges, kindly use the comment section to air your issue, and I will gladly assist as much as possible.
A TIP FROM THE EDITOR: For more work with canvas and React, don’t miss our 2D sketches with React and the Canvas API and Implementing 3D Graphics In React articles.
Gain Debugging Superpowers
Unleash the power of session replay to reproduce bugs and track user frustrations. Get complete visibility into your frontend with OpenReplay, the most advanced open-source session replay tool for developers.
