Social Media Authentication in React Native using Auth0
How to add social login to your app


Social sign-in can give a very smooth and safe app user experience as users are authenticated with their existing social media profiles on Facebook, Twitter, Linkedin, or any social media platform they are registered on. Integrating this feature dissolves users’ need to manually submit their details for authentication during sign-up.
This tutorial will cover the step-by-step process of setting up Facebook, and Twitter, social login functionality in a React Native project with auth0. To find the complete source code of this project, kindly refer to my GitHub repo. To follow along, basic knowledge of React Native is essential. You should have completed the React Native Environment setup, and for testing the applications, you should have an Android and an iOS simulator running on your computer. If you haven’t done these yet, you should find instructions for the React Native Environment setup here. Also, in this tutorial, you must create an Auth0 account.
Cloning Demo Application
Delving right into the core of this tutorial, I have put a demo project together, which you will have to clone to progress. It is a React Native project with three screens on which this Social Login functionality will be set up. I believe I have established that this tutorial will contain specific steps, descriptions, and processes to enable you to set up social authentication using Auth0 in your React Native project. The Authentication methods will include Facebook and Twitter. On the Auth0 dashboard, you will find several other social platforms you can integrate into your application. Still, the scope of this tutorial will be the three I have just recently mentioned.
The demo application for this project is up on my GitHub repo. Click here to find it. To clone this repo to your computer, run the command below in your terminal.
git clone https://github.com/championuz/RNSocialAuthDemo.gitAfter that, you need to download the necessary node_modules and the required dependencies for it to work on iOS. The commands to download these are below.
#Install Node Modules
npm install

# Navigate to the ios folder and Install iOS dependencies
cd ios && pod install

#Navigate back to the Project root folder
cd ..
You should test this project on your emulator to be sure it’s working. The commands for that are below:
#Run on Android Emulator
npx react-native run-android
#Run on iOS Simulator
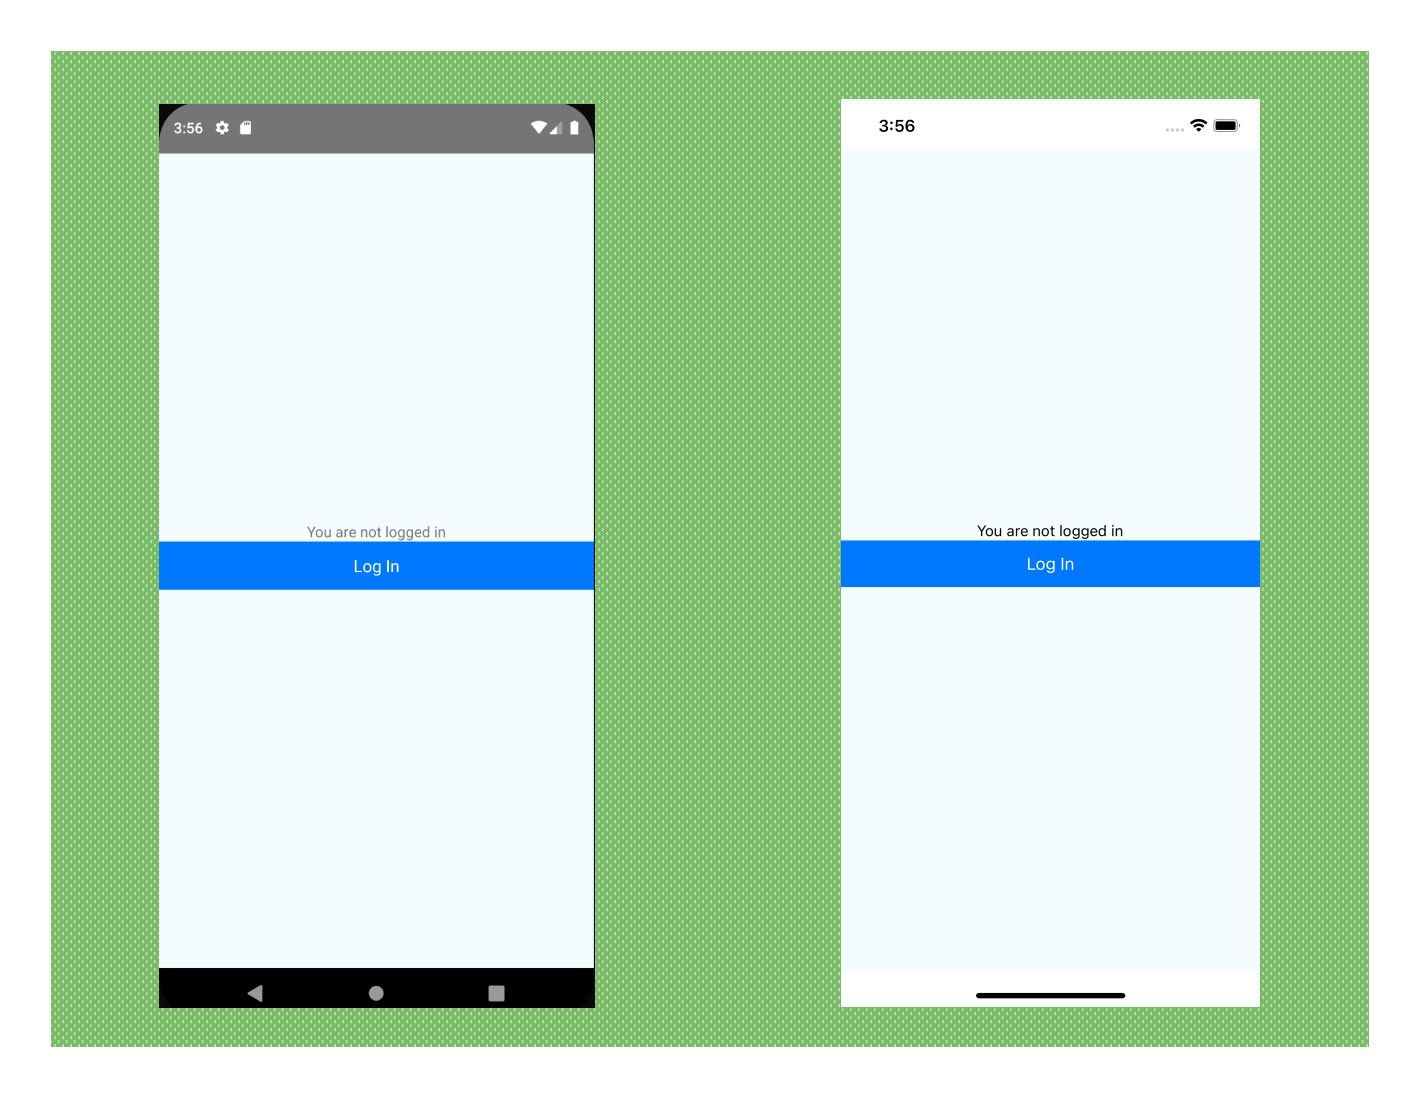
npx react-native run-iosYou should have your Android and iOS emulators show up like so:
Moving On…
Moving on from here, we have our React Native application started and running, but there are some things I need to establish.
The main dependency for this tutorial is the react-native-auth0. This is set up by Auth0 so that their authentication functionality can be applied in React Native applications.
Another necessary dependency for this tutorial is the jwt-decode. This library will be used to extract user details from the idToken that will be returned after the user has successfully logged in.
Also, I will be working with the react-navigation dependency. This is a robust library and makes it relatively easy to use to set up navigation in React Native projects. I have used the library to set up the navigation, which is present in the demo project, so I won’t be covering it. To learn more about it, click here.
At this juncture, we need to register this project with Auth0, and here, you will need to have an account with Auth0, after which we will configure Auth0 for Android and iOS.
Registering Project with Auth0
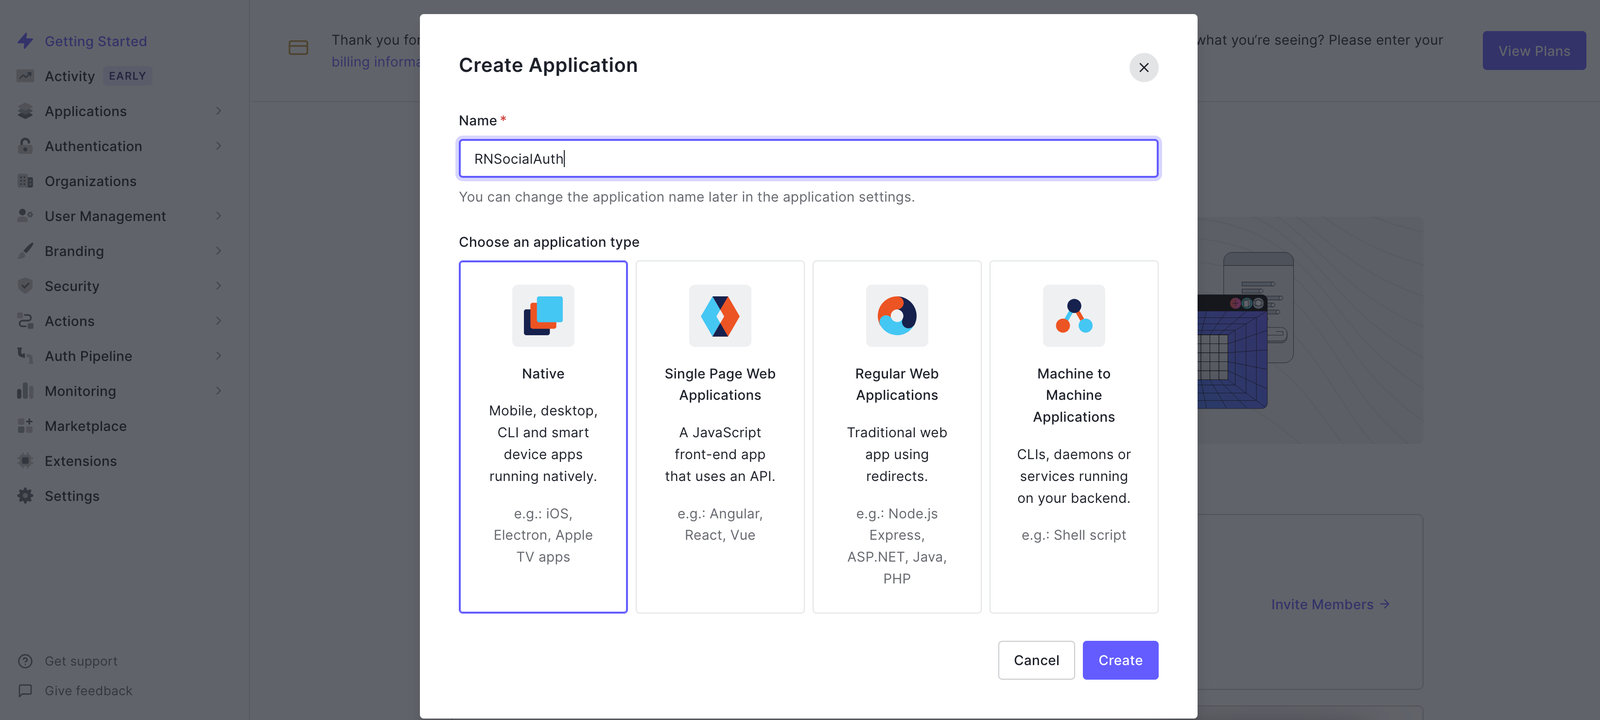
Proceed to sign up for an account with Auth0. After filling in your details and setting up your profile, you will be assigned a Tenant Domain. Next, you need to create an application. To do that, right on the Dashboard, you should see “Getting Started” and a button to “Create Application”; click on it. Now, state the application’s name (“RNSocialAuth” in this case), then select “Native” and click “Create”.
After clicking on “Create” from the previous step, you should be taken to the application’s screen. On this screen, navigate to the settings tab. Now, you should see your ClientID and Domain. This information is crucial, and I will tell you a bit about what they stand for.
-
Auth0 Domain: This is a unique domain where your users will be authenticated. It serves as the base URL for access to the Auth0 API. It usually includes a value from a region, and you can select from supported regions while setting up your account with Auth0.
-
ClientID: The ClientID is a unique, unmodifiable, auto-generated identifier that will be used to configure your authentication system with Auth0.
We will be working with two other highly important items to set up this social authentication functionality. They are:
-
Callback URL: Since Auth0 externally handles the authentication for us, this URL is used to redirect users back to your application after Auth0 has authenticated them. This URL consists of your Android Package Name (Android) /Bundle Identifier (iOS), your Auth0 Domain, and the application type, Android or iOS, as the case may be.
-
Logout URL: Also, when users try to log out from your application, this URL is what is used to redirect them back to the application. This URL is the same as the CallbackURL but must be inputted accordingly.
To complete the registration of this project with Auth0, the Callback URLs and the Logout URLs must but added. The Callback and the Logout URLs for Android and iOS follow the pattern below:
#Callback/Logout URL for Android
<Android Package Name>://<Auth0 Domain>/android/<Android Package Name>/callback,

#Callback/Logout URL for iOS
<Bundle Identifier>://<Auth0 Domain>/ios/<Bundle Identifier>/callback
Now, to populate this pattern with the Android Package Name of the application, open your code editor, and from the root folder, open the AndroidManifest.xml file by navigating to <Root Folder>/Android/app/src/main/AndroidManifest.xml. You should have your Android Package Name at the top of the page. Here’s a sample.

Now, you want to organize the callback URL following the above-displayed pattern, so copy the Android package name and paste it on the side of your code editor, then copy your Auth0 Domain from and on the Applications settings tab on your Auth0 dashboard and also paste it following the pattern as shown below:

Once that’s done, follow this same sequence for iOS while you’re modeling the above-displayed pattern, then copy it to the Allowed Callback URL field on the Application settings tab on your Auth0 dashboard. Also, paste it under the Allowed Logout URL field.
To get the iOS bundle identifier, run the following command in your terminal to open the Xcode project.
cd ios && rnsocialauth.xcworkspaceThis command should open up your project in Xcode. Once it’s open, click on the project name on the left side of the screen, and you should have the screen below.
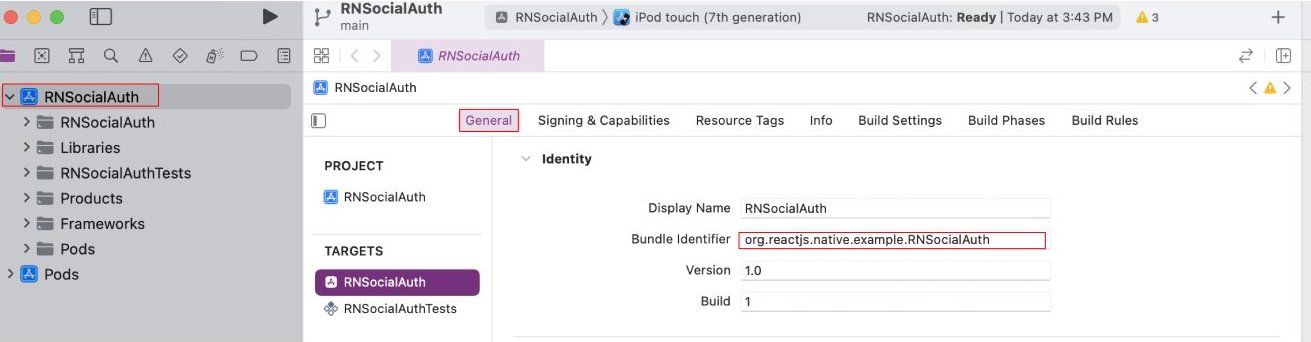
The bundle identifier should be within the highlighted area. Copy and paste it into your code editor and organize it with the pattern above so that it shows up like so:

After organizing it to follow the sequence shown, copy it to the Allowed Callback URL and Logout URLs. Ensure that you are separating the Android and iOS URLs with a comma so there’s no mix-up. After this step, the project is now been registered with Auth0.
Setting up Social Authentication
Right on the Auth0 dashboard, you must select the authentication systems you want to enable on your application. In this case, it’s Facebook and Twitter.
To do this, click on Authentication from the menu on the left and click on Social. It should bring you to a screen like this. Then Click on “Create Connection”.
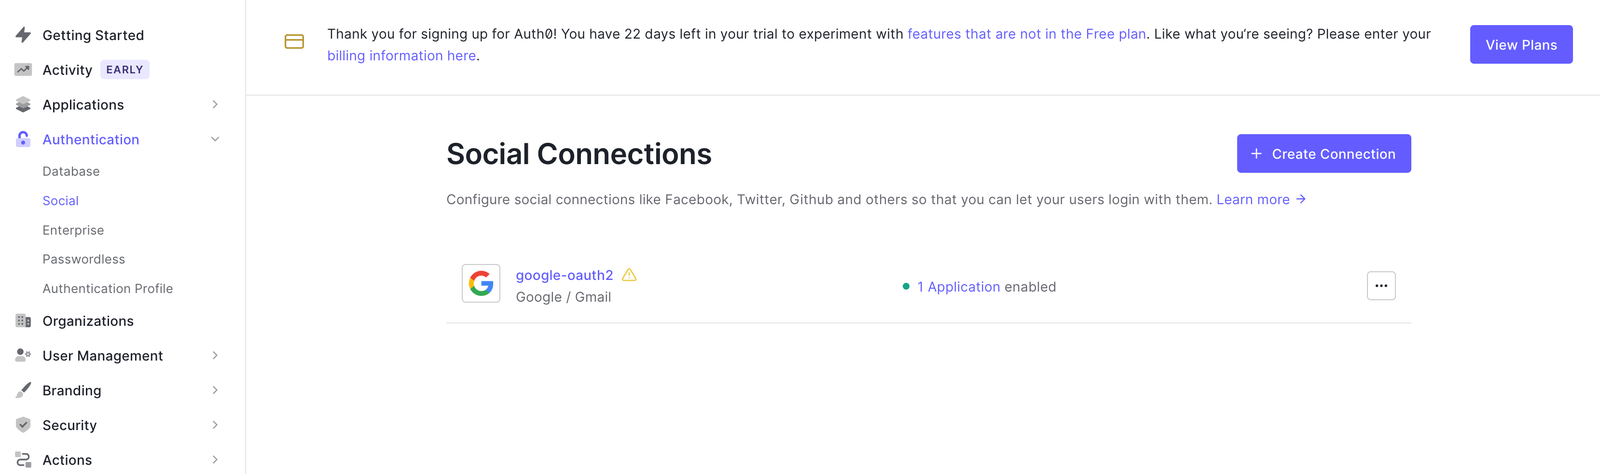
Now, you will be required to select the social connection you want to be present in your application. For this tutorial, I will select Facebook and Twitter. After selection and confirmation, you will be required to select the application to apply the connection—endeavor to select the correct project name. Although you must select and confirm one connection at a time, you should follow the same process to select and confirm all social connections you want.
To cross-check all active connections in your project, click on Applications from the menu items on the left, and from the dropdown, select applications. Click on your project name, and from the tabs, click on connections. You will find the selected applications alongside Google Auth and Email and Password Auth. For this project, I will turn them off so that I only have Twitter and Facebook as my social authentication systems.
Installing Dependencies At this point, we need to install the dependencies and configure Auth0 for Android and ios. The commands to install the dependencies are below:
#Installing Dependencies
npm i react-native-auth0 jwt-decode
Configuring Auth0 for Android
For Auth0 to work on Android, you must update your project’s defaultConfig in the app/build.gradle file. To do this, navigate to <Root Folder>/Android/app/build.gradle and update the defaultConfig block with the code below:
defaultConfig {
      ...
      manifestPlaceholders = [auth0Domain: "Your Auth0 Domain", auth0Scheme: "${applicationId}"]
After this, save the file and build the project on your Android emulator. The command for that has been stated above.
Configuring Auth0 for iOS
For Auth0 to work on iOS, you need to update your AppDelegate.mm file and your info.plist file. To update your AppDelegate.mm file, Navigate to <Root Folder>/ios/RNSocialAuth/AppDelegate.mm and add the code below, among other import statements at the top of the page.
#import <React/RCTLinkingManager.h>Still in the AppDelegate.mm file, add the following code at the end of the page, just before the #endif statement.
- (BOOL)application:(UIApplication *)app openURL:(NSURL *)url
            options:(NSDictionary<UIApplicationOpenURLOptionsKey, id> *)options
{
  return [RCTLinkingManager application:app openURL:url options:options];
}

#endif
@end
Now, still on that <Root Folder>/ios/RNSocialAuth directory, open info.plist file and add the code below after the first <dist> tag.
...
<key>CFBundleURLTypes</key>
<array>
  <dict>
    <key>CFBundleTypeRole</key>
    <string>None</string>
    <key>CFBundleURLName</key>
    <string>auth0</string>
    <key>CFBundleURLSchemes</key>
    <array>
      <string>$(PRODUCT_BUNDLE_IDENTIFIER)</string>
    </array>
  </dict>
</array>
...
Once this is added, navigate to the iOS directory and run pod install. Then, build the project on your iOS simulator.
Session Replay for Developers
Uncover frustrations, understand bugs and fix slowdowns like never before with OpenReplay — an open-source session replay tool for developers. Self-host it in minutes, and have complete control over your customer data. Check our GitHub repo and join the thousands of developers in our community.
Setting up the App with Auth0
We have been able to register the application with Auth0 and configure it to work on Android and iOS. The next thing to be done is to set the application to authenticate users with their social profiles and get their details.
How it will work is that we will create a context and wrap the app with it. That way, user variables, and authentication states are globally accessible and available. Thus, the first page to work on will be the context page.
Right now, I will create a folder inside the src folder on the root directory, and the title of the new folder will be AuthContext.js. Inside this AuthContext page, you should import the modules that will be used on this page. These import statements should be added at the top of the page.
import React, { useState } from "react";
import Auth0, {useAuth0} from "react-native-auth0";
import jwtDecode from "jwt-decode";
Next, I will create the AuthContext object using the React createContext() method. Here’s the code below:
const AuthContext = React.createContext();After this, I will create a functional component called AuthContextProvider. In this component, I will state set the states for the user login, logout, loading, and user data. Here’s the code:
const AuthContextProvider = (props) => {
    const [loading, setLoading] = useState(true);
    const [loggedIn, setLoggedIn] = useState(null);
    const [userData, setUserData] = useState(null);
    ...
I have passed the props because it’s within this functional component that the global variables will be rendered through the AuthContext.Provider component.
Next, I will create an Auth0 object which will take your Domain and ClientID. Kindly grab your Domain and ClientID from your Auth0 dashboard and populate accordingly. The code below should be added just after the declaration of the states.
...
const auth0 = new Auth0({
      domain: "Your Auth0 Domain",
      clientId: "Your Client ID",
    });
...
Once that’s set, let us define the login function. When this function is fired, the user is directed to the Auth0 Universal Login page, where the user is authenticated. The auth0.webAuth.authorize() method fires the process, which goes with a scope property. This scope property is a list of requests for authorization for the user’s details to be accessed. You can learn more about Open ID Connect (OIDC) scopes here. After the authorization, the user details are returned, and idToken is a JWT token. This idToken is then decoded, the details are stored in the userData state, then loggedIn state is set to true. The code is below. Ensure it’s inserted just after the previous code.
const login = async () => {
    try {
      const user_auth = await auth0.webAuth.authorize({
        scope: 'openid email profile',
      });
      const user_details = jwtDecode(user_auth.idToken);
      setUserData(user_details);
      setLoggedIn(true);
    } catch (err) {
      alert(err+ 'Error logging in');
    }
  };
We will also define the logout function. Here, when this function is called, the auth0.webAuth.clearSession() method clears the user’s session, and the userData is set to null while the loggedIn state is set to false. Add the code after the login function.
...
const logout = async () => {
      try {
        await auth0.webAuth.clearSession({});
        setLoggedIn(false);
        setUserData(null);
      } catch (err) {
        alert('Error logging out');
      }
    };
...
Now, we will declare the context values and assign them to the AuthContext.Provider component that is being rendered and export the AuthContext and the AuthContextProvider. Here’s the code:
...
const variables = {
        loading,
        loggedIn,
        login,
        logout,
        userData,
      };
  return (
    <AuthContext.Provider value={variables}>{props.children}</AuthContext.Provider>
  );
};
export { AuthContext, AuthContextProvider };
Integrating Screens with Authentication
Moving on to the next screen, the App.js screen, I will import the AuthContext so that it wraps up all the screens in the application. The code is below:
// Add among the imports at the top of the page
import {AuthContextProvider} from './src/context/AuthContext';
Next, within the app component, wrap the screens with the AuthContextProvider like so:
return (
  <SafeAreaView style={styles.container}>
    <StatusBar />
    <AuthContextProvider>
      <NavigationContainer>
      ...
      </NavigationContainer>
      </AuthContextProvider>
  </SafeAreaView>
);
Loading Screen This screen is the entry screen, so when this application is opened, it is the first screen that interacts with it. I will set up a checkpoint to check if there’s a logged-in user and immediately navigate the user to the HomeScreen or LoginScreen if there’s no user data available.
To achieve this, I will use the already defined context and continuously check for a user using the useEffect Hook. The code is below:
// This should be added at the top of the page
import React, { useEffect, useContext } from "react";
import { AuthContext } from "../context/AuthContext";

// Update the LoadingScreen Component Accordingly
function LoadingScreen({ navigation }) {
  const { loading, loggedIn } = useContext(AuthContext);
  useEffect(() => {
    if (loggedIn) {
      navigation.replace("Home");
    } else if (!loggedIn) {
      navigation.replace("Login");
    }
  }, [loggedIn]);
  return (
    <View style={styles.container}>
      {loading && (
        <React.Fragment>
        ...
        </React.Fragment>
      )}
    </View>
  );
Login Screen
In the LoginScreen, when the user clicks the login button, the login function defined in the AuthContext page is fired. When the user is logged in, this page automatically redirects to the HomeScreen, so I will also use the useEffect Hook and the defined context in this screen. The code is below:
// Add this to the top of the page
import React, {useContext, useEffect} from 'react'
import { AuthContext } from "../context/AuthContext";

// Update your login component accordingly
const LoginScreen =({navigation}) => {
  const { loggedIn } = useContext(AuthContext);
  useEffect(() => {
    if (loggedIn) {
      navigation.replace("Home");
    }
  }, [loggedIn]);
  const { login } = useContext(AuthContext);

    return (
      <View style={styles.container}>
        <Text>You are not logged in</Text>
        <TouchableOpacity style={styles.signInButton} onPress={()=>login()}>
            <Text style={styles.signInButtonText}>Log In</Text>
          </TouchableOpacity>
          </View>
    );
  };
Home Screen
Here in the HomeScreen, users only get here after they have been authenticated, and their name and profile pictures are displayed on this screen. Also, there’s a button to log out, and when clicked, the logout function we defined in the AuthContext page is fired, and the user is redirected to the login page. The code is below:
// Add the import statements at the top of the page
import React, {useEffect, useContext} from 'react';
import { View, Text, Image, TouchableOpacity, StyleSheet } from 'react-native';
import { AuthContext } from "../context/AuthContext";
// Update your HomeScreen component accordingly
const HomeScreen =({navigation}) => {
const { userData, loggedIn, logout } = useContext(AuthContext);
useEffect(() => {
if (!loggedIn) {
navigation.replace("Login");
}
}, [loggedIn]);
return (
<View style={styles.container}>
<Text style={styles.title}>Welcome to the HomeScreen</Text>
<Image
style={{ width: 100, height: 100, borderRadius: 50}}
source={{ uri: userData.picture }} />
<Text style={styles.label}>Logged in as {userData.name} </Text>
<TouchableOpacity style={styles.signInButton} onPress={()=>logout()}>
<Text style={styles.signInButtonText}>Sign out</Text>
</TouchableOpacity>
</View>
);
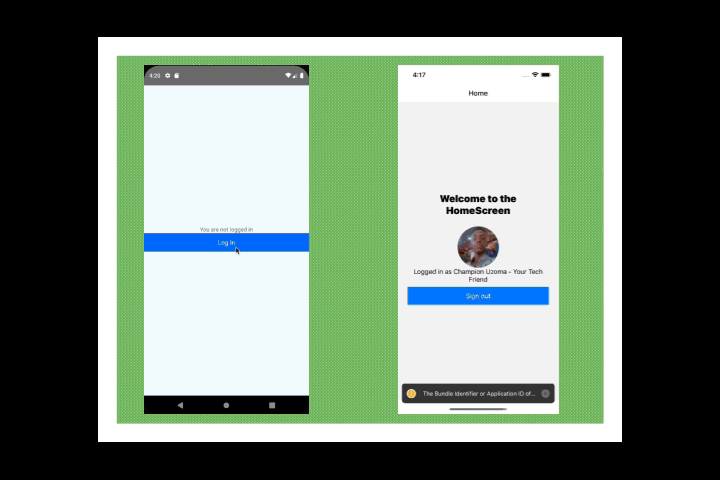
};After setting all this up, social authentication should be working in your project, and you should be able to test it on your Android and iOS Emulators like so:
Conclusion
The message standing out in this tutorial is Social Authentication Made Simple! With Auth0, you can easily integrate several social authentication systems, and if you followed duly, I believe you got the same results as I did. If you want the source code of this tutorial, it’s right on my GitHub repo. Let me know if you have any challenges trying out this project.
Gain Debugging Superpowers
Unleash the power of session replay to reproduce bugs and track user frustrations. Get complete visibility into your frontend with OpenReplay, the most advanced open-source session replay tool for developers.