
Enhancing UI with Staggered Text Animations


User interfaces are, at the core, a presentational unit of web applications as they communicate a web application’s purpose to users, interact with users, and convey site functionalities. As such, there is a drive to make user interfaces simple, intuitive, and functional to drive user conversion rates. Staggered text animations provide extra interest to your page, as this article will show.

Discover how at OpenReplay.com.
Staggered text animations present a method of arranging texts on a web application to best convey the site’s key purpose and features and provide a structure for subheading content. Guiding the user observation means not overwhelming users with a lot of content simultaneously but rather presenting text in sequences in a carefully choreographed manner. This intentional delay, or stagger, in presenting UI elements can significantly impact the user’s perception and interaction. In this article, we’ll delve into the fascinating world of staggered animations, exploring how they enhance the overall user experience and contribute to creating more visually appealing and user-friendly interfaces.
What are staggered animations?
The term staggered animation refers to a technique used in web design and multimedia presentations. In this technique, visual changes to UI elements happen in series, sometimes overlapping, to enhance design capabilities, add a feel of interactivity, and captivate the site audience.
The purpose of staggered animation is to create a dynamic showcase of content in which the user is entranced, and their attention is guided to specific pieces of information, creating a sense of movement or progression that is visually appealing.
With staggered animations on individual elements, words, lines of text, or characters are made possible, and a delay is introduced between the appearance of each element, thereby creating a sequential or otherwise staggered presentation.
Let’s take a look at examples of some staggered animations:
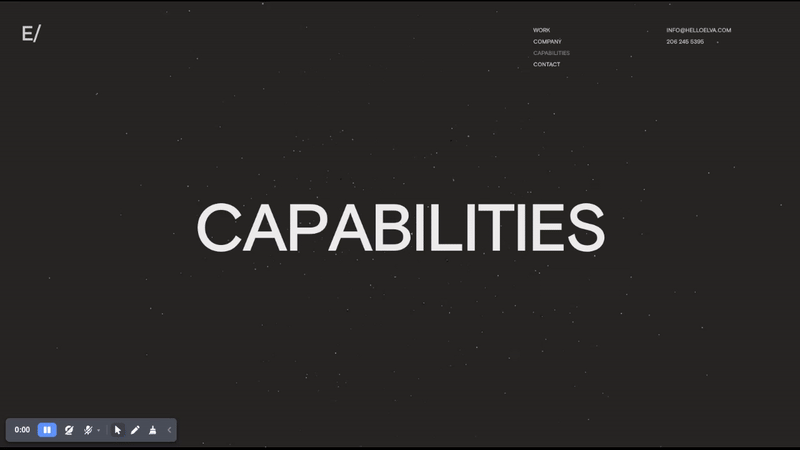
In the GIF above, the site Elva Design Group uses staggered animations to display content on their page. Here the texts, and shapes are animated in a defined order, adding an aesthetic feel to the site.
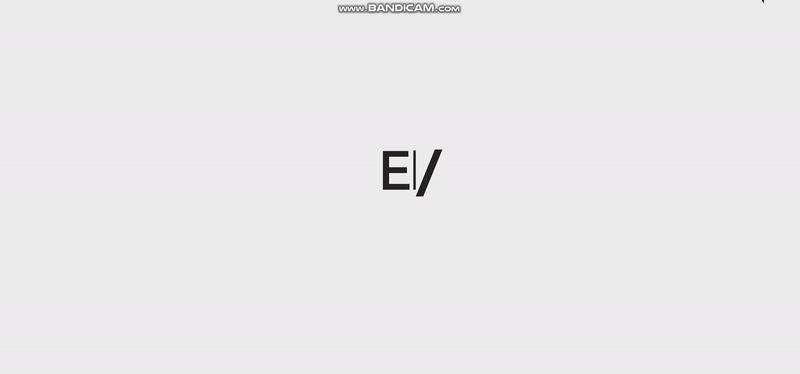
Staggered animations can also be assigned to specific site sections, such as side menus, as illustrated in the GIF below:
What is a staggered text animation?
Staggered text animation refers to a form of staggered animation applied to text elements, which involves an intentional delay between the occurrence of individual characters, words, or lines of text. In this animation, a technique is used to animate text elements sequentially orchestrated, creating dynamic and engaging visual effects and resulting in a gradual or progressive appearance of the text.
Applications and benefits of staggered animations
This section will discuss the benefits of using staggered animations on your web application and areas where its usage is more pronounced.
- More pronounced Call-to-Action (CTA) elements: Staggered animations can draw attention to important elements such as call-to-action buttons or links on a web application, encouraging users to take action and providing better conversions. With staggered animations, these site elements are more easily noticed when they come into the user’s viewport than non-animated CTA elements.
- Intuitive interfaces: Staggered animation can be applied as a core part of user interfaces to layer site content and provide digestible bits of information at their own pace and in manageable chunks.
- User onboarding and tutorials: The user onboarding process and tutorial guide are best presented in measured bits containing simple animations to avoid overwhelming the user with too much information. Instead, an onboarding guide should introduce users step-by-step to key features and functionalities of the web application.
- Data visualization and infographics: These animations are particularly beneficial in the field of data visualization as they can be used to animate data points or chart elements sequentially, helping users focus on specific insights or trends. For instance, in bar charts and line graphs, with the bars appearing in sequence one after the other, the user can be guided along the course of the presentation, getting the desired information from the start of the data analysis to the current state, making complex information more accessible and engaging.
- Visual feedback and micro-interactions: SSite interactivity and visual feedback in response to user actions can be performed with staggered animations and provide an intuitive and responsive web application. Micro-interactions such as user clicks, swiping, tapping, or dragging are made more pronounced when an animation occurs to inform users of the successful completion or error occurrence based on their application and have been statistically proven to provide a positive user experience, a more user-friendly and engaging software product, and encourage users to revisit the application. A more profound use case of this application is in typing games, where visual cues are provided by the interface on what keys to press and feedback on key-down events.
- Brand identity and aesthetics: A site with staggered animation can instill a highly immersive and enjoyable experience in users. Such sites employ a unique presentation approach, embedding themselves in the user’s memory and leveraging their satisfaction and cognitive remembrance to drive their usage and recommendations to a broader audience.
- Site accessibility refers to the methods used to ensure a web application considers the diverse needs of a wide audience. Implementing staggered animations, such as staggered texts, can help enhance readability, retain user attention, and provide visual cues and paced content, making it easy for users of different backgrounds.
- Navigation and Menus: Staggered animations can serve as visual cues or signifiers to convey meaning and context within the interface. For example, animating the expansion of a drop-down menu or the collapse of an accordion panel provides visual feedback that communicates the action’s outcome.
Setting up dev dependencies
In this section, we will set up Framer Motion in an existing web application project. For this installation, I will be making use of Node.js and a command-line interface in my project directory:
# bash commands
npm install framer-motion
Creating staggered text animations
In this section, we will create staggered text animations in a web application using Framer Motions.
Animating text characters
Here, we will apply staggered animation to individual text characters, applying a delay and moving these characters a little at a time.
"use client";
import React from "react";
import { motion } from "framer-motion";
const StaggeredAnimations = () => {
// text to animate
const firstText = "Welcome to Storytelling";
// to easily reuse the animation props
const AnimationProps = {
initial: { opacity: 0, y: 0 },
animate: { opacity: 1, y: 20 },
};
return (
<div>
{/* staggered text animations */}
{/* for screen readers */}
<span className="sr-only">{firstText}</span>
{/* for animation purposes and users */}
{/* use the initial and animate states from AnimateProps */}
<motion.span
arial-hidden="true"
className="text-8xl font-bold text-center"
initial="initial"
animate="animate"
transition={{ staggerChildren: 0.1 }}
>
{/* render words */}
{firstText.split(" ").map((word, index) => (
<React.Fragment key={index}>
{/* split and animate individual text characters */}
{word.split("").map((letter, index) => (
<motion.span
className="inline-block"
key={index}
variants={AnimationProps}
>
{letter}
</motion.span>
))}
{/* add space between words */}
<motion.span
className="inline-block"
key={index}
variants={AnimationProps}
>
</motion.span>
</React.Fragment>
))}
</motion.span>
</div>
);
};
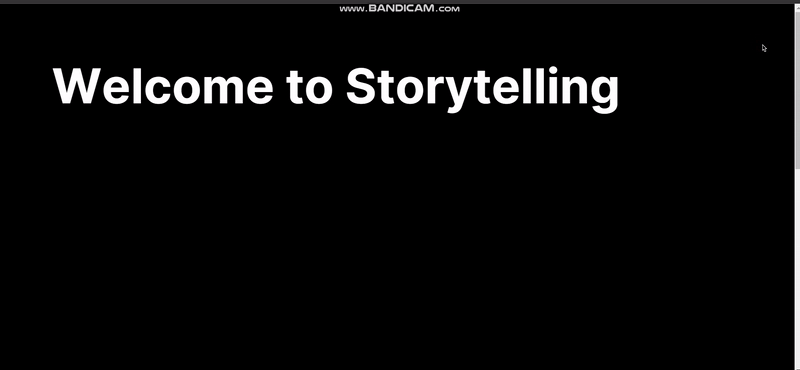
export default StaggeredAnimations;In the code block above, we created a variable firstText with the sentence “Welcome to Storytelling”. In the code above, we will apply a stagger animation which moves every character along the y-axis. The animation uses AnimationProps as a property to specify the initial and final values of the animation. The initial value object specifies that the element starts from a value 0 of opacity and y, to a final value of 1 for opacity and 20 on the y-axis.
In our component, we first created a span element meant for screen readers for accessibility purposes so that they only focus on the entire text with the class sr-only, as the other span with the stagger animation will cause a problem with screen readers. For the animation, we created another span element and added a property arial-hidden as true, to hide it from screen readers.
We used the motion component from Framer Motion and set an initial and animate state for the animation referencing the specified animation behavior in AnimationProps. We created two loops, with the first loop splitting the sentence variable firstText into words and the second loop splitting each word into individual characters. Finally, we set the variants property to use the defined animation properties and added a 0.1s delay between each animated child of the motion.span element, using transition={{ staggerChildren: 0.1 }}. Below is the output of this animation:
Triggering animations on page scroll
By default, animations occur on page load, regardless of whether the elements are in the viewport. To correct this, we will add a ref property to the element and only execute animations when the element is scrolled into view on the browser.
"use client";
import React, { useRef } from "react";
import { motion, useInView } from "framer-motion";
const StaggeredAnimations = () => {
// text to animate
const firstText = "Welcome to Storytelling";
const secondText = "We will love to tell your story";
// to easily reuse the animation props
const AnimationProps = {
initial: { opacity: 0, y: 0 },
animate: { opacity: 1, y: 20 },
};
const ref = useRef(null);
const viewPort = useInView(ref, {
amount: 0.5,
});
return (
<div>
{/* staggered text animations */}
{/* for screen readers */}
{/* First text animation */}
//...
{/* second text */}
<div className="h-screen">
<span className="sr-only">{secondText}</span>
<motion.span
ref={ref}
arial-hidden="true"
className="text-8xl font-bold text-center"
initial="initial"
animate={viewPort ? "animate" : "initial"}
transition={{ staggerChildren: 0.1 }}
>
{secondText.split(" ").map((word, index) => (
<React.Fragment key={index}>
{word.split("").map((letter, index) => (
<motion.span
className="inline-block"
key={index}
variants={AnimationProps}
>
{letter}
</motion.span>
))}
<motion.span
className="inline-block"
key={index}
variants={AnimationProps}
>
</motion.span>
</React.Fragment>
))}
</motion.span>
</div>
</div>
);
};
export default StaggeredAnimations;In the code above, we import useRef from React, and useInView from Framer. We also have the variables firstText and secondText each containing strings. We created a variable viewPort which uses the Framer useInView hook and a ref to determine if half of the element (the specified amount of 0.5 stands for half of the element) has entered the viewport. Using the boolean state of this variable, we set the animate property of the motion component, as such the animation only starts when the element comes into view.
Both animations performed on the secondText and firstText values make use of AnimationProps and change the values of opacity and y, the same as the previous section. Compared to the first animation, the second one only starts when the element is in the viewport due to the referenced ref value and the useInView hook in viewPort which we use as a condition for the animate property. If this value is false, it returns initial which returns the animation to the start values of the animation. When true, the animation is set to the animate property and the animation occurs.

Staggering multiple sentences
In this section, we will apply stagger animations to different sentences in the same section and set their delay property so they appear in sequence rather than all at once within the viewport.
// new sentence variable
const sitedescription = "Storytelling is the social and cultural activity of sharing stories, often with improvisation, theatrics, or embellishment. Stories or narratives have been shared in every culture as a means of entertainment, education, cultural preservation, and instilling moral values. Crucial elements of stories and storytelling include plot, characters, and narrative point of view.";
// animate property and delay for description
const AnimationDescription = {
initial: { opacity: 0, y: 20 },
animate: {
opacity: 1,
y: 0,
transition: {
delay: 3,
type: "spring",
stiffness: 120,
},
},
};
//...
<div className="h-screen">
<span className="sr-only">{firstText}</span>
{/* for animation purposes and users */}
{/* use the initial and animate states from AnimateProps */}
<motion.span
arial-hidden="true"
className="text-8xl font-bold text-center"
initial="initial"
animate="animate"
transition={{ staggerChildren: 0.1 }}
>
{/* render words */}
{firstText.split(" ").map((word, index) => (
<React.Fragment key={index}>
{/* split and animate individual text characters */}
{word.split("").map((letter, index) => (
<motion.span
className="inline-block"
key={index}
variants={AnimationProps}
>
{letter}
</motion.span>
))}
{/* add space between words */}
<motion.span
className="inline-block"
key={index}
variants={AnimationProps}
>
</motion.span>
</React.Fragment>
))}
</motion.span>
{/* site description */}
<motion.p
className="text-left text-xl w-1/2 mt-16"
initial="initial"
animate="animate"
aria-hidden="true"
variants={AnimationDescription}
>
{sitedescription}
</motion.p>
</div>;
{
/* second text */
}
//...Here, we have the firstText animation we created in the previous section, which splits each character of every word and animates its opacity and y-axis value with the property AnimationProps. We created a new variable, sitedescription and animation property AnimationDescription. For this animation, we started by specifying initial values of 0 for opacity and 20 for y, and a final value of 1 for opacity and 0 for y.
Also, we added a delay of 3 seconds and made use the type spring with a stiffness of 120. This makes the animation behave like a spring streching passed its intended position on the y-axis and then returning to the y-axis value of 0. This new animation is attached to the paragraph element and here, the entire text is animated at the same time unlike the first animation where we animate individual letters on the y-axis.

Creating loops with animation control
In this section, we will integrate controls into our animations and also learn how best animation start and end events can be handled.
const controls = useAnimation();
const viewPort = useInView(ref, {
amount: 0.5,
});
useEffect(() => {
let timeout: NodeJS.Timeout;
const showText = () => {
controls.start("animate");
timeout = setTimeout(async () => {
// waut to complete the animation
await controls.start("initial");
// reset the animation
controls.start("animate");
}, 10000);
};
if (viewPort) {
showText();
}
if (!viewPort) {
controls.start("initial");
}
return () => {
clearTimeout(timeout);
};
}, [viewPort]);
//...
<div className="h-screen">
<span className="sr-only">{secondText}</span>
<motion.span
ref={ref}
arial-hidden="true"
className="text-8xl font-bold text-center"
initial="initial"
animate={controls}
variants={{
animate: {
transition: {
staggerChildren: 0.1,
},
},
initial: {},
}}
>
{secondText.split(" ").map((word, index) => (
<React.Fragment key={index}>
{word.split("").map((letter, index) => (
<motion.span
className="inline-block"
key={index}
variants={AnimationProps}
>
{letter}
</motion.span>
))}
<motion.span
className="inline-block"
key={index}
variants={AnimationProps}
>
</motion.span>
</React.Fragment>
))}
</motion.span>
</div>In the code block above, we first created a variable controls which uses the Framer useAnimation() hook. Using this hook we will detect if an element with the ref property has entered the viewport and also added a repeat for the animation using setTimeout. When the element with the ref enters the viewport, we call a function showText(). In this function, we start the animation with controls.start("animate") and run asynchronous function to repeat the animation. The reason for this async function is to ensure that the animation states do not overlap and the animation repeats only after the initial state has been completed.
Everytime there is a change in viewPort, the useEffect hook checks if the element is in view and executes the animation if true. The animation is also set to repeat after a delay of 10 seconds.

Building a landing section with staggered animations
In this section, we will create a landing section and use staggered animation to choreograph the presentation of site content. First, we will create a navigation component, Nav.tsx, and add the following code to it:
"use client";
import { motion } from "framer-motion";
import React from "react";
const Nav = () => {
  return (
    <div className="w-full flex justify-center">
      <motion.div
        className="w-4/5 bg-white text-slate-900 font-medium flex justify-between items-center px-6 py-3 rounded-2xl mt-12"
        initial={{ y: -100 }}
        animate={{ y: 0 }}
        transition={{ duration: 0.5 }}
      >
        <h1>Storytelling</h1>
        <div className="flex space-x-4 items-center">
          <a href="#" className="hover:text-slate-900">
 Home
          </a>
          <a href="#" className="hover:text-slate-900">
 About
          </a>
          <a href="#" className="hover:text-slate-900">
 Services
          </a>
          <a href="#" className="hover:text-slate-900">
 Contact
          </a>
          {/* cta */}
          <button className="bg-slate-900 text-white px-4 py-2 rounded-md">
 Get Started
          </button>
        </div>
      </motion.div>
    </div>
 );
};
export default Nav;
This component uses the Framer motion component to animate the element along the y-axis on page load. Here, we have a div which will serve as a navigation bar, and we are using the motion component to animate this container on the y-axis from an initial value of -100 to 0 using the initial and animate props, and within a duration of 0.5 seconds. We also have four anchor elements and a button for the nav menu.
Next, we will create a call-to-action component for the buttons called CTA.tsx:
"use client";
import React from "react";
import { motion } from "framer-motion";
const Ctas = () => {
  return (
    <div className="flex items-center gap-4 mt-12">
      <motion.button
        className="bg-white text-slate-900 px-4 py-2 rounded-md"
        initial={{ opacity: 0 }}
        animate={{ opacity: 1 }}
        transition={{ duration: 1, delay: 4.3 }}
      >
 Get Started
      </motion.button>
      <motion.button
        className="border-white border text-slat-900 px-4 py-2 rounded-md"
        initial={{ opacity: 0 }}
        animate={{ opacity: 1 }}
        transition={{ duration: 1, delay: 4.8 }}
      >
 Learn More
      </motion.button>
    </div>
 );
};
export default Ctas;
In the code block above, we have two buttons that use the motion component. For both buttons, the opacity values change from an initial opacity of 0 to a final value of 1. The animation runs for a second and starts after a specified delay. We have a specified animation duration and a delay to make the buttons appear one after the other.
In the StaggeredAnimations.tsx component, make the following changes:
"use client";
import React, { useEffect, useRef } from "react";
import { motion, useAnimation, useInView } from "framer-motion";
import Ctas from "./Ctas";
const StaggeredAnimations = () => {
  //... variables and functions
  return (
    <div>
      {/* staggered text animations */}
      {/* for screen readers */}
      <div className="h-full flex flex-col items-center gap-8">
 //...
        <Ctas />
      </div>
    </div>
 );
};
export default StaggeredAnimations;
Here, we have added the call-to-action component Ctas within the StaggeredAnimations component, after the staggered text animations we created at the start of this article, present in the file. This way, the buttons come after the hero texts on the landing section.
Finally, we will return the Nav and StaggeredAnimations.tsx components in the root page of our application:
import Nav from "@/components/Nav";
import StaggeredAnimations from "@/components/StaggeredAnimations";
export default function Home() {
  return (
    <main className="flex flex-col items-center justify-between px-24">
      <Nav />
      <StaggeredAnimations />
    </main>
 );
}
In the code above, we added the Nav and StaggeredAnimations components to a main element tag and added some styles to display the components in a flex-box. Now, if we run the application, we will get the following results:

Conclusion
Hurray, you’ve made it to the end of this article! In this article, we covered the concept of staggered animations, delving into its applications and benefits, and also discussed code approaches to staggered animation in a web application using Framer Motions.
Truly understand users experience
See every user interaction, feel every frustration and track all hesitations with OpenReplay — the open-source digital experience platform. It can be self-hosted in minutes, giving you complete control over your customer data. . Check our GitHub repo and join the thousands of developers in our community..
