Beyond useState: State Management in Next.js using URL Parameters
An alternative way to handle state

With frontend frameworks like React.js and Next.js,
useStateis a popular way to manage application states. However, as apps grow, developers seek more advanced ways to manage states for better user experience, SEO, and optimization, which leads to other options, such as URL parameters. This article explores using URL parameters to manage the state in a Next.js project.

Discover how at OpenReplay.com.
The useState hook is still the most commonly used React hook for managing state in functional components. However, it has limitations, particularly as the application grows and more components require data. This often leads to the practice of passing data from component to component, known as props drilling or using state management libraries. Below are a few limitations:
- Local component scope: useState is designed to manage the state of the defined component. If you need to share a state across multiple components or manage a global state, consider using the
useContexthook fromReactor a state management library likeRedux-toolkit. - Not optimized for SEO: SEO Can be impacted as URL parameters don’t reflect state changes made with useState.
- Consideration for User Experience: In an e-commerce app, not leveraging URL parameters can result in a poor user experience, as users cannot share their preferences with others.
- Prop drilling: If you use useState to manage the global state, you must pass the state and the setter function as props to every component that needs them. This can make your code hard to follow, especially if you have deeply nested components.
To overcome these limitations, you may want to use other state management options, such as the useReducer hook, the useContext hook, or third-party libraries like Redux, and MobX.
Why Use URL Parameters over useState?
To understand why using URL parameters is better than useState, it’s important to understand what URL parameters are.
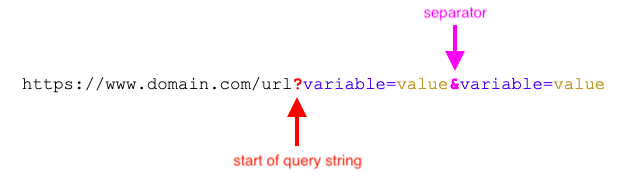
URL parameters are query strings added at the URL’s end using a question mark (?). These parameters are used to enhance the functionality of a webpage with features like search and pagination, increase page SEO, and, most of the time, track marketing campaigns. A URL can have multiple parameters separated using an ampersand (&).
Example of a URL with parameters.
So why then use URL parameter over useState?
URL parameters can be a better choice than useState in certain scenarios, especially when managing application state in a more versatile and shareable way. There are several reasons why you might choose URL parameters over useState:
- Webpage bookmarking: URL parameters allow you to encode state information directly into the URL. This makes it easy for users to bookmark and share a specific page with others.
- Improved state management: In a webpage with search functionality, the search term can be saved for later, even if the user refreshes the browser. This improves the user experience and encourages them to stay on your website.
- Simplified component logic: URL parameters can simplify the logic within individual components. Instead of using useState to handle complex search functionality, you can rely on the URL query parameters.
While useState is powerful for managing local component states, combining it with URL parameters offers a more enhanced approach to state management.
Understanding URL parameter query Patterns
URL parameters consist of two parts, namely a key and value pair. The key serves as a placeholder to identify the parameter name, while the value represents the value that binds to the key. An equal sign separates these two parts (=). A URL can have multiple parameters, and each parameter (key and value) is separated by an ampersand (&). For example: https://www.example.com/search?q=mens+t-shirt&size=3xl&color=white&sort=asc This is a URL that leads to a search route. The search parameter begins with q. To separate multiple search queries, the ampersand (&) is used. In this case, the first parameter key is q, the second is size, the third is color, and the last is sort. These parameters together display what the user wants, including sorting the page.
Common URL Parameter Use Cases
Websites commonly use URL parameters to manage advanced states, such as marketing campaigns and page SEO. There are numerous benefits to using URL parameters.
- Sorting and Filtering: URL parameters are often used on e-commerce and other websites to allow users to sort and filter webpage content to display their desired information.
- Search Queries: Parameters can include user search queries, and the search results can be bookmarked for later use.
- Language translation: URL parameters can be used for language translation queries, allowing users to view webpages on blog or newsletter sites in their preferred language.
- Track marketing campaign: Parameters can include campaign queries; the queries may include referrer IDs used by web servers to identify page click-through rates and the campaign author.
- Page pagination: URL parameters are also used to paginate a webpage search results.
URL parameters are a powerful tool for improving webpage functionality and user experience.
Global State with URL - Pros and Cons
When it comes to managing the state of web applications, using URLs can be beneficial in various ways. It can enhance the user experience, enable tracking of marketing campaigns, and improve page SEO. However, if not used correctly, it can also lead to issues on the webpage. Here are some pros and cons to consider.
Pros
- Bookmarkable and Shareable URLs: Users can bookmark specific URL states of the application or share them with others, enhancing usability and collaboration.
- Deep Linking: Developers can use URL parameters to create dynamic pages that match query strings, improving deep linking of application states.
- Server-Side Rendering (SSR) Compatibility: Using Next.js for projects requiring server-side rendering is ideal, as URL parameters may transmit state data between the server and client.
Cons
- Security concerns: Sensitive information stored in URL parameters may pose significant security risks, as they can be visible to users and potentially tampered with.
- Duplicate content: Misuse of URL parameters can lead to multiple confusing URLs and potentially slow page ranking for SEO engines.
- Complex URL Structures: Complicated query parameters often lead to long, difficult-to-read URLs, discouraging users from clicking and trusting your link, thereby reducing page visits.
Security Considerations
When using URL query parameters, keeping security in mind is crucial. Avoid storing sensitive information, like credit card details, in the parameters. Additionally, don’t display form fields on the URL before sending them to the web server.
Instead, useState manages user preferences like a dark or light theme. Avoid storing item prices or discount codes on the URL, as they can be tampered with.
However, you can store data fetching, page number pagination, tabs, and modal states on the URL to enhance user experience.
How to implement URL Parameters in next.js
Implementing URL query parameters in a Next.js project may seem challenging, but it is quite simple. You will need to have some understanding of the Next.js routing system and how to create a Next.js project. To learn more, check out these two articles.
OpenReplay’s article on Routing and Getting started with Next.js
Setting up a project
In this tutorial, I will demonstrate how to use search and sort query parameters with JSONPlaceholder API. You can either follow my example or integrate it into your existing project.
NOTE: As of the time of writing this article, Next.js version 14 has changed the import for the client component’s useRouter to next/navigation instead of next/router. If you’re using an older version from 12 and below, you can still use import from next/router, but you may find the section slightly different. However, versions 13 and above should not have any issues.
Creating folders
There are various methods to generate query parameters. In this tutorial, I will use a specific route named /search to manage the queries. You can use a different approach if you prefer. Keeping this in mind, let’s look at your application folder’s structure.
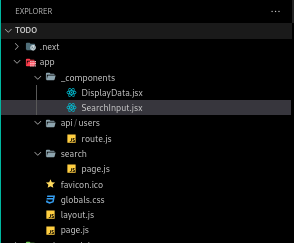
In the image above, the component folder will contain all the reusable components like SearchInput and DisplayData. Next, the api/users folder will handle the data fetching from the placeholder API. Finally, the search folder represents the actual /search route, which will navigate users when searching or sorting on the homepage.
How to fetch data from API in next.js
To retrieve data from the JSONplaceholder API, we will use the routing system in next.js 14. This system suggests putting all API requests into the api folder. To follow this convention, you can create a new file called route.js inside the api/users folder and copy-paste the code snippet below.
import { NextResponse } from "next/server";

async function fetchUsers() {
  const baseUrl = "https://jsonplaceholder.typicode.com/users";
  const response = await fetch(baseUrl);
  const data = await response.json();

  return data;
}

export async function GET(request) {
  const posts = await fetchUsers();

  return NextResponse.json(posts);
}
We import the nextResponse function from Next.js in the following code block. This function enables us to make our return data from JSONPlaceholder API available to the public endpoint.
Then, we define a function called fetchUsers which fetches user data from our API. Once we have the data, we expose it to the public endpoint.
Clear the clutter
To use the API route we created, open the page.js file in the App folder and remove all the boilerplate code. Copy and paste the below code.
"use client";
import { Suspense, useEffect, useState } from "react";

export default function Home() {
  const [data, setData] = useState([]);
  const fetchPosts = async () => {
    const res = await fetch("/api/users");
    const data = await res.json();
    setData(data);
  };

  useEffect(() => {
    fetchPosts();
  }, []);
  return (
    <div className="m-12">
      <SearchSortInput />
      <Suspense fallback={<div>Loading...</div>}>
        <DisplayData data={data} />
      </Suspense>
    </div>
  );
}
As previously discussed, we will display the data on the homepage. If a user searches for that data, We will append their search query to the URL and navigate to the /search route, similar to how Netflix manages its search functionality. To accomplish this, we will create two additional components to handle these functionalities.
Creating components
Create two components. First, a search input component that handles appending the search and sort queries to the URL.
import { useRouter, useSearchParams } from "next/navigation";To begin with, we import our query hooks from next/navigation. The useRouter hook enables us to navigate to any route within our client application. On the other hand, the useSearchParams hook allows us to manipulate the queries from the URL such as get, set, and delete methods.
const SearchSortInput = () => {
  const router = useRouter();
  const searchParams = useSearchParams();
  const query = searchParams?.get("q");
  const sort = searchParams?.get("sort");

  const newParams = URLSearchParams(searchParams.toString());
};
Next, we initialize our hooks, and using the search parameters, we retrieve existing queries from the URL. This allows us to persist any query in our input fields.
return (
  <div className="flex items-center space-x-4 mb-4">
    <button
      onClick={() => router.push("/")}
      className="border border-gray-300 p-2 rounded text-black border-black"
    >
      Home
    </button>

    <form
      className="
        flex items-center space-x-4 mb-4 mx-auto
      "
    >
      <input
        type="text"
        placeholder="Search..."
        name="search"
        key={query || ""}
        defaultValue={query || ""}
        className="border border-gray-300 p-2 rounded text-black border-black"
      />
      <button
        type="submit"
        className="border border-gray-300 p-2 rounded text-black border-black"
      >
        Search
      </button>
      <div className="flex gap-2 items-center">
        <p>Sort by:</p>

        <select
          defaultValue={sort || "default"}
          name="sort"
          onChange={(e) => {
            newParams.set("sort", e.target.value);
            router.push(`/search?${newParams.toString()}`);
          }}
          className="border border-gray-300 p-2 rounded"
        >
          <option value="default">Default</option>
          <option value="title">Name</option>
          <option value="asc">Ascending</option>
          <option value="desc">Descending</option>
          <option value="a-z">A to Z</option>
        </select>
      </div>
    </form>
  </div>
);
In this section, we are creating input fields for the user to type search queries. Instead of using useState to handle the updates of the inputs, we set the defaultValue of the inputs to our existing queries. This way, even if the user navigates away from the page or refreshes it, their queries will still be there. This is one of the benefits of using URL query parameters. To style our input fields, we are using TailwindCSS.
 const handleSubmit = (event) => {
  event.preventDefault();
  const val = event.target;
  const search = val.search;
  const sortBy = val.sort;

  if (search.value) {
    newParams.set("q", search.value);
  } else {
    newParams.delete("q");
  }
  if (sortBy.value) {
    newParams.set("sort", sortBy.value);
  } else {
    newParams.delete("sort");
  }
  router.push(`/search?${newParams.toString()}`);
};
This function is responsible for processing the query logic. We are not using useState to manage our inputs, so we retrieve the values from the form. If the search input has a value, we create a new query with the key q and the value being whatever the user has typed in. If the search input is empty, we remove the query. The same process is repeated for sorting. Finally, we navigate to the /search route and add the queries to the URL.
return (
  <div className="flex items-center space-x-4 mb-4">
    // other codes here...
    <form onSubmit={handleSubmit}>
    // inputs here...
    </form>
  </div>
);

export default SearchSortInput;
To complete the logic for this component, we hook up our handleSubmit function to our form and export it.
Creating the data display component
This data display component will handle the filtering of our data from the JSONPlaceholder API` using the user queries.
"use client";

export default function DisplayData({ data, q, sort }) {}
To begin with, we create a function that accepts data, q, and sort parameters. We include use client at the top to indicate that this is a Next.js client component.
const filteredData = () => {
  let newData = [...data];

  if (q) {
    newData = newData.filter(
      (item) =>
        item.name.toLowerCase().includes(q.toLowerCase()) ||
        item.username.toLowerCase().includes(q.toLowerCase()),
    );
  }

  if (sort) {
    newData.sort((a, b) => {
      if (sort === "name") {
        return a.name.localeCompare(b.name);
      } else if (sort === "a-z") {
        return b.username.localeCompare(a.username);
      } else if (sort === "asc") {
        return a.id - b.id;
      } else if (sort === "desc") {
        return b.id - a.id;
      } else {
        return 0;
      }
    });
  }

  return newData;
};
We then create a filteredData function that utilizes JavaScript’s built-in filter and sort methods to search and sort the data. If there are no search or sort queries, we simply return the complete data.
return (
  <div className="flex flex-col items-center">
    <h1
      className="
        text-4xl font-semibold text-center mb-4 mt-8 mx-auto
      "
    >
      My Feed
    </h1>
    <ul className="grid grid-cols-4 mx-auto max-w-[1260px] gap-10"></ul>
    {filteredData().map((item) => (
      <ul
        key={item.id}
        className="flex border border-gray-300 p-4 rounded w-[600px] mb-4 gap-4"
      >
        <h3 className="text-lg font-semibold mb-2">{item.name}</h3>
        <p className="text-gray-500">Username: {item.username}</p>
        <p className="text-gray-500">Email: {item.email}</p>
      </ul>
    ))}
  </div>
);
Finally, we map through the filtered data and render it.
Creating the search page
This is the page where we display the search results based on user queries. We use the DisplayData component that we created earlier. Open the page.js file inside the search folder and paste the code snippet below.
"use client";
import { useSearchParams } from "next/navigation";
import { Suspense, useEffect, useState } from "react";
import DisplayData from "../_components/DisplayData";
import SearchSortInput from "../_components/SearchInput";

export default function Search() {
  const searchParams = useSearchParams();
  const q = searchParams.get("q");
  const sort = searchParams.get("sort");
  const [data, setData] = useState([]);

  useEffect(() => {
    const fetchData = async () => {
      const searchParams = new URLSearchParams();

      if (q) {
        searchParams.append("q", q);
      }

      if (sort) {
        searchParams.append("sort", sort);
      }
      const response = await fetch(`/api/users`);
      const data = await response.json();

      setData(data);
    };

    fetchData();
  }, [q, sort]);

  return (
    <div className="m-12">
      <SearchSortInput />
      {q && (
        <h3 className="text-2xl font-bold mb-4">Search results for: {q}</h3>
      )}
      {sort && <p className="text-[14px] mb-4">Sorted by: {sort}</p>}
      <Suspense fallback={<div>Loading...</div>} key={q}>
        <DisplayData data={data} sort={sort} q={q} />
      </Suspense>
    </div>
  );
}
In the following code snippet, we utilize the searchParams function to extract user queries from the URL. After that, we use the useEffect function to ensure that we fetch our data from the API route only when the page has fully loaded.
To display the search results, we import the DisplayData component and pass it in our props. We use the Suspense function from React to display a loading message while our data is still loading.
Finally, to wrap up our URL query implementation in Next.js. Open the page.js file inside the App folder and paste the code snippet below.
"use client";
import { Suspense, useEffect, useState } from "react";
import DisplayData from "./_components/DisplayData";
import SearchSortInput from "./_components/SearchInput";

export default function Home() {
  const [data, setData] = useState([]);
  const fetchPosts = async () => {
    const res = await fetch("/api/users");
    const data = await res.json();
    setData(data);
  };

  useEffect(() => {
    fetchPosts();
  }, []);
  return (
    <div className="m-12">
      <SearchSortInput />
      <Suspense fallback={<div>Loading...</div>}>
        <DisplayData data={data} />
      </Suspense>
    </div>
  );
}
In this file, our main task is to retrieve data from our API route. As this is the homepage, we display our search inputs and the DisplayData component. We are only rendering the components here, while the search and sort logic is implemented on the /search page, which is dedicated to it.
Testing our application
To test our application, open the terminal in Vscode or your terminal of choice, then start the application by running:
npm run dev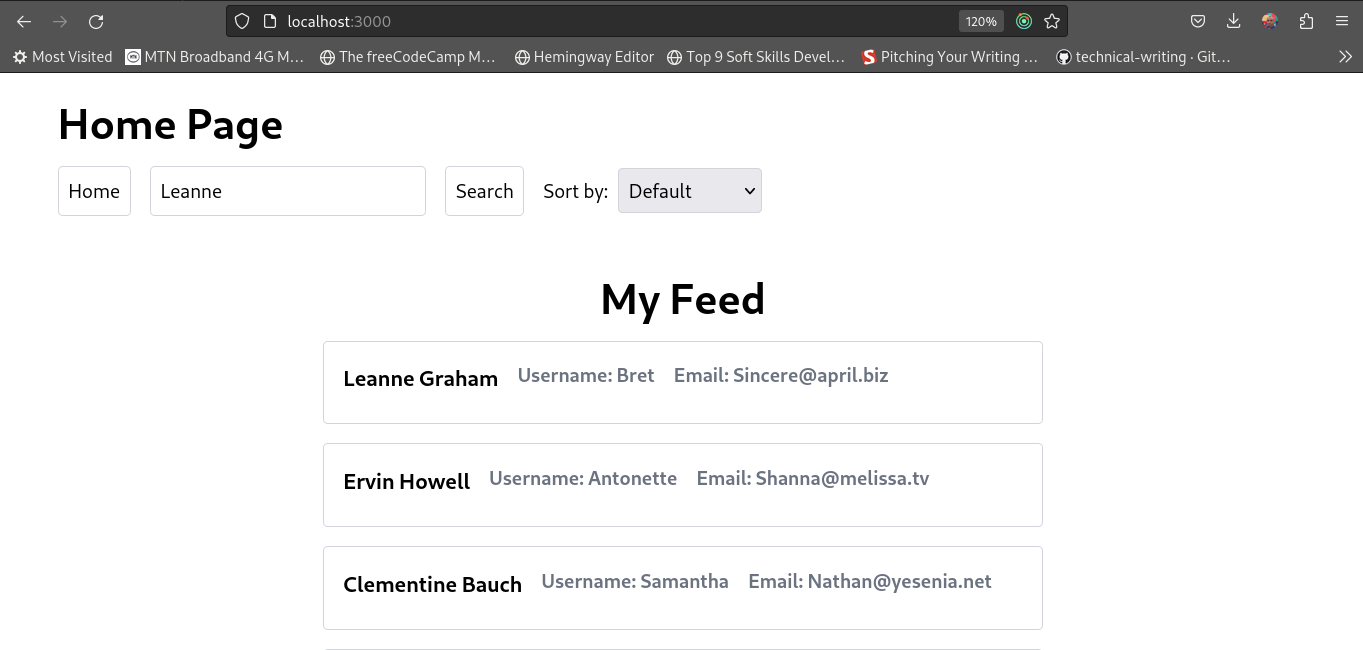
The above image describes what we have just implemented. From this home page, when a user searches or sorts the data, we navigate them to the /search page and perform the filtering.
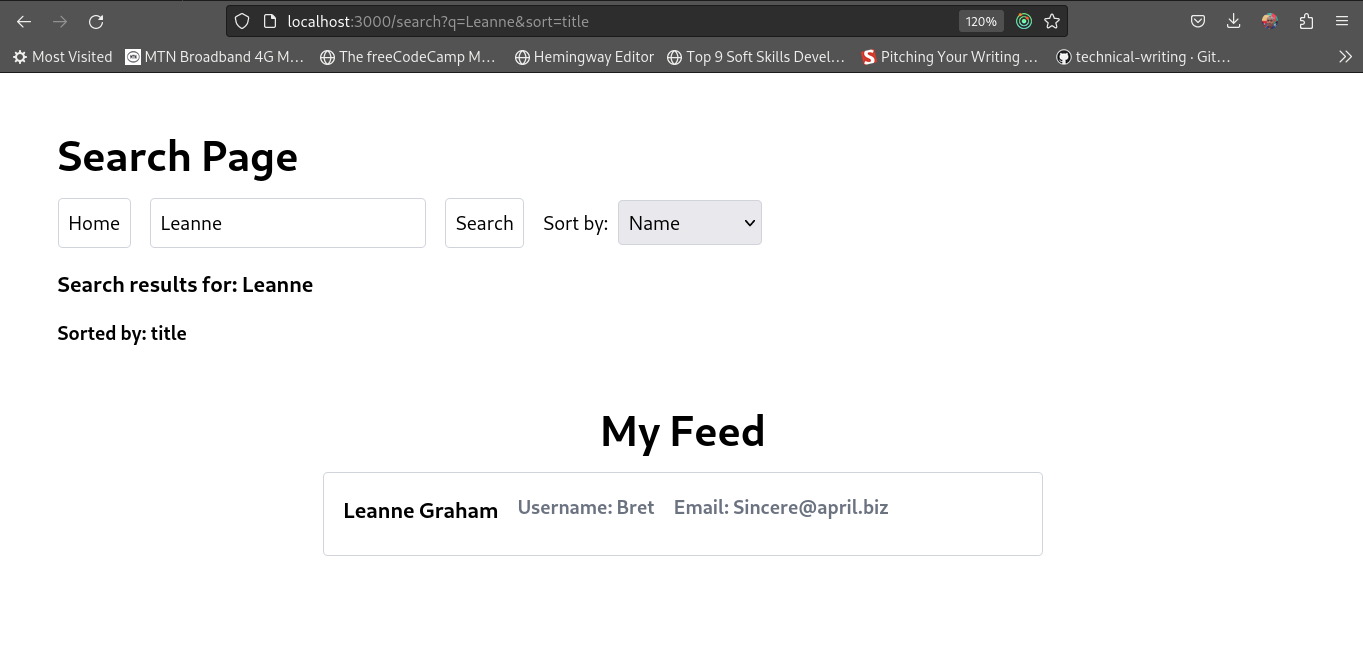
In this search page, queries from the homepage are automatically used to perform the searching or sorting. Additionally, the user can perform new searches or sorts in this search page and instantly see the results without refreshing the page.
Handling edge cases in query parameters
When using query parameters in your application, it is always advisable to handle edge cases, including validating the incoming query parameters to make sure they are safe. Here are some edge cases to consider:
- Undefined or Null values: It’s important to always provide a fallback value for query parameters that are null or undefined. This ensures that your application does not throw errors.
- Unexpected values: In order to validate a user in your application using authentication tokens, it is important to sanitize URL query parameters to ensure they are valid.
- Type Checking: Make sure to validate query parameters against expected types and convert or parse values if necessary. For example, when managing page pagination, always check and parse incoming queries into numbers.
- Security Consideration: Use regular expressions to remove any special characters in query parameters. This ensures users don’t manipulate the query parameters in your application.
By addressing these edge cases, you can enhance the security of your application when working with query parameters in URLs.
Conclusion
URL query parameters are a powerful tool that can significantly improve website performance and enhance user experience. It’s great to see that many developers are now using query parameters in their codebase while building real-world applications. Big companies like Amazon and Netflix web apps already leverage the query parameters tool.
In this article, we have learned about the importance of URL query parameters and how to implement them in a Next.js project. That’s all for now. Thank you for reading until the end.
You can get the full code here, and happy coding!
Gain Debugging Superpowers
Unleash the power of session replay to reproduce bugs, track slowdowns and uncover frustrations in your app. Get complete visibility into your frontend with OpenReplay — the most advanced open-source session replay tool for developers.
Star on GitHub12k

