
As an application’s complexity increases, data owned by a component must be accessed by other components on the tree. Prop drilling: passing data from the parent to the last child node solves this problem, but you must manually lift the state up and then pass it down the hierarchy. This makes the code unclear and creates a solid hindrance to scalability. Developers and the industry had to give complex state management libraries like Redux a chance.
Redux ticks all the boxes regarding scalability, efficiency, and performance, but it requires a lot of boilerplate code and is just overkill for small projects. As a result, it provided room for small and minimal state management libraries such as the Context API, Xstate, Recoil, and Jōtai, to mention a few.
Jōtai distinguishes itself from the competition by offering a linear API and having the smallest bundle size. It is a Recoil-inspired state management library developed by Paul Henschel and released in 2021. With its minimalistic nature, it has grown and made its way to be among top state management libraries
This guide will give you a comprehensive look at the Jōtai Library and prepare you to use it in your next project.
How Jōtai works
Jōtai is an atomic state management library. Unlike Redux and Zustand, where data is stored in global storage outside the tree. In it, data is stored in the tree in special containers called atoms.
Imagine an atom as React useState that can be accessed from anywhere in the application with a hook; the useAtom hook.
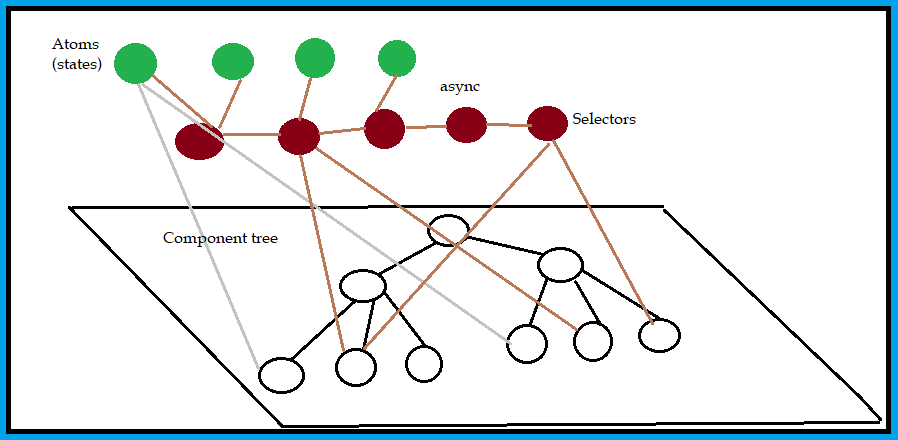
Jōtai approaches state management from the bottom up, storing data in small, independent states that combine to form a more complex state. Atoms are updateable, and when they are changed, all the other states linked to them also change. This reduces re-rendering because changes occur only in states that require them. Additionally, you will not have to create a large number of providers, as in the case of the React Context API. Derived states are selectors similar to Redux’s useReducer. They help by giving you access to a particular state anywhere in the application and manipulating it to your preference.
Building an app using Jōtai
To better understand Jōtai, let’s build a Todo app where you will learn how to create, update, and delete states. Tasks you want to complete, such as reading a book or taking a walk, are states or data in a To-Do app. You shall be able to create a React app where you can add tasks, update them, and delete them.
Instalation
Create a folder called “jotai,” navigate to it via the terminal, and type the below command to create a React app.
npx create-react-app todo_appStart up your favorite code editor and open the jotai folder, then type the below command on the terminal.
cd todo_appNow that we are in our app, let’s install Jōtai via the below command.
npm install jotaior
yarn add jotaior
pnpm install jotaiCreating Atoms
Now, let’s create an atom. First, you must wrap the application with the Provider component. The provider component contains the store that helps provide atom value to the entire application; it also helps declare the initial state of an atom. You import the provider component through the code below.
import { Provider } from "jotai";Now wrap the application in index.js with the provider, as shown below.
// index.jsx or index.tsx
import React from "react";
import ReactDOM from "react-dom";
import { App } from "./App";
import { Provider } from "jotai"; //importing Provider

ReactDOM.render(
  <React.StrictMode>
    <Provider>
      <App />
    </Provider>
  </React.StrictMode>,
  document.getElementById("root")
);
Atom
Atoms in Jōtai are units of state that hold a particular value or data. To create one, you will import it as shown below.
import { atom } from "jotai";Now, you can allocate value to the atom, as shown below.
const age = atom(25);To use the atom, Jōtai comes with the useAtom hook, which is very similar to useState as it also returns two arguments. Let’s see how it works.
import { atom, useAtom } from "jotai";

const ageAtom = atom(25);
export const App = () => {
  const [age, setAge] = useAtom(ageAtom);

  return (
    <div>
      <h1> the age is {age}</h1>
    </div>
  );
};
The setAge variable can be used to change the age value. Let’s increment the age with the setAge.
import { atom, useAtom } from "jotai";
import { atom, useAtom } from "jotai";

const ageAtom = atom(25);
export const App = () => {
  //using the atom
  const [age, setAge] = useAtom(ageAtom);

  return (
    <div>
      <h1> the age is {age}</h1>
      <Button onClick={() => setAge((original) => original + 1)}>click</Button>
    </div>
  );
};
By clicking the button, you will be incrementing the age by 1.

Adding todos
You’ve seen how simple it is to work with jotai’s atoms. Let’s work on our to-do app now. Create a components folder in the src folder first. This is where all user interface files should be kept.
On the components folder, create a file called TodoAdd.js which shall contain an input and a button as shown below.
function TodoAdd() {
  return (
    <div>
      <input style={input} placeholder="New todo" />
      <button style={button}>Add Todo</button>
    </div>
  );
}
export default TodoAdd;
Having created the todoadd component, let’s check if it perfectly adds tasks by creating a component that will display all our to-dos. On the component folder, create another JS file called TodoList and have the below code on it.
const TodoList = () => {
  return (
    <>
      {todos.map((todo) => (
        <div key={todo.id}>
          <input style={checkbox} type="checkbox" />
          <input style={input} value={todo.text} />
          <button style={del}>Delete</button>
        </div>
      ))}
    </>
  );
};
export default TodoList;
The above code will loop through all our to-dos and display them one by one on the browser. Now, for our todosAtom to be accessible from other files, we will put them in a separate file. On the src file, create a file called TodoStore.js. and create todos atoms as shown below.
import { atom } from "jotai";
//create todos atom which is an empty arr
export const todoAtom = atom([]);
Remember to export it since we will be using it in other files. After creating it, launch “TodoAdd.js” to handle data input and push data to our atom. This is how your TodoAdd.js file will look after you add it:
import { useState } from "react";
import { TodosAtom } from "../TodoStore.js"; //import TodoAtom from store
import { useAtom } from "jotai";
import { v4 } from "uuid"; //library to generate unique id
const TodoAdd = () => {
//state to store the input value
const [value, setValue] = useState("");
const [, setTodos] = useAtom(TodosAtom);
//you  can avoid the first unused parameter with a comma

//Function to handle change
const onChange = (event) => {
  setValue(event.target.value);
};
//function to handle adding todos by clicking the add button
const handleAdd = () => {
  if (value) {
    setTodos((prevTodos) => [
      ...prevTodos,
      {
        id: v4(),
        text: value,
        done: false,
      },
    ]);
    setValue(""); //after clicking it set input back to empty
  }
};
return (
  <div>
    <input placeholder="New todo" value={value} onChange={onChange} />
    <button onClick={handleAdd}>Add Todo</button>
  </div>
);
};
export default TodoAdd;
When a user clicks the “Add Todo” button, the handleadd function is invoked, checking to see if the input contains any values. If values are present, they are pushed to the todoAtom.
Once the item has been successfully added to the list, the setValue function returns the input to empty.
Now let’s go to the todoList file so we can display our to-dos once we add them.
On the todoList, import the todosAtoms and the useAtoms as shown below.
import {useAtom} from 'jotai';

import {todosAtoms} from "../TodoStore.js"
Now we can define our to-dos using the useAtom hook, as shown below.
const [todos, setTodos] = useAtoms(todosAtom);Your final TodoList.js will look like this:
import { useAtom } from "jotai";
import { TodosAtom } from "../TodoStore";
const TodoList = () => {
  const [todos, setTodos] = useAtom(TodosAtom);

  return (
    <>
      {todos.map((todo) => (
        <div key={todo.id}>
          <input type="checkbox" checked={todo.isdone} />
          <input value={todo.text} />
          <button>Delete</button>
        </div>
      ))}
    </>
  );
};

export default TodoList;
feel free to style it to your preference.
Very easy, right? You can create as many todos as you want, which will be displayed on the browser.
Session Replay for Developers
Uncover frustrations, understand bugs and fix slowdowns like never before with OpenReplay — an open-source session replay tool for developers. Self-host it in minutes, and have complete control over your customer data. Check our GitHub repo and join the thousands of developers in our community.
Update Todos
Before we update, let’s bring all the business logic into TodoList.js. For that, let’s loop through our to-dos in app.js and give a single task as a prop. The final code for app.js will look as shown below.
import "./App.css";

---

import TodoAdd from "./Components/TodoAdd"; //importing todoAdd component
import { useAtom } from "jotai";
import TodoList from "./Components/TodoList"; //importing todolist component
import { TodosAtom } from "./TodoStore.js"; //importing our list of todos

const App = () => {
  const [todos] = useAtom(TodosAtom); //using our TodosAtom component

  return (
    //looping through our todos and giving one task as a props to TodoList.js
    <div className="App">
      {todos.map((duty) => (
        <TodoList key={duty.id} task={duty} />
      ))}

      <TodoAdd />
    </div>
  );
};

export default App;
As you have seen, we are now importing our TodosAtom from the store into the app.js file. We use our atom through the useAtom hook to get the data stored in our atom, then loop through our to-dos and pass a single task as a prop to the Todolist component.
Here is the final code for TodoList.js
//TodoList.js
import { useAtom } from "jotai";
import { TodosAtom } from "../TodoStore";

export const TodoList = ({ task }) => {
  const [todoList, setTodoList] = useAtom(TodosAtom);
  const index = todoList.findIndex((listTasks) => listTasks === task);
  //function to update task
  const updateTask = (e) => {
    const newTodiList = updateItemAtIndex(todoList, index, {
      ...task,
      text: e.target.value,
    });

    setTodoList(newTodoList);
  };
  //function to mark completion of task
  const toggleDone = () => {
    const newTodoList = updateTask(todoList, index, {
      ...task,
      isdone: !task.isdone,
    });


    setTodoList(newTodoList);
  };
  //function to remove a task
  const deleteItem = () => {
    const newTodoList = removeItemAtIndex(todoList, index);

    setTodoList(newTodoList);
  };

  return (
    //jsx
    <div>
      <input
        type="text"
        style={checkbox}
        value={task.text}
        onChange={updateTask}
      />
      <input
        type="checkbox"
        checked={task.isdone}
        onChange={toggleDone}
        style={input}
      />
      <button style={del} onClick={deleteItem}>
        delete
      </button>
    </div>
  );
};
//function to add and element in  an array
const updateItemAtIndex = (arr, index, newValue) => {
  return [...arr.slice(0, index), newValue, ...arr.slice(index + 1)];
};
//function to remove an element from an array
const removeItemAtIndex = (arr, index) => {
  return [...arr.slice(0, index), ...arr.slice(index + 1)];
};
export default Todolist;
For the update, you must have noticed we are receiving a single task as a prop from app.js. Then look for the same task we want to update in our todoList, which is an array atom. We can achieve this through the findIndex() function. This function will return the index of the task in the TodosAtom array.
check out:
const index = todoList.findIndex((listItem) => listItem === task);Once we have it, the updateItemAtIndex will find the elements and update them to new values.
const updateItemAtIndex = (arr, index, newValue) => {
 return [...arr.slice(0, index), newValue, ...arr.slice(index + 1)];
};
The function takes an array, an index, and new values as arguments. First, we spread out the array from the first index to the index we want to update, then we put in our updated values and spread out the rest of the array. The updateTask will now be called whenever we perform an onChange event.
const updateTask = (e) => {
  const newTodoList= updateItemAtIndex(todoList, index, {
    ...task,
    text: e.target.value,
  });

  setTodos(newTodoList);
};
Furthermore, using the toggledone function, we can update whether or not a specific task has been completed by changing the done element to either true or false via the checkbox. Here is the function:
  const toggleDone = () => {
    const newTodoList = updateTask(todoList, index, {
      ...task,
      isdone: !task.isdone,
    });


    setTodoList(newTodoList);
  };
Remove Todos
For removing a particular task from the list of to-dos, we have implemented the below function:
const removeItemAtIndex = (arr, index) => {
  return [...arr.slice(0, index), ...arr.slice(index + 1)];
};
The above function takes an array and an index as parameters, spreads the array from the start to the index, then spreads the rest of the array.
const deleteItem = () => {
  const newTodoList = removeItemAtIndex(todoList, index);

  setTodoList(newTodoList);
};
We use the function in the above deleteItem function and then pass to it our todolist array. After removing the task from the list, it returns a newly updated list of tasks.
Derived atoms
This type of atom is one that can be created from another atom. We use the get function to specify the atom we want to use, then manipulate it to create our new atom.
const num1 = atom(1);
const num2 = atom(2);
const num2 = atom(3);

const sum = atom((get) => get(num1) + get(num2) + get(num3));
In the above function, the sum atom will be the sum of all the “num” atoms. The sum atom is called a read-only atom, but we can create a read-and-write atom; check out the below code.
//read-write derived atom
const countAtom = atom(0);
const decrementCountAtom = atom(
  (get) => get(countAtom), //specify the atom
  (get, set, _arg) => set(countAtom, get(countAtom) - 1) //the set function change function operation
);

const Counter = () => {
  const [count, decrement] = useAtom(decrementCountAtom);
  return (
    <h1>
      {count}
      <button onClick={decrement}>Decrement</button>
    </h1>
  );
};
For the above function in the decrementCountAtom atom, we are giving two parameters, one of which is this:
(get) => get(countAtom);Here we specify the decrementContAtom will be a derived atom from the countAtom.
Hence, its first return will be the current value of the countAtom. The second parameter is shown below.
(get, set, _arg) => set(countAtom, get(countAtom) - 1);This function specifies that the second return of the decrementContAtom will be a function that gets the count atom and subtracts one from it. The set function is used to make the changes. Hence, when we use the decrementContAtom atom, we extract the count and decrement from it, as shown below.
const [count, decrement] = useAtom(decrementCountAtom);Async Atoms
One important feature that is packaged by a large number of state management libraries is the asynchronous feature. On various occasions, you might need an atom to be asynchronous, which means the program can wait for a particular task to finish before starting another. A good example is when fetching data from a server. Here is a small snippet.
const countObject = atom(ri
  (get) => get(countAtom),
  async (_get, set, url) => {
    const response = await fetch(url); //fetch a given url
    set(countAtom, (await response.json()).parse().length); //cont number of objects
  }
);

function Counter() {
  const [count, findLength] = useAtom(countObject);
  return (
    <button onClick={() => findLength("http://openreplay.com")}>length</button>
  );
}
We have created a function that fetches JSON from the server, parses it into an object, and counts its length. We must wait for the fetch and count operations to complete before proceeding with the execution. Finally, when you use the counter component, we must wrap it with a suspense component for it to run.
<Suspense fallback={<Text>Loading...<Text>}>
  <Controls />
</Suspense>
The fallback is what you want to be shown while tasks are suspended.
Conclusion
The Jōtai Atomic approach to state management is newer than Redux and Zustand, but it has been well-received by the developer community. Jōtai has proven reliable in small to large-size projects, and it’s without a doubt that it is an equal competitor to any state management library out there.
Resources
A TIP FROM THE EDITOR: For other alternatives to Redux, consider Zustand: simple, modern state management for React and A Deep Dive Into Rematch — State Management For React.
Gain Debugging Superpowers
Unleash the power of session replay to reproduce bugs and track user frustrations. Get complete visibility into your frontend with OpenReplay, the most advanced open-source session replay tool for developers.