Step by step: Toggling Elements using React Hooks
Several ways to toggle elements in React


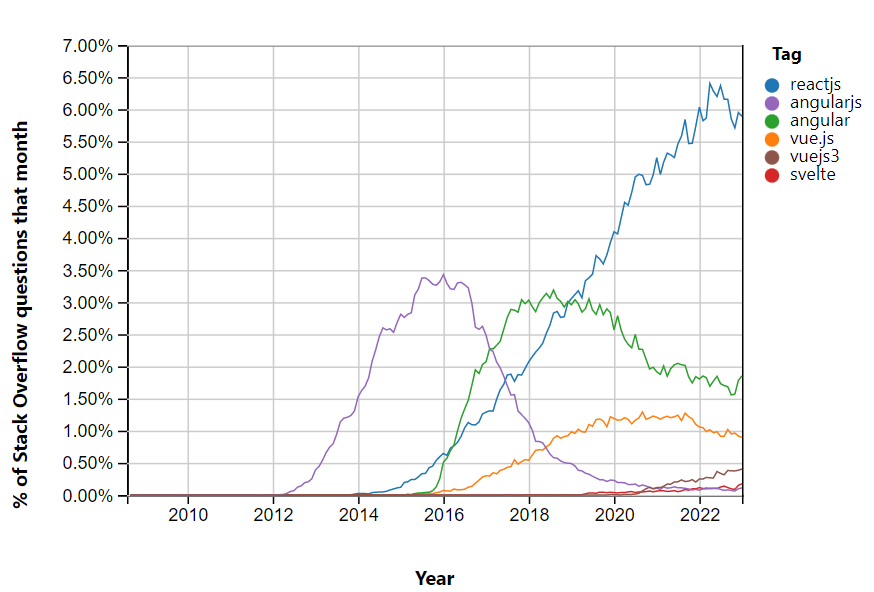
React has emerged as the most popular front-end library for creating dynamic user interfaces for web applications. The ability to toggle elements, such as dropdown menus and side panels, is an essential feature of modern web design. Below is the Stack Overflow Trends data, which shows that React.js is a popular front-end library, and the most frequently asked questions on the platform are related to React.js.
In version 16.8, React hooks were introduced, which allow developers to use state and other advanced features in functional components without writing classes. This results in simpler, more reusable code that is much easier to maintain and scale. This article explores different ways to implement toggle functionality in React, using hooks to streamline code and enhance user experience.
Install and setup the React Project
To work with React, you must set up a development environment on your computer. This section covers the installation and configuration steps for a new React project.
-
Step 1: Install Node.js: To install Node.js, visit the official Node.js website (https://nodejs.org) and download the version for your operating system. It’s recommended to choose the ‘Recommended For Most Users’ version. Once the installation is complete, create a new folder, open it, and launch the command prompt in that folder. Then, follow the steps below.
-
Step 2: Create a new React project: You can easily create a new React project using the
create-react-appcommand-line tool. This tool sets up the project with all the required files and configurations. Open a terminal window and run this command, after which a new directory with the specified name (e.g., my-app) will be created, containing all the necessary files and folders for your React project.
npx create-react-app my-app- Step 3: Navigate to the code editor: Running the command below in your terminal will open your my-app in the code editor. This is where we can start implementing the different methods for toggling an element.
cd my-app
code .
Toggle an Element Using Logical Operators
We must add Bootstrap to our project to make our toggle button more interactive. Go to the Bootstrap website and copy the CSS link.
Open the index.html file in your React project’s public folder. Paste the stylesheet link in the head section, and it should look something like this:
<!DOCTYPE html>
<html lang="en">
  <head>
    <meta charset="utf-8" />
    <link rel="icon" href="%PUBLIC_URL%/favicon.ico" />
    <meta name="viewport" content="width=device-width, initial-scale=1" />
    <meta name="theme-color" content="#000000" />
    <meta
      name="description"
      content="Web site created using create-react-app"
      />
    <link rel="apple-touch-icon" href="%PUBLIC_URL%/logo192.png" />
    <link rel="manifest" href="%PUBLIC_URL%/manifest.json" />
    <!-- Bootstrap -->
    <link
      href="https://cdn.jsdelivr.net/npm/bootstrap@5.0.2/dist/css/bootstrap.min.css"
      rel="stylesheet"
      integrity="sha384-EVSTQN3/azprG1Anm3QDgpJLIm9Nao0Yz1ztcQTwFspd3yD65VohhpuuCOmLASjC"
      crossorigin="anonymous"
      />
    <title>React App</title>
  </head>
  <body>
    <noscript>You need to enable JavaScript to run this app.</noscript>
    <div id="root"></div>
  </body>
</html>
Next, create a new folder called ‘toggle_methods’ inside the ‘src’ directory. Then, create a new JavaScript file called ‘logical_not’ inside the ‘toggle_methods’ folder.
To implement the logical NOT operator method, use the following code:
logical_not.js:
import React, { useState } from "react";

const LogicalNot = () => {
  const [toggle, setToggle] = useState(true);

  return (
    <>
      <button
        onClick={() => setToggle(!toggle)}
        className="btn btn-danger mb-5"
      >
        Toggle State
      </button>

      {toggle && (
        <ul className="list-group">
          <li className="list-group-item">Item 1</li>
          <li className="list-group-item">Item 2</li>
          <li className="list-group-item">Item 3</li>
          <li className="list-group-item">Item 4</li>
          <li className="list-group-item">Item 5</li>
        </ul>
      )}
    </>
  );
};
Let’s see what we are doing in the code?
- Import React and the
useStatehook from the React library. - Define a functional component named
LogicalNot. - The state variable
toggleis defined using theuseStatehook and initialized to true, which means the list of items will be displayed initially. - When the button is clicked, the
setTogglefunction is called with the opposite value of the toggle state. - If the toggle state is true, the list of items will be displayed; otherwise, it will not be displayed.
To see the output, go to the App.js file in the src folder and add the following code.
App.js:
import './App.css';
import LogicalNot from './toggle_methods/logical_not';

function App() {
  return (
    <div className="App mt-5">
      <LogicalNot />
    </div>
  );
}

export default App;
Open the terminal and type npm start to run the code.
Output:

Toggle an Element Using the useToggle Hook
Create a new file called toggle_hook.js inside the toggle_methods folder.
Let’s see what we are doing in the code?
- Create a component called ToggleHook.
- Create a custom hook named useToggle that uses
useStateto create a state variable called state and a function called setState to update the state. - Define a toggle function to change the value of the state.
- Call useToggle with no arguments and store the returned values in isToggled and toggle.
- When the button is clicked, the toggle function will be called. If isToggled is true, the list of items will be displayed; otherwise, it will not be displayed.
toggle_hook.js:
import React, { useState } from "react";

const ToggleHook = () => {
  const useToggle = () => {
    const [state, setState] = useState(true);
    const toggle = () => {
      setState(!state);
    };
    return [state, toggle];
  };

  const [isToggled, toggle] = useToggle();

  return (
    <div>
      <button onClick={toggle} class="btn btn-warning mb-5">
        Toggle State
      </button>

      {isToggled && (
        <ul className="list-group">
          <li className="list-group-item">Item 1</li>
          <li className="list-group-item">Item 2</li>
          <li className="list-group-item">Item 3</li>
          <li className="list-group-item">Item 4</li>
          <li className="list-group-item">Item 5</li>
        </ul>
      )}
    </div>
  );
};

export default ToggleHook;App.js:
import "./App.css";
import ToggleHook from "./toggle_methods/toggle_hook";

function App() {
  return (
    <div className="App mt-5">
      <ToggleHook />
    </div>
  );
}

export default App;
Output:
Toggle an Element Using the Ternary Operator
A ternary operator is a shorthand way to write an if-else statement in a single line of code. It takes three operands:
- A condition that evaluates to either true or false.
- A question mark (?) specifies the expression to evaluate if the condition is true.
- A colon (:), which is used to specify the expression to evaluate if the condition is false.
Create a new file called ternary_operator.js inside the toggle_methods folder.
ternary_operator.js:
import React, { useState } from "react";

const Ternary = () => {
  const [toggle, setToggle] = useState(true);

  const handleClick = () => {
    setToggle(!toggle);
  };

  return (
    <div>
      <button onClick={handleClick} className="btn btn-secondary mb-5">
        Toggle State
      </button>

      {toggle ? (
        <ul className="list-group">
          <li className="list-group-item">Item 1</li>
          <li className="list-group-item">Item 2</li>
          <li className="list-group-item">Item 3</li>
          <li className="list-group-item">Item 4</li>
          <li className="list-group-item">Item 5</li>
        </ul>
      ) : (
        <></>
      )}
    </div>
  );
};

export default Ternary;App.js:
import './App.css';
import Ternary from './toggle_methods/ternary_operator';

function App() {
  return (
    <div className="App mt-5">
      <Ternary />
    </div>
  );
}

export default App;
Let’s see what we are doing in the ternary_operator.js code?
- We create a component called Ternary and use the
useStatehook to create a toggle state and a function to toggle it. By default, the toggle state is true. - To handle user clicks on a button, we define a function called handleClick that toggles the toggle state.
- The button element has an
onClickevent handler that calls the handleClick function when clicked. - We use a ternary operator to render a list based on the toggle state conditionally. If the toggle state is true, we display the list. If it’s false, we show nothing.
Output:
Session Replay for Developers
Uncover frustrations, understand bugs and fix slowdowns like never before with OpenReplay — an open-source session replay tool for developers. Self-host it in minutes, and have complete control over your customer data. Check our GitHub repo and join the thousands of developers in our community.
Toggle an Element Using the If/Else Statement
Create a new file called if_else.js inside the toggle_methods folder.
In our code:
- We create a functional component called IfElse that uses the
useStatehook to create a toggle state and a function to toggle it. The initial state is true. - We also defined a handleClick function that toggles the toggle state using the setToggle function.
- Using an if-else statement, we show a list if the toggle state is true, and nothing if it’s false.
if_else.js:
import React, { useState } from "react";

const IfElse = () => {
  const [toggle, setToggle] = useState(true);

  const handleClick = () => {
    setToggle(!toggle);
  };
  if (toggle) {
    return (
      <div>
        <button onClick={handleClick} class="btn btn-success mb-5">
          If-Else
        </button>
        <ul className="list-group">
          <li className="list-group-item">Item 1</li>
          <li className="list-group-item">Item 2</li>
          <li className="list-group-item">Item 3</li>
          <li className="list-group-item">Item 4</li>
          <li className="list-group-item">Item 5</li>
        </ul>
      </div>
    );
  } else {
    return (
      <button onClick={handleClick} class="btn btn-success mb-5">
        If-Else
      </button>
    );
  }
};

export default IfElse;App.js:
import './App.css';
import IfElse from './toggle_methods/if_else';

function App() {
  return (
    <div className="App mt-5">
      <IfElse />
    </div>
  );
}

export default App;
Output:
Toggle an Element Using CSS Conditional Styling
The code below is similar to the previous examples. It uses the style attribute to set the display CSS property of a list.
style={{ display: toggle ? "block" : "none" }}If the toggle is true, the list is displayed by setting the display property to block. If the toggle is false, the list is hidden by setting the display property to none.
css_styling.js:
import React, { useState } from "react";

const cssStyle = () => {
  const [toggle, setToggle] = useState(true);

  const handleClick = () => {
    setToggle(!toggle);
  };
  return (
    <div>
      <button onClick={handleClick} class="btn btn-info mb-5">
        Toggle State
      </button>

      <ul class="list-group" style={{ display: toggle ? "block" : "none" }}>
        <li className="list-group-item">Item 1</li>
        <li className="list-group-item">Item 2</li>
        <li className="list-group-item">Item 3</li>
        <li className="list-group-item">Item 4</li>
        <li className="list-group-item">Item 5</li>
      </ul>
    </div>
  );
};

export default cssStyle;App.js:
import './App.css';
import CssStyling from './toggle_methods/css_styling';

function App() {
  return (
    <div className="App mt-5">
      <CssStyling />
    </div>
  );
}

export default App;
Output:
Toggle display with Props
The code uses a ternary operator to set the value of an element’s CSS display property. The value is determined based on the value of the toggle state variable.
If toggle is true, the display value is set to props.displayValue, a CSS display property value passed as a prop to the component. If the toggle is false, the display value is set to none, which hides the element.
import React, { useState } from "react";

const DisplayProps = (props) => {
  const [toggle, setToggle] = useState(true);

  const handleClick = () => {
    setToggle(!toggle);
  };

  return (
    <div>
      <button onClick={handleClick} class="btn btn-dark mb-5">
        Toggle Element
      </button>
      <ul
        class="list-group"
        style={{ display: toggle ? props.displayValue : "none" }}
      >
        <li className="list-group-item">Item 1</li>
        <li className="list-group-item">Item 2</li>
        <li className="list-group-item">Item 3</li>
        <li className="list-group-item">Item 4</li>
        <li className="list-group-item">Item 5</li>
      </ul>
    </div>
  );
};

export default DisplayProps;
Output:
Toggle visibility with props
The use of a ternary operator determines visibility. If toggle is true, then visibility is set to props.displayValue, passed in as a prop.
If the toggle is false, visibility will be set to hidden, which will hide the list of elements.
import React, { useState } from "react";

const ToggleVisibility = (props) => {
  const [toggle, setToggle] = useState(true);

  const handleClick = () => {
    setToggle(!toggle);
  };

  return (
    <div>
      <button onClick={handleClick} class="btn btn-warning mb-5">
        Toggle Element
      </button>
      <ul
        class="list-group"
        style={{ visibility: toggle ? props.displayValue : "hidden" }}
      >
        <li className="list-group-item">Item 1</li>
        <li className="list-group-item">Item 2</li>
        <li className="list-group-item">Item 3</li>
        <li className="list-group-item">Item 4</li>
        <li className="list-group-item">Item 5</li>
      </ul>
    </div>
  );
};

export default ToggleVisibility;
Output:

Conclusion
In this article, you learned how to toggle elements in a React application. You learned how to toggle elements using logical operators, ternary operators, if/else statements, the useToggle hook, CSS styling, and toggling display and visibility with props.
Gain Debugging Superpowers
Unleash the power of session replay to reproduce bugs and track user frustrations. Get complete visibility into your frontend with OpenReplay, the most advanced open-source session replay tool for developers.