Strengthen App Security with Multi-Factor Authentication
Enable higher security with MFA


Passwords are very important in applications as they create a barrier between unauthorized users and a resource in the application. These passwords alone can’t prevent hackers from brute-forcing their way into your application, hence the need for Multi-Factor authentication.
Multi-Factor authentication creates a two-layered barrier between an unauthorized user and resources in your web applications. To get into your application, one of the common ways is to ask the user to provide their username and password. Once this is provided, the user is required to retrieve the One Time Password (OTP) sent to their email. This strengthens the security of your various applications to a large extent.
Follow this tutorial to learn how to integrate Multi-factor authentication into your applications.
What is MFA?
Multi-Factor Authentication (MFA) is an authentication mechanism that requires two or more distinct method of verification which grants the user access to a resource in the application. Research shows that cracking an eight-character password containing symbols, and lower and uppercase letters, using a supercomputer, can be done in a couple of hours. This makes it essential to add layers of authentication to your application. MFA makes use of verification processes like passwords, biometrics, One Time Passwords (OTP), etc.
Now that we have basic knowledge of MFA, let’s get started with the application.
Getting Started
Create a new folder in your chosen directory that will contain all the source code for this application. Name this folder as you desire, but its name in this tutorial is mfa. Open the folder in VS Code and run the command below in the integrated terminal to create a NextJS application.
yarn create next-appNext, we will install the following dependencies:
npm install mongoose nodemailer nanoid jose cookiemongoosewill be used to link our application to MongoDB and create a Login schema.nodemailerwill be used to send the generated OTP to the user’s provided email address.nanoidwill be used to generate the random OTP.josewill be used to generate thejwtand store the OTP.cookiewill be used to store the token.
Once we’ve installed the dependencies successfully, the next step is to create different API routes for this application. In this application, we will create two routes.
- Auth Route.
- Email Route.
- Verify Route. Let’s create the following files in the api folder.
┣ pages
┃ ┣ api
┃ ┃ ┣ auth.js
┃ ┃ ┣ email.js
┃ ┃ ┗ verify.js
┃ ┣ _app.js
┃ ┗ _document.js
Next, we will create four files in the pages folder; login.js, signup.js, verify.js, and protected.js.
┣ pages
┃ ┣ index.js
┃ ┣ protected.js
┃ ┣ login.js
┃ ┣ signup.js
┃ ┣ verify.js
┃ ┣ _app.js
┃ ┗ _document.js
When we’ve created the api and the pages files, we can start building the first stage of authentication.
Setting up the database
In this section, we will set up the database, and a Log in/Sign up authentication mechanism, where users will log in/sign up with their username and password.
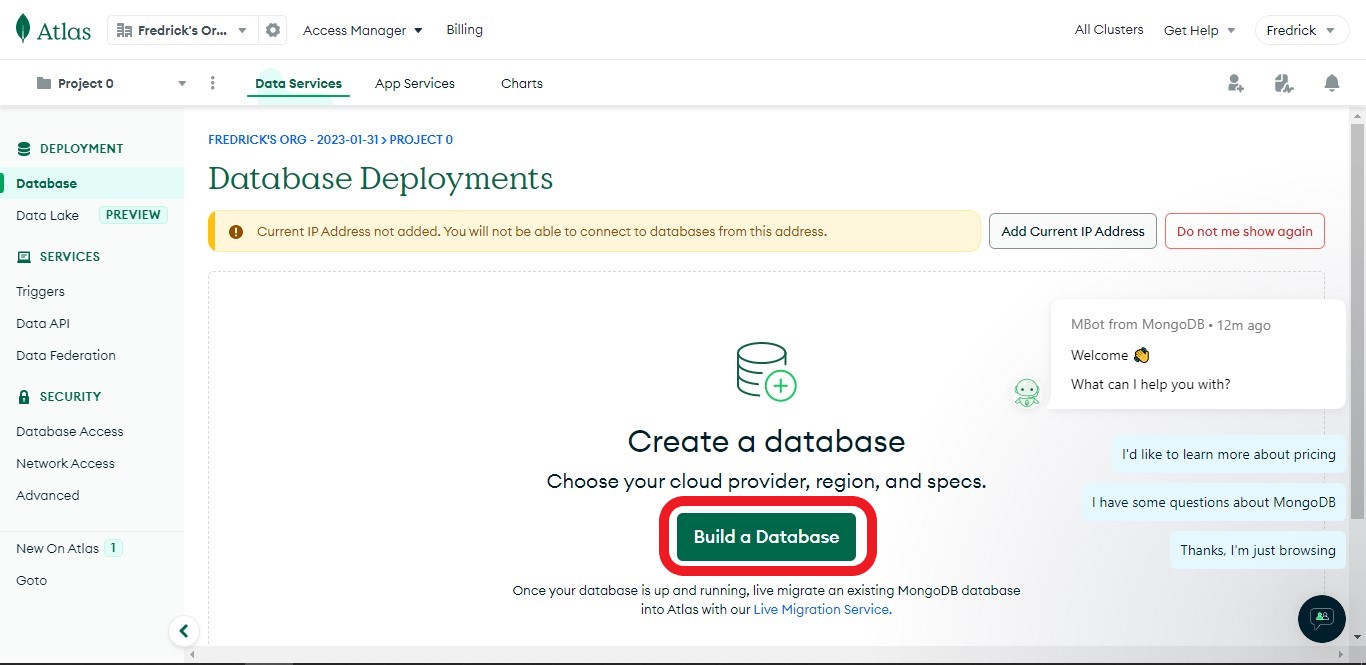
This tutorial chooses Mongodb as its chosen database. Feel free to use any database you desire. Navigate to Mongodb’s official website to login or signup for an account, if you don’t have one.
Once you’re done, head on to your dashboard and Build a database.
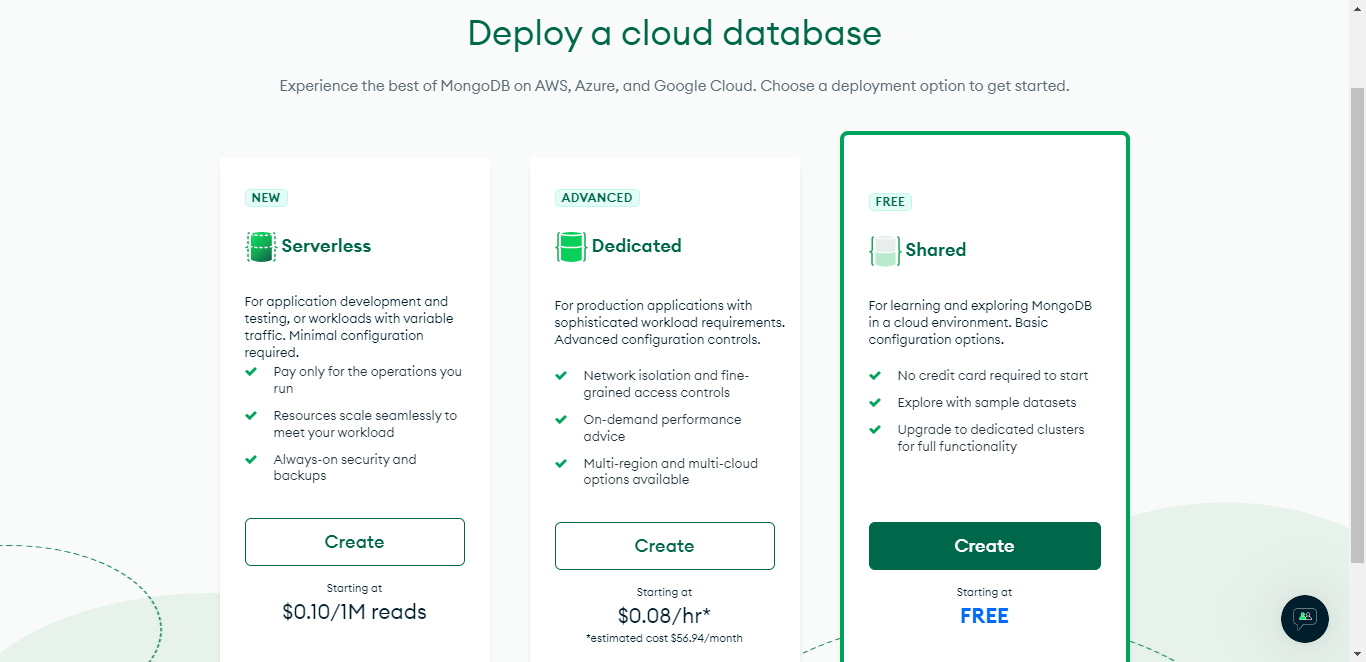
 You can choose to use any tier of your choice, but this tutorial uses the free tier.
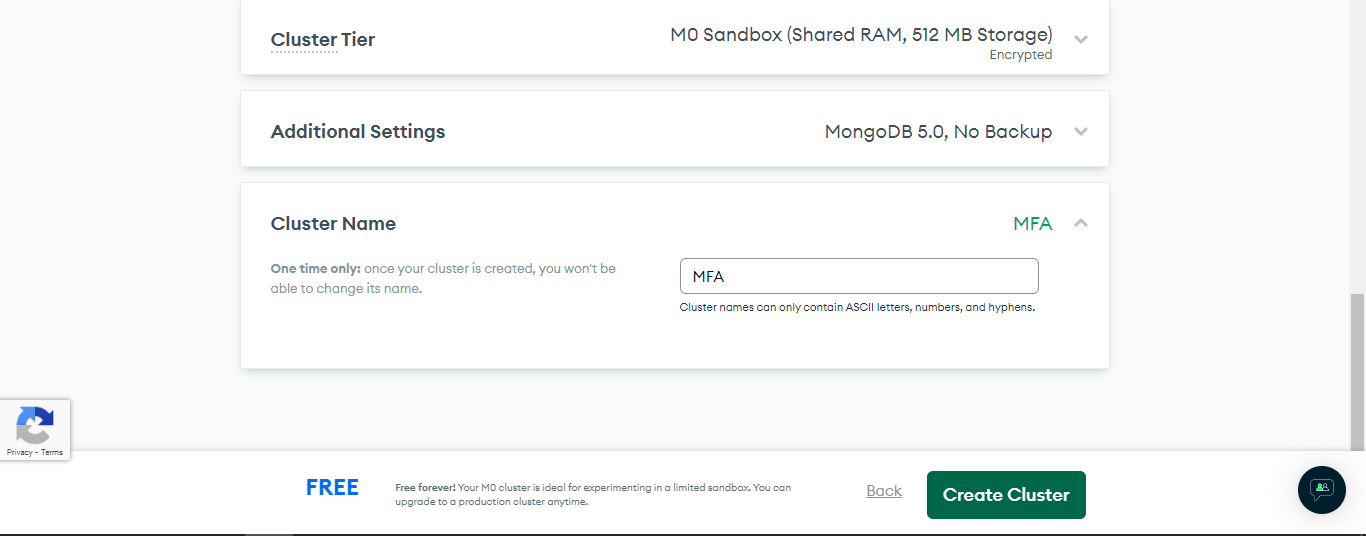
 Next, scroll to the bottom, give the database a name, and click Create Cluster. The name of the database in this tutorial is MFA.
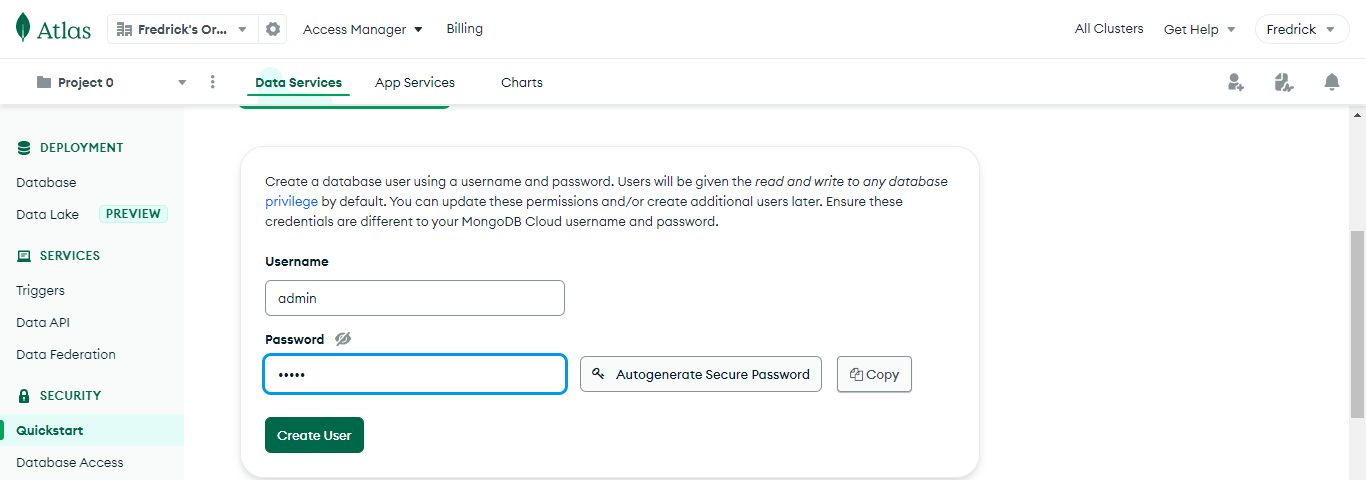
 Next, you’ll be asked to add a username and a password; else, click on Database Access by the sidebar and select ADD NEW DATABASE USER. Enter your desired details, and click Create User
 Select Network Access by the side nav bar and click on Add IP Address to configure the database’s IP address.
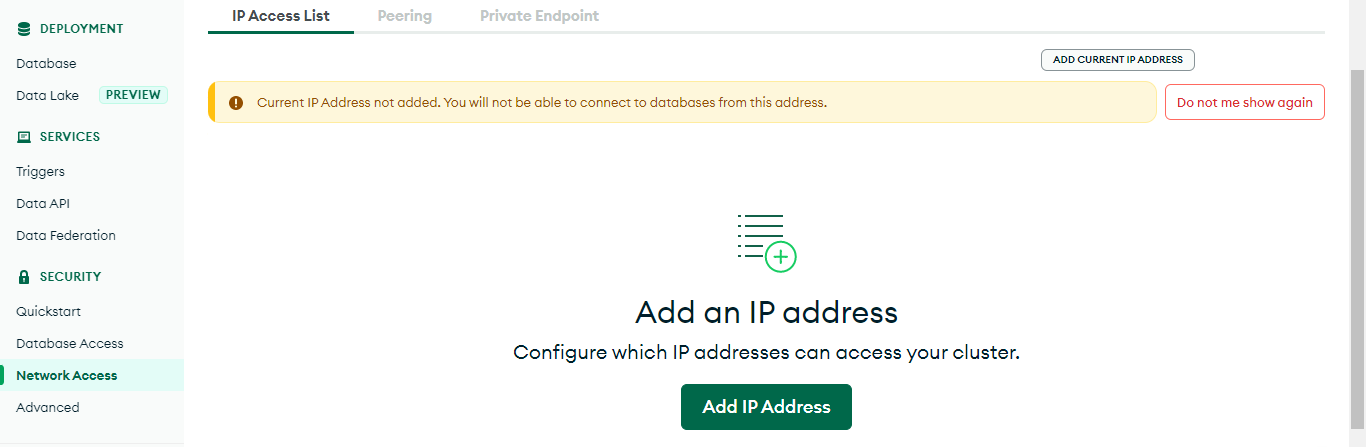 .
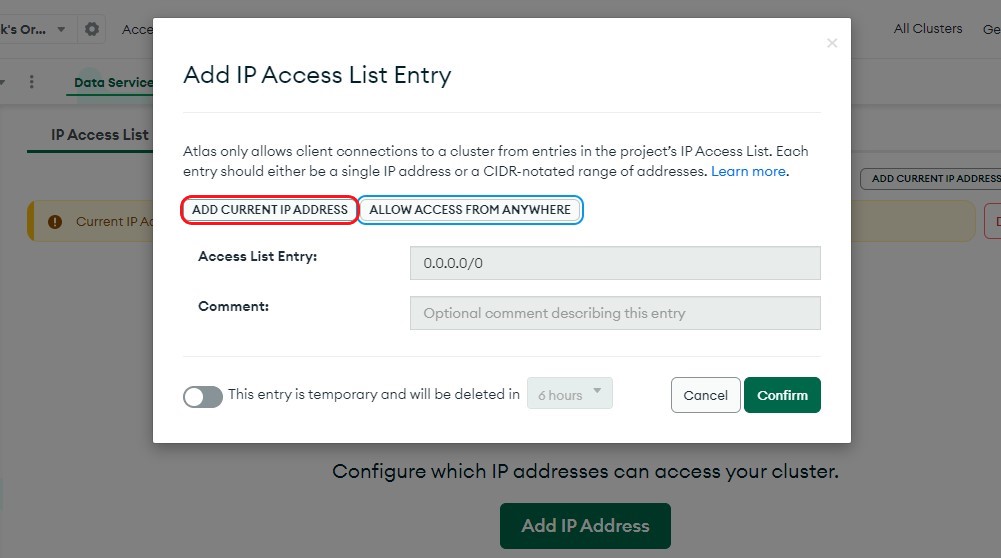
You can decide to either add only your current IP address or make the database accessible to all. Once the decision is made, click on the Confirm button.
.
You can decide to either add only your current IP address or make the database accessible to all. Once the decision is made, click on the Confirm button.
Adding MongoDB to the application
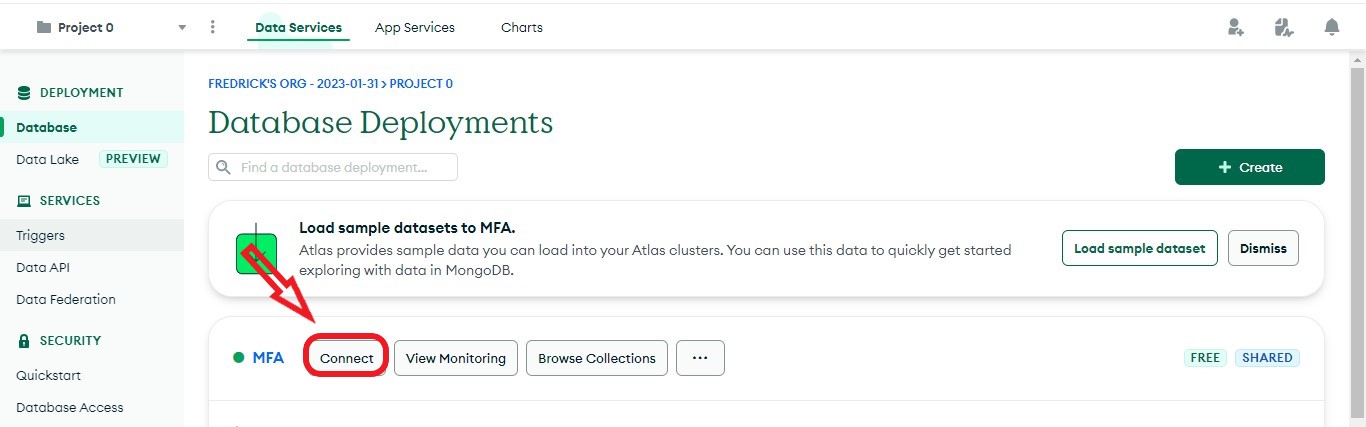
Select Database on the sidebar and click the Connect button.
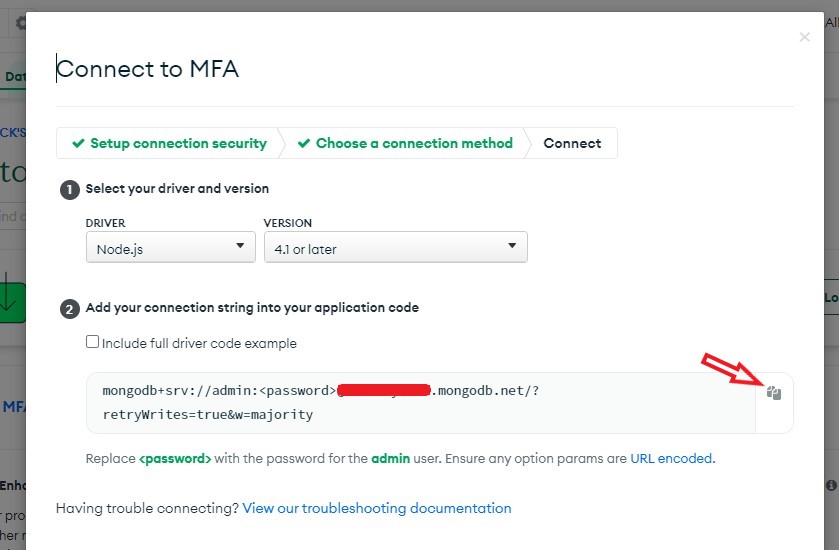
 Click on Connect your application
 Now, copy the MongoDB URI.
 Open the next.config.js file and paste the URI as shown in the code below.
/** @type {import('next').NextConfig} */
const nextConfig = {
  reactStrictMode: true,
   env: {
    MONGO_URI:
      'mongodb+srv://admin:<password>@mfa.example.mongodb.net/?retryWrites=true&w=majority',
  },
};

module.exports = nextConfig;
Replace <password> with the password you specified.
Next, create a folder in the project’s directory named database and create a file named index.js in it. This file will connect our application to MongoDB. Add the following lines of code to the index.js file.
//Path: datbase/index.js
import mongoose from 'mongoose';

const ConnectDB = () => {
  mongoose.set('strictQuery', false);

  mongoose
    .connect(process.env.MONGO_URI)
    .then(() => {
      console.log('Connected successfully');
    })
    .catch(err => {
      console.log(err.message);
    });
};

export default ConnectDB;
Ensure you added the MONGO_URI to the next.config.js file
Open your auth.js file and add the lines of code below.
//Path: pages/api/auth.js
import ConnectDB from '@/database';//Importing the Function for connecting MongoDB.
ConnectDB();// Running the function
const Auth = (req, res) => {};
export default Auth;
Setting up the server
In this section, we’ll handle the different CRUD operations that will be sent to the api/auth route.
Still in the auth.js file, add the following.
//Path: pages/api/auth.js

import ConnectDB from '@/database'; //Importing the Function for connecting MongoDB.
ConnectDB(); // Running the function
const Auth = async (req, res) => {
  const { method } = req; //Getting the type of request made
  switch (method) {
    case 'POST': //handler for POST requests
      try {
        console.log(method + ' REQUEST');
        res.end();
      } catch (error) {
        console.log(error);
        res.status(400).json({ success: false, message: 'POST request Error' });
      }
      break;
    case 'PUT': //handler for PUT requests
      try {
        console.log(method + ' REQUEST');
        res.end();
      } catch (error) {
        console.log(error);
        res.status(400).json({ success: false, message: 'PUT request Error' });
      }
      break;
    default:
      res
        .status(400)
        .json({ success: false, message: 'Unsupported CRUD operation' });
      break;
  }
};
export default Auth;
Above, we created a handler for the PUT and POST requests and returned an error, a status of 400, when a different CRUD operation is sent.
Creating the user model
Now, we will create the schema for the first layer of authentication.
This schema will contain a name, email, and a password.
Create a file named model.js in the database folder and add the following to it.
//Path: database/model.js

const mongoose = require('mongoose');

const { Schema } = mongoose;
const UserSchema = new Schema({//Creating the schema
  name: {
    type: String,
  },
  email: {
    type: String,
    required: [true, 'Provide an email address'],
  },
  password: {
    type: String,
    required: [true, 'Please add a password'],
    minlength: 6,
  },
});
//Checking if the model has been created
module.exports = mongoose.models.User || mongoose.model('User', UserSchema);
In the above code, we created the user model containing the name, email, and password fields. We set the email as required, sending an error message if the email address is not provided. We did the same for the password field but specified a minimum length the password should have.
Storing the user’s data
Now, import the model.js file into the auth.js file.
//Path: pages/api/auth.js

import ConnectDB from '@/database'; //Importing the Function for connecting MongoDB.
import User from '@/database/model'; // Importing the User Model

//The rest of the code
Next, we will handle the PUT operation that will be used to register new users.
//Path: pages/api/auth.js

import ConnectDB from '@/database'; //Importing the Function for connecting MongoDB.
import User from '@/database/model'; // Importing the User Model

ConnectDB(); // Running the function
const Auth = async (req, res) => {
  const { method } = req; //Getting the type of request made
  switch (method) {
    case 'PUT': //handler for PUT requests
      try {
        const check = await User.findOne({ email: req.body.email });//Checking if the email exist
        if (check) {
          res
            .status(400)
            .json({ success: false, message: 'Email already exists!' });
        } else {
          await User.create(req.body);//Adding the user to the database
          res
            .status(201)
            .json({ success: true, message: 'Account created successfully' });
        }
      } catch (error) {
        console.log(error.message);
        res.status(400).json({ success: false, message: 'PUT request Error' });
      }
      break;

    //The rest of the code
  }
};
export default Auth;
Above, we checked if the email provided by the user is already in the database else, we will add the user’s detail to the database. You can choose to encrypt the password before storing it in the database using bcrypt.
Signing users
Here, we will handle the POST request that will be used to sign in users.
//Path: pages/api/auth.js

import ConnectDB from '@/database'; //Importing the Function for connecting MongoDB.
import User from '@/database/model'; // Importing the User Model

ConnectDB(); // Running the function
const Auth = async (req, res) => {
  const { method } = req; //Getting the type of request made
  switch (method) {

  //Missing lines of code

   case 'POST': //handler for POST requests
      try {
        const user = await User.findOne({ email: req.body.email }); //Checking if the email exist with a password
        if (user) {
          if (user.password === req.body.password) {
            //Checking the password provided is the same as the one in the database
            res
              .status(200)
              .json({ success: true, message: 'Login successful' });
          } else {
            res
              .status(401)
              .json({ success: false, message: 'Invalid Email or Password' });
          }
        } else {
          res
            .status(401)
            .json({ success: false, message: 'Invalid Email or Password' });
        }
      } catch (error) {
        console.log(error);
        res.status(400).json({ success: false, message: 'POST request Error' });
      }
      break;
    default:
      res
        .status(400)
        .json({ success: false, message: 'Unsupported CRUD operation' });
      break;
  }
};
export default Auth;
The above code handles the Login function. We checked if the user’s email existed then we checked if the password provided tallies with the one in the database.
Setting up the Frontend
With this, we are done with the server-side part of the first layer of authentication. The next step is to work on the client side. Open the signup.js file, and let’s handle the signup page.
//Path: pages/signup.js

import { useState } from 'react';

export default function Signup() {
  const [name, setName] = useState('');
  const [email, setEmail] = useState('');
  const [password, setPassword] = useState('');
  const handleChange = (e, func) => {
    func(e.target.value);
  };

  return (
    <>
      <div
        style={{
          display: 'flex',
          justifyContent: 'center',
          alignItems: 'center',
          height: '100vh',
          fontSize: '30px',
        }}
      >
        <form onSubmit={onSubmit}>
          <u>
            <h1>Register</h1>
          </u>
          <label htmlFor="name">Name: </label>
          <input
            type="text"
            value={name}
            onChange={e => handleChange(e, setName)}
            style={{
              marginBottom: '10px',
              height: '20px',
              fontSize: '20px',
              outline: 'none',
            }}
          />
          <br />
          <label htmlFor="email">Email: </label>
          <input
            type="email"
            name="email"
            value={email}
            style={{
              marginBottom: '10px',
              height: '20px',
              fontSize: '20px',
              outline: 'none',
            }}
            id="email"
            required
            onChange={e => handleChange(e, setEmail)}
          />
          <br />
          <label htmlFor="password">Password: </label>
          <input
            type="password"
            name="password"
            value={password}
            style={{
              marginBottom: '10px',
              height: '20px',
              fontSize: '20px',
              outline: 'none',
            }}
            id="password"
            minLength="6"
            required
            onChange={e => handleChange(e, setPassword)}
          />
          <br />
          <button type="submit" style={{ width: '100px', height: '30px' }}>
            Submit
          </button>
        </form>
      </div>
    </>
  );
}
This tutorial will focus more on the authentication part rather than on beautification. So, feel free to design the authentication to your taste.
Now, we will create an onSubmit function that will send a PUT request to the /api/auth route and redirect the user to the protected when the request is successful.
//Path: pages/signup.js

import { useEffect, useState } from 'react';

export default function Signup() {
  const [name, setName] = useState('');
  const [email, setEmail] = useState('');
  const [password, setPassword] = useState('');

  const handleChange = (e, func) => {
    func(e.target.value);
  };

  const onSubmit = async e => {
    //Handling the registration
    e.preventDefault();
    const response = await fetch('api/auth', {
      method: 'PUT',
      headers: {
        'Content-Type': 'application/json',
      },
      body: JSON.stringify({
        name,
        email,
        password,
      }),
    });
    const data = await response.json();
    if (data.success === true) return router.push('/protected');
    alert(data.message);
  };

  return (
  //The rest of the code
  );
}
Let’s Handle the login page next.
import { useState } from 'react';
import { useRouter } from 'next/router';

export default function Login() {
  const [email, setEmail] = useState('');
  const [password, setPassword] = useState('');

  const router = useRouter();

  const handleChange = (e, func) => {
    func(e.target.value);
  };

  const onSubmit = async e => {
    //Handling the login
    e.preventDefault();
    const response = await fetch('api/auth', {
      method: 'POST',
      headers: {
        'Content-Type': 'application/json',
      },
      body: JSON.stringify({
        email,
        password,
      }),
    });
    const data = await response.json();
    if (data.success === true) return router.push('/protected');
    alert(data.message);
  };

  return (
    <>
      <div
        style={{
          display: 'flex',
          justifyContent: 'center',
          alignItems: 'center',
          height: '100vh',
          fontSize: '30px',
        }}
      >
        <form onSubmit={onSubmit}>
          <u>
            <h1>Login</h1>
          </u>
          <label htmlFor="email">Email: </label>
          <input
            type="email"
            name="email"
            value={email}
            style={{
              marginBottom: '10px',
              height: '20px',
              fontSize: '20px',
              outline: 'none',
            }}
            id="email"
            required
            onChange={e => handleChange(e, setEmail)}
          />
          <br />
          <label htmlFor="password">Password: </label>
          <input
            type="password"
            name="password"
            value={password}
            style={{
              marginBottom: '10px',
              height: '20px',
              fontSize: '20px',
              outline: 'none',
            }}
            id="password"
            minLength="6"
            required
            onChange={e => handleChange(e, setPassword)}
          />
          <br />
          <button type="submit" style={{ width: '100px', height: '30px' }}>
            Submit
          </button>
        </form>
      </div>
    </>
  );
}
Now, let’s add the following to the route we are protecting, the protected.js file.
//Path: pages/protected.js
export default function App() {
return (
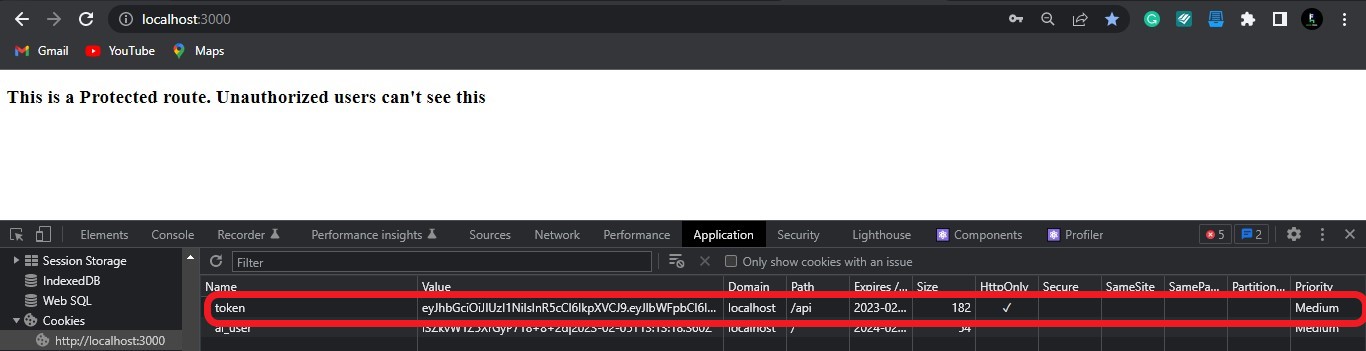
<h2>This is a Protected route. Unauthorized users can't see this</h2>
);
}Lastly, the index.js file.
//Path: pages/index.js
Sessions in JWT
Here, we’ll handle sessions using JWT and cookie. Once users log in or sign up, we will generate a token using JWT and store this token as a cookie in the application.
jose needs a set of strings, mostly random strings, to create the token.
For security reasons, open the next.config.js file and store your secret in an environmental variable as shown below:
//Path: next.config.js

/** @type {import('next').NextConfig} */
const nextConfig = {
  reactStrictMode: false,
  env: {
    MONGO_URI:
      'mongodb+srv://admin:<password>@mfa.example.mongodb.net/',
    SECRET: 'OpenReplay',
  },
};

module.exports = nextConfig;
Above, we made use of OpenReplay as our set of random strings. Feel free to use something different.
Let’s generate and store the token for users that just signed up. Open the auth.js file and add the following.
//Path: pages/api/auth.js

//The rest of the code

const secret = process.env.SECRET; //Getting the secret

//The rest of the code
    case 'PUT': //handler for PUT requests
      try {
        const check = await User.findOne({ email: req.body.email }); //Checking if the email exist
        if (check) {
          res
            .status(400)
            .json({ success: false, message: 'Email already exists!' });
        } else {
          await User.create(req.body); //Adding the user to the database
          const iat = Math.floor(Date.now() / 1000);
          const exp = iat + 60 * 60 * 24; // 1day

          const token = await new SignJWT({ key: 'test' })
            .setProtectedHeader({ alg: 'HS256', typ: 'JWT' })
            .setExpirationTime(exp)
            .setIssuedAt(iat)
            .setNotBefore(iat)
            .sign(new TextEncoder().encode(secret)); //Generating the token
          const serialized = cookie.serialize('token', token, {
            httpOnly: true,
            maxAge: 60 * 60 * 24,
            path: '/',
          }); //Serializing the token
          res.setHeader('Set-Cookie', serialized); //Setting the cookie
          res
            .status(201)
            .json({ success: true, message: 'Account created successfully' });
        }
      } catch (error) {
        console.log(error.message);
        res.status(400).json({ success: false, message: 'PUT request Error' });
      }
      break;
//The rest of the code
Next, we generate the token for Logged in Users
//Path: pages/api/auth.js

//The rest of the code

const secret = process.env.SECRET; //Getting the secret

//The rest of the code
    case 'POST': //handler for POST requests
      try {
        const user = await User.findOne({ email: req.body.email }); //Checking if the email exist with a password
        if (user) {
          if (user.password === req.body.password) {
            //Checking the password provided is the same as the one in the database
            const iat = Math.floor(Date.now() / 1000);
            const exp = iat + 60 * 60 * 24; // 1day

            const token = await new SignJWT({ key: 'test' })
              .setProtectedHeader({ alg: 'HS256', typ: 'JWT' })
              .setExpirationTime(exp)
              .setIssuedAt(iat)
              .setNotBefore(iat)
              .sign(new TextEncoder().encode(secret)); //Generating the token
            const serialized = cookie.serialize('token', token, {
              httpOnly: true,
              maxAge: 60 * 60 * 24,
              path: '/',
            }); //Serializing the token
            res.setHeader('Set-Cookie', serialized); //Setting the cookie

            res
              .status(200)
              .json({ success: true, message: 'Login successful' });
          } else {
            res
              .status(401)
              .json({ success: false, message: 'Invalid Email or Password' });
          }
        } else {
          res
            .status(401)
            .json({ success: false, message: 'Invalid Email or Password' });
        }
      } catch (error) {
        console.log(error);
        res.status(400).json({ success: false, message: 'POST request Error' });
      }
      break;
//The rest of the code
From the codes above, we created the token by passing the following basic parameter:
- Type of token -
JWT - Token expiration time -
1day - JWT Secret -
OpenReplay(envgotten from the next.config.js file) Next, we created the cookie using the token and set its time limit (one day)
Testing out the application will store the cookie, as shown in the output below.
Protecting routes
Any user can access the protected page with or without the token. We need to stop this and create a mechanism that allows access when the token is present.
We will make use of the NextJS Middleware to do this.
To do this, we will create a file in the project’s directory named middleware.js.
This name is not optional. NextJS supports either middleware.js or middleware.ts
//Path: middleware.js

import { NextResponse } from 'next/server';
import { jwtVerify } from 'jose';
const secret = process.env.SECRET; //Importing the secret
export const config = {
  //Setting the supported route
  matcher: ['/login', '/signup', '/protected'],
};
export default async function Middleware(req, res) {
  const token = req.cookies.get('token')?.value; //Getting the token from the cookie
  const url = new URL(req.url);
  const tokenChecker = async () => {
    if (token) {
      try {
        const verified = await jwtVerify(
          //Verifying the token
          token,
          new TextEncoder().encode(secret)
        );
        return verified;
      } catch (error) {
        return null;
      }
    } else {
      return null;
    }
  };
  if (url.pathname === '/protected') {
    //Checking the present url
    const checker = await tokenChecker();
    if (checker) {
      return null;
    } else {
      return NextResponse.redirect(new URL('/', req.url));
    }
  }

  NextResponse.next();
}
We specified the routes that this middleware applied to using the matcher option. Then we got the token from the cookie and verified the token using jwtVerify, a module in jose. Next, we redirected users trying to access the /protected route without a token or an invalid token to the / page.
After protecting the /protected route, we need redirected users with valid tokens trying to access the login or signup page to the /protected page.
//Path: middleware.js

//The rest of the code
  if (url.pathname === '/login' || url.pathname === '/signup') {
    const checker = await tokenChecker();
    if (checker) {
      return NextResponse.redirect(new URL('/protected', req.url));
    }
  }

//The rest of the code.
Session Replay for Developers
Uncover frustrations, understand bugs and fix slowdowns like never before with OpenReplay — an open-source session replay tool for developers. Self-host it in minutes, and have complete control over your customer data. Check our GitHub repo and join the thousands of developers in our community.
Logout
Here, we will handle the logout function in the application.
Once the user clicks on the logout button, we will send a GET request to the api/auth route. Immediately we get this request, we will set the time limit of the cookie to 1sec and redirect the user to the login Page.
Now open your protected.js file and create the button.
//Path: pages/protected.js

 import { useRouter } from 'next/router';

export default function App() {
  const router = useRouter();

  const onLogout = async () => {
    const response = await fetch('api/auth');
    const data = await response.json();
    if (data.success === true) return router.push('/login');
    alert(data.message);
  };
  return (
    <>
      <h2>This is a Protected route. Unauthorized users can't see this</h2>
      <button onClick={onLogout}>Logout</button>
    </>
  );
}

//The rest of the code
Next, open the auth.js file and handle the logout request.
//Path: pages/api/auth.js

  case 'GET':
      try {
        const serialized = cookie.serialize('token', null, {
          httpOnly: true,
          maxAge: 1, //Deleting the cookie after 1 second
          path: '/',
        }); //Serializing the token
        res.setHeader('Set-Cookie', serialized); //Setting the cookie
        res.redirect('/login');
      } catch (error) {}
      break;

//The rest of the code
Creating the second layer of authentication
In the previous part of this tutorial, we authenticated users using JWT and their credentials. Now, we will authenticate users using OTP.
Setting up Nodemailer
Nodemailer is a NodeJS module that sends emails to users. Setting up nodemailer requires an email service or an SMTP service, and this tutorial makes use of the Google mailing service. Go Gmail’s signup page to create an account if you don’t have one.
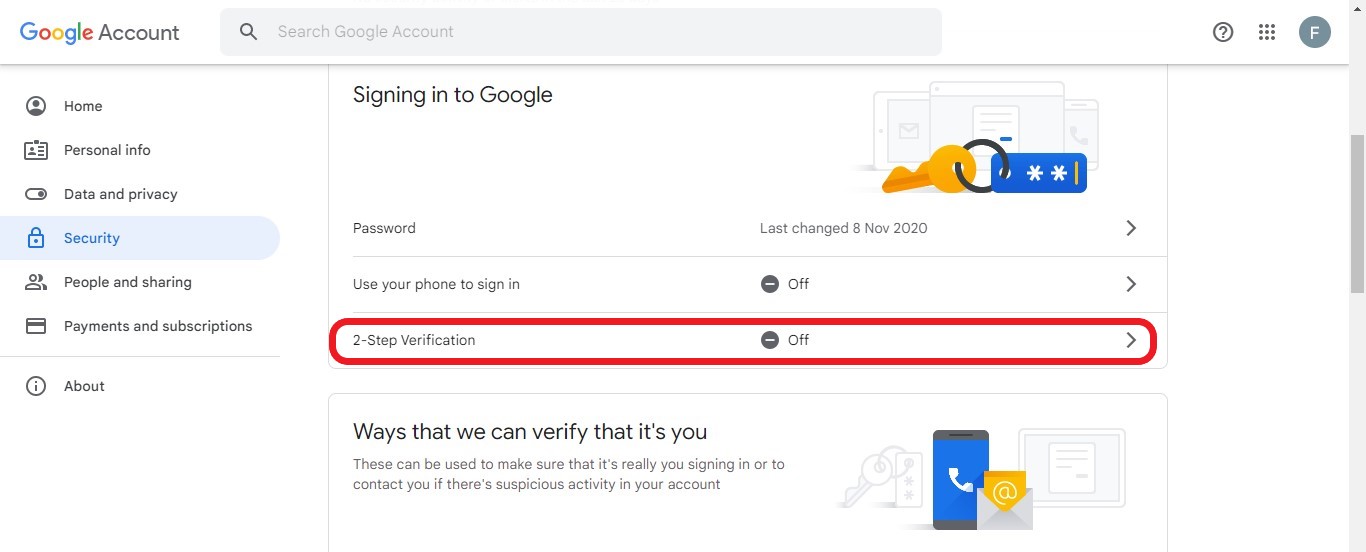
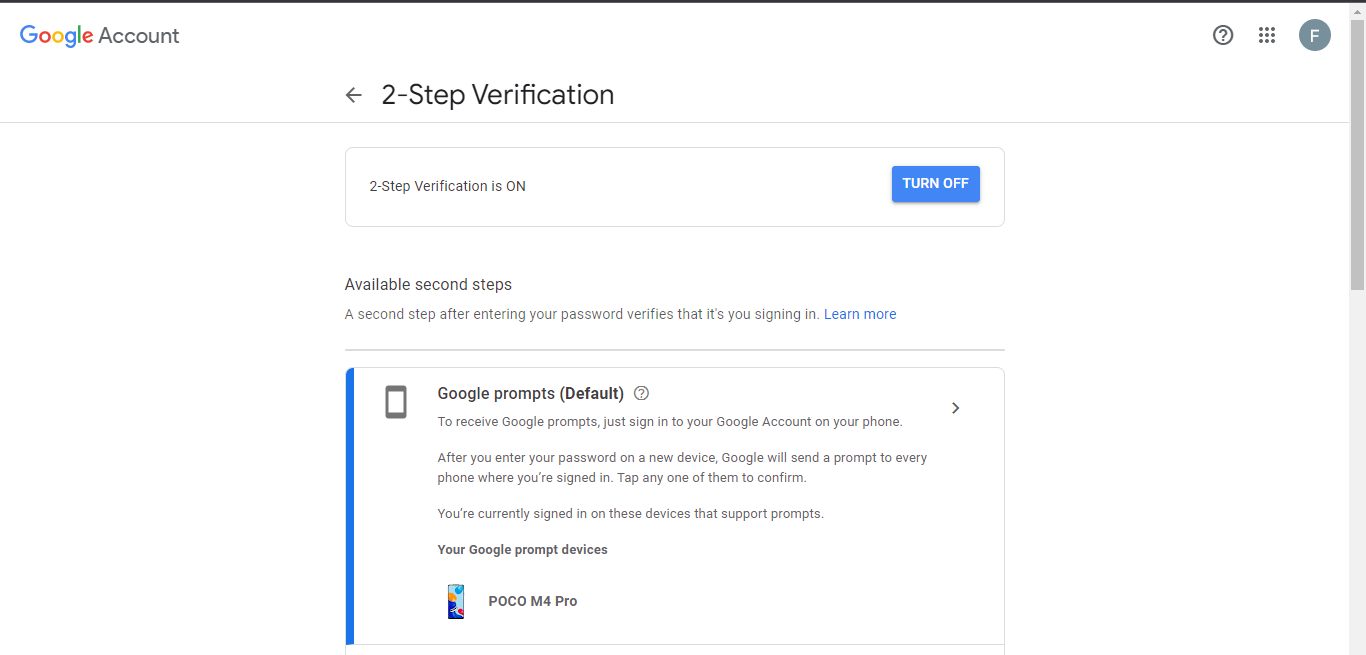
Now that your Gmail account is set, you need to enable 2-Step Verification.
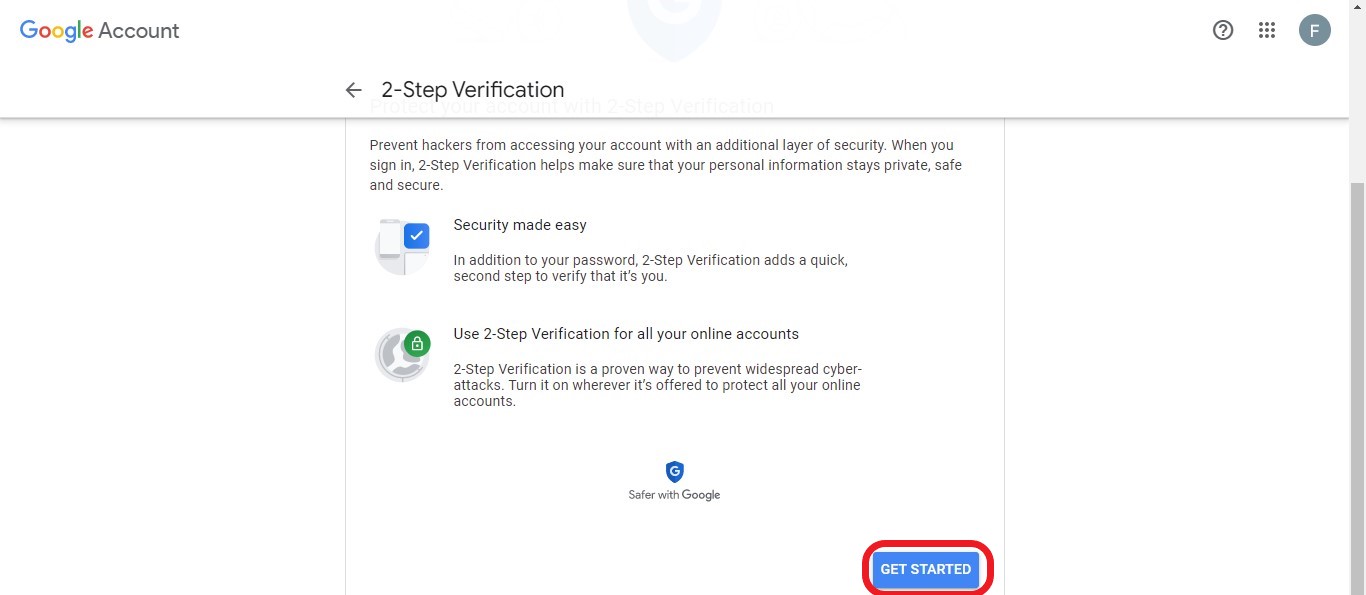
 Next, click on GET STARTED
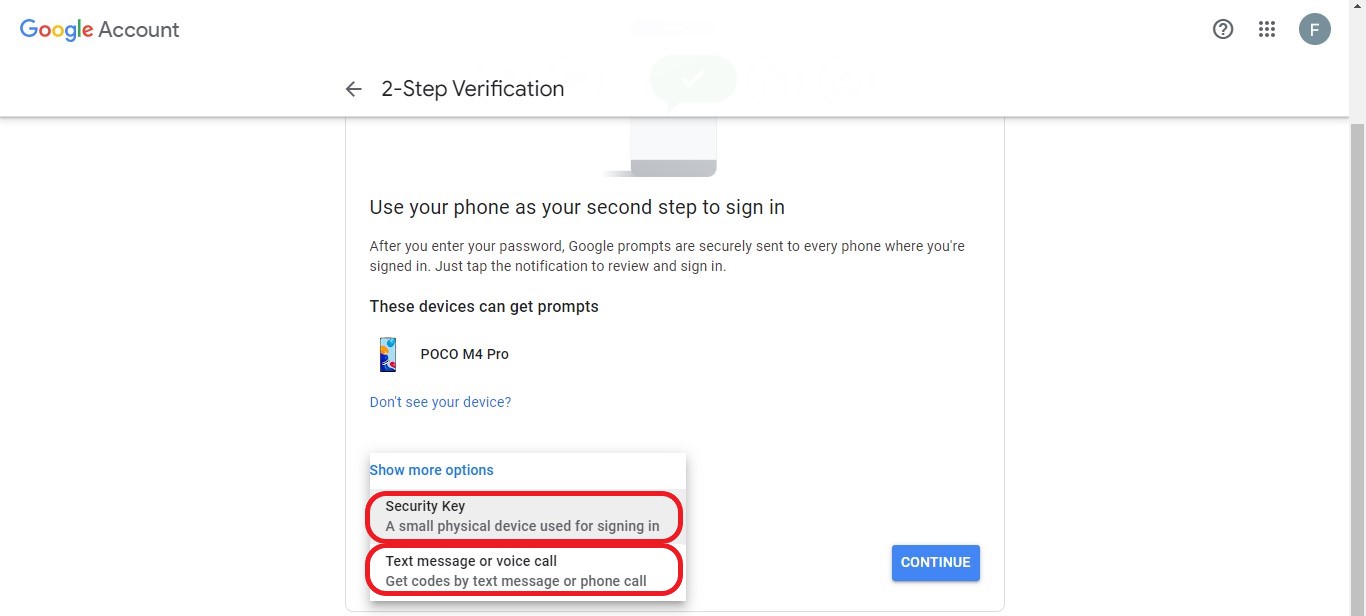
 You can choose to use the following option to set up your 2-step verification process:
- Getting a notification in your already connected devices
- Using a security key
- Getting a verification code.
 Once you are done, you should get a similar output as shown below.
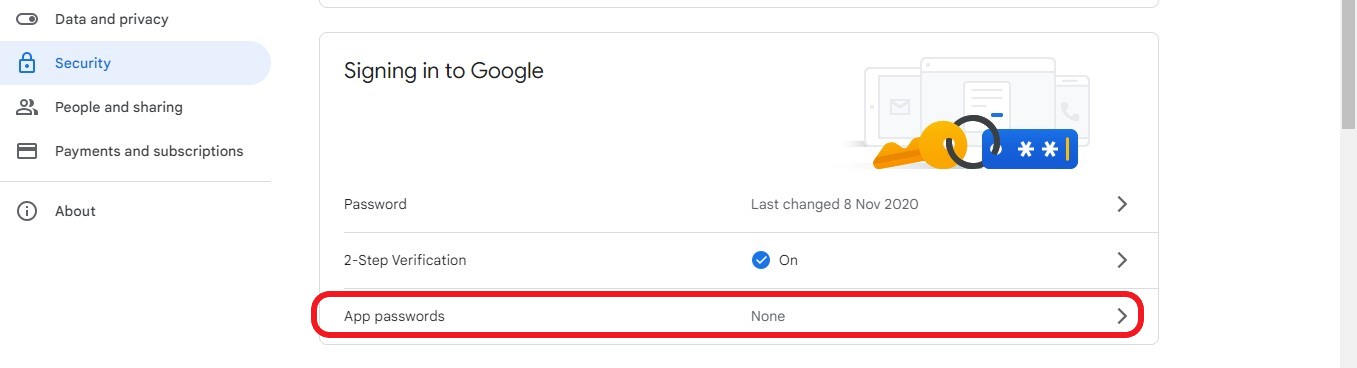
 Next, you need to set an App password in the [Signing in to Google]((https://myaccount.google.com/u/2/security) option
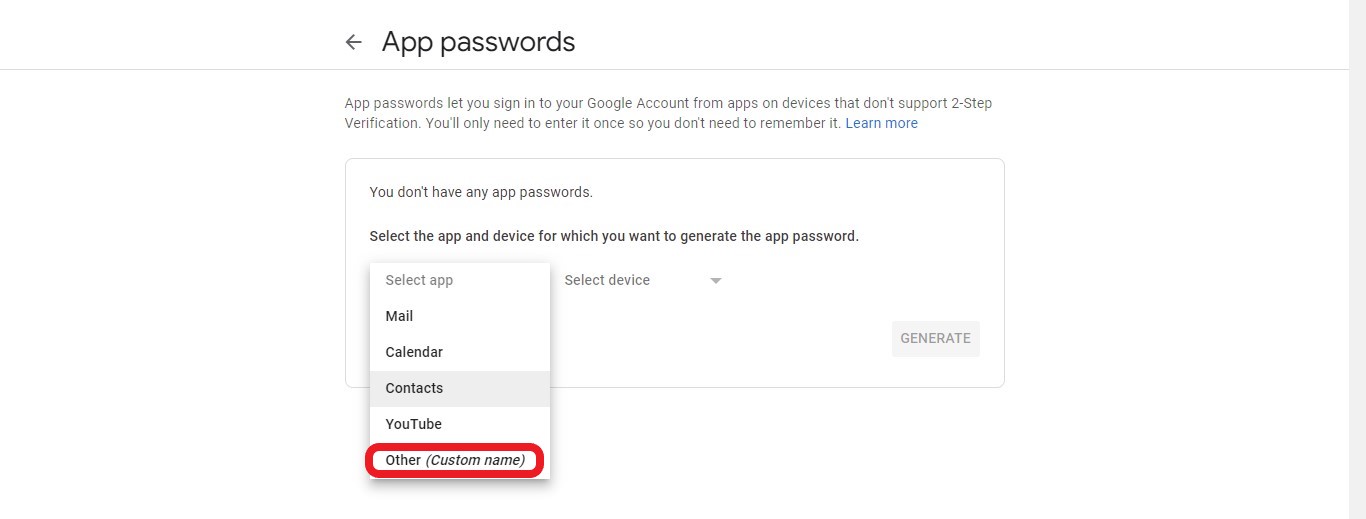
 Click on the Select app option and choose Other (Custom name)
 Enter Nodemailer or any desired name, click GENERATE, and copy the generated 16 digits password.
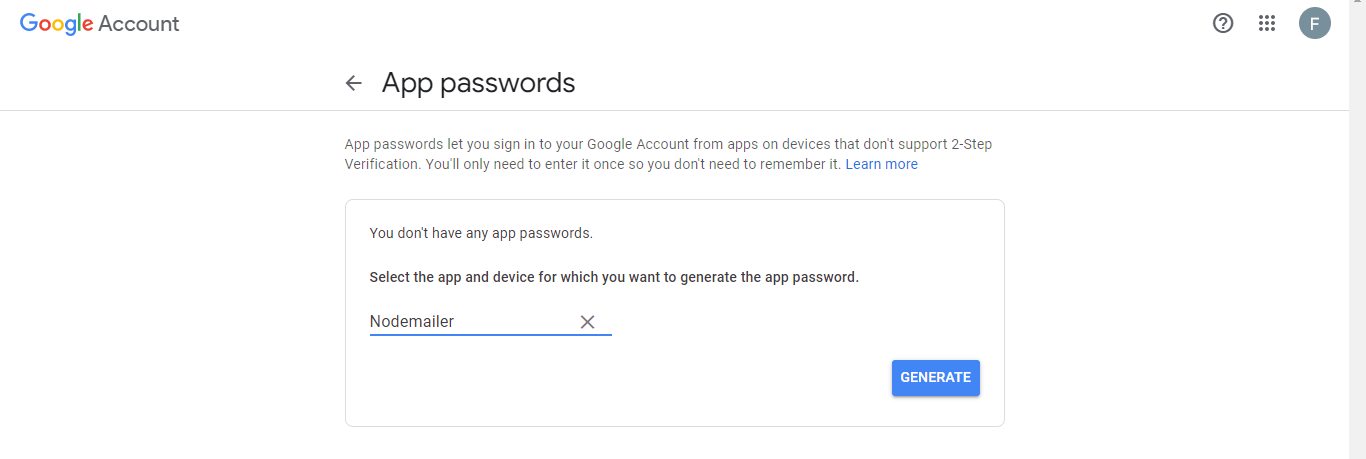 Ensure you copy the password because you can’t retrieve it. You can store this password in the next.config.js file.
With this, we can create a mechanism for sending emails. Open your email.js file, and let’s configure nodemailer
//Path: pages/api/email.js

import nodemailer from 'nodemailer';

export default function Verify(req, res) {
  const transporter = nodemailer.createTransport({
    service: 'gmail', //Specifying the service
    auth: {
      user: 'yourgmail@gmail.com', //Your Gmail
      pass: process.env.PASSWORD, //Your app password
    },
  });

  const mailOptions = {
    from: 'yourgmail@gmail.com',
    to: req.body.email,//Getting the user's email
    subject: 'Subject',
    text: 'OTP',//Passing the OTP
  };

  transporter.sendMail(mailOptions, function (error, info) {
    if (error) {
      console.log(error);
      res.status(400).json({ success: false, message: error });
    } else {
      console.log('Email sent: ' + info.response);
      res.status(201).json({ success: true, message: info.response });
    }
  });
}
Source: Use Gmail with Nodemailer
Generating the OTP
We are done setting up nodemodule, now we need to generate the OTP that will be sent to users’ email once they log in or sign up.
Before we do that, let’s refactor our application.
- We need to redirect users from the
loginorsignuproute to theverifypage for the 2nd layer of authentication.
//Path: pages/login.js

//The rest of the code
  const onSubmit = async e => {
    //Handling the login
    e.preventDefault();
    const response = await fetch('api/auth', {
      method: 'POST',
      headers: {
        'Content-Type': 'application/json',
      },
      body: JSON.stringify({
        email,
        password,
      }),
    });
    const data = await response.json();
    if (data.success === true) {
      try {
        const res = await fetch('api/email', {
          method: 'POST',
          headers: {
            'Content-Type': 'application/json',
          },
          body: JSON.stringify({
            email,
          }),
        });
        const sent = await res.json();
        sent.success === true
          ? router.push('/verify')
          : alert('an error occurred');
      } catch (error) {
        console.log(error);
      }
    } else {
      alert(data.message);
    }
  };
//The rest of the code
Same goes for the signup page
//Path: pages/signup.js

//The rest of the code
  const onSubmit = async e => {
    //Handling the registration
    e.preventDefault();
    const response = await fetch('api/auth', {
      method: 'PUT',
      headers: {
        'Content-Type': 'application/json',
      },
      body: JSON.stringify({
        name,
        email,
        password,
      }),
    });
    const data = await response.json();
    if (data.success === true) {
      try {
        const res = await fetch('api/email', {
          method: 'POST',
          headers: {
            'Content-Type': 'application/json',
          },
          body: JSON.stringify({
            email,
          }),
        });
        const sent = await res.json();
        sent.success === true
          ? router.push('/verify')
          : alert('an error occured');
      } catch (error) {
        console.log(error);
      }
    } else {
      alert(data.message);
    }
  };
//The rest of the code- Next, we will take out the token and cookie lines of code from the auth.js file. We need the creation of tokens and cookies to be done after they’ve entered a valid OTP.
//Path: pages/api/auth.js

//The rest of the code
  case 'PUT': //handler for PUT requests
      try {
        const check = await User.findOne({ email: req.body.email }); //Checking if the email exist
        if (check) {
          res
            .status(400)
            .json({ success: false, message: 'Email already exists!' });
        } else {
          await User.create(req.body); //Adding the user to the database
          res
            .status(201)
            .json({ success: true, message: 'Account created successfully' });
        }
      } catch (error) {
        console.log(error.message);
        res.status(400).json({ success: false, message: 'PUT request Error' });
      }
      break;
    case 'POST': //handler for POST requests
      try {
        const user = await User.findOne({ email: req.body.email }); //Checking if the email exist with a password
        if (user) {
          if (user.password === req.body.password) {
            //Checking the password provided is the same with the one in the databse
            res
              .status(200)
              .json({ success: true, message: 'Login successful' });
          } else {
            res
              .status(401)
              .json({ success: false, message: 'Invalid Email or Password' });
          }
        } else {
          res
            .status(401)
            .json({ success: false, message: 'Invalid Email or Password' });
        }
      } catch (error) {
        console.log(error);
        res.status(400).json({ success: false, message: 'POST request Error' });
      }
      break;
//The rest of the code
Let’s add the following code to the verify.js file.
//Path: pages/verify.js
import { useRouter } from 'next/router';
import { useState } from 'react';
export default function Verify() {
  const [text, setText] = useState('');

  const router = useRouter();

  const handleChange = (e, func) => {
    func(e.target.value);
  };

  const onSubmit = async e => {
    //Handling Verification
    e.preventDefault();
    const response = await fetch('api/verify', {
      method: 'POST',
      headers: {
        'Content-Type': 'application/json',
      },
      body: JSON.stringify({
        OTP: text,
      }),
    });
    const data = await response.json();
    data.success === true ? router.push('/protected') : alert('Invalid OTP');
  };

  return (
    <>
      <div
        style={{
          display: 'flex',
          justifyContent: 'center',
          alignItems: 'center',
          height: '100vh',
          fontSize: '30px',
        }}
      >
        <form onSubmit={onSubmit}>
          <u>
            <h1>Verify</h1>
          </u>
          <label htmlFor="email">OTP: </label>
          <input
            type="text"
            name="text"
            value={text}
            style={{
              marginBottom: '10px',
              height: '20px',
              fontSize: '20px',
              outline: 'none',
            }}
            id="text"
            required
            onChange={e => handleChange(e, setText)}
          />
          <br />
          <button type="submit" style={{ width: '100px', height: '30px' }}>
            Submit
          </button>
        </form>
      </div>
    </>
  );
}
From the above code in the verify.js file, we sent a POST request to api/verify route, passing the OTP the user provided as the body params.
Once we are done refactoring, we can generate the OTP and send it to the user’s email.
//Path: pages/api/email.js

import nodemailer from 'nodemailer';
import { customAlphabet } from 'nanoid';

const nanoid = customAlphabet('1234567890', 8);

export default function Verify(req, res) {
  const OTP = nanoid();
  const transporter = nodemailer.createTransport({
    service: 'gmail', //Specifying the service
    auth: {
      user: 'yourgmail@gmail.com', //Your Gmail
      pass: process.env.PASSWORD, //Your app password
    },
  });

  const mailOptions = {
    from: 'yourgmail@gmail.com',
    to: req.body.email, //Getting the user's email
    subject: 'One Time Password',
    text: `Here is your OTP: ${OTP}`, //Sending the OTP
  };

  transporter.sendMail(mailOptions, function (error, info) {
    if (error) {
      console.log(error);
      res.status(400).json({ success: false, message: error });
    } else {
      console.log('Email sent: ' + info.response);
      res.status(201).json({ success: true, message: info.response });
    }
  });
}
Once we send the OTP to the user’s email, let’s encrypt the OTP and store it as a cookie.
//Path: pages/api/email.js

import nodemailer from 'nodemailer';
import { customAlphabet } from 'nanoid';

import { SignJWT } from 'jose';
import cookie from 'cookie';

const secret = process.env.SECRET;
const nanoid = customAlphabet('1234567890', 8);

export default async function Verify(req, res) {
  const OTP = nanoid();
  const iat = Math.floor(Date.now() / 1000);
  const exp = iat + 60 * 60 * 24; // 1day

  const OTPToken = await new SignJWT({ OTP })
    .setProtectedHeader({ alg: 'HS256', typ: 'JWT' })
    .setExpirationTime(exp)
    .setIssuedAt(iat)
    .setNotBefore(iat)
    .sign(new TextEncoder().encode(secret)); //Generating the token
  const serialized = cookie.serialize('OTPToken', OTPToken, {
    httpOnly: true,
    maxAge: 60 * 60 * 24,
    path: '/',
  }); //Serializing the token
  res.setHeader('Set-Cookie', serialized); //Setting the cookie

//The rest of the code
After we’ve encrypted the OTP, let’s compare the OTP provided by the user to the OTP stored as a cookie in the verify.js file.
//Path: pages/api/verfiy.js

import { SignJWT, jwtVerify } from 'jose';
import cookie from 'cookie';
const secret = process.env.SECRET;
export default async function Verify(req, res) {
  const OTP = req.cookies.OTPToken; //Getting the token from the cookie
  console.log(OTP);
  if (OTP) {
    try {
      const OTPVerify = await jwtVerify(
        //Verifying the token
        OTP,
        new TextEncoder().encode(secret)
      );
      console.log(OTPVerify.payload.OTP, req.body.OTP);

      if (OTPVerify.payload.OTP === req.body.OTP) {
        return res
          .status(200)
          .json({ success: true, message: 'OTP is correct' });
      }
      res.status(400).json({ success: false, message: 'OTP is not correct' });
    } catch (error) {
      console.log(error);
      res.status(401).json({ success: false, message: 'Invalid OTP', error });
    }
  } else {
    res.status(403).json({ success: false, message: 'OTP does not exist' });
  }
}
Lastly, we will create the token and delete the OTPToken when the provided OTP is valid.
//Path: //Path: pages/api/verfiy.js

//The rest of the code
  if (OTP) {
    try {
      const OTPVerify = await jwtVerify(
        //Verifying the token
        OTP,
        new TextEncoder().encode(secret)
      );
      console.log(OTPVerify.payload.OTP, req.body.OTP);

      if (OTPVerify.payload.OTP === req.body.OTP) {
        const iat = Math.floor(Date.now() / 1000);
        const exp = iat + 60 * 60 * 24; // 1day

        const token = await new SignJWT({ key: 'test' })
          .setProtectedHeader({ alg: 'HS256', typ: 'JWT' })
          .setExpirationTime(exp)
          .setIssuedAt(iat)
          .setNotBefore(iat)
          .sign(new TextEncoder().encode(secret)); //Generating the token
        const serialized = cookie.serialize('token', token, {
          httpOnly: true,
          maxAge: 60 * 60 * 24,
          path: '/',
        }); //Serializing the token
        const OTPserialized = cookie.serialize('OTPToken', null, {
          httpOnly: true,
          maxAge: 1,
          path: '/',
        }); //Serializing the token
        res.setHeader('Set-Cookie', [serialized, OTPserialized]); //Setting the cookie
        return res
          .status(200)
          .json({ success: true, message: 'OTP is correct' });
      }
      res.status(400).json({ success: false, message: 'OTP is not correct' });
    } catch (error) {
      console.log(error);
      res.status(401).json({ success: false, message: 'Invalid OTP', error });
    }
  } else {
    res.status(403).json({ success: false, message: 'OTP does not exist' });
  }
Conclusion
This tutorial was aimed at teaching you how to set up multi-factor authentication in your application. In this tutorial, you learned how to set up MongoDB, connect it to the application, handle user registration/login/logout, handle sessions using token & cookie, and One-Time-Password using nodemailer.
Resources
Gain Debugging Superpowers
Unleash the power of session replay to reproduce bugs and track user frustrations. Get complete visibility into your frontend with OpenReplay, the most advanced open-source session replay tool for developers.