

TensorFlow is a powerful library that lets you leverage AI functions in browsers, and this article will show you how to implement an object detection app with few lines of code.

Discover how at OpenReplay.com.
There has been a shift in the way Artificial Intelligence (AI) is used in front-end development, and one of the examples is TensorFlow.js. It allows developers to create responsive and user-focused applications by leveraging machine learning on web browsers.
This article aims to develop an object detection app using React Native and TensorFlow.js. Additionally, we will explore aspects of TensorFlow and emphasize its groundbreaking impact on front-end Artificial Intelligence.
Understanding TensorFlow.js
To effectively utilize TensorFlow.js, it is essential to have an understanding of it. Here, you will be provided with an explanation of the TensorFlow.js library and everything it encompasses.
Explanation of TensorFlow.js library
TensorFlow.js is a JavaScript library developed by Google that aims to help with machine learning in web browsers. It allows developers to build, train, and run machine learning models within the client’s browser, eliminating the requirement for server-side processing.
One of the aspects of TensorFlow is its ability to support neural network architectures, making it a flexible tool suitable for various AI tasks.
Object detection
Now, let’s build an app for detecting objects using React Native and TensorFlow.js with the following steps:
Project design
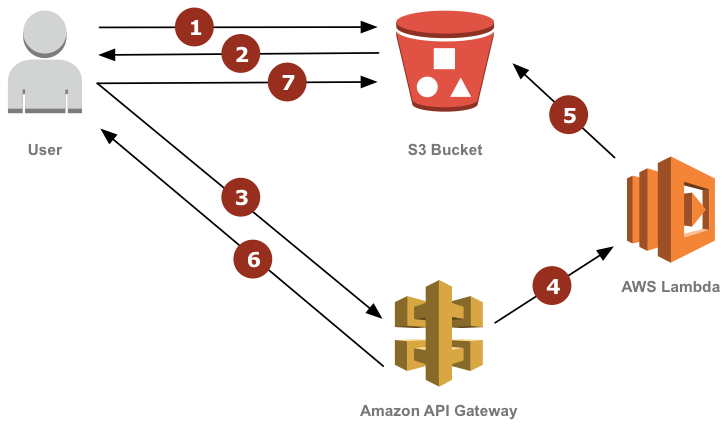 Image source: aws.amazon.com
Image explanation:
The image above involves uploading, storing, and getting pictures in a serverless setup. Let’s examine each step, with each numbered arrow representing a specific action:
-
Arrow 1: From the arrow labeled 1, a user makes an HTTP request (an asset being a resized image, e.g.) from an S3 bucket through its static website hosting URL. This could be a URL like https://example.com/images/resized/image.jpg.
-
Arrow 2: From the arrow labelled 2, the
S3 bucketcontains a routing rule configured for redirecting a request to resize API that is unavailable. As the asset is unavailable in theS3 bucket, the request to the resize API method is redirected. -
Arrow 3: From the arrow labelled 3, the user’s browser follows the redirection by sending a request to the resize operation through API Gateway. The request contains information about the original asset that you are requesting and possibly some parameters for resizing, such as width, height, or other attributes.
-
Arrow 4: From the arrow labeled 4, the
API Gatewaymethod is configured to call a Lambda function; which handles the request and will be the one to resize the image. -
Arrow 5: From the arrow labeled 5, the
Lambdafunction accepts the request, downloads the original image from theS3 bucketusing the request details, performs the resize operation on the image, and then uploads the resized image back into theS3 bucketwith the same key as the image requested by the client. -
Arrow 6: From the arrow labeled 6, after the
Lambdafunction completes the image resizing and the resized image is stored in theS3 bucket,API Gatewayrenders an HTTP permanent redirect (status code 301) to the user’s browser pathing to the URL of the resized image inS3. -
Arrow 7: From the arrow labeled 7, the user’s browser recognizes the permanent redirect and sends a new request to the URL of the resized image in the
S3 bucket. This time, unlike the initial request when the resized image was absent fromS3, it now exists in theS3 bucket, and the user’s browser retrieves it directly from there.
Device setup
For React Native development, you can test your app on an Android smartphone. You can do this by using your Android device and follow the steps below:
- Enable developer mode and USB debugging: Activate developer mode on your Android device and enable USB debugging in the developer options.
- Connect your Android device to your computer: You can link your Android device to your computer by utilizing a USB cable.
- Configure React Native project: Open the terminal and navigate to the directory of your React Native project. The React Native CLI can be used to initialize a project if you haven’t already:
npx react-native init objectdetector- Run the React Native project on your Android device: You can now run your React Native project on your Android device by connecting it to your computer and enabling USB debugging. Open the project directory in the terminal and type the following command:
npx react-native run-androidInstalling packages
The next step is to install the react-native-image-picker package. With the help of this package, you can take or pick pictures by opening the device’s camera or photo library.
The react-native-image-picker makes it simple to incorporate image selection and capture features into your React Native app by offering a straightforward API to access images from the device’s gallery or camera.
npm install react-native-image-picker --saveMore packages are required in addition. Now run the following commands inside your project directory to install these packages:
npm install expo-constants --savenpm install jpeg-js --savenpm install expo-permissions --saveIn our application, the expo-permissions package offers a practical means of requesting different permissions needed to use the camera, microphone, location, and other aspects of the device.
The jpeg-js package can help process picture data after it has been recorded or selected because it enables you to decode data from JPEG photos from within your React Native application.
The expo-constants package gives details on the device, including its platform (Android or iOS), ID, name, and version of the app, among other things. You can use this information to track statistics or to configure your app according to the device’s capabilities.
Integration of TensorFlow.js in React Native
Follow the instructions in the link to integrate TensorFlow.js into your React Native application. This involves setting up TensorFlow.js and configuring it to work within a React Native environment.
For applications used for image detection, you need to use certain pre-trained models after integrating TensorFlow.js. You can do this by running the following command inside your project directory:
npm install @tensorflow-models/mobilenet --saveThe command above installs the MobileNet model, which is a popular pre-trained model for image detection tasks.
This package provides a convenient API for loading the MobileNet model and using it for image detection tasks in your React Native app.
Integration of AWS Lambda in React Native
To store images in an S3 bucket and use a Lambda function to retrieve the image URL, go to the comprehensive instructions found in the AWS Lambda documentation.
To do this, an AWS Lambda function must be built up and configured to process picture data, and the processed photos must be saved to an S3 bucket.
In the AWS (Amazon Web Sevices) dashboard, you will also set up an API Gateway that will interface your React Native application and the Lambda function.
Your React Native app will send picture data to the Lambda function, which will then process it, save the processed image to the S3 bucket, and use the API Gateway to return the URL of the saved image to the client application.
Setting up AWS API Gateway for React Native integration
Begin by creating an API in your AWS console by utilizing this link. Follow the instructions provided under the API Gateway section.
Once you have completed setting up the API, return to the React Native application. Replace the content of the App.js file in your project directory with the code provided below:
import React, { useState } from "react";
import { View, Button, Image, Alert } from "react-native";
import * as ImagePicker from "expo-image-picker";
import { uploadImage } from "./api";

const App = () => {
  const [image, setImage] = useState(null);

  const pickImage = async () => {
    let result = await ImagePicker.launchImageLibraryAsync({
      mediaTypes: ImagePicker.MediaTypeOptions.All,
      allowsEditing: true,
      aspect: [4, 3],
      quality: 1,
    });

    if (!result.cancelled) {
      setImage(result.uri);
      uploadImage(result.uri);
    }
  };

  return (
    <View style={{ flex: 1, alignItems: "center", justifyContent: "center" }}>
      <Button title="Pick an image from camera roll" onPress={pickImage} />
      {image && (
        <Image source={{ uri: image }} style={{ width: 200, height: 200 }} />
      )}
    </View>
  );
};

export default App;
Explanation:
This code offers a straightforward user interface for choosing and showing an image from the device’s camera roll. Additionally, it works with the uploadImage API call to upload the chosen picture to an API Gateway.
Configuring Amplify with API name and endpoint URL
The API name and endpoint URL created are utilized to configure Amplify, as demonstrated below:
Amplify.configure({
  API: {
    endpoints: [
      {
        name: "MyAPI",
        endpoint: "https://example.com/myapi",
      },
    ],
  },
});
Explanation:
The provided code snippet initializes Amplify to communicate with a designated API endpoint, enabling the application to seamlessly interact with the specified back-end services.
Storing image in component state
The captureImageButtonHandler method will be triggered by the capture button. Next, it will prompt the user to take a picture or choose one from the device’s system file . The captured or selected image will be kept in the state as depicted below:
import React, { useState } from "react";
import { View, Button, Image, Alert } from "react-native";
import * as ImagePicker from "expo-image-picker";

const App = () => {
  const [image, setImage] = useState(null);

  const captureImageButtonHandler = async () => {
    try {
      const permissionResult =
        await ImagePicker.requestMediaLibraryPermissionsAsync();

      if (permissionResult.granted === false) {
        Alert.alert("Permission to access camera roll is required!");
        return;
      }

      const result = await ImagePicker.launchImageLibraryAsync({
        mediaTypes: ImagePicker.MediaTypeOptions.All,
        allowsEditing: true,
        aspect: [4, 3],
        quality: 1,
      });

      if (!result.cancelled) {
        setImage(result.uri);
      }
    } catch (error) {
      console.error("Error capturing image:", error);
    }
  };

  return (
    <View style={{ flex: 1, alignItems: "center", justifyContent: "center" }}>
      <Button title="Capture Image" onPress={captureImageButtonHandler} />
      {image && (
        <Image
          source={{ uri: image }}
          style={{ width: 200, height: 200, marginTop: 20 }}
        />
      )}
    </View>
  );
};

export default App;
Explanation:
- We start by importing necessary components and hooks from React Native, such as
useStatefor managingstateandButtonandImagefor UI elements. - Inside the app component, we initialize
statewithuseState, initially setting image tonull. - The
captureImageButtonHandlerfunction is an asynchronous function that handles the logic for capturing or selecting an image. - We use
ImagePicker.requestMediaLibraryPermissionsAsync()to request permission to access the device’s media library (camera roll). - If permission is granted, we use
ImagePicker.launchImageLibraryAsync()to launch theimage picker, allowing the user to select an image from the device’s file system. - If an image is selected
(!result.cancelled), we update the imagestatewith the URI of the selected image, which will be displayed in the UI. - Finally, we render a
buttonwith the title “Capture Image” that triggers thecaptureImageButtonHandlerfunction when pressed. We also conditionally render the selected image below thebuttonifimageisnot null.
Displaying the captured image and sending it to the endpoint
After capturing or selecting the picture, we will display it in the application.
The submitButtonHandler method will be invoked upon clicking the submit button. At this point, the captured picture will be sent to the designated endpoint as outlined below:
import React, { useState } from "react";
import { View, Button, Image, Alert } from "react-native";
import * as ImagePicker from "expo-image-picker";

const App = () => {
  const [image, setImage] = useState(null);

  const captureImageButtonHandler = async () => {
    try {
      const permissionResult =
        await ImagePicker.requestMediaLibraryPermissionsAsync();

      if (permissionResult.granted === false) {
        Alert.alert("Permission to access camera roll is required!");
        return;
      }

      const result = await ImagePicker.launchImageLibraryAsync({
        mediaTypes: ImagePicker.MediaTypeOptions.All,
        allowsEditing: true,
        aspect: [4, 3],
        quality: 1,
      });

      if (!result.cancelled) {
        setImage(result.uri);
      }
    } catch (error) {
      console.error("Error capturing image:", error);
    }
  };

  const submitButtonHandler = async () => {
    try {
      if (!image) {
        Alert.alert("Please capture or select an image first!");
        return;
      }

      const formData = new FormData();
      formData.append("image", {
        uri: image,
        type: "image/jpeg",
        name: "image.jpg",
      });

      const response = await fetch("https://your-designated-endpoint", {
        method: "POST",
        body: formData,
        headers: {
          "Content-Type": "multipart/form-data",
        },
      });

      if (response.ok) {
        Alert.alert("Image submitted successfully!");
      } else {
        Alert.alert("Error submitting image. Please try again later.");
      }
    } catch (error) {
      console.error("Error submitting image:", error);
      Alert.alert("Error submitting image. Please try again later.");
    }
  };

  return (
    <View style={{ flex: 1, alignItems: "center", justifyContent: "center" }}>
      <Button title="Capture Image" onPress={captureImageButtonHandler} />
      {image && (
        <Image
          source={{ uri: image }}
          style={{ width: 200, height: 200, marginTop: 20 }}
        />
      )}
      <Button title="Submit" onPress={submitButtonHandler} />
    </View>
  );
};

export default App;
Explanation:
- The logic for submitting the taken picture to the specified endpoint is handled by the asynchronous
submitButtonHandlerfunction. - We verify whether an image has been taken or chosen before submitting it. If not, we provide the user with an alert to take or choose an image first.
- The obtained picture data is appended to a newly created
FormDataobject. Sending the picture data as a component of a multipart form request requires this. - We transmit the picture data to the specified endpoint via a
POST requestusing theretrieve API.
Fetching image from S3 bucket and performing image classification
Through API Gateway, an AWS Lambda function is triggered by the picture that was submitted by the React Native app.
After processing the image and storing it in an S3 bucket, the Lambda function returns the URL of the stored image.
The React Native app receives the image URL in the response, and it is used to update its state.
The application then retrieves the picture data from S3 using the URL, enabling additional processing like TensorFlow-based image categorization.
For example:
import React, { useState, useEffect } from "react";
import { View, Button, Image, Alert } from "react-native";
import * as ImagePicker from "expo-image-picker";

const App = () => {
  const [image, setImage] = useState(null);
  const [imageUrl, setImageUrl] = useState(null);

  const captureImageButtonHandler = async () => {
    try {
    } catch (error) {
      console.error("Error capturing image:", error);
    }
  };

  const submitButtonHandler = async () => {
    try {
      setImageUrl(url);
      classifyImage(url);
    } catch (error) {
      console.error("Error submitting image:", error);
      Alert.alert("Error submitting image. Please try again later.");
    }
  };

  const classifyImage = async (url) => {
    try {
      const response = await fetch(url);
      const imageData = await response.blob();

      const predictions = await classifyImageProcessing(imageData);

      console.log("Predictions:", predictions);
    } catch (error) {
      console.error("Error classifying image:", error);
      Alert.alert("Error classifying image. Please try again later.");
    }
  };

  useEffect(() => {}, []);

  return (
    <View style={{ flex: 1, alignItems: "center", justifyContent: "center" }}>
      <Button title="Capture Image" onPress={captureImageButtonHandler} />
      {image && (
        <Image
          source={{ uri: image }}
          style={{ width: 200, height: 200, marginTop: 20 }}
        />
      )}
      <Button title="Submit" onPress={submitButtonHandler} />
    </View>
  );
};

export default App;
Explanation:
- To hold the URL for the picture that is kept in the
S3 bucket, we create a newstatevariable calledimageUrl. - When an image is submitted, the URL is sent to the
submitButtonHandlerfunction from theLambdafunction, which then usessetImageUrlto set the picture’sstatebefore calling theclassifyImagefunction and passing the URL as an argument. - Using TensorFlow.js, the
classifyImagefunction takes the image data from theS3 bucketvia the URL, processes it to create predictions, and then handles the predictions as necessary. - The
useEffecthook is used for additional setup or initial data fetching, such as checking permissions or fetching initial data when the component mounts.
Decoding raw image data with jpeg-js
The imageToTensor handler method utilizes the jpeg-js package to decode raw image data, extracting essential information such as width, height, and binary pixel data.
This information is then used to create a TensorFlow.js tensor representing the image, enabling further image processing or analysis, such as machine learning-based tasks.
For example:
import jpeg from "jpeg-js";

const imageToTensor = (rawImageData) => {
  const rawImage = jpeg.decode(rawImageData, true);
  const { width, height, data } = rawImage;
  const tensor = tf.tensor3d(data, [height, width, 4], "int32");
  return tensor;
};
Explanation:
- We import the
jpegmodule from thejpeg-jspackage, which provides functions to decode JPEG images. - The
imageToTensorfunction accepts the raw image data as an argument. - Inside the function, we decode the raw image data using the
jpeg.decodefunction provided by thejpeg-jspackage. We passtrueas the second argument to decode the image as a buffer. - The decoded
imageobject contains properties such as width, height, and data, where width and height represent the image’s dimensions, and data contains the binary pixel data. - We then use these properties to create a TensorFlow.js
tensorusing thetf.tensor3dfunction. We specify the dimensions of thetensoras [height, width, 4]. - Finally, we return the TensorFlow.js
tensorrepresenting the image.
Updating the existing Lambda function
In your AWS console, you can add the following code to the Lambda function that you’ve already generated.
const AWS = require("aws-sdk");
var s3BucketName = "<Your-S3-BucketName>";
var s3Bucket = new AWS.S3({
  params: { Bucket: s3BucketName, region: "<Your-S3-Bucket-Region>" },
});
exports.handler = (event, context, callback) => {
  let parsedData = JSON.parse(event);
  let encodedImage = parsedData.Image;
  var filePath = parsedData.name;
  let buf = Buffer.from(
    encodedImage.replace(/^data:image\/\w+;base64,/, ""),
    "base64",
  );
  var data = {
    Key: filePath,
    Body: buf,
    ContentEncoding: "base64",
    ContentType: "image/jpeg",
  };
  s3Bucket.putObject(data, function (err, data) {
    if (err) {
      callback(err, null);
    } else {
      var s3Url =
        "https://" + s3BucketName + "." + "s3.amazonaws.com/" + filePath;
      callback(null, s3Url);
    }
  });
};
In the provided code, the Lambda function manages image uploads, storesng them in an S3 bucket, ansuppliesng the URL of the stored image for subsequent processing or display.
Let’s run the app
To launch the application, enter the provided command into the terminal window:
react-native run-androidThe provided command will initiate the application on your Android device.
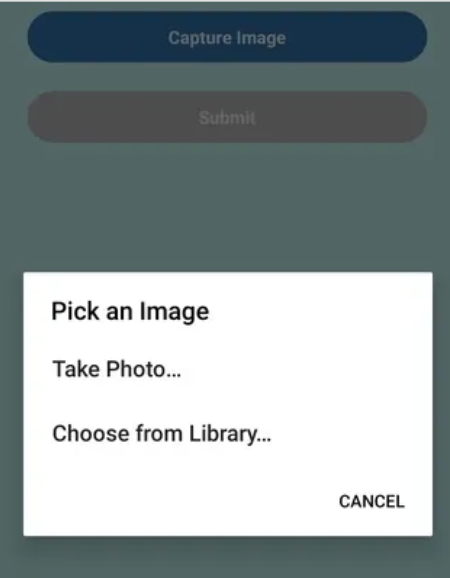
Screenshots of the application operating on an Android device are displayed below:
![20240212_085833[1]](/images/tensorflow--a-game-changer-for-development/images/image2.jpg)
And:
And:
![20240212_085856[1]](/images/tensorflow--a-game-changer-for-development/images/image4.jpg)
Explanation: We start from the attached screenshots above by giving the app access to the photos, images, and also files on the device. After that, the user will be given a choice to take a photograph with the device’s camera or choose an image from the device’s photo gallery. Once the image is captured or selected, the app will detect the objects present in the image. The object detection process is over; the app is able to make inferences based on the image content. Thus, we have successfully created an app to detect objects through React Native and TensorFlow.js.
Challenges and considerations
Let’s explore some of the challenges and considerations of using TensorFlow.
Performance consideration
The user experience can be impacted by the resource-intensive nature of running machine learning models in a browser. Sustaining adequate performance requires a careful evaluation of the computational load and optimal model architecture.
Compatibility and limitations
Ensuring compatibility and optimizing for various environments can be challenging because TensorFlow performance varies across different browsers and devices.
Model size and loading time
Large models can result in extended loading times, impacting the user experience. Balancing model complexity and size is essential for efficient deployment.
Future trends
Let’s examine some of the future trends in using TensorFlow:
Potential advancement in Tensorflow.js
Potential advancements in using TensorFlow are expected to bring transformative changes to the landscape of web-based machine learning. These transformative changes include real-time interactivity, federated learning in the browser, auto-machine learning integration, hardware acceleration support, etc.
Impact on the future of front-end development
With TensorFlow, machine learning capabilities can now be directly integrated into web applications, having a major influence on the direction of front-end development.
TensorFlow is impacting and will continue to shape front-end development through interactive and dynamic user experiences, personalized user interfaces, edge computing integration, enhanced data visualization with machine learning, and so on.
Integration with emerging web technologies
TensorFlow integration with emerging technologies is at the forefront of driving innovations across various domains. The following are some of the ways TensorFlow is seamlessly incorporating itself into the fabric of cutting-edge technologies:
- Internet of things(IoT): TensorFlow integration with IoT allows for on-device machine learning, making it possible for edge devices to make intelligent decisions locally without depending on centralized servers.
- Augmented Reality(AR) and Virtual Reality (VR): By combining Tensorflow.js with Augumented Reality and Virtual Reality technologies, developers can create applications such as object detection, gesture recognition, and scene understanding with AR and VR.
- WebAssembly(Wasm): By utilizing WebAsssembly, TensorFlow enhances performance and enables machine learning models to operate in web browsers at nearly native speeds.
- 5G networks: Large-scale dataset processing and streaming is made easier with TensorFlow applications thanks to the introduction of 5G networks. This is especially important for services and apps that operate in real time.
- Blockchain and Decentralized Applications(DApps): TensorFlow can be integrated into decentralized applications on blockchain networks, allowing for secure and privacy-preserving machine learning operations. This opens up possibilities for collaborative and distributed machine learning models.
Case studies
Below are some case studies of incorporating TensorFlow in front-end development:
Examples of successful projects using Tensorflow.js
Several successful projects have shown TensorFlow’s versatile nature and prowess across different fields. The following are some examples:
- PoseNet:
PoseNetmodel developed by Google creative lab, uses TensorFlow for real-time human pose estimation on the browser. It enables developers to track and analyze body movements using a webcam, enabling applications ranging from fitness tracking to interactive gaming. - ML5.js:
ML5.jsis a library built on top of TensorFlow that simplifies machine learning for creative projects. - Face-api.js:
Face-api.jsis a JavaScript library that leverages TensorFlow for face detection and recognition. It has been used in projects for facial analysis, emotion recognition, and age estimation directly in web applications.
Demonstrations of innovative front-end applications
Innovative front-end applications that demonstrate machine learning’s potential right in the browser have been made possible using TensorFlow. Here are a few examples of this kind of applications:
- Interactive image segmentation: TensorFlow has been used to construct interactive image segmentation tools. Users can draw or annotate regions of interest on photos, and the model will segment and categorize the segmented area in due time.
- Real-time object detection: TensorFlow applications that can recognize and label things in camera streams are demonstrated through real-time object detection in the browser. Bounding boxes surrounding identified objects are displayed to users in real-time.
- Gesture recognition for web navigation: Applications designed for gesture recognition through the whole-hand gestures required for controlling and navigating web interfaces are built using TensorFlow. This interaction, in particular, is often necessary for accessibility and touchless interfaces.
Conclusion
In a nutshell, TensorFlow is a web development revolution that will be the segment in history when machine learning is woven into the very fabric of the internet. It is reflected in the democratization of artificial intelligence, the creation of responsive and interactive programs, and the motivation of developers to get to the limits of their creativity.
What is more, as TensorFlow grows; it not only broadens the horizons of web development but also makes us close to the era when webmasters are recognized, and users are presented with smart, dynamic, and individual experiences.


