Top 12 Advanced Git Commands to Know
Important Git commands to further your knowledge of this tool


Git is a Distributed Version Control System that practices and records the tracking and modification of any files to the software code. Git is a widely used and essential tool, primarily if you work with a team. A Distributed Version Control System is a version control system in which the user/member/engineer has a working copy of the codebase and its history on their local machine. It means that members can work offline, split features into chunks, and work with them.
Git commands are rules given to track, store and modify changes to a repository. These commands’ purpose is to do everyone’s jobs easily, fast, in sync, and bring clarity.
To follow this article well, you should have a basic understanding of Git and have it installed on the system. To get started, you can check out this article Getting started with Git.
Let us jump right into the Git commands.
Git Cherrypick
Git cherry-pick is designed to pick a commit from a branch and apply it to another branch. This could happen when a user makes a mistake by committing a change to the wrong branch. Rather than merging the whole branch, you can cherry-pick. This command is also useful for team collaboration. Different teams may need a commit. Git Cherry-pick helps with that.
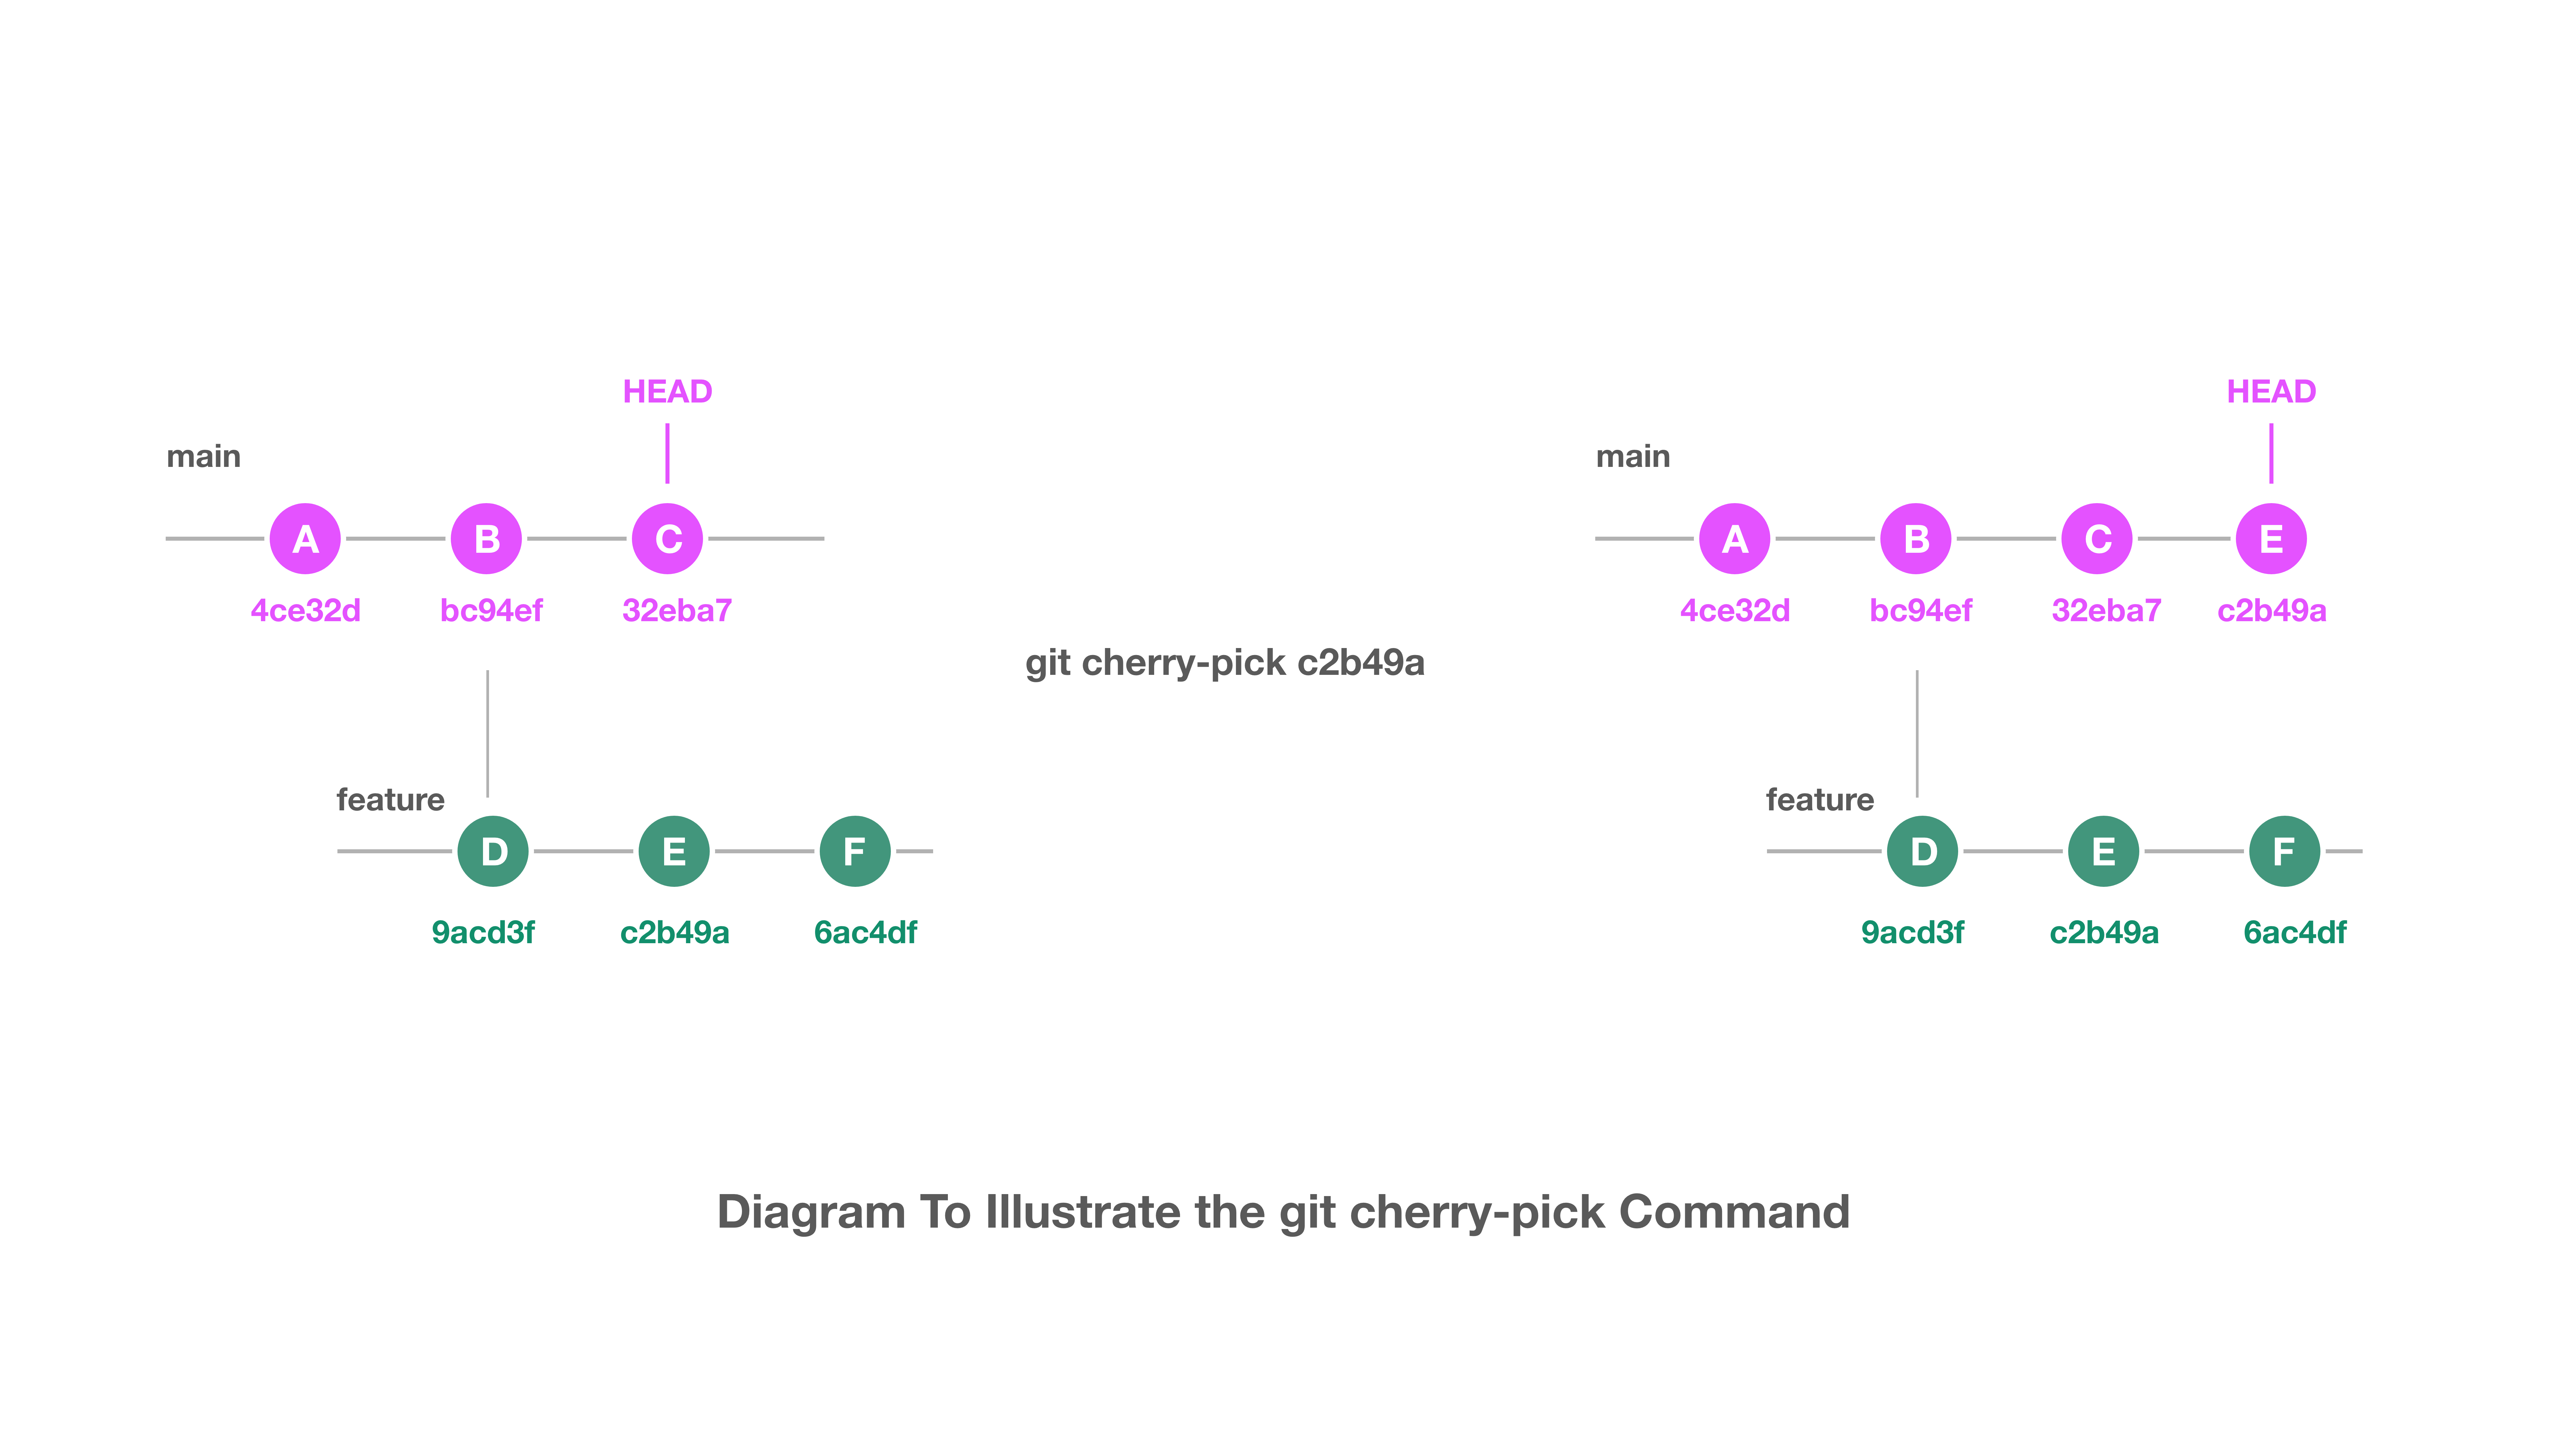
- First, ensure that you are in the branch you want to be in.
git checkout <branch_name>- Cherry-pick the commit using the commit hash
git cherry-pick <commit_id>The commit ID is the commit hash key. It can be gotten when you run git log.
git cherry-pick df2a446bd3742c530f2bc6eac2b6b38c99a697d8git cherry-pick --edit <Hash>This command lets you edit a commit message before committing.
git cherry-pick --no-commit <Hash>Rather than creating a new commit, it carries over the commit message from your branch to your working directory.
To dive deeper, you can read up on Git Cherry-pick.
Git Clean
Git Clean operates on or cleans the working repository by removing untracked files. For clarity, untracked files are files in your repository working directory that haven’t been staged or added to the version control using the popular command git add.
Just running git clean will most likely throw an error because the command needs to be passed along with an option.
git clean -nThis command tells you what file would be removed without actually removing them. This is most definitely a good practice. It makes you quite sure about what files are going to be removed.
git clean -f or --forceThis command deletes an untracked file from the working directory. This doesn’t remove untracked folders or .gitignore files. A file path can also be passed along git clean -f.
git clean -dn
git clean -df
By passing the -d option, it removes untracked directories. By default, git clean does not remove untracked directories, just untracked files.
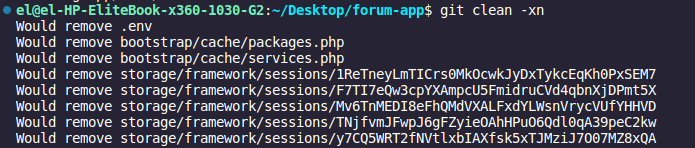
git clean -xn
git clean -x
This command forces the removal of ignored files. It is best practice to check what files would be removed by doing a dry run first.
For more on Git clean, click here
Git Commit
Git commit takes and records staged changes(changes that have been added) made to a project. This change becomes the most recent commit in the local repository.
Changes are staged using the git add . command.
Also, note that using git commit does not automatically save to the remote server. It only saves in the local Git repository.
git commitThis command launches an editor prompting for a commit message. After saving and exiting, it creates a commit message.
git commit -aThis command includes all changes to tracked files. It does not include untracked, those that haven’t been added using Git add . files.
git commit -m "commit message"
This command creates a commit along with a commit message passed. Accurate commit messages help to clarify the changes made to a repository. So teammates can understand what changes were pushed because of the right name given. This command sets the commit message here rather than launching the editor.
git commit -am "commit message"This command combines the -a and the -m options to commit changes. This creates a commit for all staged changes and adds a commit message.
This omits the git add . step.
git commit --amendThis command modifies the previous commit. Rather than creating a new commit, current staged changes will be added to the previous commit. This command opens up the editor and prompts you to change the previous commit that is already there.
For more on Git commit.
Git Config
This command allows you to change and set Git configuration values and settings globally or locally(in a specific git repository), depending on which you prefer. Git config may seem like a beginner command, but there is no end to what you can do with it.
Globally, Git configuration is stored in the .gitconfig file.
el@el-HP-EliteBook:~$ cat .gitconfig
[user]
              email = <your_email>
              name = <your_name>
This file shows the configuration already in place globally. It can be more, not just email and name.
git config user.nameThis shows the user’s name.
Locally, the config file is stored in your repository’s .git folder.
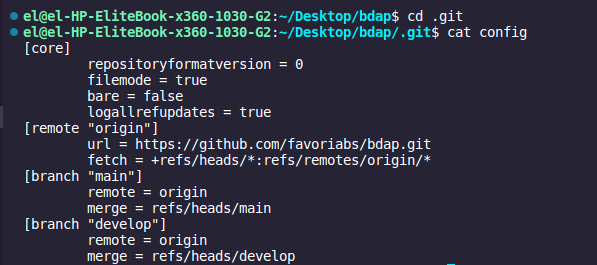
The configuration file includes some information, like the URL of the repo and the branch.
N.B Global level uses --global flag, local(specific git repository) level uses --local flag
git config --global user.name <your_name>This command writes the value <your_name> to the configuration user.name. Since it’s using the --global flag, it sets the value for the current operating system user. This username will be the commit author that will show up in your commits.
git config --global user.email <your_email>Git Config Editor
As an engineer, when any command sends me to an editor I don’t fully understand, I get confused, and it takes time to adjust. This command allows us to choose an editor of our choice.
git config --global core.editor <editor>git config --global core.editor "emacs"The particular editor of your choice will always be opened when the git command is run. There are other editors from you to choose from.
git config -l or --listThis is a way to see if the changed or added settings are applied. The results would vary depending on whether you are in your local repo or you are global.
Checkout Git Config Editor for more.
Aliases
These are custom and temporary shortcuts that help increase efficiency. Again, this can be set globally or in your local repo.
git config --global alias.<what_you_want_to_set_the_command_to> <command>git config --global alias.a addSo when next you want to add a file to the staging area, rather than using git add ., you can do git a .
git config --global alias.cm commit
git config --global alias.stat status
For more on Git Alias, click here.
The -unset flag can be used to get rid of a setting.
git config --global --unset user.nameThis removes the user name from the global config file.
—unset-all : removes multiple settings in the file
—remove-section: removes a particular section from the file
git config --global --remove-section "section"
This command removes the user section from the configuration file. To learn more, check out Git config
Session Replay for Developers
Uncover frustrations, understand bugs and fix slowdowns like never before with OpenReplay — an open-source session replay tool for developers. Self-host it in minutes, and have complete control over your customer data. Check our GitHub repo and join the thousands of developers in our community.
Git Diff
This command compares changes made in a file, commit, or between two branches. It compares changes between your working directory and the staged directory. “Changes” here is an important keyword. There has to be a difference between the changes in a working directory and the staged area; if not, there would not be output. Creating a new file and using the git diff command will output nothing.
git diff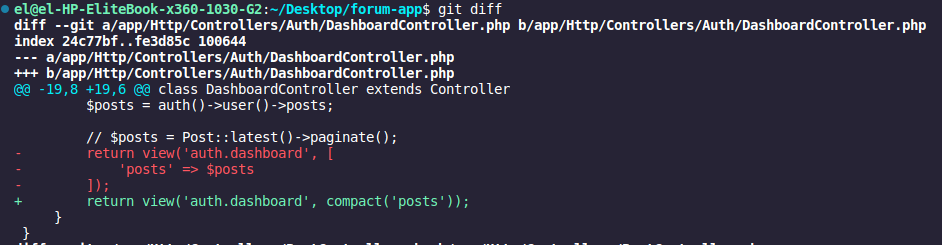
The image above shows the difference between my staged area and my current working directory. In this article, we’ll dwell on a few lines.
-
Line 1 shows the two versions of the same file. Version A and Version B
-
The red and green lines show the changes between the two versions. The red lines belong to Version A; the green lines belong to Version B
git diff --staged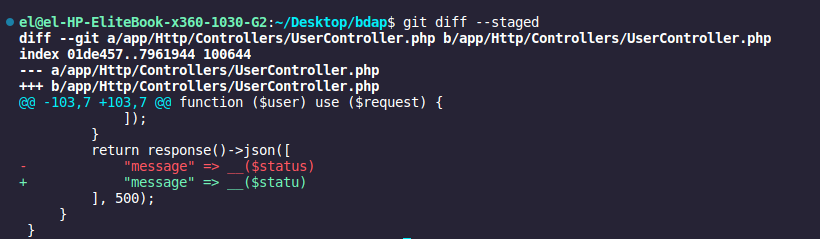
This command shows the changes between your last commit and the staged environment. Your changes have to be staged(changes that have been added).
git diff HEADThis command compares changes from your staged and unstaged environment with your last commit.
git diff <branch_1> <branch_2>This command compares changes between two branches. Specifically, the commits of these branches as this command doesn’t check the staged and unstaged changes.
Ready to learn more? Check out Git diff
Git Log
Git log is a prime example of a version control system.
This command accesses and shows the history of commits gone through by the repo.
git log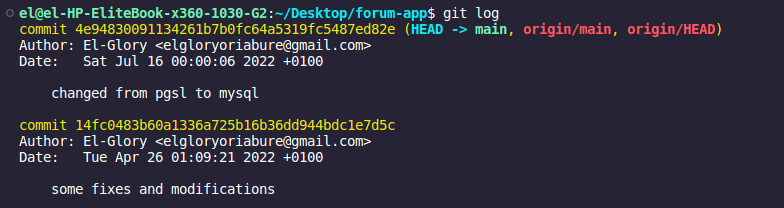
The image above shows:
-
The Commit author: The individual who performed the action.
-
The Commit date: The date, time, and timezone when the action was performed.
-
The Commit message: The message written while committing these changes.
It is worth noting that the records and history of a repo could easily grow into a large number, and soon become difficult to look through all of them.
git log --oneline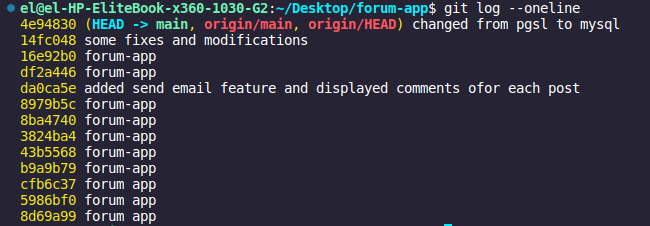
-
Commit Id: This is a compressed version of the commit hash. Every commit has this
-
Commit message: The message written while committing these changes
git log <id>This command is used to find a required commit and see the details.
git log -n 5 --onelineThis particular command limits the number of commits to be viewed. This is helpful when you have an idea of when you made those commits.
For more on Git log, click here
Git Push
This command “pushes”/saves/uploads all of the commits that you have made in your local repository to a remote server.
git push <remote_name> <branch_name>git pushGit push accepts options that specify where commits are pushed too. If the command line does not accept options about where to push, the current branch is determined so changes can be pushed. Also, the “remote_name” defaults to “origin”.
git push <remote_name> --forceThis is the same as git push but forces the push regardless of any non-fast-forward merging error that it throws.
git branch -D <branch_name>
git push <remote_name> :<branch_name>
This command deletes a branch. Specifically, Git is told to push nothing into a branch on a specific remote name, and this action deletes the specified branch.
Check out Git Push for more information.
Git Rebase
Git Rebase is designed to combine and integrate changes between branches. It is very similar to git merge, and they just do it differently.
Git rebase moves the entire working directory branch ahead of the main or master branch. This integrates all of the commits into the main branch. There won’t be any logs of the feature branch, and the logs will be modified after the merge. This method is cleaner and gives more clarity when running git log.
It is therefore better to use git rebase when working on a private branch, when other developers don’t need the logs.
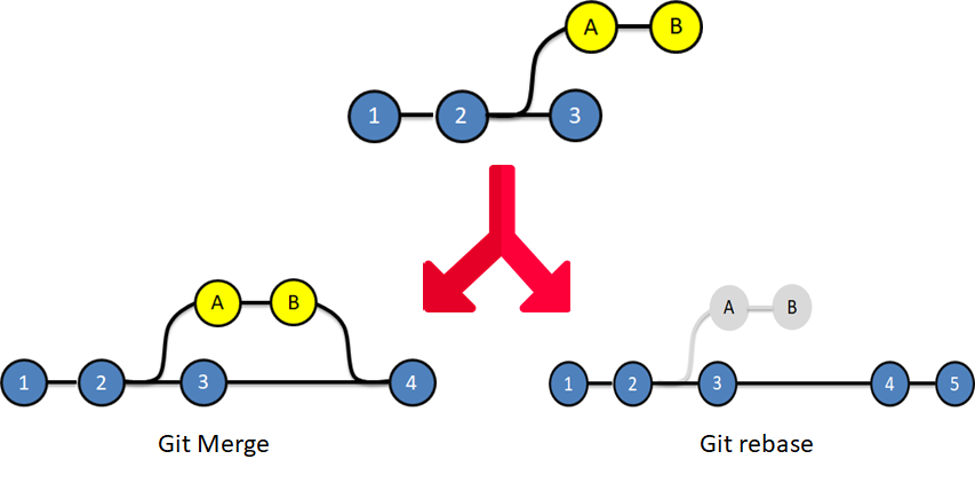
Simple illustration showing the difference between git rebase and git merge (Tanishqa Chaudhary from Edureka, Jan 18, 2022)
git checkout <your_branch_name>
git rebase name
One Golden Rule for Git rebase is that you should never rebase your main branch into your <branch_name>. That will move all of the commits from the main to the front of your feature branch, which will confuse your teammates. So it is best to avoid that.
Need to dive deeper? Checkout Git Rebase
Git Reset
As the name implies, this command is a tool for undoing changes. It resets the changes to a current state. Git reset has three forms by which it is called: —soft, —mixed, and —hard. Git reset uses the staging area (index), the working directory, and the HEAD.
For clarity, the working directory allows you to modify files before it’s added to the staging area when it is tracked. The staging area allows you to commit any given file of your choice.
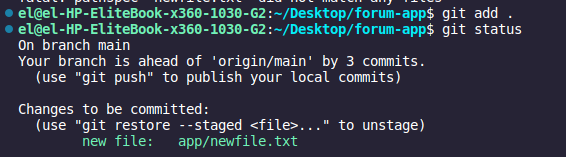
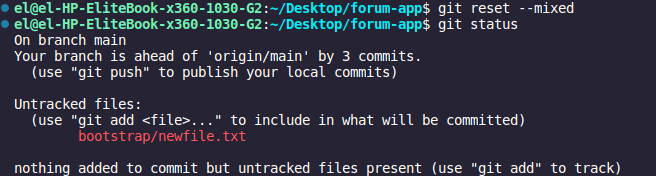
Git Reset Hard
For this example, I am
-
adding a new file
-
Checking the status
git reset --hardThe —hard option readjusts the changes and sets the HEAD to the position of the last commit. This also removes the available changes from the staging area. The new file that was added has been removed from the repository. This loss cannot be undone, so it is worth noting.
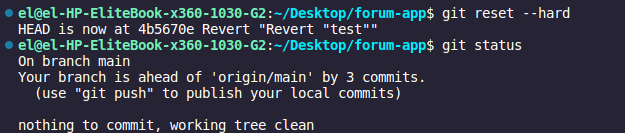
Need to dive deeper? Checkout Git Reset Hard
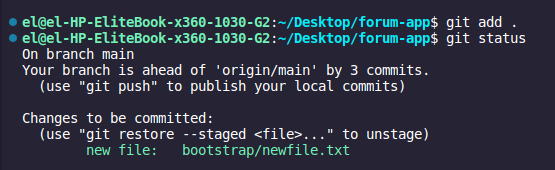
Git Reset Mixed
The mixed option is the default for the git reset command. With this option, the reference pointers are updated, the pending changes are taken back to the working directory, and the staging index area is readjusted to the position of the chosen commit.
git reset --mixed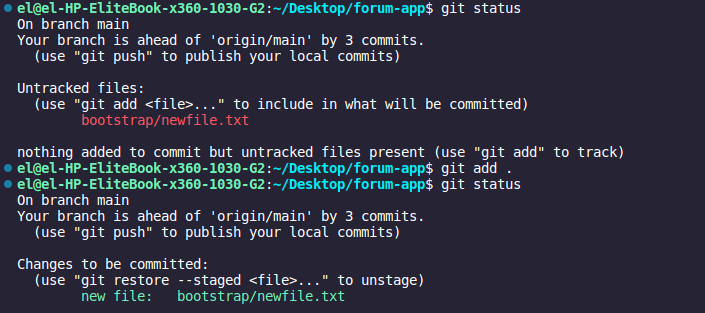
Check out Git Reset Mixed for more.
Git Reset Soft
With the --soft command, the staging area and the working repository aren’t affected, although the ref pointers will be updated.
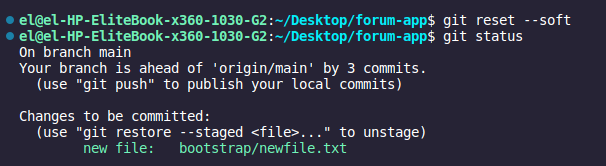
For HEAD being updated,
git reset --soft <commit_hash>This will shift the HEAD to the particular commit hash that was passed. These commands are sensitive, so if you are working with a team, they need to know if you are running any of these commands.
For more on git reset, click here
Git Revert
Git Revert could be easily called an undo operation, but that is not all it is. Git Revert removes the previous commit but doesn’t delete it from the history. Instead, it creates a new commit for the removed commit. It could be not very clear but let’s get right into it.
For example, a file was created, added to the staging area then committed.

Checking the history, we can see the commit there.
git revert <commit_id>This removes the commit and saves “removing the commit” as a commit.
git revert HEADThis command reverts the commit that was removed
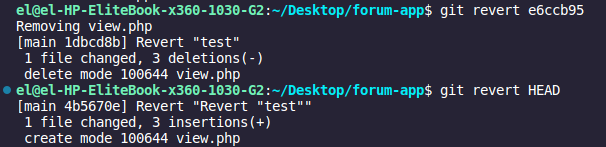
-
Line 1: Reverting the most recent commit that was made. This commit removes the file. That is because my last change was creating the file
-
Line 3:
Git revertcreates a commit called “revert test” -
Line 6: This reverts the commit that was initially reverted and creates a commit “Revert ‘Revert test’” along with it.

Git log shows the commits created when the commands were run.
Check out Git Revert for more.
Git Shortlog
git shortlog -s -n
Git shortlog -s -n counts the number of commits made by an author.
git rev-list --all --countThis command counts the total number of commits in a repository.
git rev-list --count <branch>
git rev-list --count remotes/origin/main
This counts the number of commits in a branch. You will often have to check the complete name of a branch path by listing all the branches first.
Checkout shortlog for more
Git Stash
Git Stash “stashes”/keeps/saves all of your uncommitted changes and cleans your working tree. This comes in handy when you need to work on something else, and you aren’t entirely done with the present task, or you don’t want to commit what you are working on presently. . You can always come back and re-apply/revert the stashed changes.
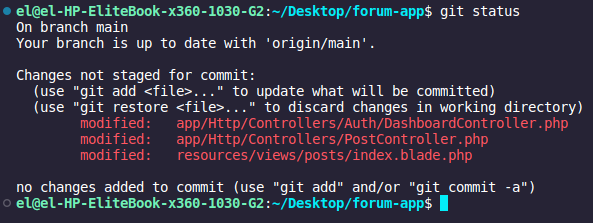
The image above shows the status of the changes made.

Git stash saves the uncommitted changes and clears the working tree.
git stash pop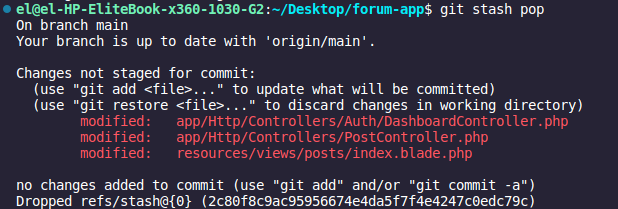
Git stash pop reverts the stashed changes.
It is important to know that git stash saves:
- Staged changes(changes that have been added)
- Changes made to files that are tracked by Git (unstaged changes)
It won’t stash:
- New files that are yet to be staged (added)
- Files that have been ignored (files in .gitignore file)
git stash -uThis command stashes the untracked files.
git stash -aThis stashes the ignored files.
Ready to learn more? Check out Git stash
Conclusion
We have been able to discuss some commands and how to maximize them. I think it is fair to say Git is a vital tool to learn, which will help your productivity.
Thank you for reading!
Gain Debugging Superpowers
Unleash the power of session replay to reproduce bugs and track user frustrations. Get complete visibility into your frontend with OpenReplay, the most advanced open-source session replay tool for developers.