Understanding React's useRef() hook
Learn how to work with the useRef() hook in a TypeScript React app


This tutorial will look at a demo that accepts user input and saves it in a reference, or ref, while building a simple task app with TypeScript. You will also learn how to create references, which are persisted mutable values, by using the useRef hook.
A built-in React hook called useRef accepts one argument or parameter as its initial value and outputs a reference. A fascinating and helpful property of the reference is called the current.
You should be familiar with the following:
- Basic knowledge of Typescript, React, JavaScript, and CSS at an intermediate level to follow along with this article.
- Additionally, you must have Node installed on your computer and have a basic understanding of npm packages.
- A good code editor; VSCode for me. You can get started by downloading VScode Here
- React Router, a library for routing in React, will also be used. Knowledge of React Router isn’t necessary, but you may want to check out the documentation.
Let’s get started!
Overview of useRef hook
Let’s look at some key features of the React useRef hook:
- When updated, it can store mutable values without requiring a re-render.
- It can be applied to directly access a DOM element.
- useRef() only returns one item, and it returns an Object called the current.
For this tutorial, we will implement the application of useRef() to access DOM elements.
For instance, you would need to access DOM elements to focus on the input field when the component mounts.
To make it work, you must construct a reference to the input, add the reference to the tag’s ref property, and then call the custom method element after mounting using the element’s.focus().
import { useRef, useEffect } from 'react';
function InputFocus() {
  const inputRef = useRef();
  useEffect(() => {
    inputRef.current.focus();
  }, []);
  return (
    <input
      ref={inputRef}
      type= "text"
    />
  );
}
const inputRef = useRef(); a reference is created to hold the input element.- inputRef is then assigned to the ref attribute of the input field:
<input ref={inputRef} type= "text"/>.
After mounting, React sets inputRef.current to be the input element. Now you can set the focus to the input programmatically: inputRef.current.focus().
When working on a TypeScript project, the useRef hook can be used in various conditions, especially when trying to manipulate and access the DOM without causing issues.
Leverage the useRef() hook to maintain track of variables without creating re-renders and enforce the re-rendering of React Components.
In React, we can add a ref attribute to an element to access it directly in the DOM.
When to use UseRef and useState
UseState hook is the React API for managing local state in a component. However, if it is called too frequently, the component must be rendered again after each call to the update methods.
UseState is ineffective for keeping specific states; too much re-rendering is caused by useState. But on the other hand, useRef may be used to track variables without triggering the re-rendering of the component.
Since both hooks can access DOM elements and essentially accomplish the same thing, useState() and useRef() are frequently confused. Some use cases to remember when using either of the react hooks are that Refs help gather user input, access DOM element properties, and store dynamic values.
State-based storage, on the other hand, is the best option if you’re using components or storing data related to them.
The reference value is updated when it is modified without requiring a refresh or re-render. However, the component must render again to update the state or its value in useState().
How Values Are Stored In useRef
React’s Ref variables are mutable objects, yet React persists the value across re-renders.
The structure of a ref object is similar to that of a {current: ReactElementReference} because it has one property named current.
Another instance of use Ref enables us to save values you can access and modify.:
const Component = () => {
    const ref = useRef({
        renderCount: 0
    });

    // Increase the render count on every re-render
    ref.current.renderCount += 1;

    return <>This is useRef</>;
}
You must change ref.current, not the ref itself, to alter the reference’s value.
If a DOM element is updated during re-rendering of a component, the reference to that element must also be updated; otherwise, the reference should be kept. By doing this, inconsistent renderings in the final product are reduced.
How to use the useRef hook with Typescript
There is a type definition for each native HTML element. Here are some other examples:
// <div> reference type
const divRef = React.useRef<HTMLDivElement>(null);

// <button> reference type
const buttonRef = React.useRef<HTMLButtonElement>(null);

// <br /> reference type
const brRef = React.useRef<HTMLBRElement>(null);

// <a> reference type
const linkRef = React.useRef<HTMLLinkElement>(null);
Passing null as the default value when creating and invoking a useRef() hook is crucial. React.useRef() can only return the element object or null, so this is significant.
Session Replay for Developers
Uncover frustrations, understand bugs and fix slowdowns like never before with OpenReplay — an open-source session replay tool for developers. Self-host it in minutes, and have complete control over your customer data. Check our GitHub repo and join the thousands of developers in our community.
Setup And Installations Of The Task App Project
Launch a terminal at the project’s root by pressing Ctrl+’ or selecting Terminal->New Terminal in Visual Studio Code.
Next, we will install React with Typescript into the root directory:
$ npx create-react-app name-of-app --template typescript
Installing React-icons and React-beautiful dnd is required for the task app.
Additionally, to enable TypeScript functions, we must install a few dependencies and type components.
Input the following command to the terminal as so:
npm i react-beautiful-dnd react-router-dom react-icons
npm i @types/react-icons
npm i @types/react-beautiful-dnd
React-router-dom will enable us to configure routes to our various React components, effectively producing various pages.
React icons will provide easy-to-use SVG-based icons.
React-beautiful-dnd is a simple library responsible for handling the drag-and-drop functionality associated with the task app.
We will add basic styling to our app using CSS modules, so create a new file: src/App.css (edit with the files on GitHub Repo).
Create App Component and Data Models
Create a Todo data model on the file on path src\models\models.ts, since we are working with TypeScript, types are assigned using the interface keyword as below:
export interface Todo {
  id: number;
  todo: string;
  isDone: boolean;
}
Now that the data model is prepared, each object has the appropriate types assigned to it. Import the Todo types into the App component.
Import this component into App.js, import DragDropContext from React beautiful dnd, and wrap around the entire parent component.
This will be our home page, so the path will be ”/”: On the Src/App.tsx file, open and edit as so:
// App.tsx
import React, { useState } from "react";
import "./App.css";
import InputField from "./components/InputField";
import TodoList from "./components/TodoList";
import { DragDropContext, DropResult } from "react-beautiful-dnd";
import { Todo } from "./models/models";
const App: React.FC = () => {
  const [todo, setTodo] = useState<string>("");
  const [todos, setTodos] = useState<Array<Todo>>([]);
  const [CompletedTodos, setCompletedTodos] = useState<Array<Todo>>([]);
  const handleAdd = (e: React.FormEvent) => {
    e.preventDefault();
    if (todo) {
      setTodos([...todos, { id: Date.now(), todo, isDone: false }]);
      setTodo("");}};
  return (
    <DragDropContext onDragEnd={onDragEnd}>
      <div className="App">
        <span className="heading">Taskify</span>
        <InputField todo={todo} setTodo={setTodo} handleAdd={handleAdd} />
        <TodoList
          todos={todos}setTodos={setTodos}CompletedTodos={CompletedTodos}
          setCompletedTodos={setCompletedTodos}/>
      </div>
    </DragDropContext>
  );};
export default App;
Within src\components\InputField.tsx, we’ll implement three simple useState hooks that do the following functions.
const [todo, setTodo] = useState<string>("")The above state keeps track of the user inputs and takes in a type of string. This enables strict error checking at runtime.const [todos, setTodos] = useState<Array<Todo>>([])Note the type being passed to the above state; it takes in an array of todos which we imported from the data model. This state renders the data model to the<TodoList>component.const [CompletedTodos, setCompletedTodos] = useState<Array<Todo>>([])Here we keep track of the completed state of the task. We want the task app to be enabled for drag-drop functionalities. Hence, it is crucial to have different states to handle completed and incomplete tasks.- Observe the imported
DragDropContextbeing wrapped around our entire app, and this is to ensure the functioning of the react drag-drop library. - Finally, the function
onDragEnd()takes care of the entire source and destination logic of any single drag-drop list item.
Create InputField Component
Next, we’ll create an <inputField> component and consume it as props from <App.tsx>. We’ll use it in our root App component to check for input when clicked in the state.
Within <inputField> From path src\components\InputField.tsx, access the DOM using useRef() to clear out the blur effect after the DOM has been manipulated.
These props are now accessible in our inputField component. We will use destructuring to get the props:
 //InputField.jsx

import React, { useRef } from "react";
import "./styles.css";

interface props {
  todo: string;
  setTodo: React.Dispatch<React.SetStateAction<string>>;
  handleAdd: (e: React.FormEvent) => void;

}
const InputField: React.FC<props> = ({ todo, setTodo, handleAdd }) => {
const inputRef = useRef<HTMLInputElement>(null);

};
export default InputField;
When the user types in their task as a string, the todo state will render, and setTodo will trigger an onChange event, thereby causing a render.
inputRef() takes in a type called HTMLInputElement, sets the initial value to null, and passes it into onSubmit() to prevent DOM issues and blurry background screen when form triggers.
So, edit inputField.tsx as so:
//InputField
return (
<form
className= "input"
onSubmit={(e) => {
handleAdd(e);
inputRef.current?.blur();
}}
>
<input
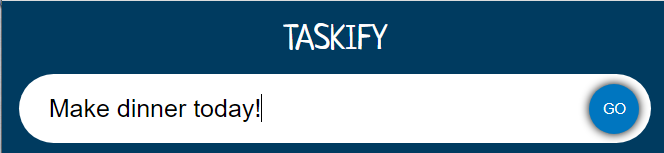
type= "text"
placeholder= "Enter a Task"
value={todo}
ref={inputRef}
onChange={(e) => setTodo(e.target.value)}
className="input__box"
/>
<button type="submit" className="input_submit">
GO
</button>
</form>
);From the above code block, when the user clicks the GO button, the onSubmit event captures the onChange function and triggers it to React.FormEvent(), which was destructured through handleAdd() and passed as props from <App.tsx>,
then a setTodos state is modified to capture the todos data models and render them on the screen.
Creating the todo list
In rc\components\TodoList.tsx, let’s map through various Todos items using the map array method while setting a unique key for each <SingleTodo> component as so:
//TodoList.tsx
import React from "react";
import { Todo } from "../models/models";
import SingleTodo from "./SingleTodo";
interface props {
todos: Array<Todo>;
setTodos: React.Dispatch<React.SetStateAction<Array<Todo>>>;
setCompletedTodos: React.Dispatch<React.SetStateAction<Array<Todo>>>;
CompletedTodos: Array<Todo>;}
const TodoList: React.FC<props> = ({
todos,setTodos,CompletedTodos,setCompletedTodos,
}) => {
return (
<div className="container">
<div >
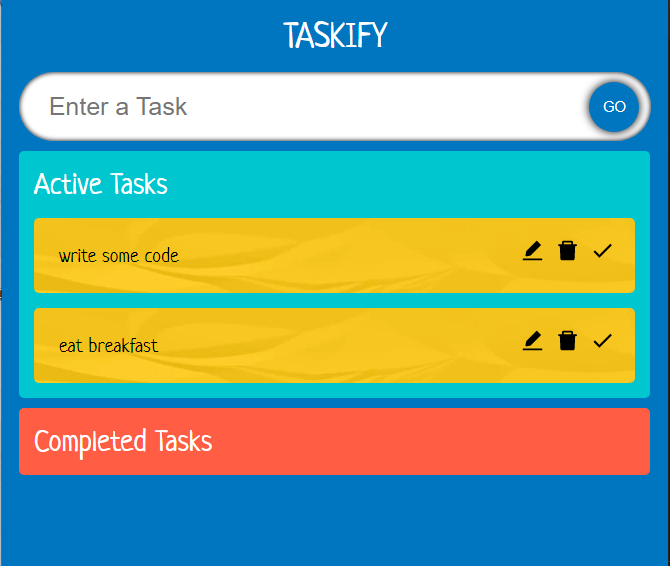
<span className="todos__heading">Active Tasks</span>
{todos?.map((todo, index) => (
<SingleTodo
index={index}todos={todos}todo={todo} key={todo.id}
setTodos={setTodos}/>))}
</div><div>
<span className="todos__heading">Completed Tasks</span>
{CompletedTodos?.map((todo, index) => (
<SingleTodo
index={index}todos={CompletedTodos}todo={todo}
key={todo.id}setTodos={setCompletedTodos}/>))}
</div></div>
);};
export default TodoList;Notice how we duplicated the <SingleTodo> component within the container div to account for both the input todos and CompletedTodo.
Creating SingleTodo Component
Finally, the <SingleTodo> component will look like this:
//SingleTodo.tsx
import React, { useEffect, useState } from "react";
import { useRef } from "react";
import { AiFillEdit, AiFillDelete } from "react-icons/ai";
import { MdDone } from "react-icons/md";
import { Todo } from "../models/models";
const SingleTodo: React.FC<{
index: number;todo: Todo;todos: Array<Todo>;
setTodos: React.Dispatch<React.SetStateAction<Array<Todo>>>;
}> = ({ index, todo, todos, setTodos }) => {
const [edit, setEdit] = useState<boolean>(false);
const [editTodo, setEditTodo] = useState<string>(todo.todo);
const inputRef = useRef<HTMLInputElement>(null);
useEffect(() => {
inputRef.current?.focus();
}, [edit]);
const handleEdit = (e: React.FormEvent, id: number) => {
e.preventDefault();
setTodos(
todos.map((todo) => (todo.id === id ? { ...todo, todo: editTodo } : todo))
);
setEdit(false);
};
const handleDelete = (id: number) => {
setTodos(todos.filter((todo) => todo.id !== id));
};
const handleDone = (id: number) => {
setTodos(
todos.map((todo) =>
todo.id === id ? { ...todo, isDone: !todo.isDone } : todo
));};
return (
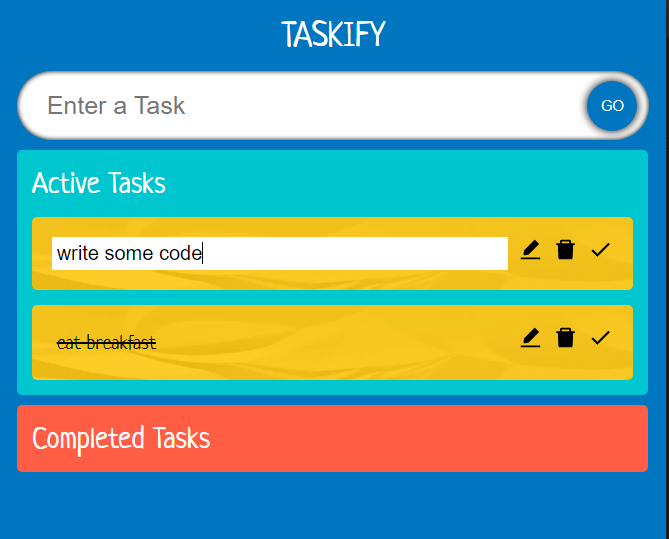
<form>{edit ? (
<input
value={editTodo}
onChange={(e) => setEditTodo(e.target.value)}
className="todos__single--text"
ref={inputRef} />
) : todo.isDone ? (
<s className="todos__single--text">{todo.todo}</s>
) : (
<span className="todos__single--text">{todo.todo}</span>
)}<div> <span
className= "icon"
onClick={() => {
if (!edit && !todo.isDone) {
setEdit(!edit); }}}>
<AiFillEdit /> </span>
<span className="icon" onClick={() => handleDelete(todo.id)}>
<AiFillDelete /> </span>
<span className="icon" onClick={() => handleDone(todo.id)}>
<MdDone /> </span>
</div> </form> );};
export default SingleTodo;In the code above, we’ve added the following functions:
-
inputRef(): we wrapped the useRef function within useContext() to ensure it runs only after the edit state is triggered.
-
handledelete(): uses the JavaScript filter array method to delete a task
-
handleDone(): maps through the todos array and enables the strikethrough to mark a given task as done.
-
handleEdit(): access the setTodos through the JavaScript map array method and modify tasks.
-
the state for editing and checking for already edited todo.
Conclusion
The main takeaways from this article include the following:
- useRef hook and Accessing DOM element
- Implement useRef with Typescript
In this article, we created a straightforward task app using Typescript and the useRef react hook. Referencing is created using the useRef() hook.
The special object inputRef is produced when calling const inputRef = useRefHTMLInputElement>(null) with the initial value(as set to null). The current property of the inputRef object can be used to read the reference value.
The value of inputRef is durable in-between re-renderings of the component as re-rendering of a component is not triggered by updating a reference, unlike updating state.
inputRef has access to DOM elements as well, be sure to check out the official documentation if you want to learn more about the useRef hook.
The final project code can be found on GitHub (remember to give it a star ⭐).
A TIP FROM THE EDITOR: For more on specific React hooks, don’t miss our A Guide To The React UseState Hook and Understanding The UseId Hook In React articles.
Gain Debugging Superpowers
Unleash the power of session replay to reproduce bugs and track user frustrations. Get complete visibility into your frontend with OpenReplay, the most advanced open-source session replay tool for developers.