Testing in web development is critical to ensure a web application’s reliability, functionality, and quality. Testing assists in identifying and correcting errors, bugs, or unexpected behavior by systematically checking various aspects such as functionality, performance, and user experience. It improves overall user satisfaction and trust in the application and saves time and money by identifying problems early in the development process. This article lays the groundwork for a more in-depth examination of the critical role that unit tests play in developing robust and dependable web-based solutions.

Discover how at OpenReplay.com.
Unit testing in Vue.js requires the use of critical tools such as Vitest,Vue Test Utils, and Jest to ensure thorough and reliable testing. Vitest, an official Vue.js utility library, allows for the simulation of Vue components, allowing for component testing in isolation. First, type this Vue CLI command into your terminal to create a new Vue project.
npm create vue@latestAfter that, you will be prompted to select all the dependencies needed for the app.
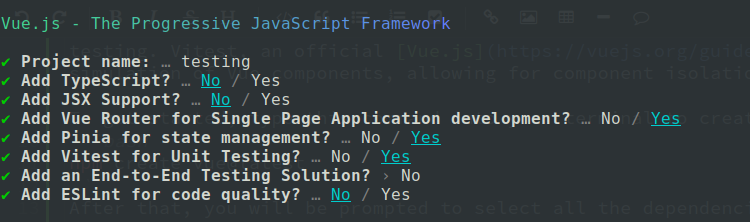 Next, select Vue Router, Pinia, Vitest, then press enter.
You can also clone this boilerplate. Everything needed has already been added there.
Next, select Vue Router, Pinia, Vitest, then press enter.
You can also clone this boilerplate. Everything needed has already been added there.
Writing Your First Vue.js Unit Test
In this example, we will create a button component named BaseButton.vue in your src/components/. This button accepts text props and, when clicked, renders new text to the user.
<template>
 <button @click="handleButton">
  {{ text }}
 </button>
 <p>{{ textToRender }}</p>
</template>
<script>
import { ref } from 'vue'
export default {
 props: {
  text: String
 },
 setup() {
  const textToRender = ref('default')
  const handleButton = () => {
   textToRender.value = 'Hi there'
  }
  return {
   handleButton,
   textToRender
  }
 }
}
</script>
We will create a basic walk-through test for props, state, and user interaction for this component. Next, create a file with the ‘.test.js’ extension in your test folder, and follow the example below to implement your first test.
import { describe, it, expect } from 'vitest'
import { mount } from '@vue/test-utils'
import BaseButton from 'from-your-component-location'
describe('MyButton.vue', () => {
 it('renders button text from props', () => {
  const text = 'Click Me'
  const wrapper = mount(BaseButton, {
   props: { text }
  })
  expect(wrapper.text()).toMatch(text)
 })
})
In this example, a test suite for the BaseButton.vue component is created. A single test case in this suite validates whether the button text is rendered correctly using the provided prop. The mount function from @vue/test-utils is used to mount the component for testing. The test is run using Vitest’s syntax, which includes test suite creation functions like describe and it, as well as assertion functions like expect to validate specific component behavior during testing.
Next, we will write a test to simulate the update made to the UI when a user clicks the button.
it('updates text when button is clicked', async () => {
 const wrapper = mount(BaseButton, {
  props: { text: 'Initial' }
 })
 await wrapper.find('button').trigger('click')
 expect(wrapper.find('p').text()).toBe('Hi there')
})
An asynchronous function is used in this test to simulate a button click event by triggering a click on the button element in the mounted component. Following this interaction, the test expects the content within the component’s p tag to be ‘Hi there,’ validating the expected text update upon button click action. This asynchronous test ensures that the component responds correctly to user interaction by changing the displayed text when a button is clicked.
Next, we will also write a test to simulate the state.
it('verifies default state', () => {
 const wrapper = mount(BaseButton)
 expect(wrapper.find('p').text()).toBe('default')
})
This example validates the button component’s default state by mounting it without any initial props and ensuring that the text within the p tag displays ‘default’. This ensures that the component behaves as expected before any props are initialized.
Now that you have completed the test suite, run this command on your terminal. If everything goes well, your test will pass.
npm run test:unit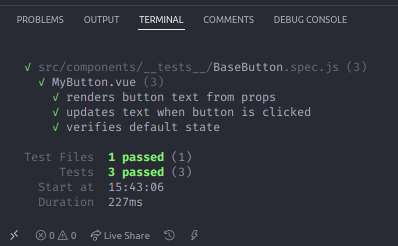 The image provided above shows that the test passed successfully.
Testing for component behavior depends on how well you know how to use assertions and expectations for validating and ensuring that the expected results are obtained. They involve creating specific statements about the expected outcomes of the component’s functionality. Here is what you should know about assertion and expectation:
The image provided above shows that the test passed successfully.
Testing for component behavior depends on how well you know how to use assertions and expectations for validating and ensuring that the expected results are obtained. They involve creating specific statements about the expected outcomes of the component’s functionality. Here is what you should know about assertion and expectation:
- Assertions are used to validate conditions or expected results.
- Expectations set the guidelines for what you assume to be true.
Examples of assertions are
toEqual,toContain,toBeDefined, and so on.
Mocking dependencies and APIs
Mocking is an important technique in unit testing because it allows developers to simulate external dependencies, functions, or services on which a component depends. It is critical when the dependencies are complex, involve network requests, or are not directly controlled by the test environment.
Mocks create controlled instances of these dependencies, allowing developers to predict their behaviors, responses, and outcomes during tests without executing the real logic or relying on real external systems.
Suppose you have a function getDataFromAPI that fetches data from an external API.
export const getDataFromAPI = () => {
 //Returns the response data;
}
In your main component, you utilize this function, getDataFromAPI
import { getDataFromAPI } from './eventService'
export async function processDataFromAPI() {
 try {
  const data = await getDataFromAPI()
  return data
 } catch (e) {
  //handle error;
 }
}
For testing processDataFromAPI, you can mock the getDataFromAPI function.
import { expect, vi, test } from 'vitest'
import { processDataFromAPI } from './mainComponent'
import * as eventService from '../eventService'
vi.mock('./eventService.js')
test('processDataFromAPI function test', async () => {
 const mockData = 'Mocked Data'
 eventService.getDataFromAPI.mockResolvedValue(mockData)
 const result = await processDataFromAPI()
 expect(eventService.getDataFromAPI).toHaveBeenCalled()
 expect(result).toBe('Mocked Data')
})
In this example, the code demonstrates the use of mocking to verify the service function processDataFromAPI functionality. The vi.mock function replaces the actual getDataFromAPI call with a mock implementation from the eventService. The mocked function resolves with the set value ‘Mocked Data’ when eventService.getDataFromAPI.mockResolvedValue(mockData) is specified.
The following is the outcome of the test:
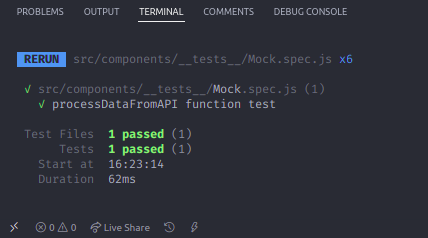 The following test checks whether the mocked
 getDataFromAPI is called and validates the processing of the mocked data, ensuring the correct operation of processDataFromAPI. This test effectively isolates and examines the behavior of processDataFromAPI without relying on the actual API call for data retrieval.
Advanced Testing Techniques
In this section, we will discuss how you can leverage testing for a certain critical part of your application. You will learn the various ways testing can be applied to the Pinia Store and also to the Vue router. The primary goal of testing a Pinia store is to evaluate the behavior and functionality of the state and actions. The critical areas for investigation include ensuring that state changes accurately reflect actions taken in the store. As a result, the tests confirm that actions precisely execute mutations and logical operations on the store’s state.
import { defineStore } from 'pinia'
export const useCounterStore = defineStore({
 id: 'counter',
 state: () => ({
  count: 0
 }),
 actions: {
  increment() {
   this.count++
  },
  decrement() {
   this.count--
  }
 }
})
In this example, the store defines a simple state for a counter with its respective actions to increment and decrement the count. Now let’s create a CounterStore.spec.js.
import { setActivePinia, createPinia } from 'pinia'
import { expect, describe, it, beforeEach } from 'vitest'
import { useCounterStore } from '../../stores/counter'
describe('Counter Store', () => {
 beforeEach(() => {
  setActivePinia(createPinia())
 })
 it('increments the count', () => {
  const counterStore = useCounterStore()
  counterStore.increment()
  expect(counterStore.count).toBe(1)
 })
 it('decrements the count', () => {
  const counterStore = useCounterStore()
  counterStore.decrement()
  expect(counterStore.count).toBe(-1)
 })
 it('increments the count twice', () => {
  const counterStore = useCounterStore()
  counterStore.increment()
  counterStore.increment()
  expect(counterStore.count).toBe(2)
 })
})
This code sets up Vue Router for testing and defines a simple route guard logic. The router has a single route /about with a requiresAuth meta field set to true. The route guard function beforeEach checks if the route requires authorization.
For demonstration purposes, it simulates an authentication check; isAuthenticated is set to false, redirecting unauthenticated users back to the home route '/' while allowing access to routes that don’t require authorization. The test suite comprises two tests, one to ensure access to a protected route when authorized and another to verify that access to the protected route is denied for unauthorized users, simulating the route guard’s behavior. Adjust the isAuthenticated condition based on the application’s authentication logic.
This is an image that shows the output of the test. Run the test, and you should get the same result.
 Next, we will learn how to test a Vue router. When testing Vue Router navigation and route guards, it’s crucial to ensure that navigation behavior and route protection mechanisms work as expected. Using a testing library like Vitest, you can simulate routing actions and verify outcomes. Here’s a sample code that tests navigation and route guards.
import { expect, it, describe } from 'vitest'
import { mount } from '@vue/test-utils'
import { createRouter, createWebHistory } from 'vue-router'
import AboutView from '../../views/AboutView.vue'
const router = createRouter({
 history: createWebHistory(import.meta.env.BASE_URL),
 routes: [
  {
   path: '/about',
   name: 'about',
   component: AboutView,
   meta: { requiresAuth: true }
  }
 ]
})
router.beforeEach((to, from, next) => {
 if (to.meta.requiresAuth) {
  const isAuthenticated = false
  if (isAuthenticated) {
   next()
  } else {
   next('/')
  }
 } else {
  next()
 }
})
describe('Vue Router Navigation', () => {
 it('navigates to a protected route with proper authorization', async () => {
  await router.push('/about')
  await router.isReady()
  const wrapper = mount(AboutView, {
   global: {
    plugins: [router]
   }
  })
  expect(wrapper.findComponent(AboutView).exists()).toBe(true)
 })
 it('prevents access to a protected route without authorization', async () => {
  await router.push('/about')
  expect(router.currentRoute.value.fullPath).not.toBe('/about')
 })
})
This code sets up Vue Router for testing and defines a simple route guard logic. The router has a single route /about with a requiresAuth meta field set to true. The route guard function beforeEach checks if the route requires authorization. For demonstration purposes, it simulates an authentication check; isAuthenticated is set to false, redirecting unauthenticated users back to the home route '/' while allowing access to routes that don’t require authorization.
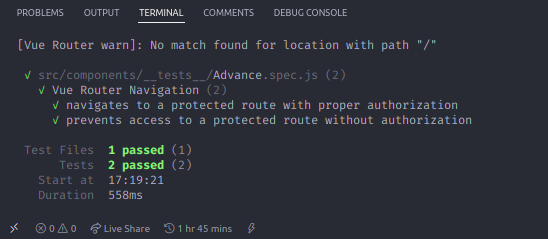
The test suite comprises two tests, one to ensure access to a protected route when authorized and another to verify that access to the protected route is denied for unauthorized users, simulating the route guard’s behavior. Adjust the isAuthenticated condition based on the application’s authentication logic.
This is an image that shows the output of the test. Run the test, and you should get the same result.
Test Coverage
Test coverage is an important metric in software development because it measures how thoroughly a test suite examines the codebase. It indicates how much of the code is put to use by tests. Increased test coverage ensures that more parts of the code are validated, lowering the likelihood of undetected bugs. It also assists in identifying areas of code that lack test coverage, allowing developers to concentrate their testing efforts on those critical sections. Vitest comes with native coverage support that helps you get the coverage report for your codebase in a few steps. Run this command on your terminal to add coverage to the test.
npm i -D @vitest/coverage-v8Copy this to your terminal once you have completed the installation, and you will get a coverage report.
npm run coverage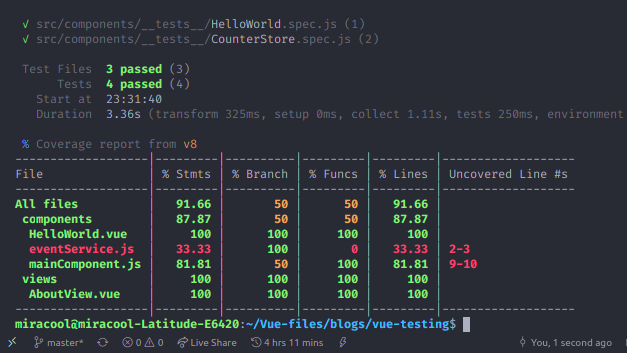 This coverage report outlines the extent of test coverage in your codebase, presenting key metrics: %Stmts, %Branch, %Funcs, and %Lines. These percentages indicate the number of code, decision branches, functions, and lines tests cover. While files like
 HelloWorld.vue and AboutView.vue have complete coverage, eventService.js and mainComponent.js show partial coverage, especially in specific lines, highlighting areas for improvement. This report serves as a guide to prioritize testing efforts, directing attention to uncovered portions for more comprehensive and reliable testing.
Conclusion
In conclusion, front-end application testing is critical for ensuring code reliability, stability, and correctness. It detects bugs early, keeps code quality high, and promotes scalability. Teams ensure robust, maintainable software by implementing routine testing, resulting in better user experiences and overall software products.
Gain control over your UX
See how users are using your site as if you were sitting next to them, learn and iterate faster with OpenReplay — the open-source session replay tool for developers. Self-host it in minutes, and have complete control over your customer data.
Star on GitHub12k