Using AI to build a YouTube Video Summarizer
Use OpenAI and React to build a summarizer

YouTube has become an integral part of the online experience, hosting a vast array of videos. However, users often face challenges in quickly grasping the essence of lengthy videos. This tutorial will address this issue by creating a YouTube Video Summarizer that leverages OpenAI’s models to generate a concise video summary.

Discover how at OpenReplay.com.
The frontend of our application will be built using React.js, On the backend, we’ll use a simple Express server to handle YouTube and OpenAI API requests. We will need the server as API usage in browser-like environments is typically disabled by default due to security concerns by OpenAI. You can override this using dangerouslyAllowBrowser: true option. However, this is not recommended due to security reasons.
Setting Up the React App
Start by creating a React app using create-react-app (CRA).
npx create-react-app youtube-summarizerThis will create a basic React app with the necessary configs and build tools. Proceed to your terminal and install the react-youtube package.
cd youtube-summarizer
npm install react-youtube
This package will help us embed and play YouTube videos on our app.
Note: The full source code used in this tutorial is available in this GitHub repository.
Open up the src/App.js file, which is our app’s root component and entry point. Then, import the above package.
import React, { useState, useEffect, useRef } from 'react';
import YouTube from 'react-youtube';
import './App.css';
Now, we can start building the pieces that will make up our summarizer app.
Creating Different Components for Our App
We can create our components in two ways. By creating a separate components folder containing each component in its own file, or by creating the components directly in our root component. We will use the latter for this tutorial as our app is not very complex.
Our components will be located below the package importations in the src/App.js file. Start by creating a VideoInput component. The component will have a videoUrl prop as the input value and update it with the setVideoUrl function when the input changes. This component will help us render an input field for entering a YouTube video URL.
// Video Input Component
const VideoInput = ({ videoUrl, setVideoUrl }) => (
  <input
    type="text"
    placeholder="YouTube Video URL"
    value={videoUrl}
    onChange={(e) => setVideoUrl(e.target.value)}
  />
);
Our app requires six other components to fully create the user interface. Below are the other vital components.
// Prompt Input Component
const PromptInput = ({ prompt, setPrompt }) => (
  <input
    type="text"
    placeholder="Enter your summarization prompt"
    value={prompt}
    onChange={(e) => setPrompt(e.target.value)}
  />
);

// Submit Button Component
const SubmitButton = ({ loading }) => (
  <button type="submit" disabled={loading}>
    Submit
  </button>
);

// Loading Message Component
const LoadingMessage = ({ loading }) => loading && <p>Loading...</p>;

// ErrorMessage Component
const ErrorMessage = ({ error }) => error && <p>{error}</p>;

// YouTube Player Component
const YouTubePlayer = ({ videoId }) => <YouTube videoId={videoId} />;

// Summary Component
const Summary = React.forwardRef(
  ({ transcriptLoaded, summary }, ref) =>
    transcriptLoaded && (
      <div className="summary" ref={ref}>
        <p>{summary}</p>
      </div>
    ),
);
The PromptInput component renders an input field for entering the summarization prompt. The SubmitButton component renders a submit button with the label Submit. When the loading prop is true, the LoadingMessage component renders a loading indicator Loading.... The ErrorMessage component renders an error message when the error prop is true. The YouTubePlayer component renders a YouTube player using the react-youtube library, with the specified videoId. Finally, the Summary component renders a div with the class summary containing a paragraph with the summary prop as its content.
Orchestrating the Entire Functionality of Our App
Start by initializing various state variables using the useState hook. We will use these variables to manage the application’s dynamic data. This data includes the video URL, video ID, transcript, loading state, error state, summary, user prompt, and form submission state.
// Main App Component
function App() {
  const [videoUrl, setVideoUrl] = useState("");
  const [videoId, setVideoId] = useState("");
  const [transcript, setTranscript] = useState("");
  const [transcriptLoaded, setTranscriptLoaded] = useState(false);
  const [loading, setLoading] = useState(false);
  const [error, setError] = useState("");
  const [summary, setSummary] = useState("");
  const [prompt, setPrompt] = useState("");
  const [formSubmitted, setFormSubmitted] = useState(false);
Then, initialize a ref that the app will use to scroll to the summary component when loaded.
const summaryRef = useRef(null);After initialization, create a form submission handler and a function to extract the video ID from a YouTube URL using a regular expression. The handler will prevent the default form submission behavior. It will extract the video ID from the provided YouTube video URL. Then, set the video ID and mark the form as submitted.
const handleSubmit = async (e) => {
  e.preventDefault();

  const videoId = getVideoIdFromUrl(videoUrl);
  setVideoId(videoId);
  setFormSubmitted(true);
};

const getVideoIdFromUrl = (url) => {
  const regex = /[?&]v=([^&]+)/i;
  return url.match(regex)[1];
};
Since we now have the video ID, we can use it to fetch a YouTube video transcript. To achieve this, utilize the useEffect hook to fetch the video transcript when the videoId state changes.
Make a POST request to the/fetchTranscript endpoint with the video ID as the payload. Then, update the transcript state with the fetched data and set transcriptLoaded to true when the process is complete.
useEffect(() => {
  const fetchTranscript = async () => {
    if (videoId) {
      setLoading(true);
      setError("");
      try {
        const response = await fetch("/fetchTranscript", {
          method: "POST",
          headers: { "Content-Type": "application/json" },
          body: JSON.stringify({ videoId }),
        });
        const data = await response.json();

        setTranscript(data.items[0].snippet.description);
      } catch (err) {
        setError("Error fetching transcript");
      } finally {
        setLoading(false);
        setTranscriptLoaded(true);
      }
    }
  };

  fetchTranscript();
}, [videoId]);
After obtaining the transcript, we can use it to generate the video summary. To achieve this, use another useEffect hook that triggers when the transcriptLoaded and formSubmitted states change.
It will then initiate the fetching of the summary by making a POST request to the /fetchSummary endpoint with the transcript and user prompt as the payload. Finally, it will update the summary state with the fetched data, scroll to the summary component, and reset loading and form submission states when the process is complete.
useEffect(() => {
  const fetchSummary = async () => {
    if (transcriptLoaded && formSubmitted) {
      setLoading(true);
      setError("");
      try {
        const response = await fetch("/fetchSummary", {
          method: "POST",
          headers: { "Content-Type": "application/json" },
          body: JSON.stringify({ transcript, prompt }),
        });
        const data = await response.json();

        setSummary(data);
        summaryRef.current.scrollIntoView({ behavior: "smooth" });
      } catch (err) {
        setError("Error fetching summary");
      } finally {
        setLoading(false);
        setFormSubmitted(false);
      }
    }
  };

  fetchSummary();
}, [transcriptLoaded, formSubmitted, transcript, prompt]);
Finally, we need to render the main structure of the application.
const App = () => {
  return (
    <div className="app">
      <h1>YouTube Summarizer</h1>
      <form onSubmit={handleSubmit}>
        <VideoInput videoUrl={videoUrl} setVideoUrl={setVideoUrl} />
        <PromptInput prompt={prompt} setPrompt={setPrompt} />
        <SubmitButton loading={loading} />
      </form>

      <LoadingMessage loading={loading} />
      <ErrorMessage error={error} />
      <YouTubePlayer videoId={videoId} />
      <Summary
        transcriptLoaded={transcriptLoaded}
        summary={summary}
        ref={summaryRef}
      />
    </div>
  );
};

export default App;
The above code includes a form with all the input fields, a submit button, and the components for displaying loading messages, errors, YouTube player, and the generated summary. It also passes the relevant state variables and functions as props to the child components.
Styling Our App
We need a way to control how our app’s components appear on a webpage. To achieve this, open the src/App.css file and paste the following code. You can adjust the styling to your liking.
body {
  background-color: #808080; /* This is a shade of grey */
}

.app {
  display: flex;
  flex-direction: column;
  align-items: center;
  justify-content: center;
  padding: 20px;
  font-family: Arial, sans-serif;
}

form {
  display: flex;
  flex-direction: column;
  align-items: center;
  margin-bottom: 20px;
}

input {
  margin: 10px 0;
  padding: 10px;
  width: 300px;
  border: 1px solid #ddd;
  border-radius: 4px;
}

button {
  padding: 10px 20px;
  border: none;
  border-radius: 4px;
  background-color: #007BFF;
  color: white;
  cursor: pointer;
}

button:disabled {
  background-color: #ccc;
  cursor: not-allowed;
}

.summary {
  width: 100%;
  border: 1px solid #ddd;
  border-radius: 4px;
  padding: 10px;
  height: 30vh;
  overflow-y: auto;
}
The above code sets the webpage’s overall background color to a shade of grey. The main application container is centered horizontally and vertically using flexbox. The form elements are also arranged in a centered column, and the input fields are styled with appropriate margins, padding, and rounded corners.
The submit button is blue, while the disabled state is indicated with a light grey background and a not-allowed cursor. The summary container is given a border and a fixed height with a vertical scrollbar.
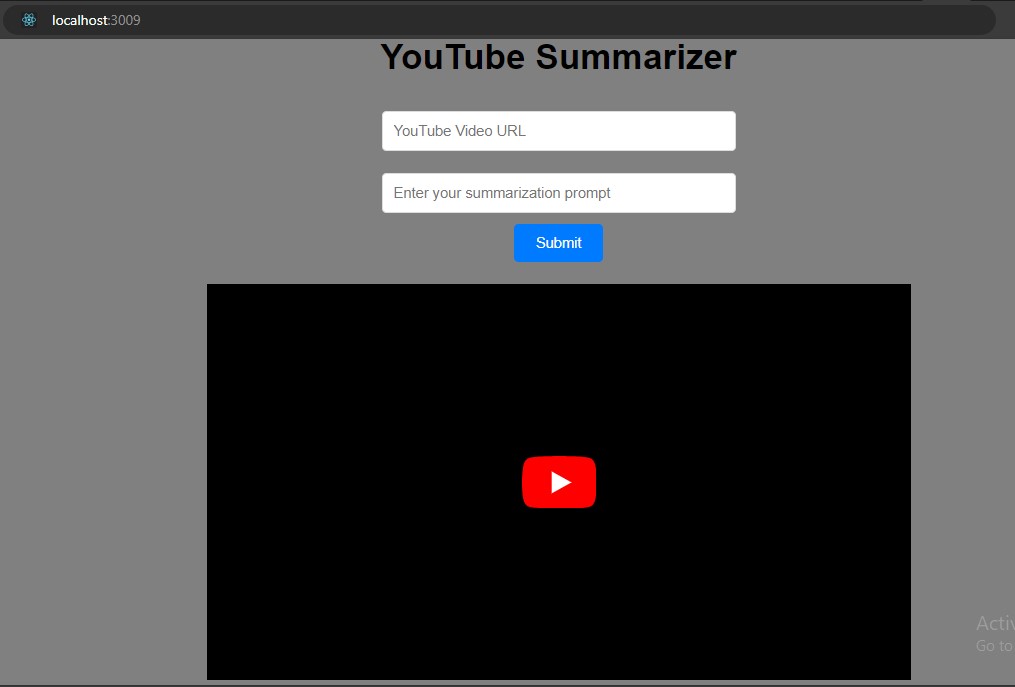
We are done developing and styling the front end. Here is a look at the completed work.
 We now need a way to communicate with the OpenAI and YouTube APIs, and our app will be complete.
Implementing a Simple Express Server
Proceed to the folder containing your app project. Create a new folder and name it to your liking. Then, initialize a new Node.js project.
npm init -yAfter initializing the project, install the Express package to handle incoming HTTP requests and serve the React front. Axios will make HTTP requests to the YouTube Data API to fetch video details and OpenAI’s API to generate summaries. Finally, Dotenv loads the API keys for YouTube and OpenAI from a .env file, keeping them separate from the codebase and enhancing security.
npm install express axios openai dotenvThen, create a new file and name it server.js. Open the file, which is where we will write our backend code. Paste the code below.
require("dotenv").config();
const express = require("express");
const axios = require("axios");
const path = require("path");
const { OpenAI } = require("openai");

const app = express();
app.use(express.json());

const API_KEY = process.env.YOUTUBE_API_KEY;
const openai = new OpenAI({
  apiKey: process.env.OPENAI_API_KEY,
});

// Fetching video transcripts
app.post("/fetchTranscript", async (req, res) => {
  const videoId = req.body.videoId;
  try {
    const response = await axios.get(
      `https://www.googleapis.com/youtube/v3/videos?part=snippet&id=${videoId}&key=${API_KEY}`,
    );
    res.json(response.data);
  } catch (error) {
    res.status(500).send("Error fetching transcript");
  }
});

// Fetching video summary
app.post("/fetchSummary", async (req, res) => {
  const transcript = req.body.transcript;
  const prompt = req.body.prompt;
  try {
    const chatCompletion = await openai.chat.completions.create({
      model: "gpt-3.5-turbo",
      messages: [
        { role: "user", content: transcript },
        { role: "system", content: `Summarize the video: ${prompt}` },
      ],
    });
    res.json(chatCompletion.choices[0].message.content);
  } catch (error) {
    res.status(500).send("Error fetching summary");
  }
});

// Serve the React app for any other GET requests. It will be helpful if you intend to build your app
app.use(express.static(path.join(__dirname, "../youtube-thumbnail-app/build")));
app.get("*", (req, res) => {
  res.sendFile(
    path.join(__dirname, "../youtube-thumbnail-app/build", "index.html"),
  );
});

const PORT = process.env.PORT || 3009;
app.listen(PORT, () => console.log(`Server listening on port ${PORT}`));
The above server code sets up an Express.js server. It includes the logic to handle POST requests for fetching video transcripts from YouTube based on the video ID and the logic for generating video summaries using OpenAI’s GPT-3.5-turbo model. The server communicates with YouTube’s API and OpenAI’s API to retrieve relevant data and responds with the fetched transcript or generated summary.
It also serves our React front statically, allowing our application to be accessible via a browser.
The last step is obtaining your OpenAI and YouTube API keys. To obtain the OpenAI API key, follow the following steps:
- Proceed to the OpenAI website and create an account.
- Log in to your account and click on your profile name to access the menu.
- From the menu, select the View API Keys option.
- Click on the Create New Secret Key button.
- Once the API key is generated, copy and paste it somewhere safe.
Then, follow the following steps to obtain your YouTube API key.
- Visit the Google developer’s console website and sign in with your Google account.
- Click on Create project and choose a relevant name for your project.
- Enable billing: This is required even if you plan to use the free tier. You won’t be charged unless you exceed the quotas.
- Click on APIs & Services.
- Search for YouTube Data API v3 and click Enable next to it.
- Click on APIs & Services -> Credentials.
- Click Create credentials and choose API key.
- Select YouTube Data API v3 for the API.
- Important: Choose Public data under restrictions.
- Click Create and copy the API key generated.
Now that you have the API keys create a .env file in the same location as your server.js file. Then, store your API keys there.
YOUTUBE_API_KEY=your_youtube_api_key
OPENAI_API_KEY=your_openai_api_key
Now, our app is ready to summarize YouTube videos.
Running Our App and Showing the Results
Proceed to the terminal and use the following command to run your app.
npm startThen, start your server and ensure it runs on the same port as your app.
node server.jsOpen localhost on your browser and use the app to summarize your desired YouTube video. If the video does not have a transcript, the app will throw an error.
Let us summarize the OpenReplay user session video. The video is twenty-two and a half minutes long. Input the video URL in the YouTube Video URL field. Then, write a prompt for how you would like the video summarized in the summarization field. For this case, we want the video summarized in a single paragraph. Finally, click Submit.
After submitting the URL and the summarization prompt, the results of the app are as shown below:
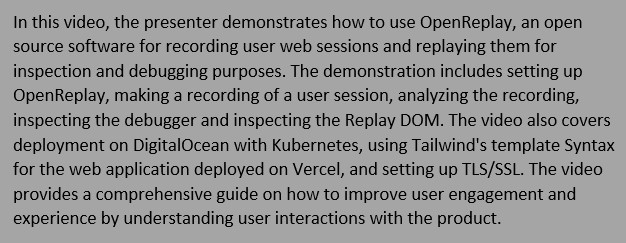
The summary tells us what the video is about by highlighting the key points in the OpenReplay user session video as a paragraph. This adheres to our prompt.
Conclusion
The YouTube Video Summarizer app seamlessly integrates the power of React and OpenAI, providing users with a tool to distill the essence of YouTube videos. While the core functionality is complete, there are potential enhancements you could make to improve this application. For example, you can adapt the app to use OpenAI’s Whisper model to summarize videos lacking a transcript.
Go ahead and explore the world of React and Large Language Models!