User registration and login with React and Axios
Use Axios to implement user registration and login.


Most web applications nowadays require user authentication and authorization: one for validation and confirming that users are who they say they are, and the other for granting permissions and access to recognized users. A popular option is using a social login provider like Google or Facebook. Uniquely, we can build authentication with React, Axios, and a Node.js backend.
In this article, we will create a React login form that uses Axios to submit users’ information for authentication with key accessibilities to deliver success. This article is both beginner- and intermediate-level developer-friendly.
Prerequisites
For this tutorial, we will be focusing only on the frontend aspect of things, but here is a link to the GitHub repo, where I have a backend prepared for this tutorial. Clone it, run yarn install or npm install to install all dependencies, and then run npm run dev or yarn dev to start up the server, which will be running on http://localhost:3500/.
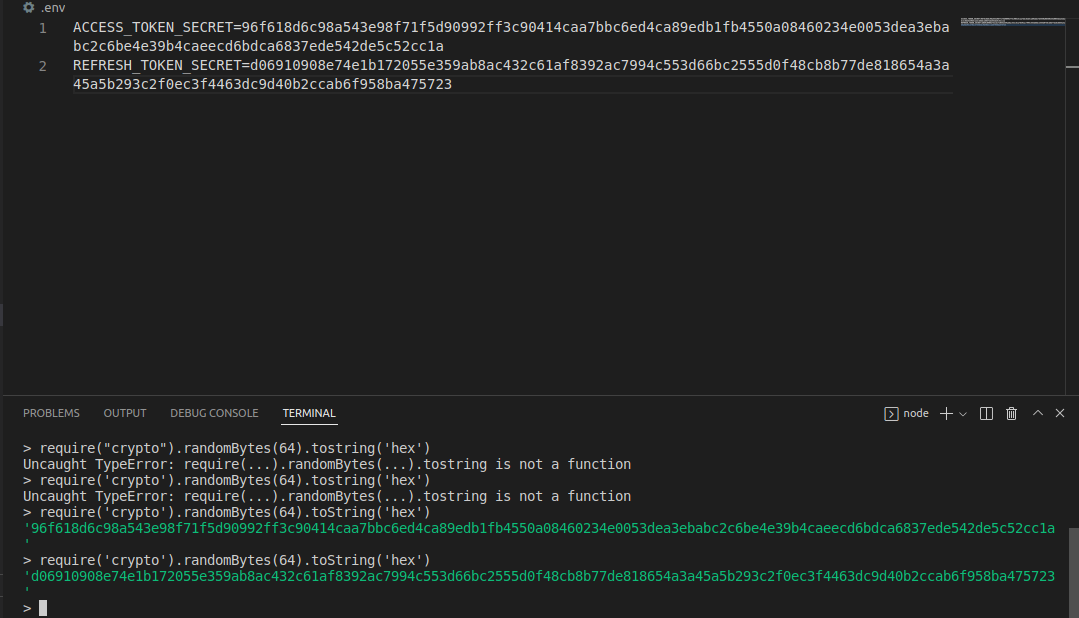
Next, create a .env file, which will store our environmental variables. Open the terminal and write Node, now, copy and paste the following into the prompt:
require("crypto").randomBytes(64).toString("hex");This will create a unique token for you. Copy the token and in the .env file, create an ACCESS_TOKEN_SECRET=” Unique token goes here”.
Next, create another token, and in the .env file, create a REFRESH_TOKEN_SECRET with the unique token.
With that, our backend is ready.
Creating a registration form
We will create a new React app with the command below:
npx create-react-app authUsing yarn:
yarn create react-app authI will be using yarn from here on out, and you can name your application whatever you want. Next, create a registration file named register.jsx for handling the registration and inside, go ahead, copy and paste the code below:
const Register = () => {
return (
<>
<section>
<p
ref={errRef}
className={errMsg ? "errmsg" : "offscreen"}
aria-live="assertive"
>
{errMsg}
</p>
<h1>Register</h1>
<form onSubmit={handleSubmit}>
<label htmlFor="username">
Username:
<FontAwesomeIcon
icon={faCheck}
className={validName ? "valid" : "hide"}
/>
<FontAwesomeIcon
icon={faTimes}
className={
validName || !user ? "hide" : "invalid"
}
/>
</label>
<input
type="text"
id="username"
ref={userRef}
autoComplete="off"
onChange={(e) => setUser(e.target.value)}
value={user}
required
aria-invalid={validName ? "false" : "true"}
aria-describedby="uidnote"
onFocus={() => setUserFocus(true)}
onBlur={() => setUserFocus(false)}
/>
<p
id="uidnote"
className={
userFocus && user && !validName
? "instructions"
: "offscreen"
}
>
<FontAwesomeIcon icon={faInfoCircle} />
4 to 24 characters.
<br />
Must begin with a letter.
<br />
Letters, numbers, underscores, hyphens allowed.
</p>
<label htmlFor="password">
Password:
<FontAwesomeIcon
icon={faCheck}
className={validPwd ? "valid" : "hide"}
/>
<FontAwesomeIcon
icon={faTimes}
className={
validPwd || !pwd ? "hide" : "invalid"
}
/>
</label>
<input
type="password"
id="password"
onChange={(e) => setPwd(e.target.value)}
value={pwd}
required
aria-invalid={validPwd ? "false" : "true"}
aria-describedby="pwdnote"
onFocus={() => setPwdFocus(true)}
onBlur={() => setPwdFocus(false)}
/>
<p
id="pwdnote"
className={
pwdFocus && !validPwd
? "instructions"
: "offscreen"
}
>
<FontAwesomeIcon icon={faInfoCircle} />
8 to 24 characters.
<br />
Must include uppercase and lowercase letters, a
number and a special character.
<br />
Allowed special characters:{" "}
<span aria-label="exclamation mark">
!
</span>{" "}
<span aria-label="at symbol">@</span>{" "}
<span aria-label="hashtag">#</span>{" "}
<span aria-label="dollar sign">$</span>{" "}
<span aria-label="percent">%</span>
</p>
<label htmlFor="confirm_pwd">
Confirm Password:
<FontAwesomeIcon
icon={faCheck}
className={
validMatch && matchPwd ? "valid" : "hide"
}
/>
<FontAwesomeIcon
icon={faTimes}
className={
validMatch || !matchPwd ? "hide" : "invalid"
}
/>
</label>
<input
type="password"
id="confirm_pwd"
onChange={(e) => setMatchPwd(e.target.value)}
value={matchPwd}
required
aria-invalid={validMatch ? "false" : "true"}
aria-describedby="confirmnote"
onFocus={() => setMatchFocus(true)}
onBlur={() => setMatchFocus(false)}
/>
<p
id="confirmnote"
className={
matchFocus && !validMatch
? "instructions"
: "offscreen"
}
>
<FontAwesomeIcon icon={faInfoCircle} />
Must match the first password input field.
</p>
<button
disabled={
!validName || !validPwd || !validMatch
? true
: false
}
>
Sign Up
</button>
</form>
<p>
Already registered?
<br />
<span className="line">
{/*put router link here*/}
{/* <a href="#">Sign In</a> */}
</span>
</p>
</section>
)}
</>
);
};
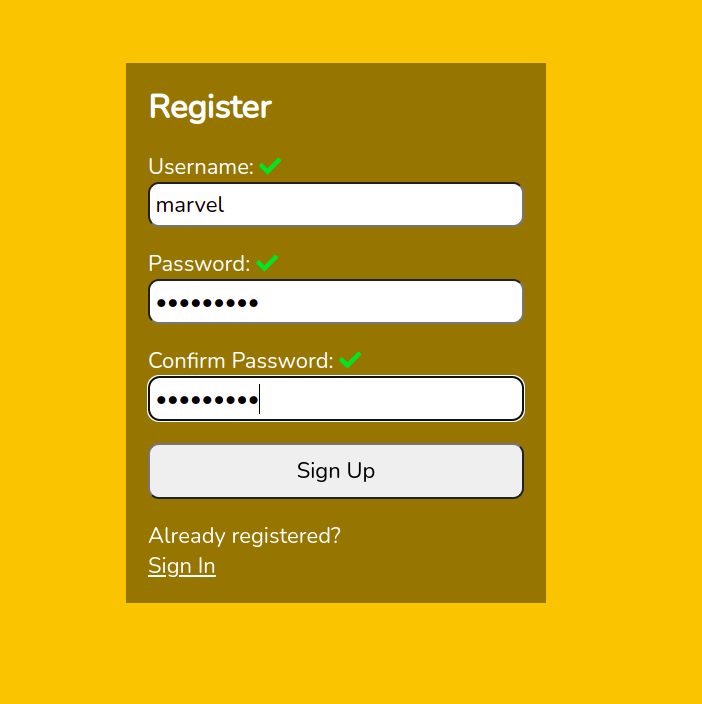
export default Register;In the code block above, we created a form for registration, and here is why you can’t authenticate users that are not registered. We created some state and ref events which we will create in the following sections. We also added Aria-labels for screen accessibility; you can read more on aria-labels here and here.
Creating and handling validation logic
We will create a regex for handling username values and one for handling password values.
const USER_REGEX = /^\[A-z\][A-z0-9-_]{3,23}$/;
const PWD_REGEX = /^(?=.*[a-z])(?=.*[A-Z])(?=.*[0-9])(?=.*[!@#$%]).{8,24}$/;
Next, we will create the state events and also the ref events. The ref events will be used to set a focus on the errors so it could display error characters if an error occurs so that the user can be notified for wrong inputs. This would be right before we return any HTML element in the component.
const userRef = useRef();
const errRef = useRef();
const [user, setUser] = useState("");
const [validName, setValidName] = useState(false);
const [userFocus, setUserFocus] = useState(false);
const [pwd, setPwd] = useState("");
const [validPwd, setValidPwd] = useState(false);
const [pwdFocus, setPwdFocus] = useState(false);
const [matchPwd, setMatchPwd] = useState("");
const [validMatch, setValidMatch] = useState(false);
const [matchFocus, setMatchFocus] = useState(false);
const [errMsg, setErrMsg] = useState("");
const [success, setSuccess] = useState(false);
// This will be used with the login
We will also create some useEffects to set the useRef focus and handle and check changes to our state events.
// State events
useEffect(() => {
  userRef.current.focus();
}, []);

useEffect(() => {
  setValidName(USER_REGEX.test(user));
}, [user]);

useEffect(() => {
  setValidPwd(PWD_REGEX.test(pwd));
  setValidMatch(pwd === matchPwd);
}, [pwd, matchPwd]);

useEffect(() => {
  setErrMsg("");
}, [user, pwd, matchPwd]);
Handling the submit function
We will install Axios, which will help send the registration data to our backend. It will be used in authenticating a user when they log in. Install Axios using the command below:
yarn add AxiosCreate a folder within the src directory and name it api/axios.js. This folder contains a file that will be responsible for sending our registered data to our backend.
// axios.js
import axios from "axios";
export default axios.create({
  baseURL: "http://localhost:3500",
});
In the code above, we created a baseURL specifying the URL where our backend will exist. We then import it into our registration file and then use it to handle submitting the filled data of registered users to the backend.
// Register.js
const REGISTER_URL = "/register";
import axios from "./api/axios";
// other imports
const handleSubmit = async (e) => {
  e.preventDefault();
  const v1 = USER_REGEX.test(user);
  const v2 = PWD_REGEX.test(pwd);
  if (!v1 || !v2) {
    setErrMsg("Invalid Entry");
    return;
  }

  try {
    const response = await axios.post(
      REGISTER_URL,
      JSON.stringify({ user, pwd }),
      {
        headers: { "Content-Type": "application/json" },
        withCredentials: true,
      }
    );
    setSuccess(true);
    //clear state and controlled inputs
    setUser("");
    setPwd("");
    setMatchPwd("");
  } catch (err) {
    if (!err?.response) {
      setErrMsg("No Server Response");
    } else if (err.response?.status === 409) {
      setErrMsg("Username Taken");
    } else {
      setErrMsg("Registration Failed");
    }
    errRef.current.focus();
  }
};
We created a function for handling our submission in the code block above. Inside we checked to see if the username or password passed the regex test. We also created a registration URL that we can submit to the backend.
And, after submitting the data:

And with that, we are done creating the registration form. Let’s create a login form to test whether we can log in with the registered credentials.
Open Source Session Replay
OpenReplay is an open-source, session replay suite that lets you see what users do on your web app, helping you troubleshoot issues faster. OpenReplay is self-hosted for full control over your data.

Start enjoying your debugging experience - start using OpenReplay for free.
Creating a Login form
Create a file inside the src folder and name it Login.js. Open the file, copy the code below and paste it inside:
// Login.js
import { useRef, useState, useEffect, useContext } from "react";
const Login = () => {
const userRef = useRef();
const errRef = useRef();
const [user, setUser] = useState("");
const [pwd, setPwd] = useState("");
const [errMsg, setErrMsg] = useState("");
const [success, setSuccess] = useState(false);
useEffect(() => {
userRef.current.focus();
}, []);
useEffect(() => {
setErrMsg("");
}, [user, pwd]);
return (
<>
{success ? (
<section>
<h1>You are logged in!</h1>
<br />
<p>{/* <a href="#">Go to Home</a> */}</p>
</section>
) : (
<section>
<p
ref={errRef}
className={errMsg ? "errmsg" : "offscreen"}
aria-live="assertive"
>
{errMsg}
</p>
<h1>Sign In</h1>
<form onSubmit={handleSubmit}>
<label htmlFor="username">Username:</label>
<input
type="text"
id="username"
ref={userRef}
autoComplete="off"
onChange={(e) => setUser(e.target.value)}
value={user}
required
/>
<label htmlFor="password">Password:</label>
<input
type="password"
id="password"
onChange={(e) => setPwd(e.target.value)}
value={pwd}
required
/>
<button>Sign In</button>
</form>
<p>
Need an Account?
<br />
<span className="line">
<a href="#">Sign Up</a>
</span>
</p>
</section>
)}
</>
);
};
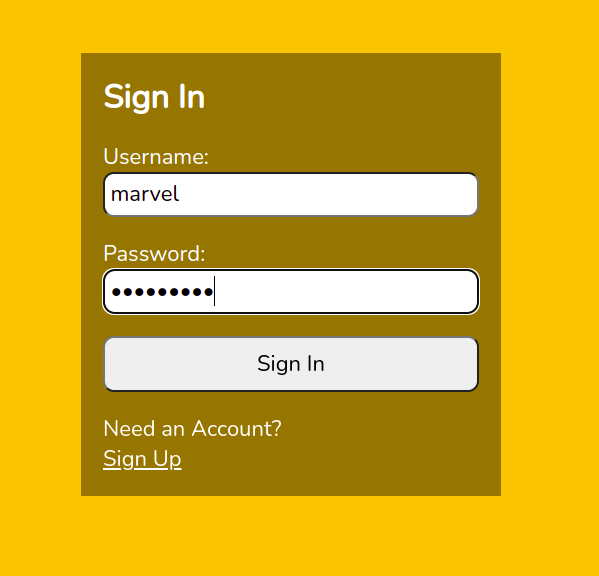
export default Login;We created a login form in the code block above. We also created state and ref events to control our inputs.
Creating AuthContext
In this section, we will create a global Auth state and use the context API. Inside our src folder, we would create a folder called context-Api and a file right inside it called AuthProvider.js.
// AuthProvider.js
import { createContext, useState } from "react";
const AuthContext = createContext({});
export const AuthProvider = ({ children }) => {
  const [auth, setAuth] = useState({});
  return (
    <AuthContext.Provider value={{ auth, setAuth }}>
      {children}
    </AuthContext.Provider>
  );
};

export default AuthContext;
In the code above, we defined our global state, which we will import into our index.js file and wrap our App component so that the entire app can have access to the auth state.
// index.js
import React from "react";
import ReactDOM from "react-dom/client";
import "./index.css";
import App from "./App";
import { AuthProvider } from "./context/AuthProvider";
const root = ReactDOM.createRoot(document.getElementById("root"));
root.render(
  <React.StrictMode>
    <AuthProvider>
      <App />
    </AuthProvider>
  </React.StrictMode>
);
Next, we import AuthContext into our login.js. We also created a handleSubmit function in charge of sending and verifying the data sent to the backend.
// Login.js
// imports
import AuthContext from "./context/AuthProvider";
function Login() {
  const { setAuth } = useContext(authContext);
  const handleSubmit = async (e) => {
    e.preventDefault();
    try {
      const response = await axios.post(
        LOGIN_URL,
        JSON.stringify({ user, pwd }),
        {
          headers: { "Content-Type": "application/json" },
          withCredentials: true,
        }
      );
      const accessToken = response?.data?.accessToken;
      const roles = response?.data?.roles;
      setAuth({ user, pwd, roles, accessToken });
      setUser("");
      setPwd("");
      setSuccess(true);
    } catch (err) {
      if (!err?.response) {
        setErrMsg("No Server Response");
      } else if (err.response?.status === 400) {
        setErrMsg("Missing Username or Password");
      } else if (err.response?.status === 401) {
        setErrMsg("Unauthorized");
      } else {
        setErrMsg("Login Failed");
      }
      errRef.current.focus();
    }
  };
}
You can add the following styles inside your index.js file.
@import url('https://fonts.googleapis.com/css2?family=Nunito&display=swap');
* {
  margin: 0;
  padding: 0;
  box-sizing: border-box;
}

html {
  font-family: 'Nunito', sans-serif;
  font-size: 22px;
  color: #fff;
}

body {
  min-height: 100vh;
  background-color: rgb(255, 184, 30);
}

.App {
  display: flex;
  flex-direction: column;
  justify-content: center;
  align-items: center;
  min-height: 100vh;
  padding: 1rem 0.5rem;
}

section {
  width: 100%;
  max-width: 420px;
  min-height: 400px;
  display: flex;
  flex-direction: column;
  justify-content: flex-start;
  padding: 1rem;
  background-color: rgba(0, 0, 0, 0.4);
}

form {
  display: flex;
  flex-direction: column;
  justify-content: space-evenly;
  flex-grow: 1;
  padding-bottom: 1rem;
}

a,
a:visited {
  color: #fff;
}

input[type='text'],
input[type='password'],
button,
textarea {
  font-family: 'Nunito', sans-serif;
  font-size: 22px;
  padding: 0.25rem;
  border-radius: 0.5rem;
}

label,
button {
  margin-top: 1rem;
}

button {
  padding: 0.5rem;
}

.instructions {
  font-size: 0.75rem;
  border-radius: 0.5rem;
  background: #000;
  color: #fff;
  padding: 0.25rem;
  position: relative;
  bottom: -10px;
}

.instructions>svg {
  margin-right: 0.25rem;
}

.offscreen {
  position: absolute;
  left: -9999px;
}

.hide {
  display: none;
}

.valid {
  color: limegreen;
  margin-left: 0.25rem;
}

.invalid {
  color: red;
  margin-left: 0.25rem;
}

.errmsg {
  background-color: lightpink;
  color: firebrick;
  font-weight: bold;
  padding: 0.5rem;
  margin-bottom: 0.5rem;
}

.line {
  display: inline-block;
}
This would be the result:
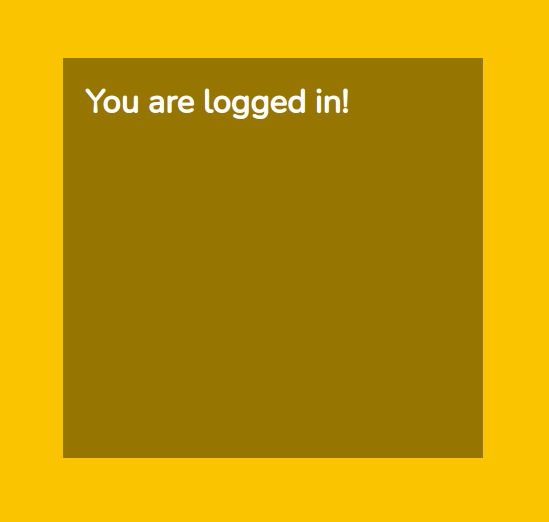
And, after clicking in the button:
Conclusion
In this article, we learned about User Login and authentication using React18 and Axios. We also learned the basic way to authenticate with a Node.js server. Here is the git repo for the React project.