Using the Platform Module in React Native
How to write platform-specific code for React Native

When creating React Native apps, it may be advantageous to include platform-specific code, and this article will teach you how to use the Platform module and include iOS- or Android-specific code in your cross-platform app,
React Native’s Platform module is a module present in React Native. It offers a straightforward method for creating platform-specific code that can only be run on particular operating systems. With the help of this module, we may create code exclusive to iOS or Android, or we can create cross-platform code with platform-specific features.
The great importance of the platform module is that it promotes reusable codes as much as possible, which is the hallmark of react-native. With this module, we don’t have to worry about how to implement different visuals for our Android or iOS applications.
Below are the reasons why and when we would likely use this module.
- Apply different styles to components depending on the platform.
- Conditionally render components depending on the platform.
- Execute different pieces of code depending on the platform.
- Apply fonts or different font sizes depending on the platform.
- Use of icons for platform-specific cases.
- Request permissions to use APIs depending on the platform we want.
- Platform-specific animations.
- Customization f keyboard functions and appearances.
- Date and time formatting.
- Push notification handling and display.
There are just some use cases of the Platform module.
Getting ready
Start by installing React Native.
npx create-expo-app <name_of_app>Here is the link to React Native website.
NOTE: we should have Node version 16.13.0 || >=18.0.0
Then, install the latest Expo CLI.
npm install -g expo-cliThis will install the latest Expo CLI.
We have to start our application by running the command below:
npm startStyling using the Platform Module
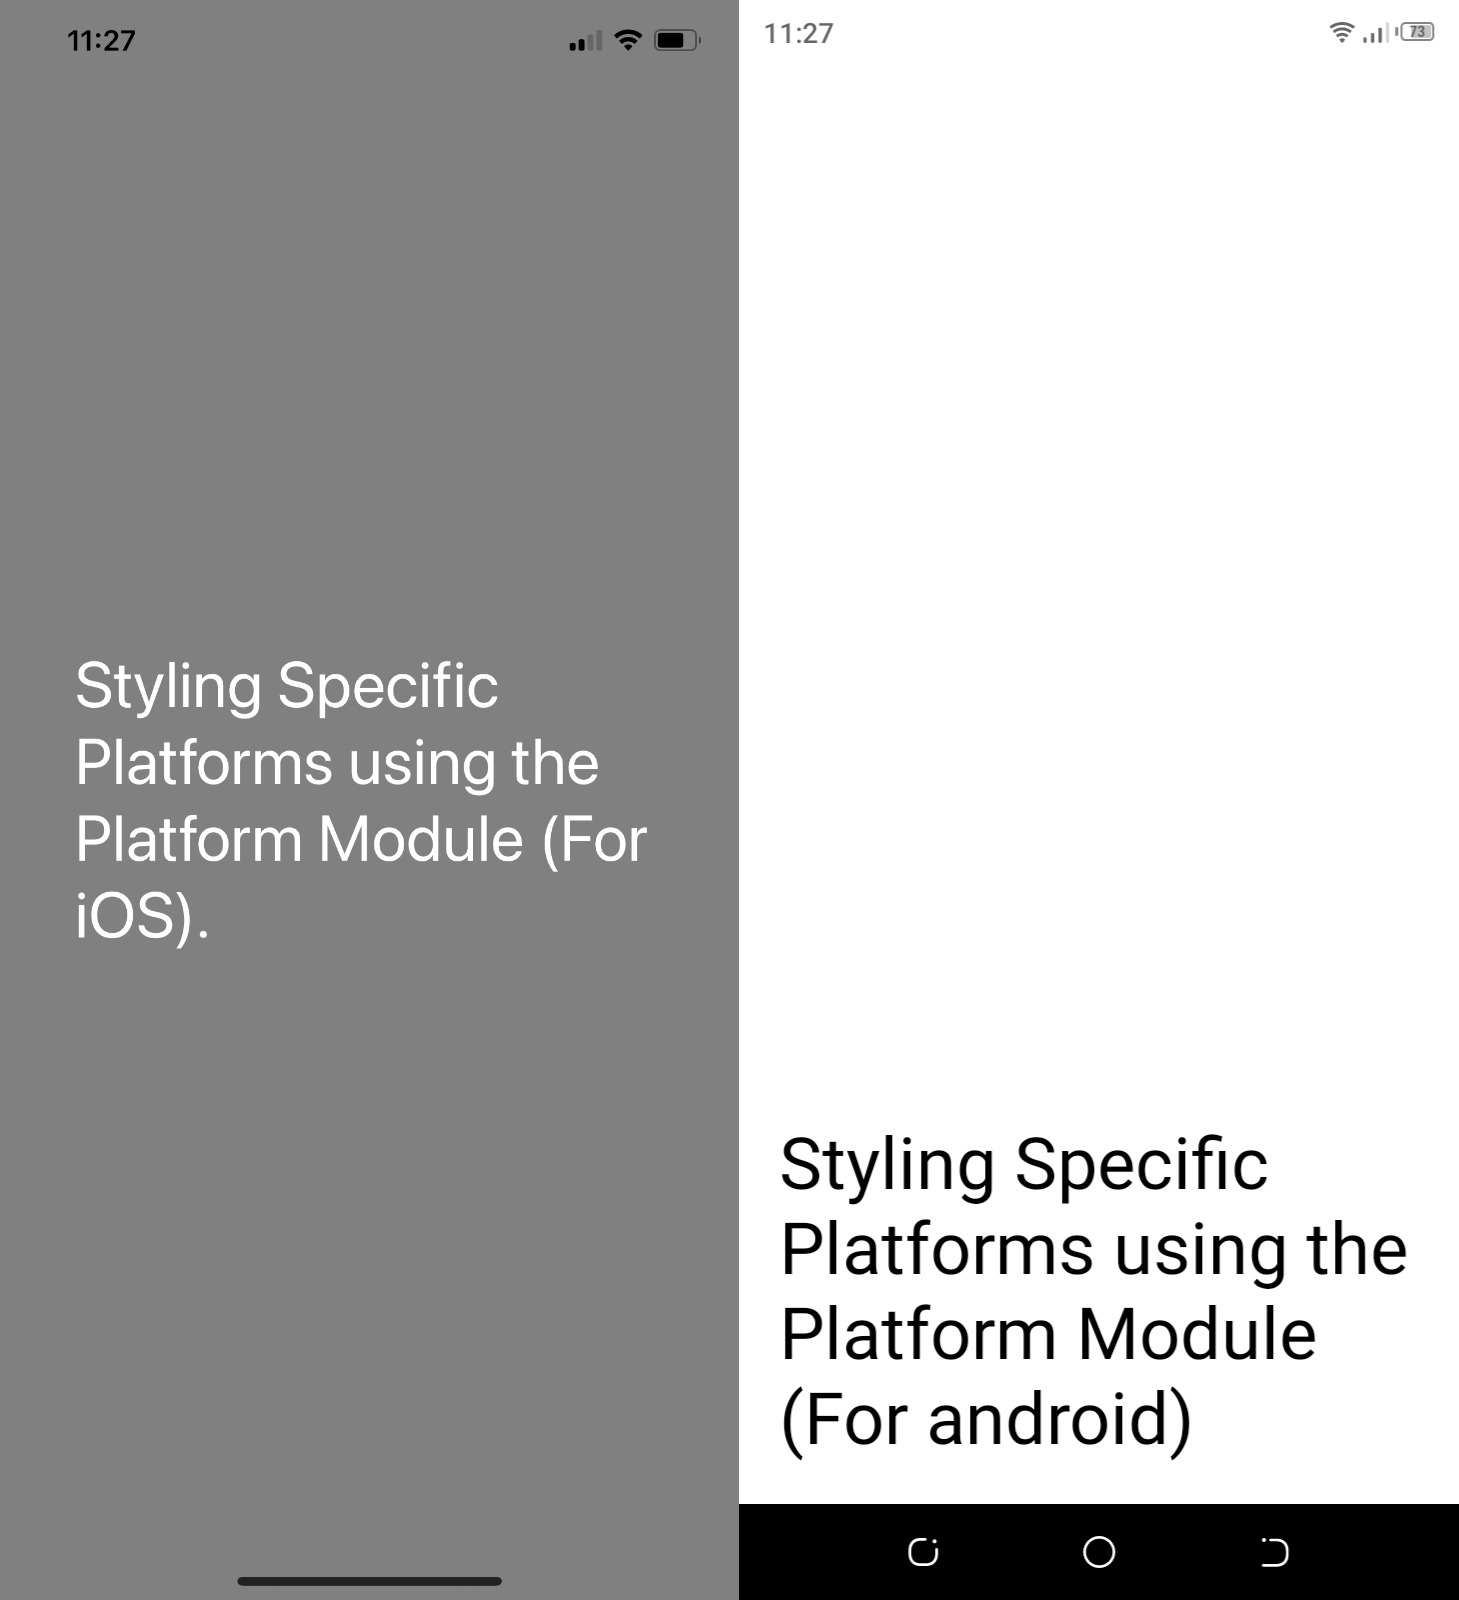
As stated before, we can use the Platform module to style components according to our choice and platform.
Replace the content of App.js with the following:
// path: ./App.js
import { StatusBar } from "expo-status-bar";
import { Platform, StyleSheet, Text, View } from "react-native";

export default function App() {
  return (
    <View style={styles.container}>
      {Platform.OS === "ios" ? (
        <Text style={styles.text}>
          Styling Specific Platforms using the Platform Module (For iOS).
        </Text>
      ) : (
        <Text style={styles.text}>
          Styling Specific Platforms using the Platform Module (For android)
        </Text>
      )}
      <StatusBar style="auto" />
    </View>
  );
}

const styles = StyleSheet.create({
  container: {
    flex: 1,
    backgroundColor: Platform.OS === "ios" ? "grey" : "white",
    alignItems: "center",
    justifyContent: Platform.select({
      ios: "center",
      android: "flex-end",
    }),
    padding: 20,
    textAlign: "center",
  },
  text: {
    color: Platform.OS === "android" ? "black" : "white",
    fontSize: 36,
  },
});
In the code above, we import the Platform module in the third line. We then used the Platform.OS property to specify what should be displayed as texts on the screen, together with their corresponding styles. And lastly, we also used Platform.OS and Platform.select in our stylesheet.
Summarily, we specify that for platform ios, we want the backgroundColor to be grey, the content to flex to the center, aligned to the center of the screen and the text should be black. And as for the Android platform, we want the text to be aligned to the center but justified to the end of the screen.
Using the Platform Module to select Navigations
Install the react-navigation package.
npm install @react-navigation/nativeInstall dependencies required for our Expo-managed project.
npx expo install react-native-screens react-native-safe-area-contextInstalling Drawer Navigation
Now, we want to specify the type of navigation we want for the Android and iOS platforms. For Android, we want drawer navigation, and for iOS, we want bottom tab navigation.
This, of course, can only be possible using the Platform module. So, let us get started.
For the drawer navigation, we need to install @react-navigation/drawer.
npm install @react-navigation/drawerAnd because we are running our project on Expo, we install the following dependencies:
npx expo install react-native-gesture-handler react-native-reanimatedCheckout react-native-gesture-handler and react-native-reanimated for more.
NOTE: add this plugins: [‘react-native-reanimated/plugin’], to the
babel.config.jsfile
Installing Bottom-tab Navigation
We have to install the package below:
npm install @react-navigation/bottom-tabsYou can learn more about @react-navigation/bottom-tabs.
This is the time to create our screens. Create a folder called screens. Inside it, first create the file Home.js and add the following piece of code.
// path: ./screens/Home.js
import { StyleSheet, Text, View } from 'react-native';

export default function Home() {
  return (
    <View style={styles.container}>
      <Text>This is the Home Screen</Text>
    </View>
  );
}

const styles = StyleSheet.create({
  container: {
    flex: 1,
    backgroundColor: '#fff',
    alignItems: 'center',
    justifyContent: 'center',
  },
});
Creating the Screens
After this, create another file called About.js and add the same content as Home.js; the only difference is the text content.
// path: ./screens/About.js
import { StyleSheet, Text, View } from 'react-native';

export default function About() {
  return (
    <View style={styles.container}>
      <Text>This is the About Screen</Text>
    </View>
  );
}

const styles = StyleSheet.create({
  container: {
    flex: 1,
    backgroundColor: '#fff',
    alignItems: 'center',
    justifyContent: 'center',
  },
});
And finally, for screens, create the screen file History.js and add the following content.
// path: ./screens/History.js
import { StyleSheet, Text, View } from 'react-native';

export default function History() {
  return (
    <View style={styles.container}>
      <Text>This is the History Screen</Text>
    </View>
  );
}

const styles = StyleSheet.create({
  container: {
    flex: 1,
    backgroundColor: '#fff',
    alignItems: 'center',
    justifyContent: 'center',
  },
});
Please understand that the Home.js, About.js, and History.js are basically to show a text description of the screens along with their stylesheets.
Creating the Navigations
For the navigations, we need the folder navigations. Now we go ahead and create this folder. Inside it, we need to create two files, BottomTabNavigation.js for the iOS display and DrawerNavigation.js for the Android display.
The BottomabNavigation.js is as follows:
// path: ./navigations/BottomabNavigation.j
import { NavigationContainer } from "@react-navigation/native";
import { createBottomTabNavigator } from "@react-navigation/bottom-tabs";
import Home from "../screens/Home";
import About from "../screens/About";
import History from "../screens/History";

const BottomTab = createBottomTabNavigator();

export default function BottomTabNavigation() {
  return (
    <NavigationContainer>
      <BottomTab.Navigator
        useLegacyImplementation={true}
        initialRouteName="Home"
      >
        <BottomTab.Screen name="Home" component={Home} />
        <BottomTab.Screen name="About" component={About} />
        <BottomTab.Screen name="History" component={History} />
      </BottomTab.Navigator>
    </NavigationContainer>
  );
}
The code above imports the NavigationContainer, our bottom tab navigation container. It also imports the createBottomTabNavigator() function, which creates bottom tab navigation for us. We also import the screens we have created previously, and we then specify the name of the screens and their corresponding component screens.
Next, we have to add content to DrawerNavigation.js. Add the following content.
// path: ./navigations/DrawerNavigation.js
import { NavigationContainer } from "@react-navigation/native";
import { createDrawerNavigator } from '@react-navigation/drawer';

import Home from '../screens/Home';
import About from '../screens/About';
import History from '../screens/History';

const Drawer = createDrawerNavigator();

export default function DrawerNavigation() {
    return (
        <NavigationContainer>
            <Drawer.Navigator useLegacyImplementation={true} initialRouteName="Home">
                <Drawer.Screen name="Home" component={Home} />
                <Drawer.Screen name="About" component={About} />
                <Drawer.Screen name="History" component={History} />
            </Drawer.Navigator>
        </NavigationContainer>
    )
}
This is similar to what we did at the BottomTabNavigation.js. The only difference is that this time we have to make use of the createBottomTabNavigator() function.
Here comes the power of the Platform module. In the App.js of our file, add the following:
// path: ./App.js
import 'react-native-gesture-handler';
import { Platform } from "react-native"
import DrawerNavigation from "./navigations/DrawerNavigation";
import BottomTabNavigation from "./navigations/BottomTabNavigation";

const App = Platform.select({
  ios: () => <BottomTabNavigation />,
  android: () => <DrawerNavigation />
})
export default App;
In the code above, we use the platform module to select which navigation to display. Here is the demo of what our platforms will look like.
 Android display
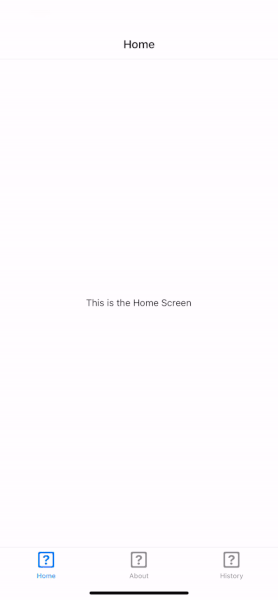 iOS display
Session Replay for Developers
Uncover frustrations, understand bugs and fix slowdowns like never before with OpenReplay — an open-source session replay tool for developers. Self-host it in minutes, and have complete control over your customer data. Check our GitHub repo and join the thousands of developers in our community.
Using the Platform Module for Native Components that are not common to iOS and Android.
Now that we have looked at how to style for different platforms and select navigations for different platforms using the Platform module. Now we let us use it for Native components that are not common to iOS and Android.
DateTimePicker
First, we start with the DateTimePicker. We have to use the Platform module because the displays for Android and iOS are different. For instance, the one for Android does not appear when the date or time has been selected. For this reason and more, we have to use the Platform module.
Inside our App.js, we have to replace the content with the following.
// path: ./App.js
import { useState } from "react";
import {
  Platform,
  StyleSheet,
  Text,
  View,
  TouchableOpacity,
} from "react-native";
import DateTimePicker from "@react-native-community/datetimepicker";

export default function App() {
  const [date, setDate] = useState(new Date());
  const [showPicker, setShowPicker] = useState(false);

  const handlePickerChange = (event, selectedDate) => {
    setDate(selectedDate || date);
    hideDateTimePicker();
  };

  const showDateTimePicker = () => {
    setShowPicker(true);
  };

  const hideDateTimePicker = () => {
    setShowPicker(false);
  };

  return (
    <View style={styles.container}>
      {Platform.OS === "ios" ? (
        <DateTimePicker
          testID="dateTimePicker"
          value={date}
          mode="datetime" // for iOS only
          display="default"
          onChange={handlePickerChange}
        />
      ) : (
        <>
          {showPicker && (
            <DateTimePicker
              testID="dateTimePicker"
              value={date}
              mode="date" // for android only
              display="default"
              onChange={handlePickerChange}
            />
          )}
          <TouchableOpacity
            style={styles.androidPicker}
            onPress={showDateTimePicker}
          >
            <Text>{date.toLocaleString()}</Text>
          </TouchableOpacity>
        </>
      )}
    </View>
  );
}

const styles = StyleSheet.create({
  container: {
    flex: 1,
    backgroundColor: "#fff",
    alignItems: "center",
    justifyContent: "center",
  },
  androidPicker: {
    backgroundColor: "#f1f1f1",
    padding: 10,
    borderRadius: 5,
  },
});
From the code above, from line 1-10, we import the useState, Platform, and DateTimePicker modules. With the useState, we set states date and showPicker in lines 13 and 14.
In lines 16-27, we create the function handlePickerChange, which is responsible for setting the date state and hiding the DateTimePicker module. We also create the showDateTimePicker(), which is responsible for displaying our picker. And lastly, the hideDateTimePicker() function hides the picker.
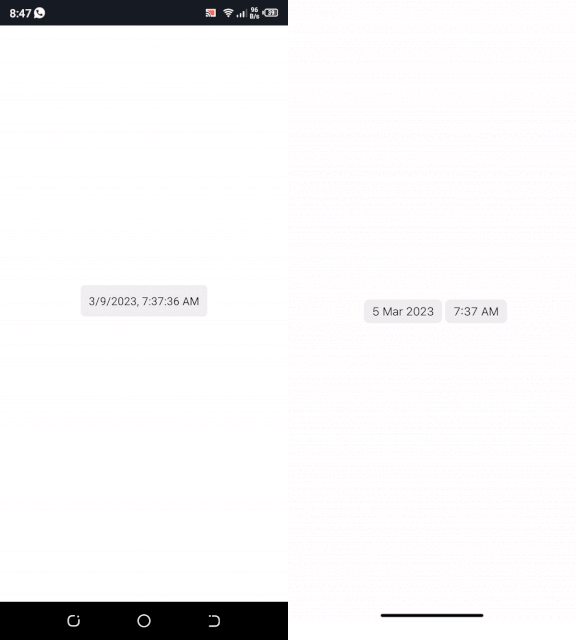
Looking at lines 30-56, in line 32, we specified the platform and the DateTimePicker to show. The first ternary value is the display for iOS. And we specify that the mode should be datetime, which is only specific to iOS. And for the Android display, we ensured it should display when the showPicker value is true. The reason is just as we stated earlier: the DateTimePicker for Android disappears after the date is set. And lastly, for the Android platform, we added the function showDateTimePicker() to TouchableOpacity module to show the DateTimePicker when clicked. We also used it to display the value of the date since it does not display by default on Android.
And lastly, we create our styles in lines 62-74.
See the demo below. On the left is the Android platform, and on the right is the iOS platform.
DrawerLayoutAndroid
The DrawerLayoutAndroid does not have an iOS alternative; for this, we will have to install react-native-drawer-layout.Check out react-native-drawer-layout for more information.
To install this, run the command below:
npm install react-native-drawer-layoutAfter that, we will need to install the following:
npx expo install react-native-gesture-handler react-native-reanimatedFinally, we add the react-native-reanimated plugin to
our babel.config.js file.
module.exports = function (api) {
  api.cache(true);
  return {
    presets: ['babel-preset-expo'],
    plugins: ['react-native-reanimated/plugin']
  };
};
And we add import react-native-gesture-handler at our entry file, which is the App.js.
Here is our code:
// path: ./App.js
import "react-native-gesture-handler";
import React, { useRef, useState } from "react";
import {
  Button,
  DrawerLayoutAndroid,
  Text,
  StyleSheet,
  View,
  Platform,
} from "react-native";
import { Drawer } from "react-native-drawer-layout";

const App = () => {
  const [open, setOpen] = React.useState(false);

  // create a navigation view for Android
  const navigationView = () => (
    <View style={styles.container}>
      <Text>I'm the Drawer!</Text>
    </View>
  );

  return (
    <>
      {/* Select for os */}
      {Platform.OS === "ios" ? (
        <Drawer
          open={open}
          onOpen={() => setOpen(true)}
          onClose={() => setOpen(false)}
          renderDrawerContent={() => {
            return (
              <View style={styles.container}>
                <Text>I'm the Drawer!</Text>
              </View>
            );
          }}
        >
          <View style={styles.container}>
            <Text>Swipe from the left (Drawerlayout for iOS)</Text>
          </View>
        </Drawer>
      ) : (
        <DrawerLayoutAndroid
          drawerWidth={300}
          renderNavigationView={navigationView}
        >
          <View style={styles.container}>
            <Text style={styles.paragraph}>
              Swipe from the left (Drawerlayout for Android)
            </Text>
          </View>
        </DrawerLayoutAndroid>
      )}
    </>
  );
};

const styles = StyleSheet.create({
  container: {
    flex: 1,
    alignItems: "center",
    justifyContent: "center",
    padding: 16,
  },
  paragraph: {
    padding: 16,
    fontSize: 15,
    textAlign: "center",
  },
});

export default App;- lines 2-12: we import some modules, among which are the
Drawer,DrawerLayoutAndroid,Platformmodules, and theuseStatehook. - line 15: we create a state variable
openfor when our drawer should close or open for the iOS platform. - lines 18-22: the navigation for Android view is created. This will be displayed when the drawer opens.
- line 27: we used the Platform module to specify the platforms Android and iOS.
- lines 28-38: the Drawer of iOS is created. We specify the
openstate variable, theonClose()andonOpen()functions. And as well as therenderDrawerContent()function, which, as the name implies, renders the view for the iOS drawer. - lines 45-54: we specify the drawer for Android. We pass the props
drawerWidth, which specifies the width of our drawer.renderNavigationView()function, which displays the navigation view of the drawer when it opens. - lines 60-72: we style the components.
- lines 74: we export our app.
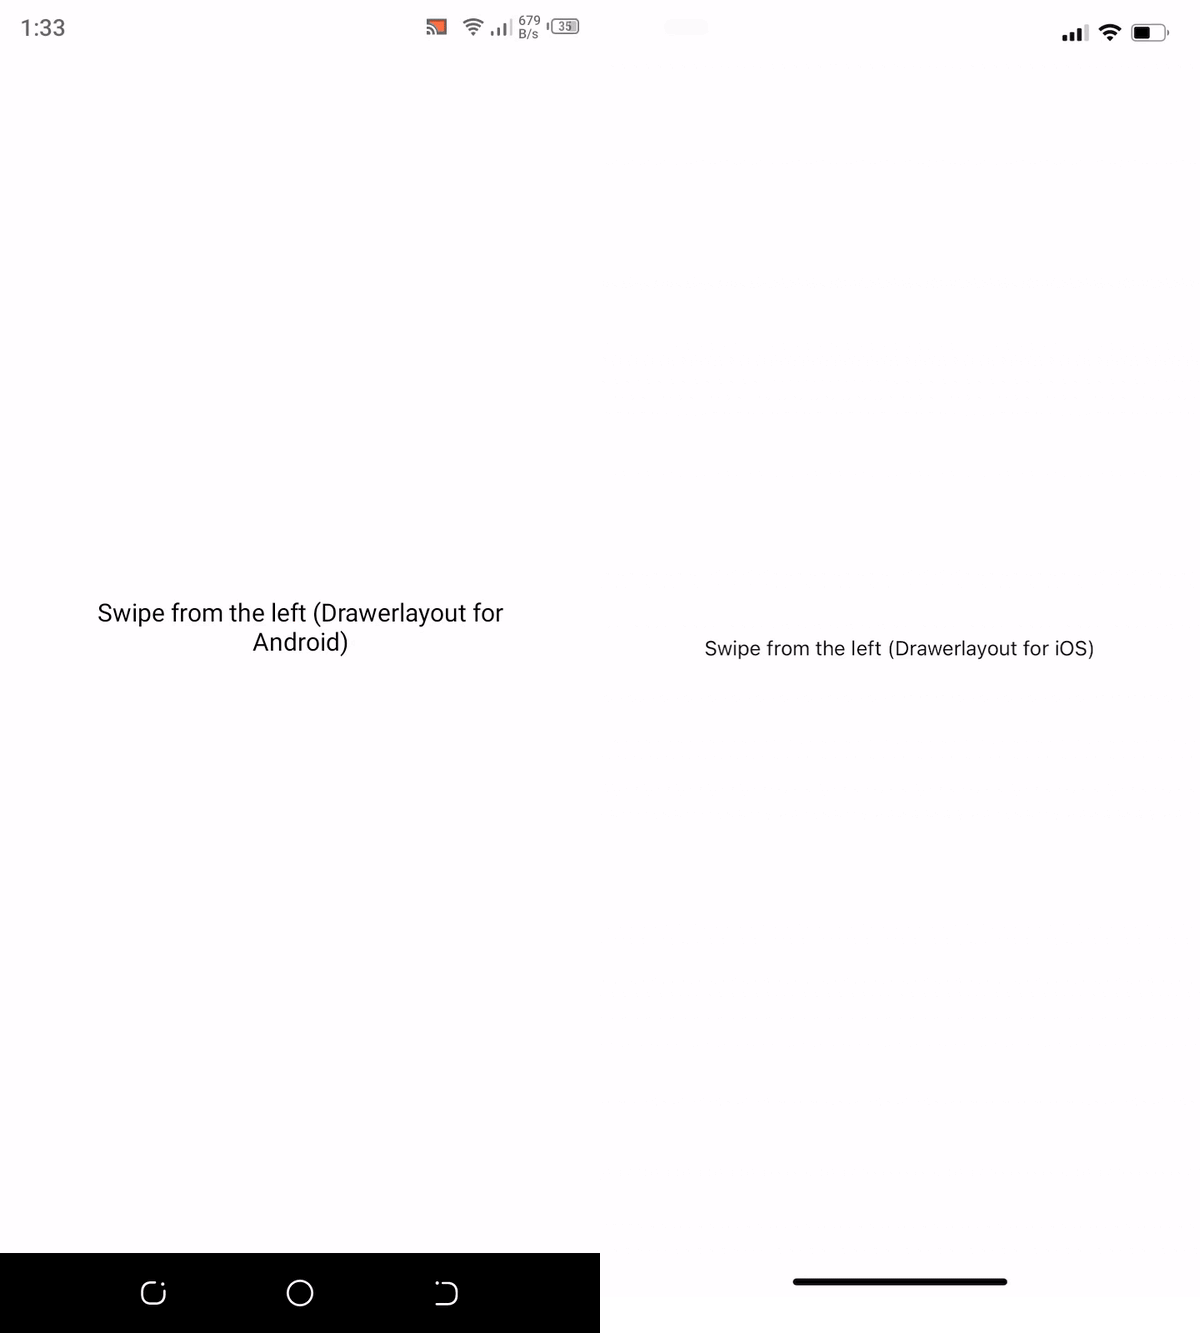
Below is the demo of the drawers in the Android and iOS platforms. On the left is Android, and on the right is iOS.
NOTE: by default, they slide from the left.
Switch
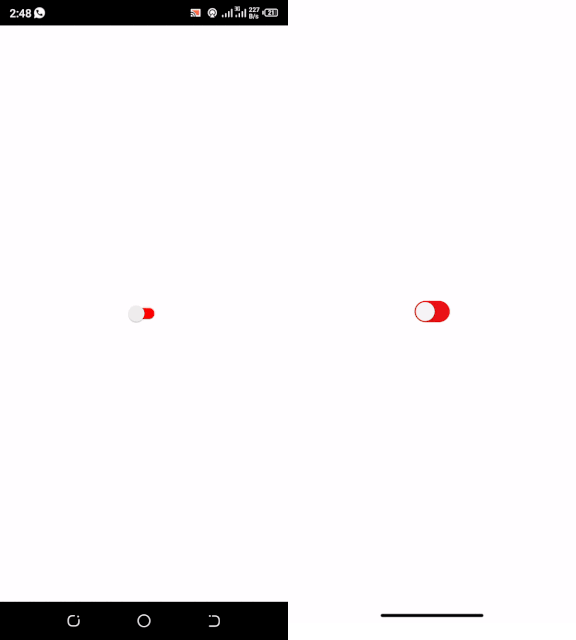
One difference when it comes to using Switch for Android and iOS is the ios_backgroundColor property. It is only specific to iOS. For this reason, the Platform module is required.
// path: ./App.js
import React, { useState } from 'react';
import { View, Switch, Platform, StyleSheet } from 'react-native';

export default function App() {
  const [isEnabled, setIsEnabled] = useState(false);

  const toggleSwitch = () => {
    setIsEnabled(previousState => !previousState);
  };

  return (
    <View style={styles.container}>
      {Platform.OS === 'ios' ?
        <Switch
          trackColor={{ false: 'orange', true: 'green' }}
          thumbColor={isEnabled ? '#f5dd4b' : '#f4f3f4'}
          ios_backgroundColor="red" // only available for ios and not for android
          onValueChange={toggleSwitch}
          value={isEnabled}
        />
        :
        <View style={styles.container}>
          <Switch
            trackColor={{ false: 'red', true: 'green' }}
            thumbColor={isEnabled ? '#f5dd4b' : '#f4f3f4'}
            onValueChange={toggleSwitch}
            value={isEnabled}
          />
        </View>
      }
    </View>
  );
}

const styles = StyleSheet.create({
  container: {
    flex: 1,
    justifyContent: "center",
    alignItems: 'center'
  }
})
In the code above:
- lines 1-2: we import the
useStatehook,Switch, andPlatformmodules. - line 7: we create a state variable
isEnabled, which determines if a switch is enabled or not. - line 8:
toggleSwitch()function is created, which will help us toggle the switch back and forth. - lines 16-22: we specify the value for the
Switchdisplay for iOS. The propstrackColoris set to orange when it is false and green when it is true; that is disabled and enabled. We also set thethumbColorfor when it is enabled and disabled. And thetoggleSwitch()function is called when we change the value of the switch. And lastly, we pass the value of the switch. Note that we passed theios_backgroundColor, which is only specific to iOS, as red. - lines 24-31: we specify the same for the Android display just as we did above. The difference is that we did not specify
ios_backgroundColor, and we made the track color red when it is false; this is to make its background look red.
Below is what our code will look like in Android and iOS.
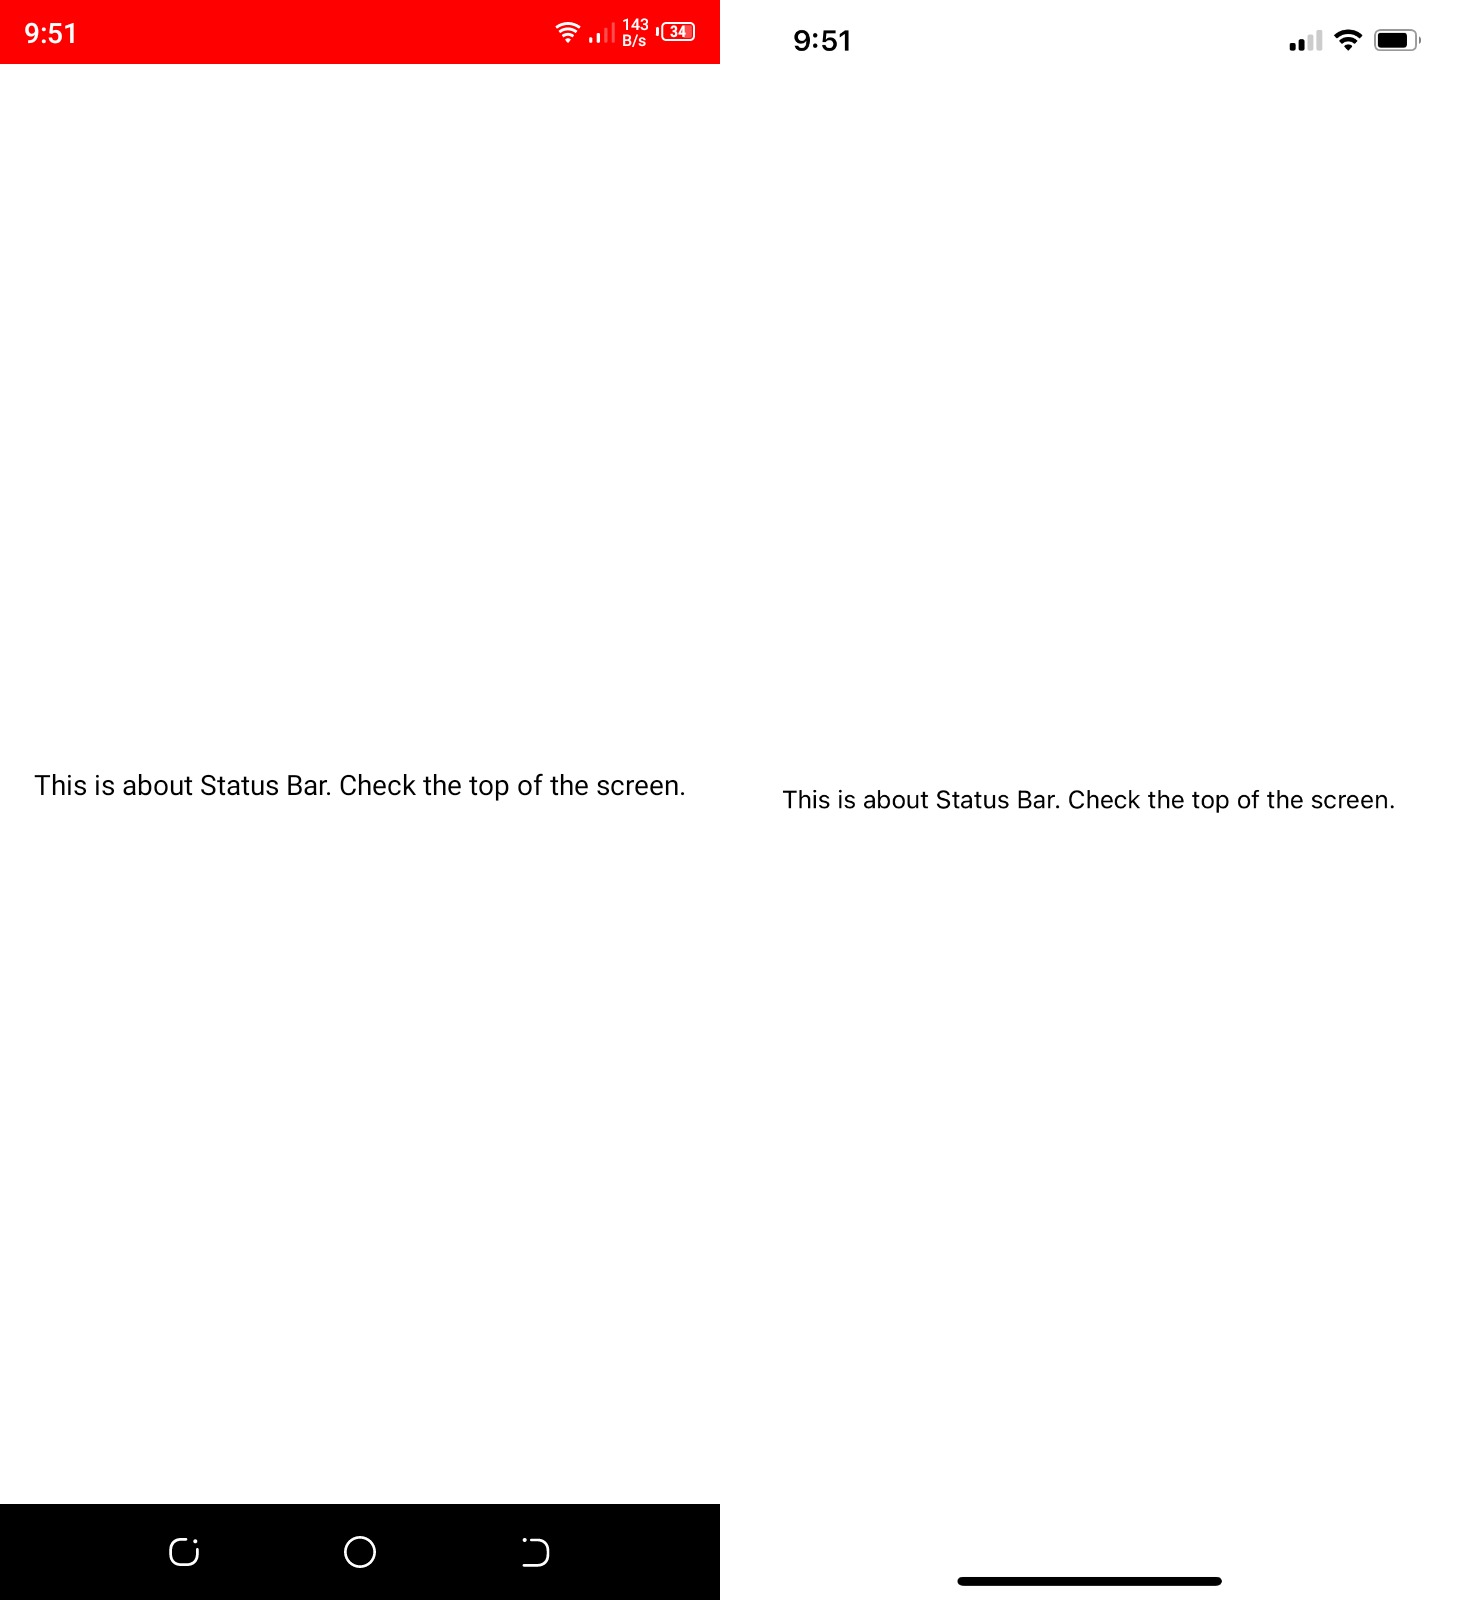
StatusBar
The StatusBar is responsible for what we see at the top of our screen.
For the StatusBar module, we need to specify for Android or iOS when we want to disable or enable networkActivityIndicatorVisible, which is specific to iOS. We also need it when we want to specify the value for the StatusBar background color, which is specific to Android.
In the App.js file, replace the code with this:
// path: ./App.js
import React from "react";
import { Platform, StatusBar, View, Text } from "react-native";

export default function App() {
  const isIOS = Platform.OS === "ios";

  return (
    <View style={{ flex: 1 }}>
      {isIOS && (
        <StatusBar
          barStyle="dark-content"
          networkActivityIndicatorVisible={true}
        />
      )}
      {!isIOS && <StatusBar barStyle="light-content" backgroundColor="red" />}
      <View
        style={{
          flex: 1,
          backgroundColor: "#FFFFFF",
          justifyContent: "center",
          alignItems: "center",
        }}
      >
        <Text>This is about Status Bar. Check the top of the screen.</Text>
      </View>
    </View>
  );
}
From the code above, we used the Platform module to specify networkActivityIndicatorVisible to true for the iOS platform and a backgroundColor of red for the Android platform.
See the display below:
Activity Indicator
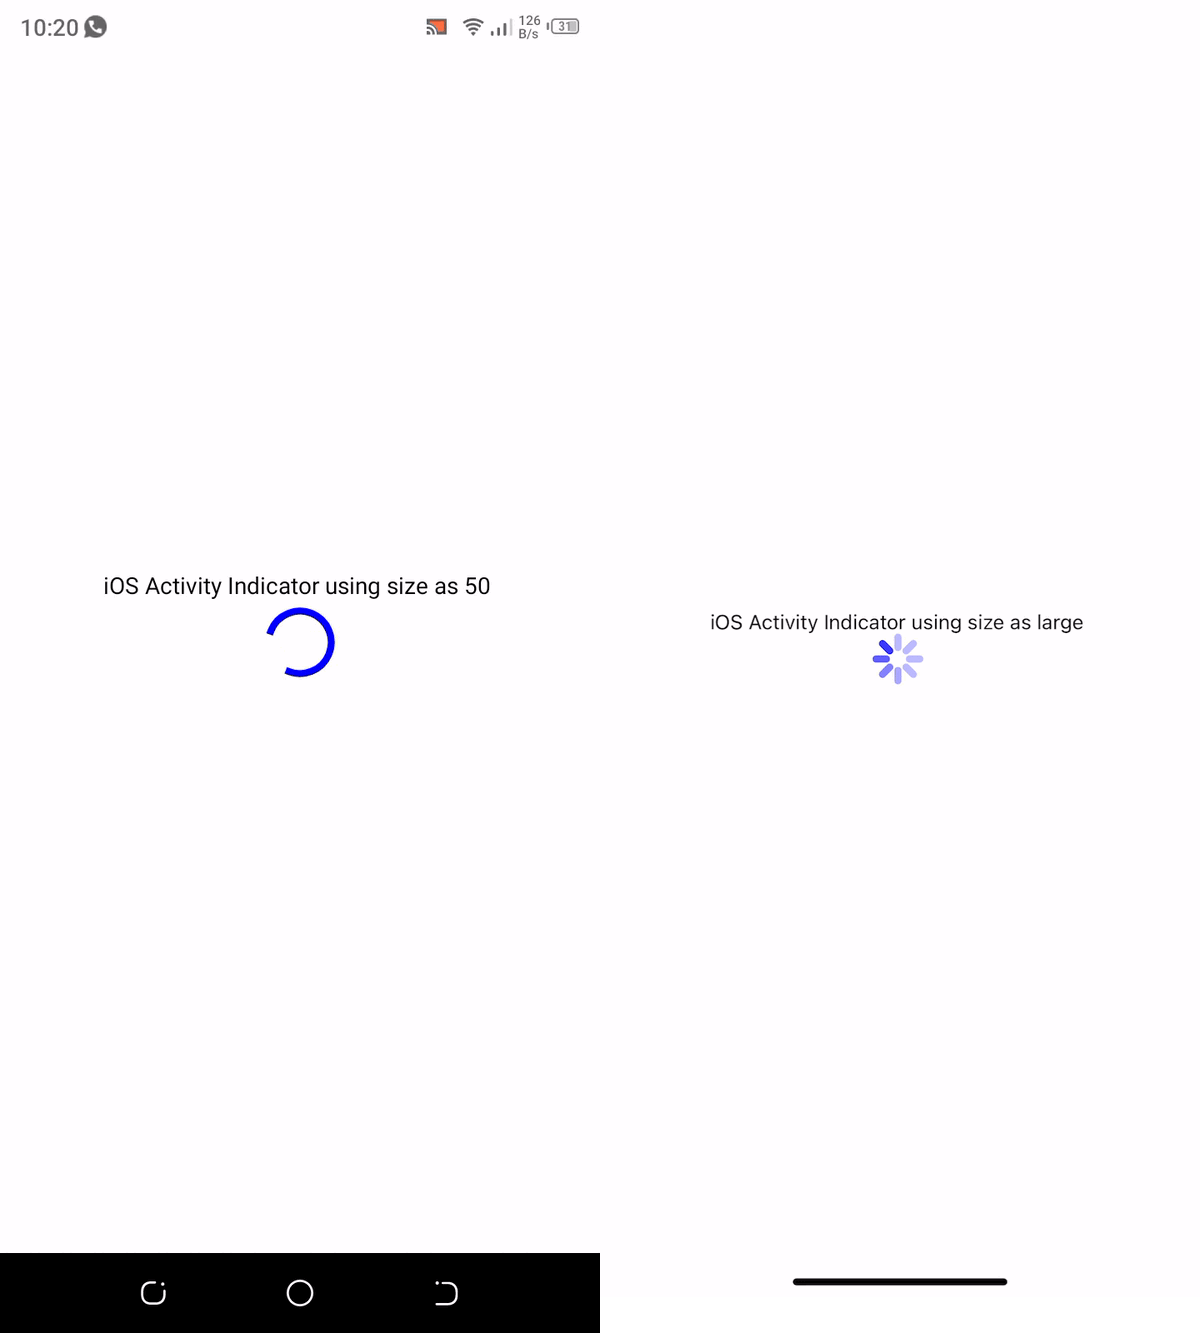
The activity indicator, as the name suggests, displays an indicator to show an ongoing activity.
For the activityIndicator, when specifying the different platforms, the size property differs. The iOS platform uses large or small, but the Android platform uses numbers. See the code below.
// path: ./App.js
import { StatusBar } from "expo-status-bar";
import {
  StyleSheet,
  Text,
  View,
  ActivityIndicator,
  Platform,
} from "react-native";

export default function App() {
  return (
    <View style={styles.container}>
      <Text>
        iOS Activity Indicator using size as{" "}
        {Platform.select({
          android: "50",
          ios: "large",
        })}{" "}
      </Text>
      <ActivityIndicator
        size={Platform.OS === "android" ? 50 : "large"}
        animating={true}
        color="blue"
      />
    </View>
  );
}

const styles = StyleSheet.create({
  container: {
    flex: 1,
    backgroundColor: "#fff",
    alignItems: "center",
    justifyContent: "center",
  },
});
In the code above, we used the Platform.select to specify the display text for Android and iOS. And with the Platform.OS, we specified the size for Android as 50 and for iOS as “large”.
Here is a preview of our activity indicator.
WebView
Because the WebView is deprecated, we need to install the react-native-webview from the react native community. Find out more about react-native-webview. It still has the same props as the latter.
One of the reasons to use the Platform module here is that there are some props that are platform specific. For instance, the cacheEnabled is available on iOS. The geoLocationEnabled and scalesPageToFit are specific to the Android platform.
Run the command below to install this package:
npm i react-native-webviewAfter that is done, replace the content of App.js with the code below.
// path: ./App.js
import { StyleSheet, Platform } from "react-native";
import { WebView } from "react-native-webview";

export default function App() {
  return Platform.OS === "ios" ? (
    <WebView
      source={{ uri: "https://blog.openreplay.com/" }}
      cacheEnabled={true}
    />
  ) : (
    <WebView
      source={{ uri: "https://blog.openreplay.com/" }}
      geolocationEnabled={true}
      scalesPageToFit={true}
      domStorageEnabled={true}
    />
  );
}
In the code above, using the Platform module we specified the cacheEnabled to true for the iOS platform. And then geoLocationEnabled and scalesPageToFit for the Android platform and true.
Here is the preview below:

Conclusion
In this article, we have looked at the Platform module and why it is useful. We also looked at how to use it on different components and modules that are not specific to iOS and Android.
Gain Debugging Superpowers
Unleash the power of session replay to reproduce bugs and track user frustrations. Get complete visibility into your frontend with OpenReplay, the most advanced open-source session replay tool for developers.