How To: Snapshot Testing in React Native with Jest
Learn this important testing technique for mobile development


Snapshot testing is an important technique for software development, and this article will show you how to do it for your React Native mobile apps.

Discover how at OpenReplay.com.
Snapshot testing is used in software development to verify the consistent rendering of a component’s output, including its UI, across time. In React Native, this process entails capturing a snapshot of the component’s rendered output and comparing it to a previously stored reference snapshot. Any differences detected between the two snapshots suggest a possible alteration in the component’s functionality, requiring further investigation.
This article comprehensively covers all aspects of snapshot testing, including its benefits and practical applications, and demonstrates how Jest simplifies the process for React Native developers.
Why Are They Useful for React Native Development?
Snapshot tests provide numerous advantages for React Native development:
- Visual Regression Testing: They automatically detect unintended UI alterations, safeguarding against regressions that could harm user experience.
- Debugging: Snapshots facilitate pinpointing the origin of UI discrepancies by isolating the responsible component.
- Documentation: Reference snapshots act as visual documentation, enhancing maintainability and communication among developers regarding component behavior.
- Fast Feedback: Snapshot tests offer swift and dependable feedback on UI modifications during development.
Brief Overview of Jest Testing Framework
Jest is a popular testing framework widely used in the React ecosystem, including React Native. It offers a user-friendly and flexible approach to writing tests and supports various types, including snapshot testing. Jest seamlessly integrates with React Native, providing built-in features and utilities for testing components and asynchronous operations.
Getting Started
In this section, we will delve into the installation process of Jest, a popular testing framework, and guide you through creating your first Jest Snapshot. By following these steps, you’ll be equipped with the essential tools to effectively implement Jest within your React Native project and start harnessing the power of snapshot testing to ensure the stability and reliability of your application.
Installation of Jest in Your React Native Project
Before proceeding with installing Jest, ensure that your React Native project is up and running. Once confirmed, to install the latest version of Jest in your application, execute the following command in your project root terminal:
npm install --save-dev jestOnce Jest is installed, the next step is to install React Test Renderer. This tool, provided by the React team, aids in testing React components by rendering them to pure JavaScript objects, free from reliance on the actual DOM or native mobile environment. To add this library to your project, simply execute the following code in your project terminal:
npm i react-test-rendererCreating Your First Snapshot Test
In this section, we’ll create a component that serves as the main display in our mobile application and will be utilized for snapshot testing. This component will be invoked in a separate test file to examine UI changes. Below is the code for the UI on which we’ll conduct the test.
import {FlatList, Image, StyleSheet, Text, TextInput, View} from 'react-native';
import React from 'react';
const PlayGround = () => {
let data = [
{
index: 1,
name: 'Cat',
image:
'https://encrypted-tbn0.gstatic.com/images?q=tbn:ANd9GcTLLSW36lWjG4vE6ilG5DXjYYzMqTLF1Mwp-TcZblQh2w&s',
},
{
index: 2,
name: 'Dog',
image:
'https://encrypted-tbn0.gstatic.com/images?q=tbn:ANd9GcTFji2g7Budhl8Uhb1ndt-kHFGJxzeI6MJs4fO1ZlwCRg&s',
},
{
index: 3,
name: 'Rabbit',
image:
'https://encrypted-tbn0.gstatic.com/images?q=tbn:ANd9GcSPytnWLr_SismreCcmqDGS6uXL4XXfq2qm6MSpkbDyAA&s',
},
{
index: 4,
name: 'Parrot',
image:
'https://encrypted-tbn0.gstatic.com/images?q=tbn:ANd9GcRXUXpHO6vPqpoIFon0Swe-xIHIwFPfCSUdDQ&usqp=CAU',
},
];
return (
<View style={styles.body}>
<Text style={[styles.text, {marginBottom: 20}]}>List of Animals</Text>
<FlatList
data={data}
keyExtractor={(item, index) => index.toString()}
renderItem={({item}) => (
<View style={styles.list}>
<Image
style={styles.image}
source={{
uri: item.image,
}}
/>
<View>
<Text style={styles.text}>{item.name}</Text>
</View>
</View>
)}
/>
</View>
);
};
export default PlayGround;
const styles = StyleSheet.create({
body: {
backgroundColor: 'black',
flex: 1,
},
text: {
fontSize: 25,
fontWeight: 'bold',
color: 'white',
},
image: {
width: 80,
height: 80,
marginRight: 20,
borderRadius: 10,
},
list: {
marginVertical: 10,
flexDirection: 'row',
alignItems: 'center',
},
input: {
width: '100%',
padding: 10,
paddingVertical: 15,
borderBottomWidth: 2,
backgroundColor: '#2f2f2f',
color: 'white',
fontSize: 15,
borderRadius: 10,
marginVertical: 7,
},
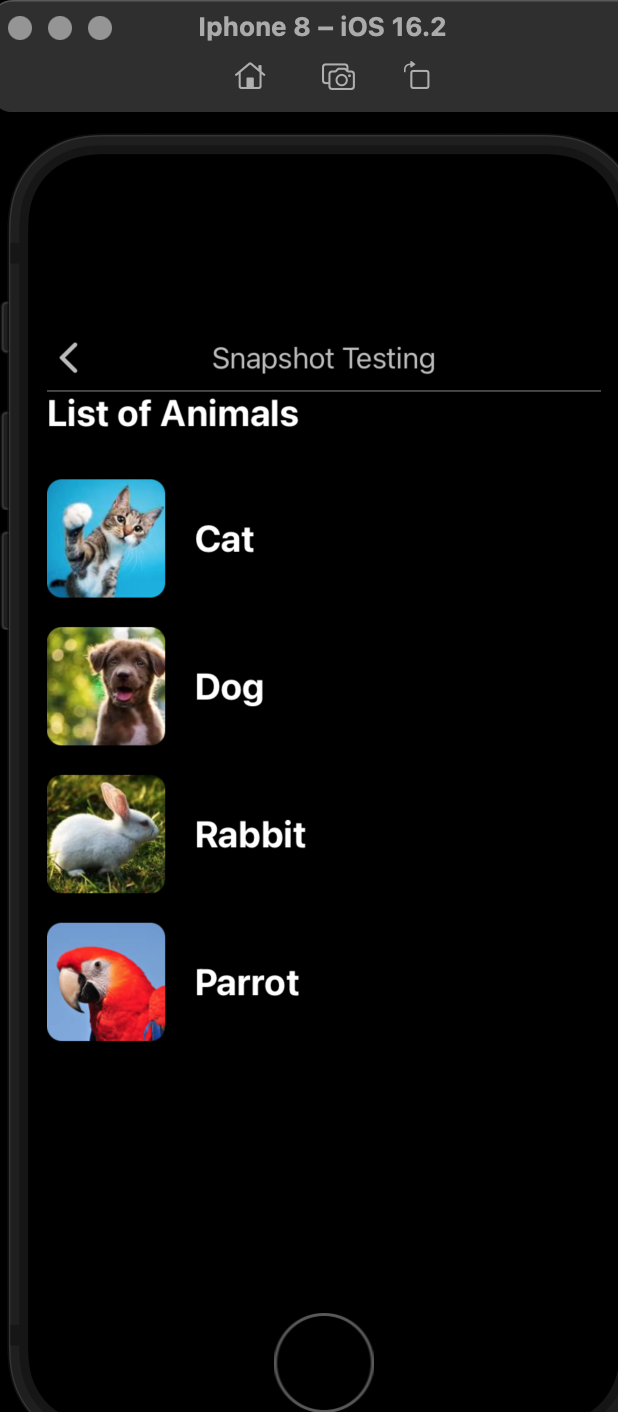
});The code above defines a React Native component named PlayGround that displays a list of animals with their names and images. It uses a FlatList component to render the data dynamically. Each item in the list includes an image and a text displaying the animal’s name. The styles define the appearance of the text, images, and the overall layout of the list.
The output for the code above is displayed below:
Next, we’ll initiate our first snapshot code within a folder named __tests__. This folder is positioned at the root of your project directory. Simply navigate to the folder, locate the default file named App.test.tsx, and delete it. Then, create a new file named Intro-test.js. In this fresh file, we’ll compose our code for the snapshot testing, as illustrated below:
import renderer from "react-test-renderer";
import PlayGround from "../src/playground/PlayGround";
it("renders correctly", () => {
  const tree = renderer.create(<PlayGround />).toJSON();
  expect(tree).toMatchSnapshot();
});
The provided code snippet evaluates whether the PlayGround component renders accurately. It employs the react-test-renderer library to generate a snapshot of the component’s rendered output. During the first snapshot test, the test succeeds by creating a snapshot file that serves as the initial reference. This file will be utilized for comparing future tests, ensuring consistency across updates.
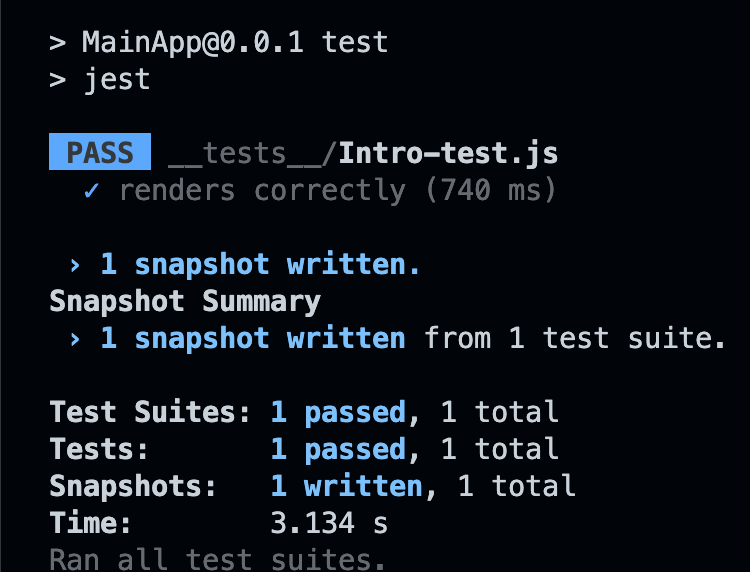
After configuring the test file, proceed to execute the snapshot test by executing the following code in your project’s root terminal:
npm run testAfter successfully executing the provided code, you will see an output similar to the following in your project terminal:
After the terminal finishes printing, a __snapshot__ folder with a file will be generated inside the __test__ folder in our project root directory, as shown below:
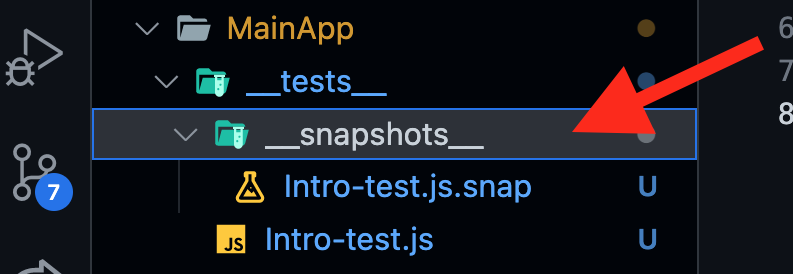
If you can locate the generated snapshot file in your project’s root folder, it indicates that everything has proceeded successfully. Let’s proceed to the next section, where we’ll update our component and compare the changes with the snapshot test.
Updating Your Snapshots
In this part, we’ll improve our component by making some adjustments. More precisely, we’ll integrate an input field to allow users to search for animals based on their names. This addition serves the purpose of comparing it with the snapshot generated earlier. Here’s the code for the new modification we implemented in the PlayGround component.
import {
FlatList,
Image,
StyleSheet,
Text,
TextInput,
View,
} from "react-native";
import React, { useEffect, useState } from "react";
const PlayGround = () => {
let data = [
{
index: 1,
name: "Cat",
image:
"https://encrypted-tbn0.gstatic.com/images?q=tbn:ANd9GcTLLSW36lWjG4vE6ilG5DXjYYzMqTLF1Mwp-TcZblQh2w&s",
},
{
index: 2,
name: "Dog",
image:
"https://encrypted-tbn0.gstatic.com/images?q=tbn:ANd9GcTFji2g7Budhl8Uhb1ndt-kHFGJxzeI6MJs4fO1ZlwCRg&s",
},
{
index: 3,
name: "Rabbit",
image:
"https://encrypted-tbn0.gstatic.com/images?q=tbn:ANd9GcSPytnWLr_SismreCcmqDGS6uXL4XXfq2qm6MSpkbDyAA&s",
},
{
index: 4,
name: "Parrot",
image:
"https://encrypted-tbn0.gstatic.com/images?q=tbn:ANd9GcRXUXpHO6vPqpoIFon0Swe-xIHIwFPfCSUdDQ&usqp=CAU",
},
];
let [animals, setAnimals] = useState(data);
useEffect(() => {
setAnimals(data);
}, []);
const onSearchHandler = (value) => {
let filteredItems = data.filter((item) => item.name.includes(value));
setAnimals(filteredItems);
};
return (
<View style={styles.body}>
<Text style={[styles.text, { marginBottom: 20 }]}>List of Animals</Text>
<TextInput
placeholder="Search for animal"
placeholderTextColor={"#ddd"}
style={styles.input}
onChangeText={(value) => onSearchHandler(value)}
/>
<FlatList
data={animals}
keyExtractor={(item, index) => index.toString()}
renderItem={({ item }) => (
<View style={styles.list}>
<Image
style={styles.image}
source={{
uri: item.image,
}}
/>
<View>
<Text style={styles.text}>{item.name}</Text>
</View>
</View>
)}
/>
</View>
);
};
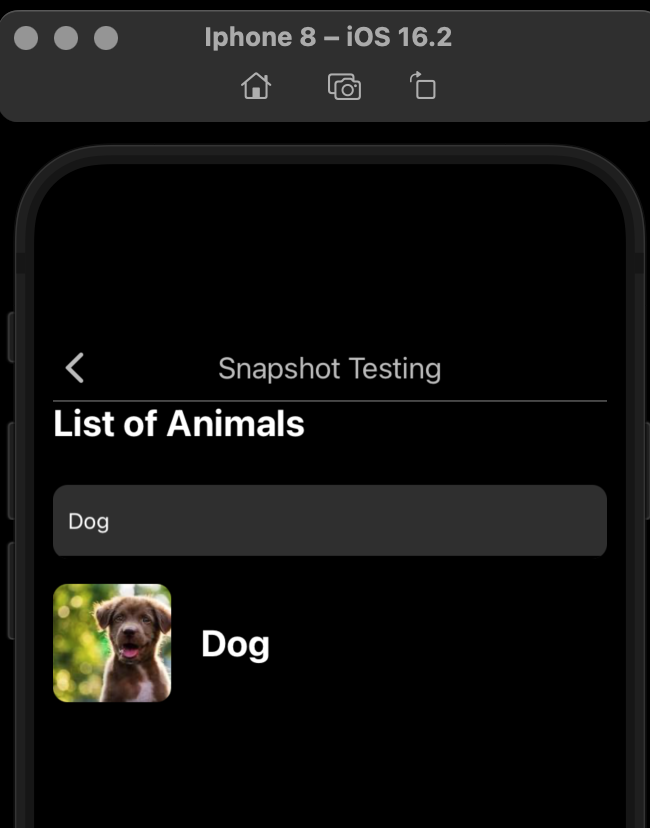
export default PlayGround;The styling remains unchanged; you need to incorporate the TextInput styles by appending the following code to your existing styles.
input: {
  width: "100%",
  padding: 10,
  paddingVertical: 15,
  borderBottomWidth: 2,
  backgroundColor: "#2f2f2f",
  color: "white",
  fontSize: 15,
  borderRadius: 10,
  marginVertical: 7,
}
Below is the updated output:
Let’s re-run the test to compare the result with the old snapshot now that we’ve made changes to our app UI. To do this, just run the following code in your project’s root terminal:
npm run testOutput:
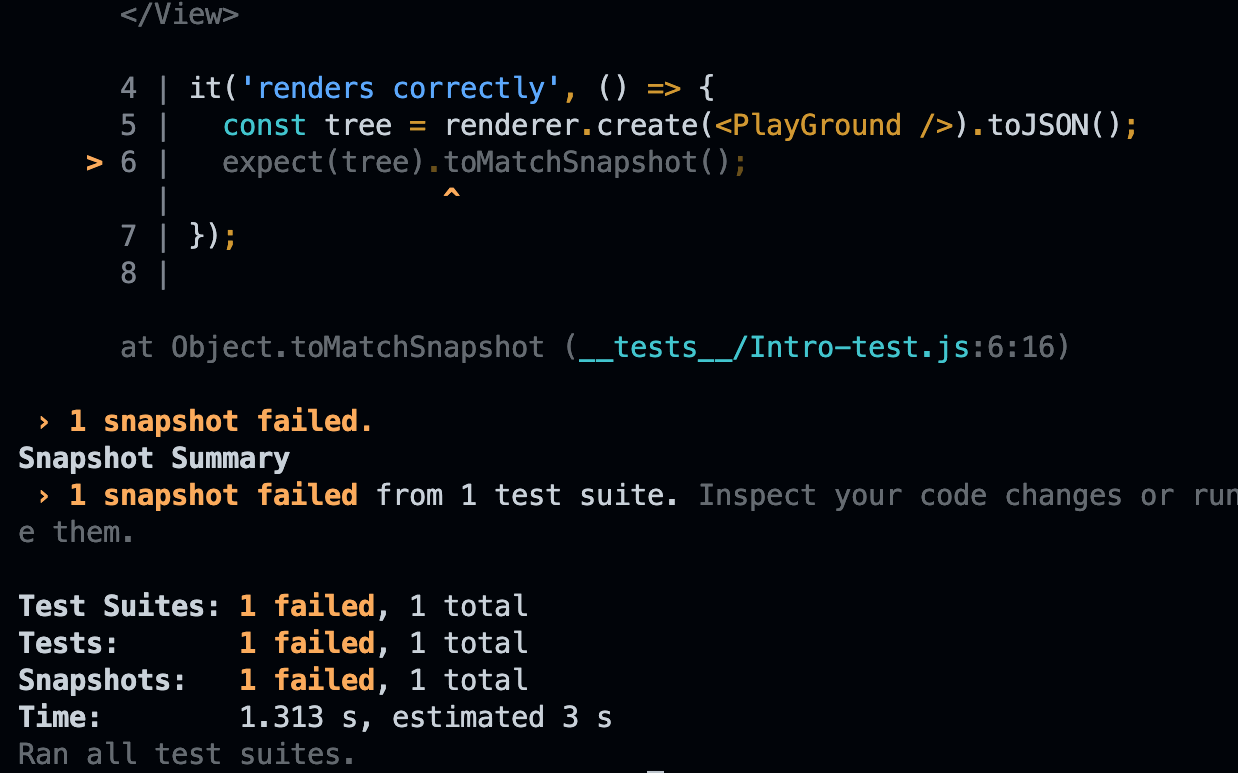
From the provided output, the test failed because the previously generated snapshot doesn’t align with the current UI of our app’s component. While this might seem concerning, it indicates that our test functions as intended. To rectify this, we can update the old snapshot by adding the --updateSnapshot flag to our test property inside the package.json file, as illustrated below:

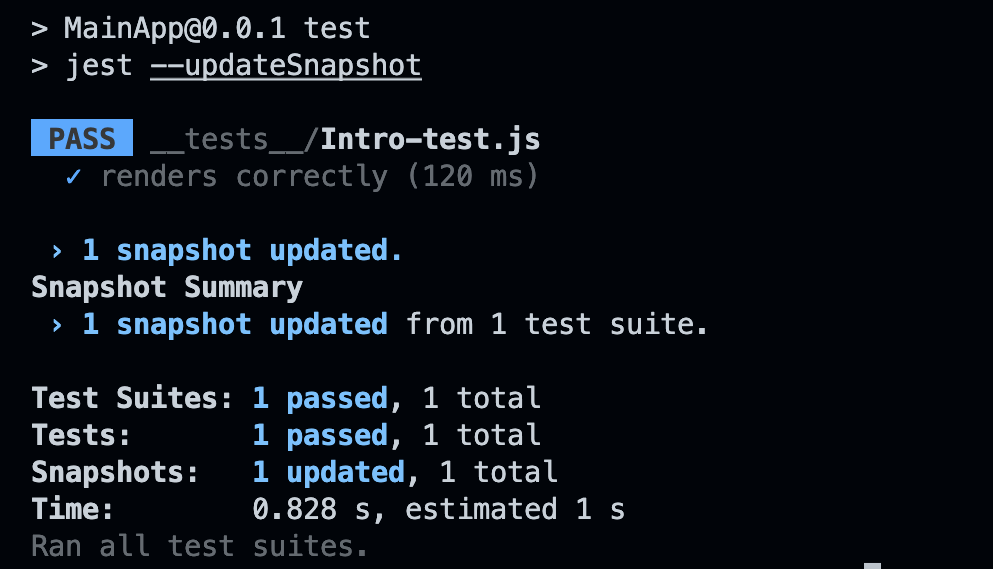
After adding the --updateSnapshot flag, simply execute the command below to update the old snapshot file:
npm run testBelow is the successful test output that was displayed in my terminal after utilizing the --updateSnapshot flag as detailed above:
Understanding the Snapshot Output
Snapshot testing is a valuable tool for capturing the rendered output of your React Native components, providing a reference point for future comparisons. However, understanding the information stored in these snapshots is crucial. This section delves into the structure and format of the generated snapshot file, as well as strategies for interpreting its contents effectively:
Reading and Interpreting the Generated Snapshot File
The actual snapshot file, typically with the .snap extension, holds the captured representation of your component’s rendered output, as shown below:

While its format may initially appear cryptic, with comprehension, it becomes an invaluable asset. Here’s what you can expect to find:
- Hierarchical Structure: The data follows a nested tree structure, reflecting your component’s hierarchy. Each element, including the root container and individual text nodes, is organized accordingly.
- Attributes and Properties: Key-value pairs record various visual aspects of each element, including text content, styles, and details of child components.
- Formatting and Serialization: Depending on your settings, the output may be formatted for readability or serialized in a specific format such as JSON or toTree.
Different Formats for Snapshots (e.g., JSON, toTree)
The default snapshot format is human-readable and designed for easy understanding. However, alternative formats offer specific benefits:
- JSON: Offers a machine-readable structure, ideal for integration with other tools or automated comparisons.
- toTree: Provides a more detailed representation, aiding in debugging complex components and identifying specific changes.
By grasping the structure of snapshot output and the various formats available, you can effectively interpret your component’s visual representation and ensure its consistency throughout development.
Writing Effective Snapshot Tests
Expanding on the introduction, let’s explore the practical aspects of crafting impactful snapshot tests:
Best Practices for Meaningful and Maintainable Tests:
- Prioritize UI Elements: Concentrate on capturing crucial visual elements of the component rather than internal data or logic.
- Employ Descriptive Names: Ensure the component and state being tested are clearly labeled for easy identification.
- Treat Snapshots as Code: Include them in version control and review changes during code reviews as you would with other code.
- Maintain Updated Snapshots: Whenever deliberate UI alterations are made, update the reference snapshots to reflect the changes accurately.
Handling Dynamic Data and Conditional Rendering:
- Mock Dynamic Data: Supply consistent inputs to prevent capturing irrelevant fluctuations in the snapshot.
- Render in Various States: Generate snapshots for diverse data combinations and component states to ensure comprehensive coverage.
- Exclude Unnecessary Data: Employ custom comparison methods or snapshot serializers to remove unnecessary information from the snapshot.
Excluding Unnecessary Information:
- Remove Timestamps and Random Values: Employ snapshot serializers to disregard particular data points.
- Exclude Internal Data Structures: Concentrate solely on the visual output, disregarding internal component intricacies.
- Disregard Whitespace and Formatting: Adjust snapshot matching criteria to ignore minor differences in formatting.
Conclusion
I hope you found this article enjoyable. It delves into snapshot testing comprehensively, covering how to perform a snapshot test, update snapshots, and understand snapshot files in your React Native application. Additionally, we discussed writing effective snapshot tests. With the knowledge gained in this article, you can confidently test your personal React Native projects and also ensure thorough testing for client projects before delivery.