

When a search argument does not match the required information, a fuzzy search is used to find content likely relevant to the search term. In this article, we’ll discuss fuzzy search and how it can improve the user experience of sites and applications. We’ll also look at how you can add this functionality to our React application.
When searching for something on a page, when you can’t recall the exact term for your desired content, you usually use related or often misspelled terms while searching. This is a standard human error.
To not leave users frustrated and help them easily find what they’re looking for, you still provide relevant results because fuzzy searching, also known as approximate string matching, is a method of finding strings roughly equivalent to a given pattern (rather than exactly).
We can achieve fuzzy search in our React applications using the Fuse.js library.
What is Fuzzy Search
Searching for information that is similar to the search query rather than completely matching it is done using a technique that can be referred to as a fuzzy search technique.
The degree of similarity between the search query and the data being searched is determined using a variety of approaches by fuzzy search algorithms, which subsequently return results that are most similar to the query.
This can be helpful in a variety of circumstances, such as when you need to locate results that are somewhat close to the search query but not precisely the same.
Improving UX
Fuzzy search can improve the user experience in an application or website by making it easier for users to find what they are looking for, even if they are not sure of the exact spelling or wording of the query.
With fuzzy search, users can enter approximate or partial queries and get relevant results, saving time and effort.
This can be especially useful in applications or websites with large databases or collections of data, where it may be difficult for users to remember the exact wording of a particular item. Fuzzy search can also help reduce the number of “no results” messages that users may encounter by returning approximate matches that may still be relevant to their query.
What we’re building
In this article, you’ll walk through the basics of Fuse.js and how we can use it. Then, you’ll see how to build a simple fuzzy search component with highlighting functionality powered by Fuse.js.
Prerequisites
To follow along and complete this tutorial, you’ll need the following:
- Basic knowledge of JavaScript and React
- Node.js installed; I’ll be using v16.13.0
- For the text editor, I recommend VSCode
Setting up React
To create a new React project run:
npx create-react-app fuzzy-appOnce React has been successfully installed, you can quickly set up tailwind:
cd fuzzy-app
npm install -D tailwindcss postcss autoprefixer
npx tailwindcss init -p
Then, add the paths to all of your template files in our tailwind.config.js file:
// ./tailwind.config.js
/** @type {import('tailwindcss').Config} */
module.exports = {
  content: [
    "./src/**/*.{js,jsx,ts,tsx}",
  ],
  theme: {
    extend: {},
  },
  plugins: [],
}
Finally, add the @tailwind directives for each of Tailwind’s layers to the ./src/index.css file:
// ./src/index.css
@tailwind base;
@tailwind components;
@tailwind utilities;
Setting up Fuse.js
To install Fuse, run:
npm install --save fuse.jsOnce successfully installed, import fuse into our app; in ./src/App.js:
// ./src/App.js
import Fuse from "fuse.js";

//...
With that, you can start working with Fuse.js.
Using Arrays of Strings
If you simply want to search through a list of strings, you can easily do that with minimal configuration.
Let’s implement fuzzy search in a list of book titles. Enter the following in ./src/App.js:
// ./src/App.js
import { useEffect, useState } from "react";
import Fuse from "fuse.js";

const bookTitles = [
  "Mercy's Birds",
  "The Last of the Mohicans",
  "Harry Potter and the Sorcerer's Stone",
  "The Hobbit",
  "The Lord of the Rings",
  "The Fellowship of the Ring",
  "The Two Towers",
  "The Sandman",
  "The Return of the King",
];

function App() {
  // search term
  const [searchTerm, setSearchTerm] = useState(" ");

  // options object for fuse.js
  const options = {
    includeScore: true,
  };

  // initialize fuse with list and options
  const fuse = new Fuse(bookTitles, options);

  // search based on search term entered
  const searchResults = fuse.search(searchTerm);

  // function to update search term from input element
  const handleSearch = ({ currentTarget }) => {
    const { value } = currentTarget;
    setSearchTerm(value);
  };
  return (
    <main>
      <div className="p-4">
        <input
          value={searchTerm}
          onChange={handleSearch}
          type= "text"
          placeholder= "Search"
          className="bg-slate-200 p-2 rounded"
        />
        <ul className="results">
          {searchResults.map((result) => (
            <li className="result my-4">
              <h2>{result.item}</h2>
              <span>Score: {result.score}</span>
            </li>
          ))}
        </ul>
      </div>
    </main>
  );
}
export default App;
Here, the bookTitles array contains a list of titles of books, which are just strings. In the App() component, a searchTerm state variable is created, which will contain the user search query.
Fuse.js accepts different options to fine-tune and customize the fuzzy search functionality; all the options can be set in the options object, as seen in the example code above.
After that, Fuse.js can be initialized by calling new Fuse(). As you can see in the code, Fuse() accepts the list - bookTitles and options - options.
In order to search, you have to call the fuse.search() method and pass in the search term. This returns the results of the search which is an array of objects.
Next, the handleSearch() function gets the value from the input element and passes it to setSearchTerm, which then updates the search results.
Finally, in the code, the <input> element has an onChange attribute which runs handleSearch(), and after that, in <ul> there’s a map function that maps through and renders the results.
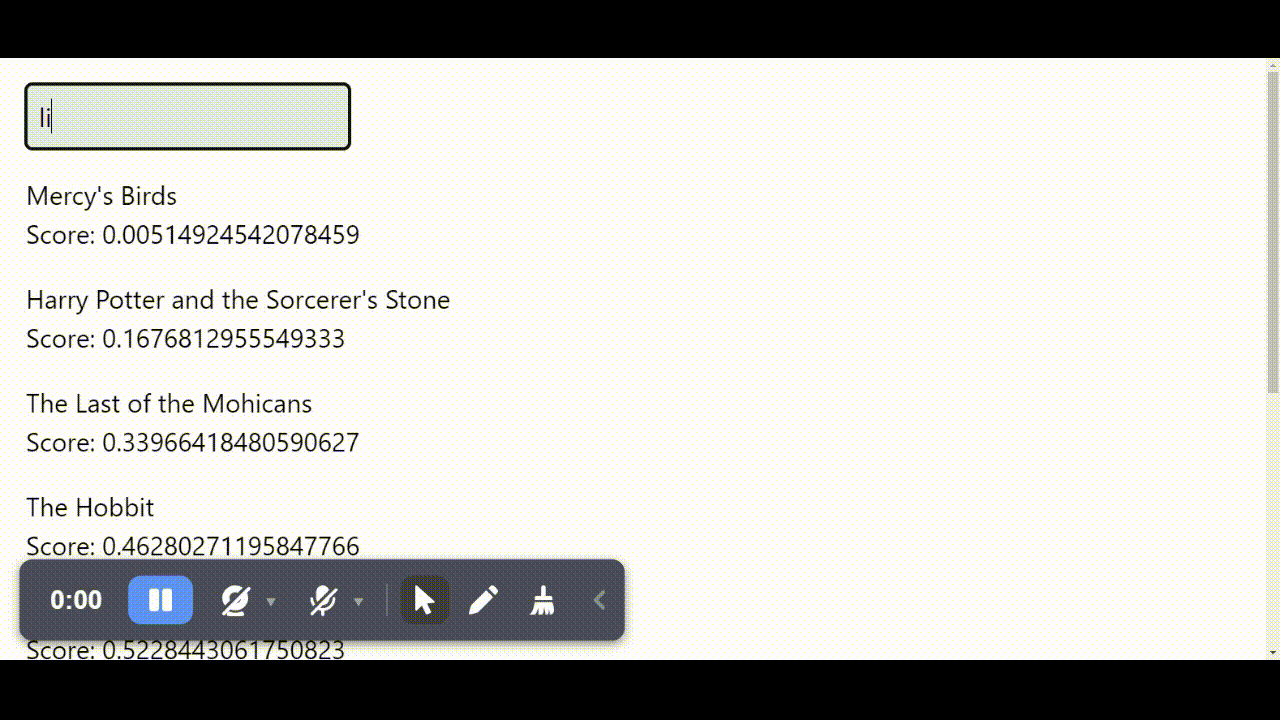
Here’s the output so far:

As you can see, thanks to the fuzzy search, the "mrcy``` term entered returned ”Mercy’s Birds``` with a pretty low score of approximately 0.37 which indicates that it’s closer to an exact match. In Fuse.js, 0 is an exact match, and 1 is a mismatch.
Using an Array of Objects
Similarly, you can use an array of objects to search from instead of an array of strings. This will require the object keys to be specified in the options object.
For example, in the following code in the ./src/App.js file, the bookTitles array will be replaced with a books array, which contains objects with the following properties: title, author, genre, tags. The tags property contains an array of objects with a name property:
// ./src/App.js
import { useEffect, useState } from "react";
import Fuse from "fuse.js";

const books = [
  {
    title: "Mercy's Birds",
    author: "Linda Holeman",
    genre: "Fantasy",
    tags: [
      {
        name: "fantasy",
      },
      {
        name: "romance",
      },
    ],
  },
  {
    title: "The Last of the Mohicans",
    author: "James Fenimore Cooper",
    genre: "Historical Fiction",
    tags: [
      {
        name: "historical",
      },
      {
        name: "adventure",
      },
    ],
  },
  // ...
];

function App() {
  // ...

  // options object for fuse.js
  const options = {
    includeScore: true,
    keys: ["title", "author", "genre"],
  };

  // ...
  return (
    <main>
      {/* ... */}
    </main>
  );
}
export default App;
For Fuse.js to know what properties of the objects in the arrays it would perform the search against, you need to define the keys in the options object, as seen in the code above. From the code above, the keys specified are "title```, ” “author” , and ”genre```, which correspond to object properties in the books list.
Now, when the user enters an author or a genre as the search term, it brings up the desired result:
Here, the query entered is “linda holmn”, which is a typo but still brings up the right result. “Linda Holeman” is the author of “Mercy’s Birds,” and since it was a close match to the author’s name, the correct result was returned.
Nested Search
Say you also want to search based on the book tags, but since the tags property on a books array object is also an array of objects with a name property, you have to specify this in the Fuse options. Luckily, there are multiple ways to go about nested search in Fuse.js, and they include:
- Defining the path with dot notation (
.) - Defining the path with array notation (
[]) - Defining a per-key
getFnfunction
In the following code in ./src/App.js, the dot notation is used:
// ./src/App.js

// ...

function App() {
  // ...

  // options object for fuse.js
  const options = {
    includeScore: true,
    keys: ["title", "author", "genre", "tags.name"],
  };

  // ...
}
export default App;
With this, the books can be searched by tag names:

Result relevance with weights
Fuse.js also has a weighted search feature where weights can be allocated to keys to give them higher or lower values in search results. To implement this, you just have to add a weight property to your keys array object like so:
// options object for fuse.js
const options = {
  includeScore: true,
  keys: [
    { name: "title", weight: 1 },
    { name: "author", weight: 2 },
    { name: "genre", weight: 3 },
    { name: "tags.name", weight: 4 },
  ],
};
Session Replay for Developers
Uncover frustrations, understand bugs and fix slowdowns like never before with OpenReplay — an open-source session replay tool for developers. Self-host it in minutes, and have complete control over your customer data. Check our GitHub repo and join the thousands of developers in our community.
Building the search component
In this section, you will see how you can build a simple search component that takes a search term and returns results containing the original item and using the **includeMatches** option, contains the matches which you can use to add basic highlighting to results.
First, create a new component in ./src/components/Search.js:
// ./src/components/Search.js
import { useEffect, useState } from "react";
import Fuse from "fuse.js";
import { useMemo } from "react";

const Search = ({ list, updateResults }) => {

  // search term
  const [searchTerm, setSearchTerm] = useState(" ");

  // options object for fuse.js
  const options = {
    includeScore: true,
    keys: ["title", "tags"],
    includeMatches: true,
  };

  // initialize fuse with list and options
  const fuse = new Fuse(list, options);

  // search based on search term entered
  const searchResults = useMemo(() => {
    return fuse.search(searchTerm);
  }, [searchTerm]);

  const handleChange = (event) => {
    setSearchTerm(event.target.value);
  };

  // update results when search term changes
  useEffect(() => {
    updateResults(searchResults);
  }, [searchResults, updateResults]);

  return (
    <div className="search">
      <input
        value={searchTerm}
        onChange={handleChange}
        type= "text"
        placeholder= "Search by title or tag"
        className="p-2 border border-gray-300 rounded-md"
      />
    </div>
  );
};
export default Search;
This is very similar to the code in the previous examples. The options object has the keys and includeMatches specified, and the searchResults uses a useMemo to run fuse.search() only when searchTerm changes which helps prevent unnecessary re-rendering.
To pass the results to the parent component, a useEffect() calls the updateResults prop and passes the result to it whenever the searchResults change.
Next, in ./src/App.js, the data will be an array of posts that will come from an API - https://dummyjson.com/posts
// ./src/App.js
import { useEffect, useState } from "react";
import Search from "./components/Search";
// function to fetch posts
const fetchPosts = async () => {
try {
const res = await fetch("https://dummyjson.com/posts");
const data = await res.json();
return data.posts;
} catch (error) {
console.log({ error });
return error;
}
};
function App() {
// posts state
const [posts, setPosts] = useState([]);
// results state
const [results, setResults] = useState([]);
// fetch posts
const getPosts = async () => {
const posts = await fetchPosts();
setPosts(posts);
};
// update results from search component
const handleUpdateResults = (results) => {
setResults(results);
};
// fetch posts on mount
useEffect(() => {
getPosts();
}, []);
return (
<main className="p-4 max-w-4xl m-auto">
<header>
<div className="wrapper">
<h1 className="text-4xl mb-4">Posts</h1>
<Search list={posts} updateResults={handleUpdateResults} />
</div>
</header>
<ul className="results flex glex-col gap-6 my-8">
{results.length > 0 ? (
results.slice(0, 3).map((post) => (
<li key={post.item.id}>
<h2 className="text-2xl">
{post.item.title}
</h2>
<p>{post.item.body}</p>
<ul className="tags flex gap-2">
{post.item.tags.map((tag) => (
<li key={tag} className="tag bg-slate-50 p-2">
{tag}
</li>
))}
</ul>
</li>
))
) : (
<li>No results</li>
)}
</ul>
</main>
);
}
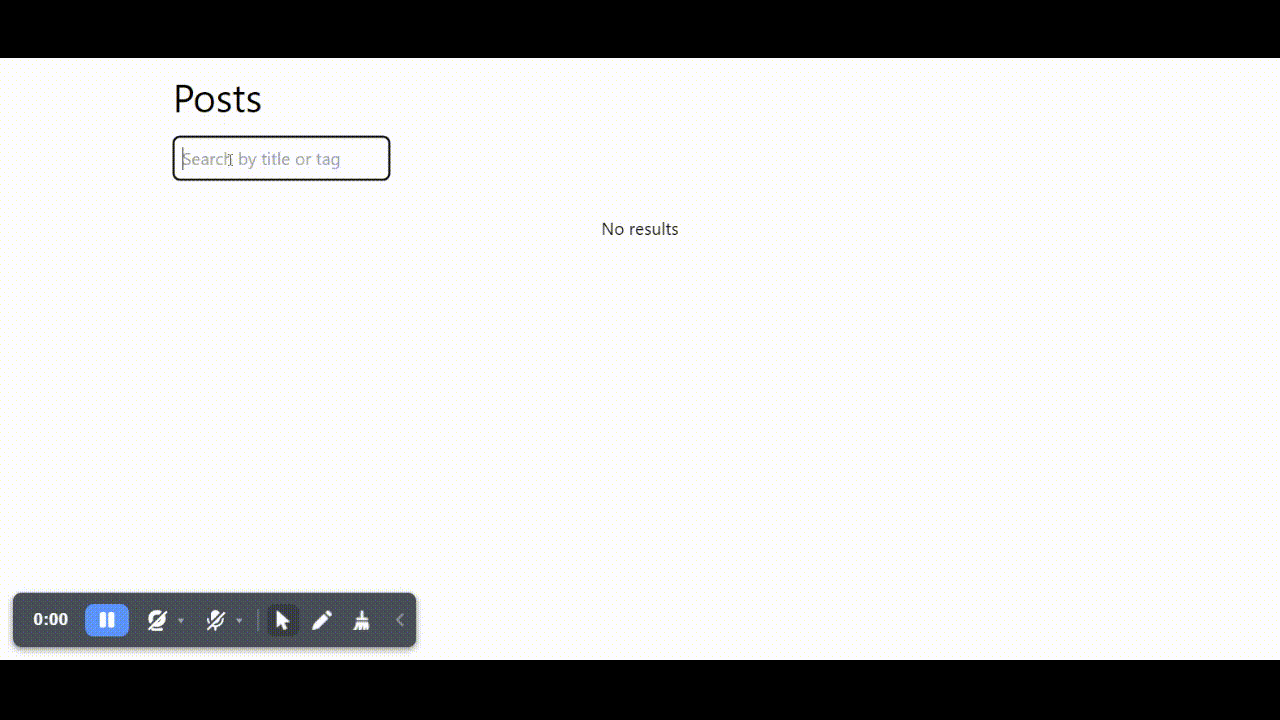
export default App;Here, the <Search> component is imported instead of a regular input element. Posts fetched from the API are passed using the list prop, and a function handleUpdateResults is passed to the updateResults prop, which will set the results state using setResults().
With that, the app looks like this:

Add highlight functionality
Another benefit of using the includeMatches option is highlighting precisely what parts of the results matched the search term.
Here’s an example of a result object; you can see the matches property contains an array of objects with properties - indices, value, and key. With this, you can build a simple highlightText() function, which will highlight the characters in the text value based on their indices.
{
    "item": {
        ...
    },
    "refIndex": 23,
    "matches": [
        {
            "indices": [
                [
                    0,
                    0
                ],
                [
                    4,
                    8
                ]
            ],
            "value": "The robot clicked disapprovingly.",
            "key": "title"
        }
    ],
    "score": 0.2
}
To do this, create a new function in ./src/App.js that takes the text and indices and returns the highlighted text:
// ./src/App.js
// ...
function App() {
  // ...
  const highlightText = (text, matches) => {
    // matches is an array of arrays
    // each array contains the start and end index of the match
    // e.g. [[0, 3], [5, 8]]
    // we need to split the text into an array of spans
    // where each span contains the text and a class
    // to highlight the text
    // e.g. [<span className="highlight">foo</span>, " ", <span className="highlight">bar</span>]
    // we can then render the array of spans
    // e.g. <span className="highlight">foo</span> <span className="highlight">bar</span>
    const spans = [];
    let lastIndex = 0;
    matches?.forEach((match) => {
      // add the text before the match
      spans.push(text.slice(lastIndex, match[0]));
      // add the match
      spans.push(
        <span
          key={match}
          className="highlight bg-sky-500 text-sky-50 px-1 rounded"
        >
          {text.slice(match[0], match[1] + 1)}
        </span>
      );
      // update the last index
      lastIndex = match[1] + 1;
    });
    // add the text after the last match
    spans.push(text.slice(lastIndex));
    return spans;
  };
  return (
    <main className="p-4 max-w-4xl m-auto">
      <header>
        <div className="wrapper">
          <h1 className="text-4xl mb-4">Posts</h1>
          <Search list={posts} updateResults={handleUpdateResults} />
        </div>
      </header>
      <ul className="results flex glex-col gap-6 my-8">
        {console.log({ results })}
        {results.length > 0 ? (
          results.map((post) => (
            <li key={post.item.id}>
              <h2 className="text-2xl">
                {highlightText(
                  post.item.title,
                  post.matches.find((match) => match.key === "title")?.indices
                )}
              </h2>
              <p>{post.item.body}</p>
              <ul className="tags flex gap-2">
                {post.item.tags.map((tag) => (
                  <li key={tag} className="tag bg-slate-50 p-2">
                    {highlightText(
                      tag,
                      post.matches.find(
                        (match) => match.key === "tags" && match.value === tag
                      )?.indices
                    )}
                  </li>
                ))}
              </ul>
            </li>
          ))
        ) : (
          <li>No results</li>
        )}
      </ul>
    </main>
  );
}
export default App;
In the template, the highlightText() function is called for the title and tags.
Now, the app should look something like this:
Conclusion
In conclusion, a Fuzzy search is a powerful tool for improving the user experience of your React applications. Fuse.js makes it easy to implement fuzzy search and provides users with a more intuitive and efficient search experience.
Whether you’re working with arrays of strings or objects, and whether you want to tweak result relevance with weights, or perform nested searches, Fuse.js has got you covered.
Also, using the steps outlined in this article, you can build a search component that will improve the user experience and yield great results.
Further reading & resources
Here are a few useful reads if you want to know more about fuzzy search and Fuse.js.
Resources
Here’s a link to the source code and a live deploy preview hosted on Netlify
Gain Debugging Superpowers
Unleash the power of session replay to reproduce bugs and track user frustrations. Get complete visibility into your frontend with OpenReplay, the most advanced open-source session replay tool for developers.