Integrating Google Analytics with React -- A full guide
Get all the advantages of Google Analytics


In today’s digital landscape, understanding user behavior and interactions within web applications is paramount for businesses and developers. By gaining insights into how users engage with your application, you can make informed decisions to improve the user experience, optimize marketing strategies, and drive business growth. This article will show you how to include Google Analytics in your React-based website.

Discover how at OpenReplay.com.
Google Analytics is a cornerstone tool in web analytics. It offers powerful capabilities to track and analyze user interactions on websites and web applications. Its robust features provide valuable insights into user demographics, behavior patterns, and conversion metrics, enabling businesses to make data-driven decisions and enhance their online presence.
By seamlessly integrating Google Analytics with React, developers can gain invaluable insights into user behavior and optimize their applications for enhanced performance and user experience.
Before delving into the integration process with React, it’s essential to grasp the fundamental concepts and terminology associated with Google Analytics.
Basic Concepts and Terminology
Google Analytics operates based on several key concepts and terminology, which include:
- Properties and Views: Google Analytics organizes data into properties, which represent individual websites or applications, and views, which are subsets of data within properties used for reporting.
- Data Streams: Google Analytics 4 (GA4) uses data streams to collect user data from your websites and apps and import it into the platform. It acts as a bridge or pathway for information to flow from your digital properties to GA4 for analysis. Each data stream is set up for a specific platform. You can have multiple streams within a single GA4 property, enabling you to compare and analyze user behavior across different channels.
- Measurement ID: A unique identifier assigned to each Google Analytics property, used to distinguish data collected from different websites or applications.
- Dimensions and Metrics: Dimensions are attributes of user interactions, such as page URLs or device types, while metrics are quantitative measurements, such as page views or bounce rates.
- Goals and Conversions: Goals in Google Analytics represent specific actions you want users to take on your website or application, such as purchase or signing up for a newsletter. Conversions occur when users complete these goals.
Setting up a Google Analytics Account
To begin using Google Analytics, you must create an account and set up a property for your website or application. The process involves:
- Signing Up: Visit the Google Analytics website and sign up for an account using your Google credentials.
- Creating a Property: Once logged in, create a new property within your Google Analytics account for the website or application you want to track. Provide relevant information, such as the website URL, industry category, and reporting time zone.
- Generating Measuring ID: Upon creating a property, Google Analytics will ask that you create a data stream. Create a web data stream. If your project is still in development, you can use any domain of your choice, whether life or not. After creating a data stream, Google Analytics will generate a unique measuring ID. The measuring ID links your application and Google Analytics, allowing data collection and reporting to occur seamlessly.
 The image above shows the MEASUREMENT ID, STREAM NAME, STREAM URL and STREAM ID. Since this is for testing purposes, you can see that the STREAM URL isn’t a valid website, but it should be updated when your project is going live.
Integrating Google Analytics with React
Integrating Google Analytics with a React application enables developers to track user interactions, monitor performance metrics, and gain valuable insights into user behavior. In this section, we’ll explore the process of integrating Google Analytics with React applications, covering various methods and best practices.
Choosing the Appropriate Integration Method
When integrating Google Analytics with a React application, developers have several options to consider:
- Traditional JavaScript Snippet: The most straightforward method involves adding the Google Analytics tracking code directly to the HTML file of the React application. While this approach works, it may not fully leverage the capabilities of React and could result in suboptimal tracking.
- React Libraries for Easier Integration: Alternatively, developers can utilize specialized React libraries to streamline the integration process. These libraries offer React-specific components and utilities for efficiently incorporating Google Analytics functionality into React applications.
Some examples of npm packages commonly used for integrating Google Analytics with React include:
- react-ga: This is the official npm package for integrating Google Analytics (Universal Analytics) with React apps. It offers basic tracking functionalities like page views, events, and transactions.
- react-ga-4: This package helps integrate Google Analytics 4 (GA4) with your React app. This package helps integrate Google Analytics 4 (GA4) with your React app. GA4 offers more advanced features and insights than Universal Analytics.
Installing Google Analytics in a React Project
For the sake of this article, we’ll focus on integrating Google Analytics into a React application using the react-ga4 package. This package provides a simple and declarative way to add Google Analytics tracking to React components, making it an ideal choice for our integration.
To begin, follow these steps to install and configure react-ga4 in your existing React project:
- Install react-ga: Start by installing the
react-ga4package using npm or yarn. Open your terminal and run the following command:
npm install react-ga4or
yarn add react-ga4- Initialize Google Analytics: Once
react-ga4is installed, import it into your project and initialize Google Analytics with your tracking ID. Typically, this initialization occurs at the entry point of your application, such asindex.jsorApp.js. Here’s an example of how you can initializereact-ga4in yourindex.js:
import React from "react";
import ReactDOM from "react-dom";
import App from "./App";
import ReactGA from "react-ga4";

ReactGA.initialize("YOUR_MEASURING_ID");

ReactDOM.render(<App />, document.getElementById("root"));
This code initializes Google Analytics 4 for tracking purposes and renders the main React application component. It’s a basic setup to get started with Google Analytics integration in a React application. Remember to replace “YOUR_MEASURING_ID” with your actual Measurement ID provided by Google Analytics.
Setting up Custom Events and Tracking
Once Google Analytics is integrated into your React application, you can begin setting up custom events and tracking user interactions. This involves:
- Tracking Page Views: You can use the
react-ga4library’s pageview method to track page views in specific components or pages. For example, you might want to track page views when a component mounts:
import React, { useEffect } from "react";
import ReactGA from "react-ga4";

const MyComponent = () => {
  useEffect(() => {
    ReactGA.send({
      hitType: "pageview",
      page: "/my-path",
      title: "Custom Title",
    });
  });

  return <div>{/* Your component JSX */}</div>;
};

export default MyComponent;
In this example, we’re using React’s useEffect hook to execute the ReactGA.send method when the component mounts. This sends a page view event to Google Analytics with the current URL path and title.
Repeat this process in any other component where you want to track page views.
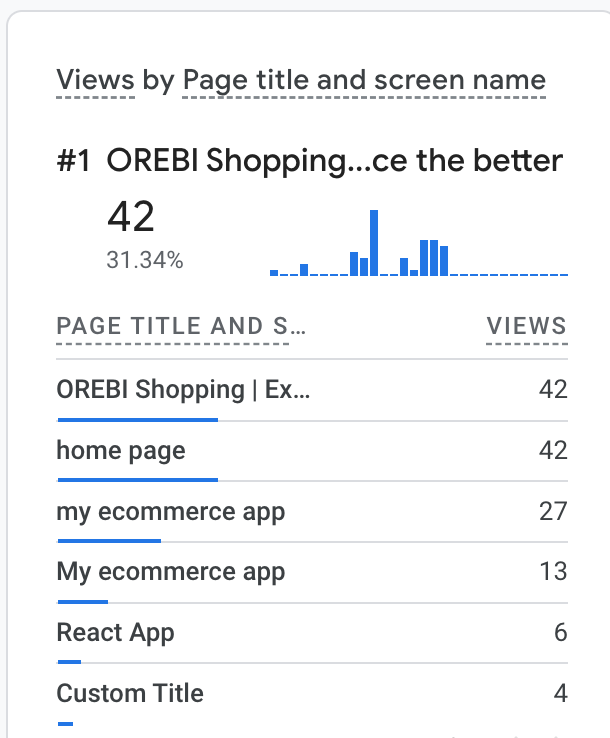 Here’s the result on our Google Analytics board, showing the page title and the number of views.
- Tracking button clicks: To track button clicks in our React application, we’ll do the following;
import React from "react";
import ReactGA from "react-ga4";

const Button = () => {
  const handleClick = () => {
    // Track button click event
    ReactGA.event({
      category: "User Interaction",
      action: "Clicked Button",
      label: "Button Label", // Optional
    });
  };

  return <button onClick={handleClick}>Click Me</button>;
};

export default Button;
In this example, we track a button click event using ReactGA.event(). We specify the event category, action, and an optional label to provide additional context. This code would be included within a React component representing the button.
 Here, we can see the different event names and the number of times these events have been initiated. From our results, the action “Clicked Button” was initiated 16 times by our users.
- tracking clicks on a link: To track clicks on a link in our application, we’ll do the following;
import React from "react";
import ReactGA from "react-ga4";

const LinkComponent = () => {
  const handleLinkClick = () => {
    // Track link click event
    ReactGA.event({
      category: "User Interaction",
      action: "Clicked Link",
      label: "Link Label", // Optional
    });
    // Additional logic for link navigation...
  };

  return (
    <a href="#" onClick={handleLinkClick}>
      Click Me
    </a>
  );
};

export default LinkComponent;
This code snippet demonstrates tracking a link click event using Google Analytics 4 within a React component. When the link is clicked, information about the interaction is sent to Google Analytics, allowing you to analyze user behavior and engagement on your website or application.
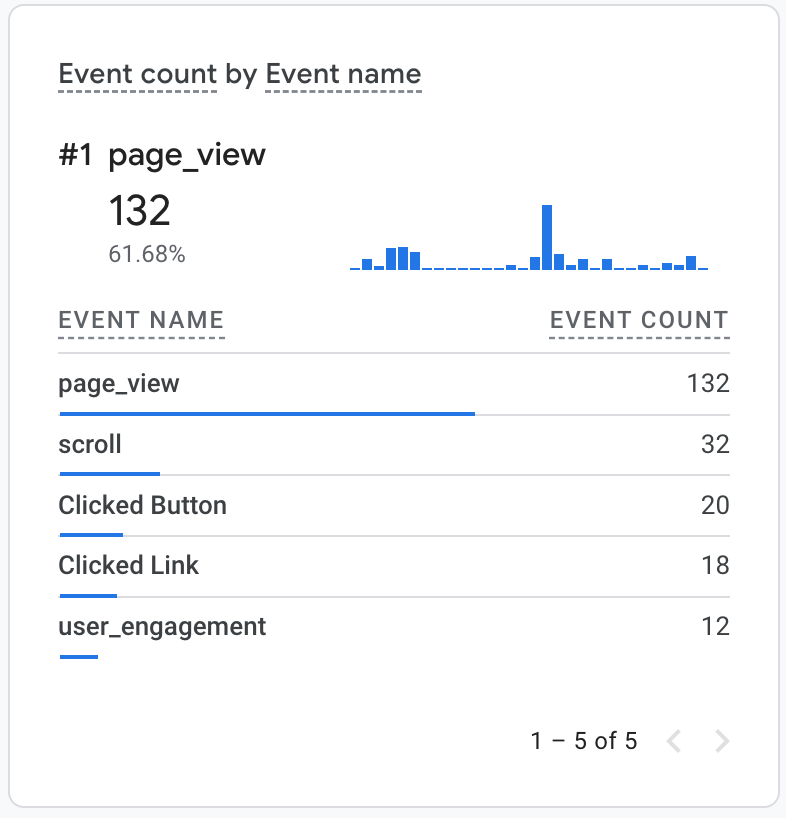 The image above shows that the event “Clicked Button” has been initiated 16 times, while the link with the event “Clicked Link” has been initiated 18 times.
Tracking Custom Events Relevant to the Application
Having seen how to create and track events in our React app using Google Analytics. Below are some custom events and how we might track them if we worked with an e-commerce React app.
import React, { useEffect } from "react";
import ReactGA from "react-ga4";

const ProductDetailPage = ({ productId }) => {
  useEffect(() => {
    ReactGA.event({
      category: "E-commerce",
      action: "Product Viewed",
      label: productId,
    });
  }, [productId]);

  return <div>{/* Product detail page content */}</div>;
};
In the code above, we see how to track views on a specific product page using ReactGA.event(). To provide additional context, we specify the event category, action, and product ID in the optional label.
const ProductCard = ({ product }) => {
  const handleAddToCart = () => {
    ReactGA.event({
      category: "E-commerce",
      action: "Product Added to Cart",
      label: product.id,
    });
    // Additional logic for adding to cart
  };

  return (
    <div>
      {/* Product card content */}
      <button onClick={handleAddToCart}>Add to Cart</button>
    </div>
  );
};
In the code above, we see how we can track the addition of specific products to the cart. By tracking clicks on the add to cart button, we track how many users have added a particular product to the cart.
const PurchaseConfirmationPage = () => {
  useEffect(() => {
    ReactGA.event({
      category: "E-commerce",
      action: "Purchase Completed",
    });
    // Additional logic for handling purchase completion
  }, []);

  return <div>{/* Purchase confirmation page content */}</div>;
};
In the code block above, we track views on the purchase confirmation page using ReactGA.event().
const RegistrationPage = () => {
  const handleUserRegistration = () => {
    ReactGA.event({
      category: "User",
      action: "User Registered",
    });
    // Additional logic for user registration
  };

  return (
    <div>
      {/* Registration page content */}
      <button onClick={handleUserRegistration}>Sign Up</button>
    </div>
  );
};
In the code block above by tracking clicks on the sign-up button, we track the number of times users have tried signing up for our application.
const WishlistInteraction = ({ product, isAdded }) => {
  const handleWishlistInteraction = () => {
    ReactGA.event({
      category: "E-commerce",
      action: isAdded
        ? "Product Added to Wishlist"
        : "Product Removed from Wishlist",
      label: product.id,
    });
    // Additional logic for wishlist interaction
  };

  return (
    <div>
      {/* Wishlist interaction component */}
      <button onClick={handleWishlistInteraction}>
        {isAdded ? "Add to Wishlist" : "Remove from Wishlist"}
      </button>
    </div>
  );
};
In the code block above, we track the addition or removal of a specific product from the wishlist by tracking clicks on a button.
These examples demonstrate how to use the react-ga4 package to track various e-commerce events within your React application. By implementing custom event tracking, you can gain valuable insights into user behavior and optimize the user experience to drive conversions and revenue growth.
Best Practices and Tips
Integrating Google Analytics with a React application is essential for gaining insights into user behavior and optimizing the user experience. To ensure effective tracking and maximize the benefits of Google Analytics, consider the following best practices and tips:
Properly Structuring Events and Tracking for Meaningful Data
When tracking events within your application, it’s essential to establish clear event categories and actions that reflect the application’s goals and user interactions. Organizing custom events into logical categories and actions allows you to streamline data analysis and derive actionable insights that drive optimization efforts.
Additionally, maintaining consistent naming conventions for event categories, actions, and labels across your application enhances data clarity and facilitates accurate reporting and analysis. This consistency ensures that data is easily understandable and interpretable, enabling stakeholders to make informed decisions based on reliable metrics.
Furthermore, leveraging custom dimensions and metrics can provide valuable context and insights relevant to your application’s objectives. Custom dimensions allow you to track user attributes or session-level data, while custom metrics enable the measurement of specific performance indicators tailored to your business needs. You can utilize custom dimensions and metrics effectively to capture comprehensive data and gain deeper insights into user behavior and application performance.
Handling User Privacy and Compliance with GDPR and CCPA
With the growing emphasis on user privacy and the enactment of stringent regulations like the GDPR (General Data Protection Regulation) and CCPA (California Consumer Privacy Act), safeguarding user data has become a paramount concern for businesses worldwide. To comply with these regulations, we can do the following:
- Obtain user consent: Implement mechanisms for users to provide explicit consent for data collection and processing activities. There are several approaches to obtaining user consent before tracking, such as cookie consent banners, opt-in/opt-out mechanisms, granular consent options, privacy policies, and transparency.
- Anonymize IP Addresses: Consider anonymizing IP addresses in Google Analytics to protect user privacy and comply with privacy regulations. Anonymized IP addresses prevent the storage of personally identifiable information (PII) and help protect user privacy while still enabling effective analytics tracking. To anonymize IP addresses in Google Analytics, you can use the anonymizeIp configuration option when initializing Google Analytics. Here’s how to implement it with the
react-ga4package:
ReactGA.initialize("YOUR_MEASURING_ID", {
  gaOptions: {
    anonymizeIp: true,
  },
});
By setting the anonymizeIp option to true, you ensure that the IP addresses of your website visitors are anonymized before being sent to Google Analytics.
While anonymizing IP addresses enhances user privacy, it may impact the accuracy of geographical data in Google Analytics reports. Keep this in mind when analyzing location-based metrics.
Regularly Reviewing and Analyzing Analytics Data for Optimization
- Set Up Automated Reports and Alerts: Configure automated reports and alerts in Google Analytics to receive regular updates on key performance metrics and significant changes in user behavior. Automated reports streamline data monitoring and highlight areas that require attention or optimization. To set up automated reports, do the following:
- Log in to Google Analytics: Visit the Google Analytics website and log in to your account using your credentials.
- Navigate to the Reports Section: Once logged in, navigate to the “Reports” section in Google Analytics. Here, you can access various reports and insights about your website’s or application’s performance.
- Customize the Report: Use the customization options available in Google Analytics to create a report that suits your needs. You can select metrics, dimensions, date ranges, and filters to tailor the report to your requirements.
- Save the Report: Once you’ve customized the report according to your preferences, save it by clicking the “Save” or “Save As” button. Give the report a descriptive name to easily identify it later.
- Schedule the Report: After saving the report, you can schedule it for automated delivery. Choose the frequency (daily, weekly, or monthly) and the recipients (email addresses) who should receive the report.
- Review and confirm: Review the settings for the automated report to ensure they’re accurate. Once satisfied, confirm the setup to schedule the report for automated delivery.
- Perform Periodic Data Audits: Conduct regular audits of your Google Analytics data to ensure data accuracy, completeness, and consistency. Verify that tracking implementations function correctly and address any discrepancies or issues identified during the audit process.
Testing Analytics Setup Thoroughly Across Different Environments
- Testing in Development and Production Environments: Test your Google Analytics setup thoroughly in both development and production environments to ensure accurate tracking and data consistency across all stages of the application lifecycle.
- Utilize Debugging Tools: Leverage Google Analytics debugging tools and browser developer tools to debug and troubleshoot tracking implementations effectively. Use tools such as Analytics Debugger or Tag Assistant to identify and resolve tracking errors.
By adhering to these best practices and tips, you can optimize your Google Analytics integration with React applications, ensure compliance with privacy regulations, and derive valuable insights to enhance the user experience and drive business success.
Conclusion
Integrating Google Analytics with a React application opens up a world of possibilities for understanding user behavior, optimizing performance, and driving business growth. Throughout this comprehensive guide, we’ve explored the process of integrating Google Analytics with React applications, covering essential concepts, installation methods, and best practices for tracking user interactions.
By leveraging Google Analytics within your React application, you gain access to invaluable insights into user demographics, behavior patterns, and conversion metrics. These insights enable data-driven decision-making, allowing you to enhance user experiences, refine marketing strategies, and maximize the effectiveness of your web presence.
Resources
Gain Debugging Superpowers
Unleash the power of session replay to reproduce bugs, track slowdowns and uncover frustrations in your app. Get complete visibility into your frontend with OpenReplay — the most advanced open-source session replay tool for developers.
Star on GitHub12k