
Integrating GraphQL into Nuxt apps with Nuxt Apollo


Building apps on the Jamstack with server-side rendering frameworks like NuxtJS allows us to perform actions like connecting to databases and making requests to internal and external APIs on the server. This potentially increases application security and speed. GraphQL requests significantly improve these benefits as a single query can request precisely what is needed. Now, with the new Nuxt Apollo module for Nuxt 3, we can easily add support for GraphQL in our app using Apollo.
We’ll go into what GraphQL is and why we should use it. We’ll then briefly introduce Apollo GraphQL and, finally, look at the Nuxt Apollo module. In the following sections, we’ll learn how to build an application using the module by making queries to an external API.
What is GraphQL
GraphQL is simply a query language and server-side runtime for application programming interfaces (APIs) that is designed to make APIs fast, flexible, and developer-friendly. It prioritizes giving clients exactly the data they request and no more. For many developers, GraphQL is an improvement over REST as a single request can be equivalent to multiple requests to a REST API.
When interfacing with an API, GraphQL eliminates the need to send more requests than are necessary, unlike a REST API, which might return either too much or too little data for an operation. If the data returned after a request does not fulfill our needs, we’d have to make another request, which will negatively impact the user experience, particularly under unreliable network situations.
GraphQL solves all these problems while introducing useful features like a playground powered by GraphiQL that allows developers to construct and fine-tune requests before applying them to the application.
Introduction to Apollo GraphQL
In simplest terms, Apollo is a suite of tools (mainly Apollo Server and Apollo Client) provided to create a GraphQL server and to consume a GraphQL API, respectively.
Apollo Client is a library provided by Apollo that enables you to consume a GraphQL API. It comes with features like:
- Declarative data fetching: Write a query and receive data without manually tracking loading states
- Incrementally adoptable: Drop Apollo into any JavaScript app and incorporate it feature by feature.
- Universally compatible: Use any build setup and any GraphQL API.
- Community driven: Share knowledge with thousands of developers in the GraphQL community.
Apollo Server, according to the docs, is an open-source, spec-compliant GraphQL server that’s compatible with any GraphQL client, including Apollo Client. It’s the best way to build a production-ready, self-documenting GraphQL API that can use data from any source.
Nuxt 3
Nuxt 3 is an open-source framework built on Vue 3. For example, previous versions of Nuxt, like Nuxt 2, were built on Vue 2. Nuxt 3 now leverages some of the amazing features provided by Vue 3 while providing many other useful features like:
- A server engine, Nitro, for:
- Server Side Rendering (SSR)
- Static Site Generation (SSG)
- Hybrid rendering and more:
- Auto-imports
- File system routing and API layer
- Data-fetching utilities
Overall, Nuxt is a pretty solid meta-framework (a framework built on another framework) that provides tools and an amazing developer experience (DX) to build better applications for the web.
Nuxt Apollo module
The Nuxt Apollo module is one of the many Nuxt modules in the Nuxt ecosystem that allows us to leverage Vue Apollo to effortlessly integrate GraphQL into our Nuxt 3 projects.
It comes with several features, including:
- SSR Support
- Minimal Configuration
- Vue-Apollo Composables
- HMR for external Apollo Client configuration
What we’re building
We’ll build a simple application that uses the Nuxt Apollo module to interface with the GitHub GraphQL API to view issues in a specified repository from a specified owner. It also uses mutations to be able to add comments. You can view the live demo on - http://issues-viewer-nuxt.netlify.app/ and access the code from this GitHub repository.
To follow along you should have the following:
- A basic understanding of HTML, CSS & JS, Vue
- Node.js* (latest LTS version)
- Visual Studio Code
- Volar Extension, and either enable Take Over Mode (recommended) or add TypeScript Vue Plugin (Volar)
- GitHub account, for the GitHub GraphQL API
- A terminal; I recommend using VS Code’s integrated terminal
Setup Nuxt and Apollo module
First, navigate to a directory of choice and run the following to install Nuxt:
npx nuxi init nuxt-apollo-appOnce the project is created, navigate to the directory and install the dependencies:
cd nuxt-apollo-app
yarn install
Next, install the Nuxt Apollo module and tailwind:
yarn add -D @nuxtjs/apollo@next @nuxtjs/tailwindcssAdd the modules to ./nuxt.config.ts:
// ./nuxt.config.ts

// https://nuxt.com/docs/api/configuration/nuxt-config
export default definenuxtconfig({
  modules: [
    '@nuxtjs/apollo',
    '@nuxtjs/tailwindcss'
  ]
})
Configure Nuxt Apollo module
Before we configure our module, since we’re using the GitHub GraphQL API, we’ll need to obtain a Personal access token (classic) with repository access and add it as a token to our authorization. Follow the guides on GitHub Docs to create a Personal access token (classic) and copy it.
Add the token and GraphQL endpoint to ./.env:
GITHUB_API=https://api.github.com/graphql
GITHUB_TOKEN=your_token
Back in ./nuxt.config.ts, we’ll add our environment variables to the Nuxt runtime config using the runtimeConfig object and add some configurations for our Nuxt apollo module:
// ./nuxt.config.ts
// https://nuxt.com/docs/api/configuration/nuxt-config
export default defineNuxtConfig({
  modules: ["@nuxtjs/apollo", "@nuxtjs/tailwindcss"],
  runtimeConfig: {
    githubURL: process.env.GITHUB_API,
    githubToken: process.env.GITHUB_TOKEN,
  },
  apollo: {
    authType: "Bearer",
    authHeader: "Authorization",
    tokenStorage: "cookie",
    clients: {
      default: {
        tokenName: "github-token",
        httpEndpoint: "https://api.github.com/graphql",
      },
    },
  },
});
For the Apollo configuration, we set the tokenName in the default client, which we’ll define using cookies. You can find more details on the configuration in the docs.
Set auth token cookie
We can set the github-token cookie using the useCookie composable. Since useCookie only works during setup or Lifecycle Hooks, we can set it in ./app.vue:
<!-- ./app.vue -->
<script setup>
// get token from runtime config
const { githubToken } = useRuntimeConfig();

// init cookie for github token
const cookie = useCookie("github-token");

// set cookie value if not set
cookie.value = cookie.value || githubToken;
</script>
Or we could set up a plugin that sets the token using the `” “apollo:auth ”``` hook:
// ./plugins/apollo.ts

export default defineNuxtPlugin((nuxtApp) => {
  const { githubToken } = useRuntimeConfig();
  nuxtApp.hook("apollo:auth", ({ client, token }) => {
    // `client` can be used to differentiate logic on a per-client basis.

    // apply apollo client token
    token.value = githubToken;
  });
});
⚠️ To keep things a little more focused on the topic, I’ve omitted some of the staying used in this application. You can always view or copy the styles from the GitHub repo.
Making Queries
We can easily make queries using useAsyncQuery, which is a convenience wrapper around Nuxt’s useAsyncData that allows you to easily query the Apollo client.
useAsyncQuery is primarily used for querying data when a page or component is initially loaded.
Let’s fetch a list of issues in a repository:
<!-- ./app.vue -->
<script setup>

// define query
const query = gql`
  query ($name: String!, $owner: String!, $limit: Int) {
    repository(name: $name, owner: $owner) {
      issues(first: $limit) {
        nodes {
          id
          number
          title
          body
          bodyHTML
          comments(first: 5) {
            nodes {
              body
              bodyHTML
              author {
                login
                avatarUrl
              }
            }
          }
          author {
            login
            url
            avatarUrl
          }
        }
      }
    }
  }
`;

// define variables
const variables = ref({
  name: "discussions",
  owner: "miracleonyenma",
  limit: 10,
});

const { data, error, refresh } = useAsyncQuery(query, variables);

</script>
<template>
  <div>
    <pre>
      {{ data }}
    </pre>
  </div>
</template>
Here we use GraphQL variables to define the name, owner, and limit for our query.
With that, we should have this:
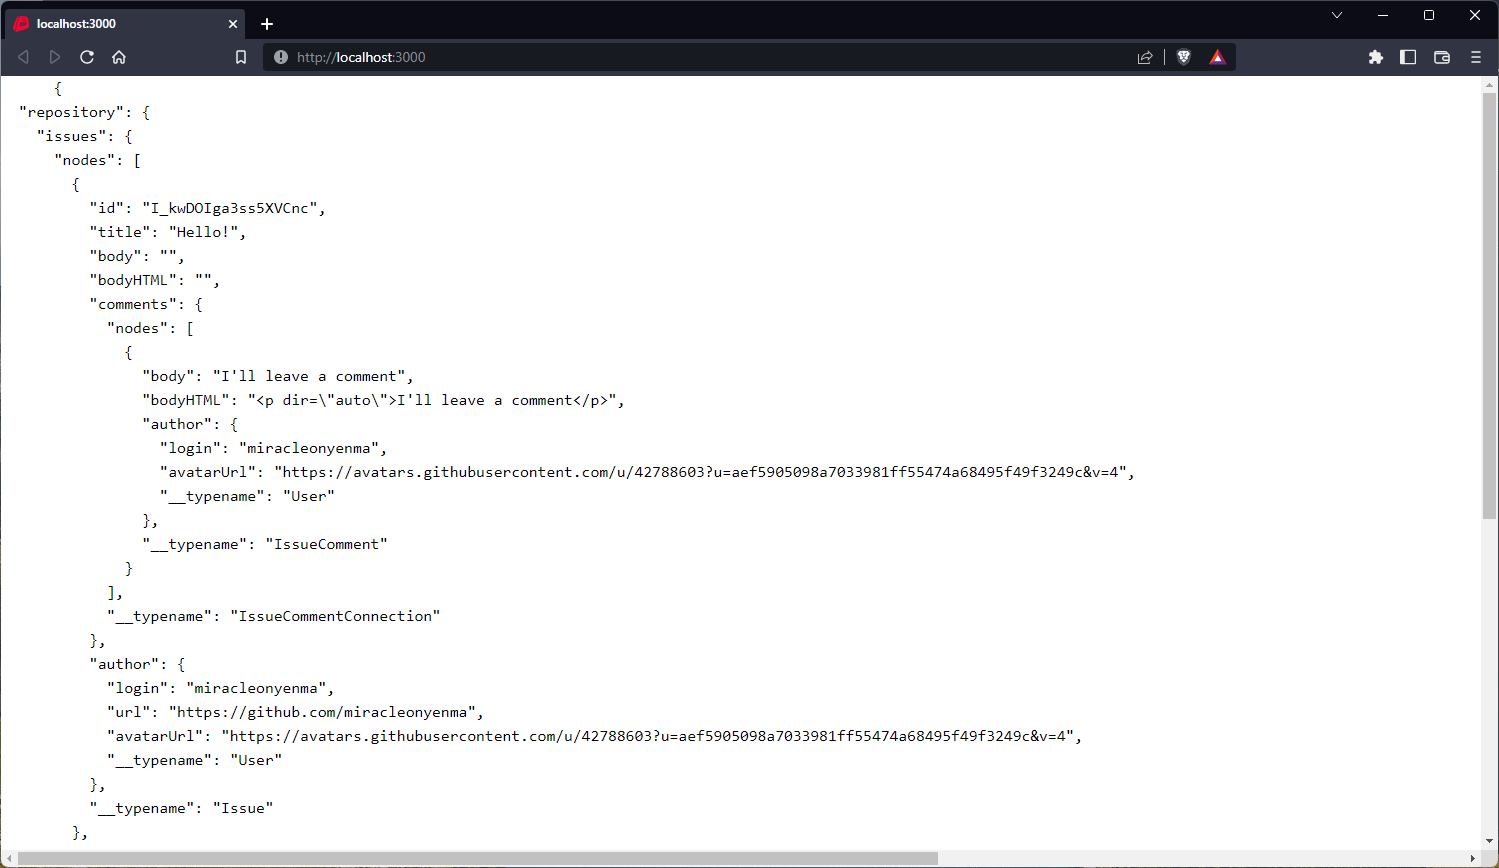
Now that we’ve seen how that works, let’s add a few components to display issues and comments.
Create IssueCard component
Create a new file - ./components/IssueCard.vue:
<!-- ./components/IssueCard.vue -->
<script setup>
// define props
const { issue } = defineProps(["issue"]);
</script>
<template>
  <article class="issue">
    <div class="wrapper">
      <header class="issue-header">
        <div class="wrapper">
          <div class="issue-title">
            <h2 class="font-bold text-4xl">{{ issue.title }} #{{issue.number}}</h2>
          </div>
          <div class= "issue-author author">
            <div class="img-cont w-6 h-6">
              <img :src="issue.author?.avatarUrl" alt="" />
            </div>
            <NuxtLink :to=" issue.author?.url">
              {{ issue.author?.login }}
            </NuxtLink>
          </div>
        </div>
      </header>
      <hr />
      <div v-if="issue.bodyHTML" class="issue-body">
        <div class="wrapper">
          <div class="issue-body-html">
            <div v-html=" issue.bodyHTML"/>
          </div>
        </div>
      </div>
      <ul v-if=" issue.comments.nodes.length" class=" issue-comments">
        <li v-for=" comment in issue.comments.nodes":key=" comment.id">
          <article class="issue-comment">
            <div class="wrapper">
              <div class="issue-comment-author author">
                <div class="img-cont w-6 h-6">
                  <img :src="comment.author?.avatarUrl" alt="" />
                </div>
                <NuxtLink :to=" comment.author?.url">
                  {{ comment.author?.login }}
                </NuxtLink>
              </div>
              <hr />
              <div class="issue-comment-body">
                <div v-html=" comment.bodyHTML"/>
              </div>
            </div>
          </article>
        </li>
      </ul>
    </div>
  </article>
</template>
<style scoped>
.issue {
  @apply bg-slate-50 rounded-xl;
}
.issue-header > .wrapper {
  @apply flex flex-col gap-2 p-4;
}
.author {
  @apply flex gap-1 items-center;
}
.issue-body {
  @apply p-4;
}
.issue-comments {
  @apply flex flex-col gap-4 p-4;
}
.issue-comment > .wrapper {
  @apply bg-slate-100 rounded-lg;
}
.issue-comment-author,
.issue-comment-body {
  @apply p-4;
}
</style>
Now, we can add our components to our page:
<!-- ./app.vue -->
<script setup>
// ...
</script>
<template>
<main>
<header class= "issues-header site-section">
<div class="wrapper">
<h1 class="font-semibold text-2xl">Issues viewer</h1>
</div>
</header>
<section class= "site-section issues-section">
<div class="wrapper">
<ul class="issues">
<li v-for=" issue in data.repository.issues.nodes":key=" issue.id">
<IssueCard :issue="issue" />
</li>
</ul>
</div>
</section>
</main>
</template>
<style scoped>
.issues-header {
@apply p-4 py-12;
}
.issues-section {
@apply w-full p-4 pb-12;
}
.issues {
@apply grid grid-cols-1 gap-4;
}
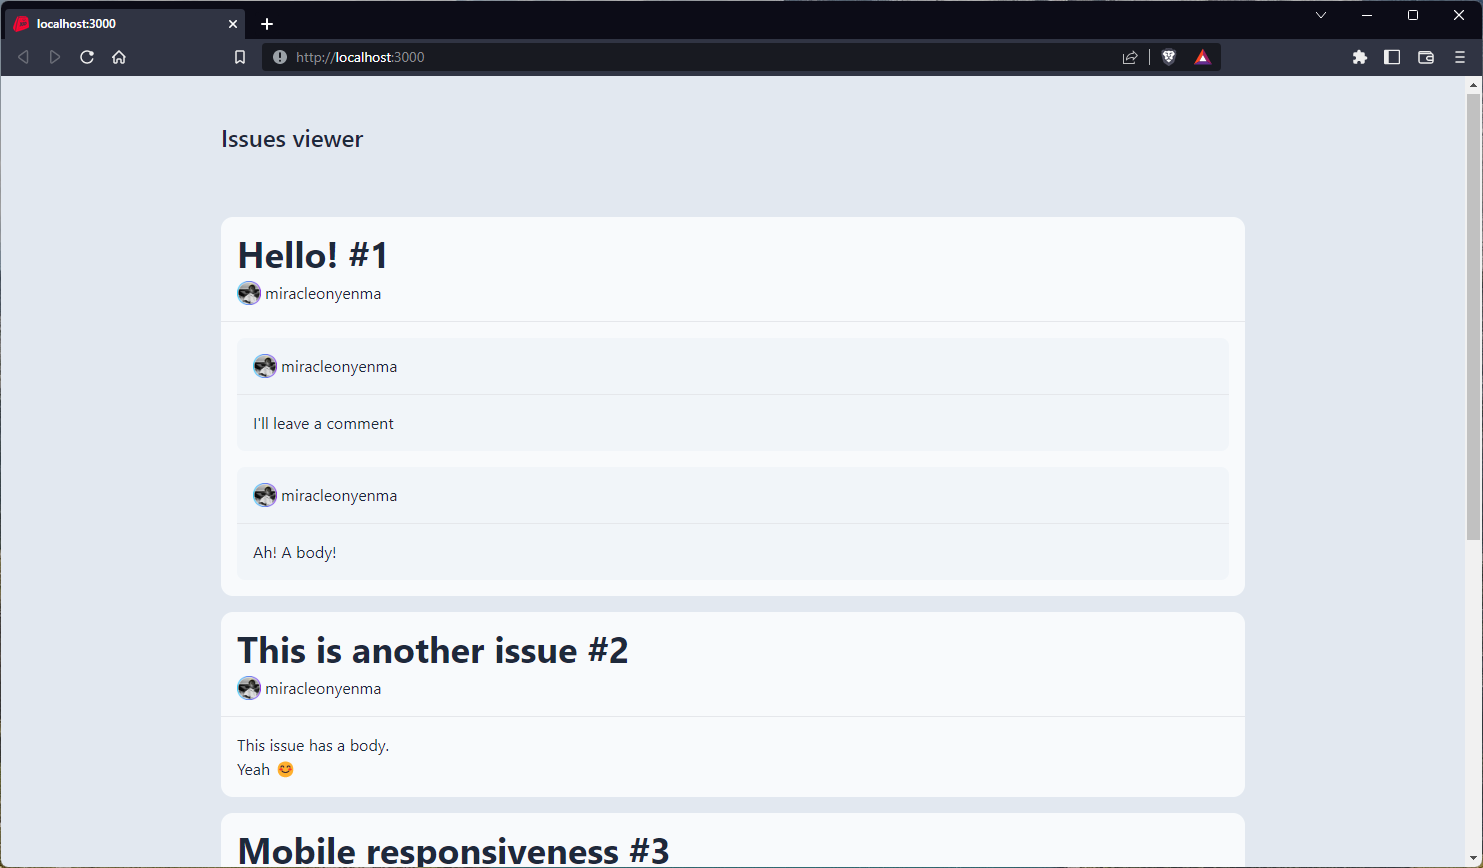
</style>We should see the first ten issues of the defined repository displayed:
useAsyncQuery refresh function
useAsyncQuery provides a refresh function that can be used to make another request which allows us to update the variables and make another request:
const { data, error, refresh } = useAsyncQuery(query, variables);Let’s see it in action. First, we’ll create two fields to update the repository name and owner.
<!-- ./app.vue -->
<template>
  <main>
    <header class= "issues-header site-section">
      <div class="wrapper">
        <h1 class="font-semibold text-2xl">Issues viewer</h1>
        <form class="my-2">
          <div class="wrapper">
            <div class="form-group">
              <div class="form-control">
                <label for="repository-name"> Repository name </label>
                <input
                  type= "text"
                  id= "repository-name"
                  v-model= "variables.name"
                  placeholder= "Repository name"
                />
              </div>
              <div class="form-control">
                <label for="repository-owner"> Repository owner </label>
                <input
                  type= "text"
                  id= "repository-owner"
                  v-model= "variables.owner"
                  placeholder= "Repository owner"
                />
              </div>
            </div>
          </div>
        </form>
        <button @click="refresh" class="cta">Refresh</button>
      </div>
    </header>
    <!-- ... -->
  </main>
</template>
We added a button to call the refresh function when clicked. With this, we should be able to fetch issues from various repositories:
Nice.
Session Replay for Developers
Uncover frustrations, understand bugs and fix slowdowns like never before with OpenReplay — an open-source session replay tool for developers. Self-host it in minutes, and have complete control over your customer data. Check our GitHub repo and join the thousands of developers in our community.
Pagination
The method of implementing pagination varies based on the API. GitHub uses a cursor-based pagination where each node has a cursor. There’s also a pageInfo field which contains data like the endCursor, hasNextPage etc.
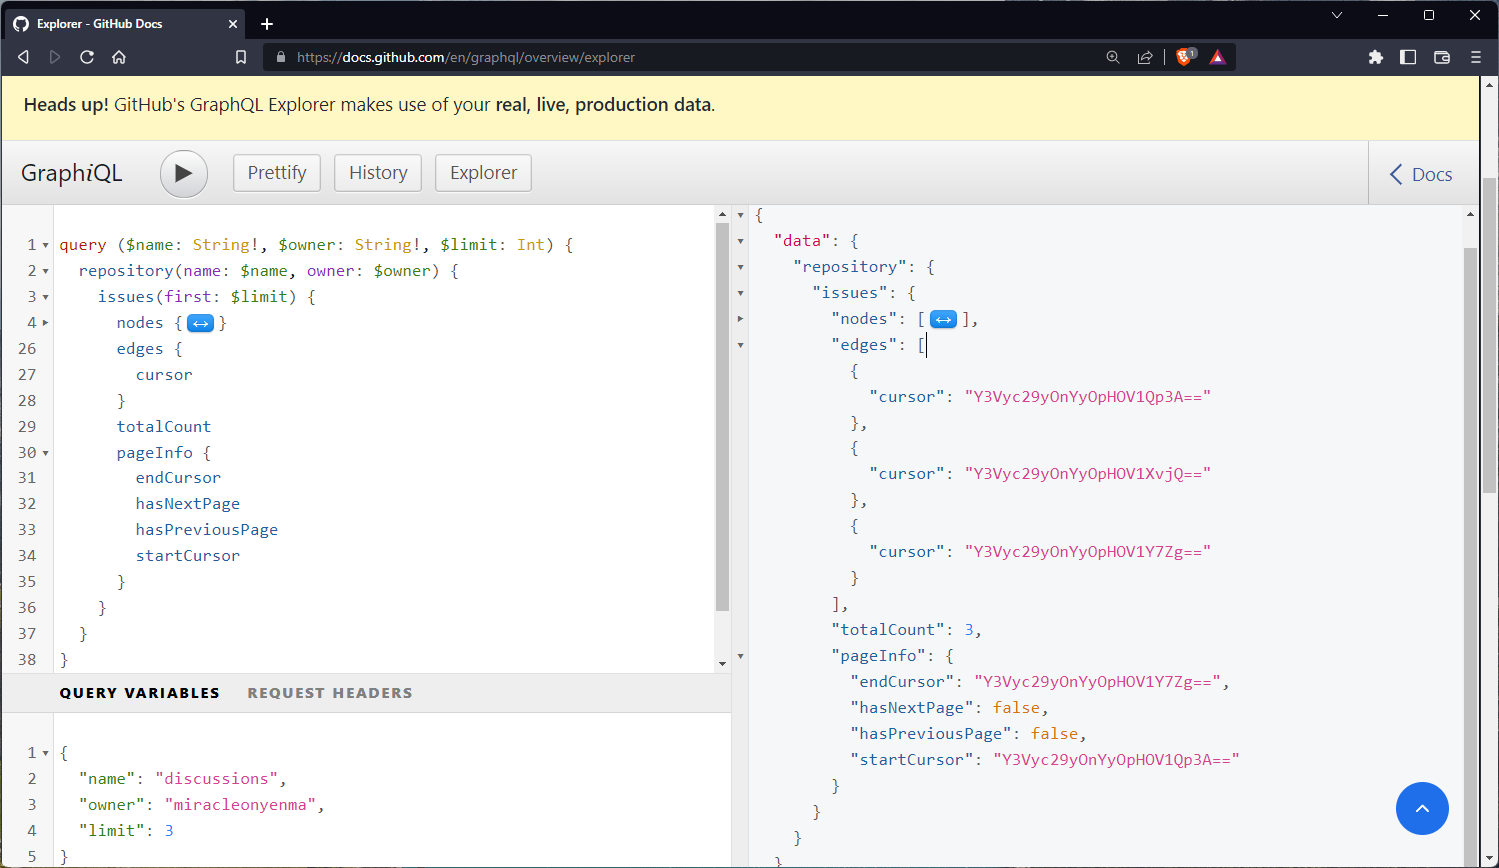
For this article, we’ll use a simple pagination strategy where we’ll use a load more button to call the refresh function with an updated limit in the variables. The limit will be incremented by ten while hasNextPage is true.
First, we update the query to contain the pageInfo fields:
const query = gql`
  query ($name: String!, $owner: String!, $limit: Int) {
    repository(name: $name, owner: $owner) {
      issues(first: $limit) {
        nodes {
          id
          title
          body
          bodyHTML
          number
          comments(first: 5) {
            nodes {
              body
              bodyHTML
              author {
                login
                avatarUrl
              }
            }
          }
          author {
            login
            url
            avatarUrl
          }
        }
        edges {
          cursor
        }
        totalCount
        pageInfo {
          endCursor
          hasNextPage
          hasPreviousPage
          startCursor
        }
      }
    }
  }
`;
Next, create a loadMore() function that checks if hasNextPage is true and if so, increments the limit and calls the refresh function:
<!-- ./app.vue -->
<script setup>
// ...

const loadMore = () => {
  if (data.value.repository.issues.pageInfo.hasNextPage) {
    variables.value.limit = variables.value.limit + 10;
    refresh(variables.value);
  }
};

</script>
Then in our template:
<template>
  <main>
    <!-- ... -->
    <section class= "site-section issues-section">
        <!-- ... -->
        <div class="action-cont">
          <button
            class= "cta"
            @click= "loadMore"
            :disabled="!data.repository.issues.pageInfo.hasNextPage"
          >
            Load more
          </button>
        </div>
      </div>
    </section>
  </main>
</template>
With that, we should have something like this:
Awesome!
Mutations
We can carry out mutations using the useMutation composable. To illustrate this, we’ll add the functionality to add comments to an issue.
Back in our ./components/IssueCard.vue file, we’ll add the following:
<!-- ./components/IssueCard.vue -->
<script setup>
// define props
const { issue } = defineProps(["issue"]);

// create reactive comments array
const comments = ref(issue.comments.nodes);

// mutation query to add a comment to the issue
const addCommentQuery = gql`
  mutation ($subjectID: ID!, $body: String!) {
    addComment(input: { subjectId: $subjectID, body: $body }) {
      clientMutationId
      commentEdge {
        node {
          body
          bodyHTML
          author {
            login
            avatarUrl
          }
        }
      }
    }
  }
`;

// mutation variables
const variables = ref({
  subjectID: issue.id,
  body:"  ",
});

// loading state ref
const isLoading = ref(false);

// destructure useMutation composable to obtain mutate frunction and rename it to `addComment`
const { mutate: addComment } = useMutation(addCommentQuery, variables.value);

// function to create new comment
const createComment = async () => {

  // return if body is empty
  if (variables.value.body.trim() === "") return;

  // set loading state to true
  isLoading.value = true;
  try {
    // call addComment function to add comment
    const { data } = await addComment(variables.value);

    // add new comment to comments array
    comments.value.push(data.addComment.commentEdge.node);

    // reset variables comment body
    variables.value.body = "";
  } catch (error) {
    console.log({ error });
  }

  // set loading state to false
  isLoading.value = false;
};
</script>
Here, we created a reactive comments variable, which will be updated when a comment has been created successfully.
We defined our mutation and the variables (which will be bound to an input element). We called the useMutation composable, which returns a mutate function which we renamed to addComment.
Within the createComment() function, we return the function if the body variable contains no string. If it does, we call the addComment function and add the returned data, if successful, to the comments array.
Here’s what our template, which contains the input field for our add comment functionality, looks like:
<template>
  <article class="issue">
    <div class="wrapper">
      <!--  -->
      <div class="new-comment-cont">
        <div class="wrapper">
          <div class=" form-control !w-full">
            <label for="new-comment">Enter a comment</label>
            <textarea
              name= "new-comment"
              id= "new-comment"
              rows= "2"
              class= "w-full"
              v-model= "variables.body"
            ></textarea>
          </div>
          <div class="action-cont">
            <button
              @click= "createComment"
              :disbled= "isLoading"
              class="cta !bg-teal-700 text-teal-100 !border-teal-800 focus:cursor-wait"
            >
              Comment
            </button>
          </div>
        </div>
      </div>
    </div>
  </article>
</template>
Here, we have our textarea with two-way binding to our variables:
<textarea
  v-model= "variables.body"
></textarea>
Our comment button calls the createComment() button when clicked:
<button
  @click= "createComment"
  :disabled= "isLoading"
>
  Comment
</button>
With that, our create comment functionality should be working:
Awesome!
Conclusion
So far, we’ve covered the basics of using the Nuxt Apollo module to integrate GraphQL into your Nuxt application. We’ve been able to interface with the GitHub GraphQL API using the module, and we’ve covered key concepts, which include making queries, mutations implementing pagination, etc.
With all these, we were able to build a pretty basic issues viewer, which allows us to fetch the issues in a specified repository, view a few comments, and even add comments.
It’s still just the basics, but with a little more research and coding, we can find that we can achieve so much more and even leverage on SSR with the Nuxt Apollo module.
Here are a few resources you might find useful:
You can access the code for the project built in this tutorial on the tutorial branch of the project repository on GitHub. This contains all the code and the styling for the application we just built in this tutorial.
The code used in the live example is on the main branch. It’s hosted on Netlify, and you can play around with it by providing your personal access token (classic).
⚠️ Heads up: The GitHub API uses your real, live, production data.
And the live example:
A TIP FROM THE EDITOR: For more on GraphQL, do look at our Working With GraphQL With Vanilla JavaScript and Fetching Data From GraphQL APIs With Apollo React articles.
Gain Debugging Superpowers
Unleash the power of session replay to reproduce bugs and track user frustrations. Get complete visibility into your frontend with OpenReplay, the most advanced open-source session replay tool for developers.
