Integrating OpenReplay with Sentry
Learn how to integrate OpenReplay with Sentry to get the most out of both worlds!


Error monitoring is a part of frontend development that is often being overlooked. Being able to monitor and then replay the errors users face while using your application goes a long way in fixing errors that will greatly enhance the user experience. In this article, we will look at how to integrate OpenReplay an open-source session replay stack with Sentry which is a popular tool for monitoring and diagnosing errors in applications.
What is OpenReplay?
Imagine physically testing your application to see what the user experience feels like and also looking for errors not caught by your automated testing. OpenReplay helps you do this at scale as it helps you replay the activities every user who used your application took until they encountered an error. These errors can then be submitted automatically to tools like Sentry for easy debugging and the best part is OpenReplay is open sourced so it can be hosted on your servers and you have full control over how the data is being used. Consider the GDPR which governs all matters of data protection in the EU, with a tool such as OpenReplay you’re safe knowing that you have full control over how the data is being used.
Prerequisites
- Sentry Account
- Domain
- Knowledge of JavaScript and React
- Node.js v12 or greater
- npm v5.2 or greater
Setting up OpenReplay
We will need a server to set up OpenReplay. I’ll be using Google Cloud Platform to illustrate how to set up OpenReplay. The OpenReplay docs also contain instructions on how to deploy to various platforms (such as AWS, Azure, Digital Ocean and others).
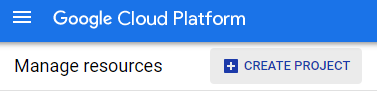
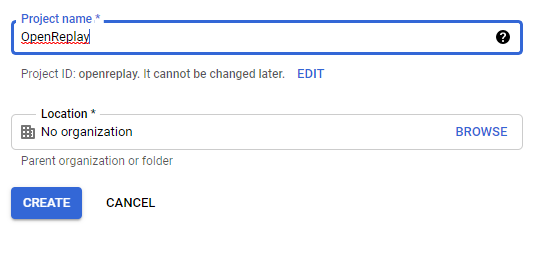
To get started, go to Google Play Console and sign up if you don’t have an account. After authentication, you will be taken to the Cloud Console. The next step is creating a project:
-
Go to Manage Resources
-
Click Create Project
-
Fill in the project details and click on Create
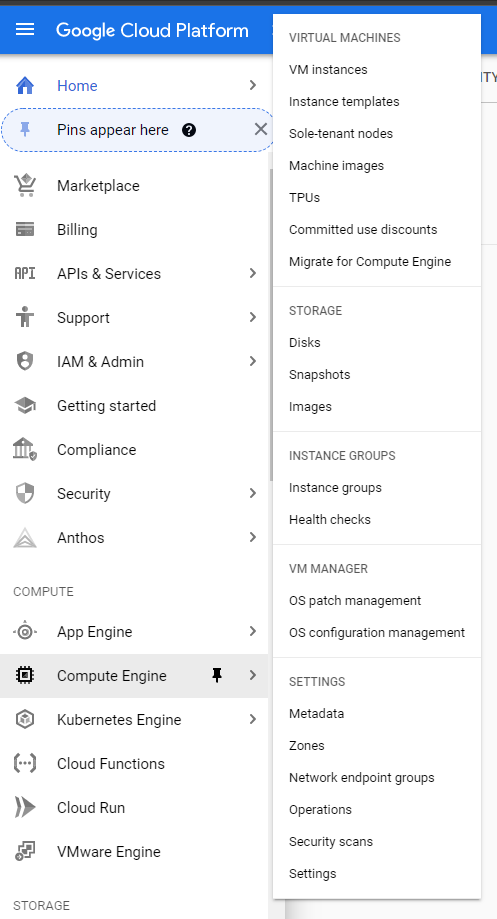
After creating a project, we will need a Virtual machine, Open Replay needs a VM with the following specifications:
- 2 vCPUs
- 8GB of RAM
- 50GB fo Storage
To set up a Virtual Machine
-
Go to Compute Engine on the sidebar of the Cloud console and select VM Instances
-
Click on Create Instance on the VM instances page and then on the Create instance form:
-
Enter the name of the instance
-
Select your preferred region and zone
-
Select
e2-standard-2as the machine type as that is what meets the minimum specs for OpenReplay -
Change the Boot Disk to Ubuntu 20.04 LTS and select SSD persistent disk for the Boot Disk Type.
-
Set the SSD disk size to 50GB and click on “Select”
-
Check “Allow HTTP” and “Allow HTTPS” in the firewall section
-
Click on Create
Once the instance is running, follow the steps below to deploy OpenReplay
- Click on the “SSH” button on the VM instances dashboard
- Paste the code below in the command line to install OpenReplay git clone https://github.com/openreplay/openreplay.git cd openreplay/scripts/helm && bash install.sh
You’ll be prompted to enter your domain name before the setup can continue. After the installation is done the next step will be configuring SSL on the domain because the OpenReplay tracker won’t work without one. There are various ways of Configuring SSL but we’ll be using Google Load Balancer to set up one in this article. Before setting up a load balancer we will have to set up an instance group which is a requirement for a load balancer
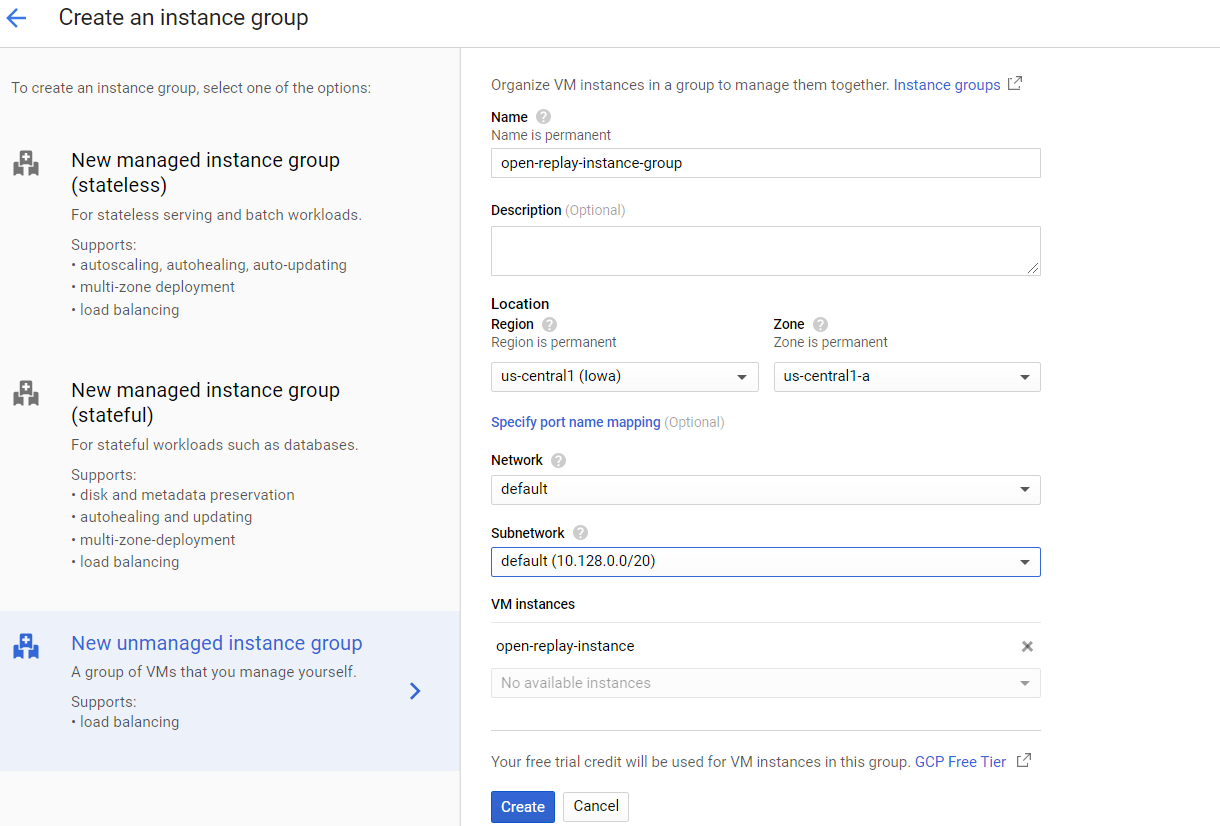
- Go to the Compute Engine > Instance Groups
- Click on Create Instance Group
- Select New Unmanaged Instance Group
- Enter the name of the instance group
- Select your preferred region and Network
- Choose the OpenReplay Instance
- Click Create
Next, we create the load balancer
-
Go to Network Services > Load Balancer

-
Click on Create Load Balancer
-
Click on Start Configuration on HTTP(S) Load Balancing
-
Choose ‘From Internet to my VMs’ and click ‘Continue’
-
Enter a name for the load balancer
-
Start with ‘Backend configuration’ and click on ‘Backend services’ > ‘Create a backend service’
-
Select Instance group for ‘Backend type’. In ‘Backends’ > ‘New backend’, choose the instance group you previously created, set the port to
80then hit ‘Done’. -
Scroll down to ‘Health Check’ and ‘Create a health check’. Choose HTTP for the ‘Protocol’ and set the ‘Port’ to
80while keeping the other default values. Hit ‘Save’. -
Click ‘Create’
-
In ‘Frontend configuration’, choose HTTPS for ‘Protocol’ then in ‘Certificate’ create a new certificate (managed by Google) or bring yours. Hit ‘Done’.
-
Review then click ‘Create’
-
Select Instance group for ‘Backend type’. In ‘Backends’ > ‘New backend’, choose the instance group you previously created, set the port to
80then hit ‘Done’. -
Scroll down to ‘Health Check’ and ‘Create a health check’. Choose HTTP for the ‘Protocol’ and set the ‘Port’ to
80while keeping the other default values. Hit ‘Save’. -
Click ‘Create’
-
In ‘Frontend configuration’, choose HTTPS for ‘Protocol’ then in ‘Certificate’ create a new certificate (managed by Google) or bring yours. Hit ‘Done’.
-
Review then click ‘Create’
At this point, you should have successfully created a load balancer. The last step is going to your DNS provider and creating an A record that points to the IP of the load balancer which can be found on the dashboard.
After the domain has successfully been pointed to the load balancer. You can signup and create a project by accessing the /signup route of the domain.
Creating a Demo App
To integrate OpenReplay we need a live frontend application. In this section, I will be creating a Single Page Application (SPA) with React to demonstrate how to integrate OpenReplay into a frontend application.
Open up a terminal and run the code below to create a React application
npx create-react-app open-replay-tutorialAfter creating the app, open the App.js file of the application in a code editor. Replace the contents of the file with the code below
import React, { useState } from 'react';
import logo from './logo.svg';
import './App.css';
function App() {
const [count, setCount] = useState(0);
const increment = () => {
if (count % 5 === 0 && count !== 0) {
throw 'Custom error triggered, count a multiple of 5';
}
setCount((prevState) => (prevState += 1));
};
const decrement = () => setCount((prevState) => (prevState -= 1));
return (
<div className="App">
<header className="App-header">
<img src={logo} className="App-logo" alt="logo" />
<p>
Edit <code>src/App.js</code> and save to reload.
</p>
</header>
<div className="counter">
<button className="btn" type="button" onClick={() => decrement()}>
-
</button>
<p className="count">{count}</p>
<button className="btn" type="button" onClick={() => increment()}>
+
</button>
</div>
</div>
);
}
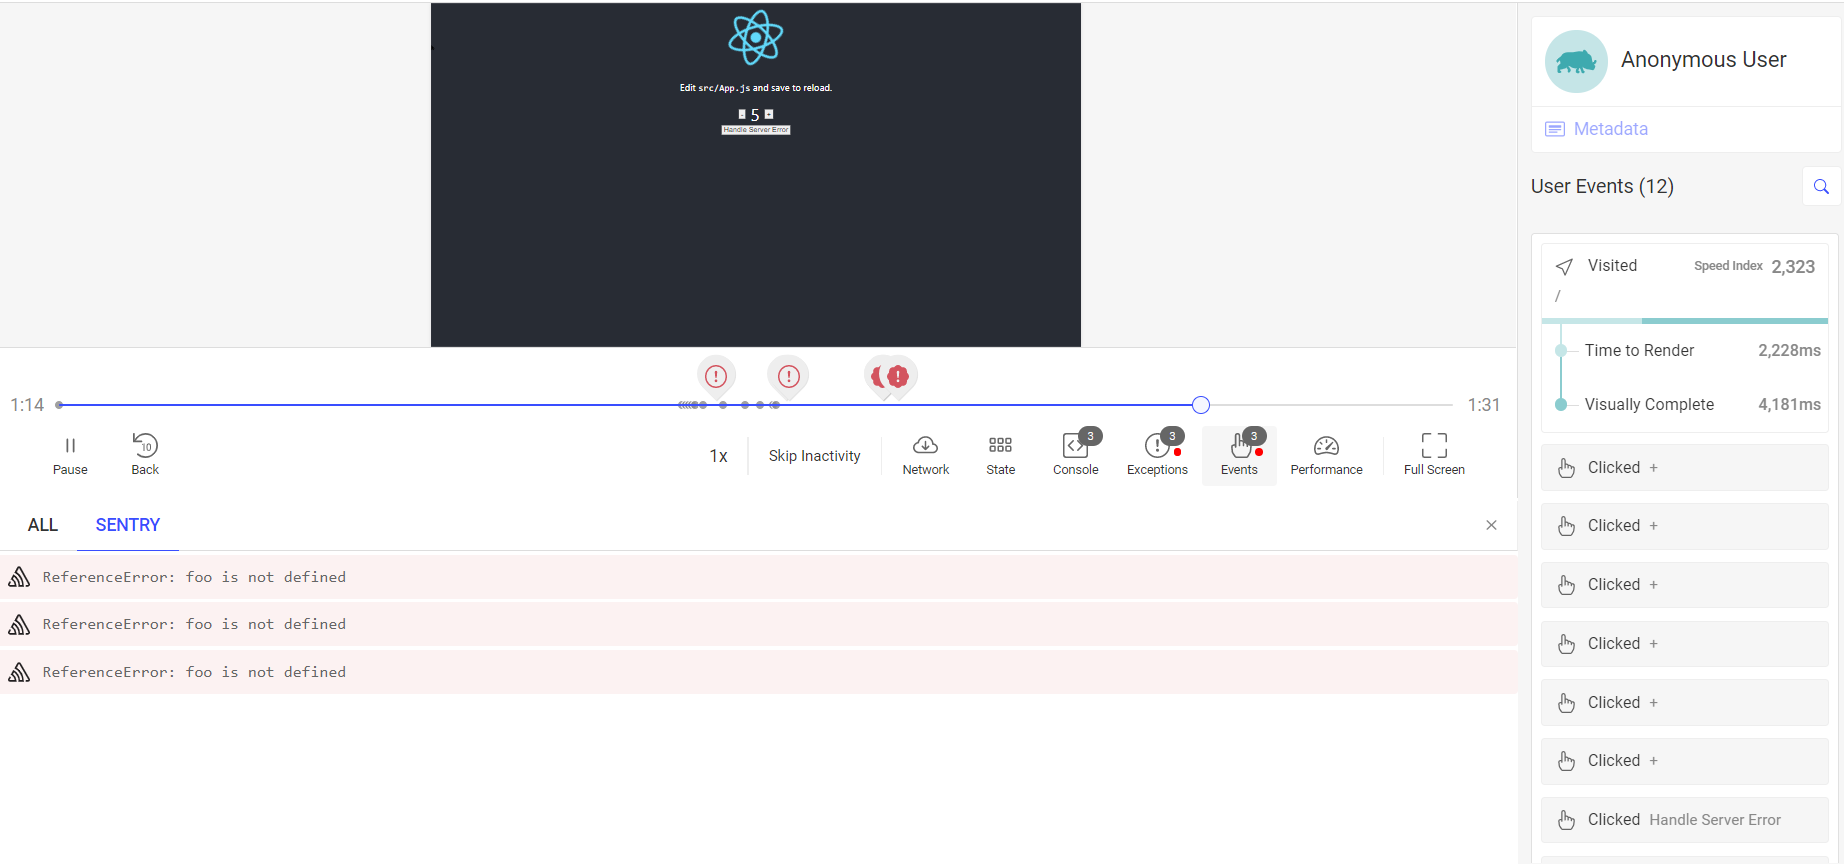
export default App;The above example is a simple counter app that allows a user to increase or decrease a count. I’ve added a custom error that’ll be triggered whenever the count is up to 5 so that we can track it with OpenReplay and send the errors to Sentry.
Save and run the code below in a terminal to launch the development server
npm run dev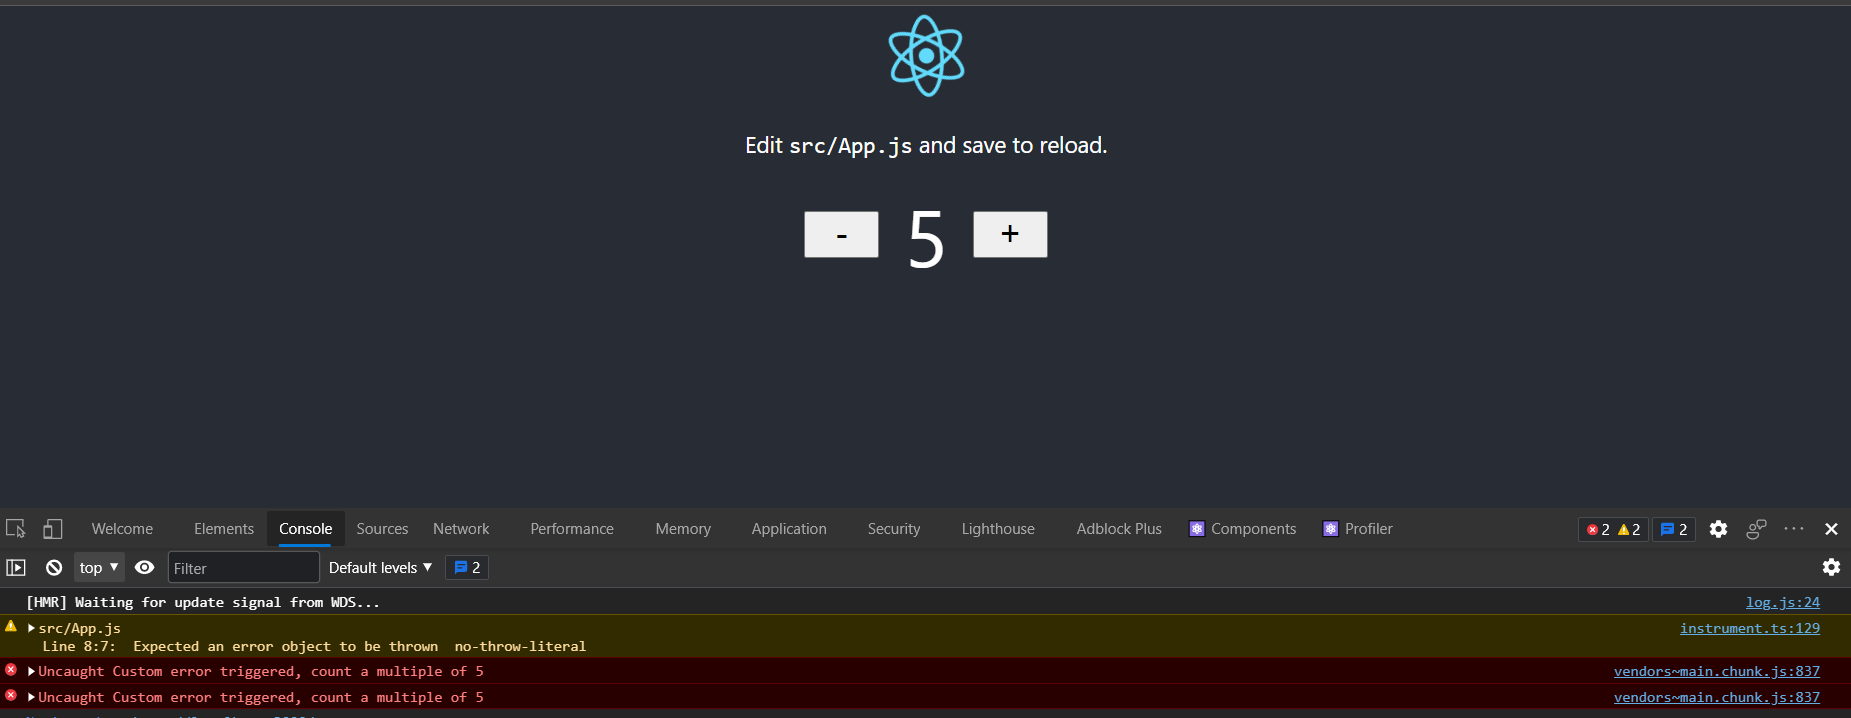
The above screenshot shows the error encountered on the app. In the next section, we will look at how to send these types of errors to OpenReplay.
Integrating OpenReplay into Demo App
After creating the application, the next step is integrating OpenReplay so we can monitor the actions users perform on the app. OpenReplay provides a JavaScript SDK which we will be using.
Navigate to the root directory of your application in a terminal, and run the code below
npm install @openreplay/trackerThe code above installs the OpenReplay SDK into our application. Now open the App.js file in a code editor and replace the code with the code below
import React, { useState } from 'react';
import logo from './logo.svg';
import './App.css';
import Tracker from '@openreplay/tracker';

const tracker = new Tracker({
  projectKey: "<project-key>",
  ingestPoint: "<domain>/ingest",
});
tracker.start();

function App() {
  const [count, setCount] = useState(0);
  const increment = () => {
    if (count % 5 === 0 && count !== 0) {
      throw 'Custom error triggered, count a multiple of 5';
    }
    setCount((prevState) => (prevState += 1));
  };
  const decrement = () => setCount((prevState) => (prevState -= 1));
  return (
    <div className="App">
      <header className="App-header">
        <img src={logo} className="App-logo" alt="logo" />
        <p>
          Edit <code>src/App.js</code> and save to reload.
        </p>
      </header>
      <div className="counter">
        <button className="btn" type="button" onClick={() => decrement()}>
          -
        </button>
        <p className="count">{count}</p>
        <button className="btn" type="button" onClick={() => increment()}>
          +
        </button>
      </div>
    </div>
  );
}
export default App;
We set up OpenReplay by creating a new instance of the Tracker and passing the projectId gotten from the OpenReplay Dashboard and then starting the tracker with tracker.start()
Note: For OpenReplay to work with our demo app it has to be deployed live, so commit and push your code to a repository and quickly deploy to any of the popular platforms like Netlify and Vercel (here is a quick tutorial on how to deploy your app on Netlify)
Once the app is accessed by a user on a live environment it should start sending the events triggered by users to the Open Replay dashboard.
Open Source Session Replay
OpenReplay is an open-source, session replay suite that lets you see what users do on your web app, helping you troubleshoot issues faster. OpenReplay is self-hosted for full control over your data.

Start enjoying your debugging experience - start using OpenReplay for free.
Integrating OpenReplay with Sentry
At this point, we’ve successfully integrated OpenReplay into our Live application and can see reports on the OpenReplay dashboard. The next step is to integrate OpenReplay with Sentry which is a service for fixing errors and crashes recorded in an application.
Now you might ask why Sentry? Let’s imagine a scenario where we have a backend and we want to identify the backend errors that occured in an OpenReplay Session. Since OpenReplay is a frontend monitoring tool this limits our options so what we can do is use Sentry to monitor errors on the backend and then every time we make a request to the backend if an error is encountered OpenReplay will send a unique identifier to Sentry to identify the session in which that error occured.
To integrate Sentry you must have a Sentry account If you haven’t created one, go to Sentry and create one. After authentication, create a new project. To connect OpenReplay to Sentry:
-
Go to API Tokens - Sentry
-
Create a new token with
event:read,org:readandproject:readpermissions
-
Copy the
tokenas it’ll be used later on -
Copy your
organization_slugfrom the organizational settings page andproject_slugfrom the Projects page in your Sentry dashboard. -
Go back to your OpenReplay dashboard
-
Navigate to Preferences > Integration
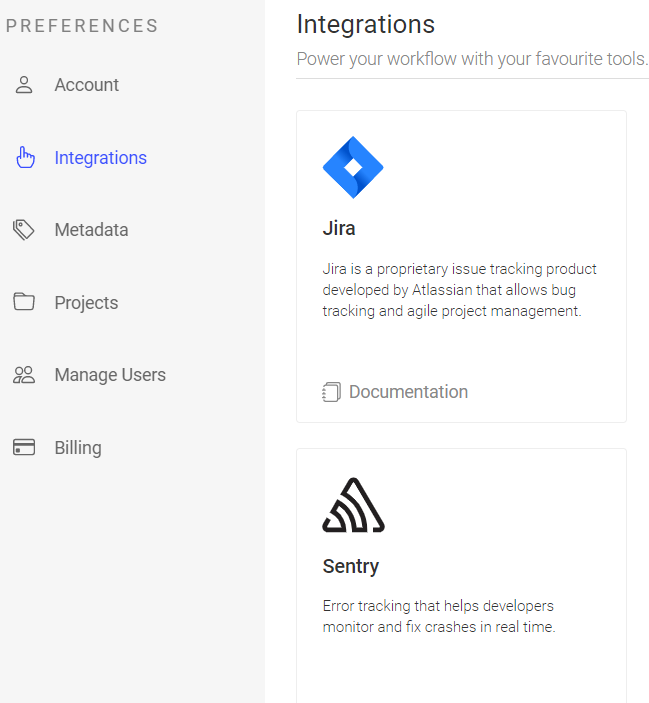
-
Click on Sentry and fill in the details gotten earlier from Sentry in the dialog that appears
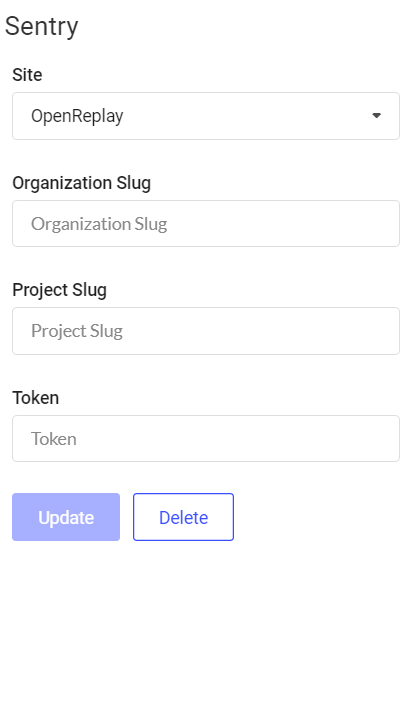
-
Update and Close
Next, you have to install Sentry into your backend application and set it up. The Sentry docs provide a way to get started with Sentry on various platforms. Follow the guide for your platform to set it up.
For OpenReplay to be associated with an error on Sentry a unique session id has to be generated on each request we want to track. We can do that by using a custom HTTP header.
Open the App.js file in your code editor and refactor the code with the code below
import React, { useState } from 'react';
import logo from './logo.svg';
import './App.css';
import Tracker from '@openreplay/tracker';

const tracker = new Tracker({
  projectKey: "<project-key>",
  ingestPoint: "<domain>/ingest",
});
tracker.start();

function App() {
  const [count, setCount] = useState(0);
  const increment = () => {
    if (count % 5 === 0 && count !== 0) {
      throw 'Custom error triggered, count a multiple of 5';
    }
    setCount((prevState) => (prevState += 1));
  };
  const decrement = () => setCount((prevState) => (prevState -= 1));
  const handleServerError = () => {
    const headers = {
      Accept: 'application/json',
      'Content-Type': 'application/json',
    };
    if (tracker && tracker.getSessionToken()) {
      headers['X-Session-Id'] = tracker.getSessionToken(); // Inject openreplay_session_id
    }
    fetch('<backend-url>', {
      method: 'GET',
      headers,
    })
      .then((res) => res.json())
      .then((data) => console.log(data))
      .catch((error) => {
        console.log(error);
        throw 'Custom error triggered, server error';
      });
  };
  return (
    <div className="App">
      <header className="App-header">
        <img src={logo} className="App-logo" alt="logo" />
        <p>
          Edit <code>src/App.js</code> and save to reload.
        </p>
      </header>
      <div className="counter">
        <button className="btn" type="button" onClick={() => decrement()}>
          -
        </button>
        <p className="count">{count}</p>
        <button className="btn" type="button" onClick={() => increment()}>
          +
        </button>
      </div>
      <button className="btn" type="button" onClick={() => handleServerError()}>
        Handle Server Error
      </button>
    </div>
  );
}
export default App;
We’ve created a function called trackServerError that makes a request to the backend. To track errors that might arise from this request a custom header has been added
if (tracker && tracker.getSessionToken()) {
  headers['X-Session-Id'] = tracker.getSessionToken();
}
This header gets the current session token so it can be used to identify the session that triggered this error.
The last step is to extract the openReplaySessionToken from the header and add it to your Sentry scope (ideally using a middleware or decorator) in your backend. The method to do this depends on the programming language of your backend, you can consult the Sentry docs on how to configure scope. The snippet below shows how to configure a Sentry scope if your backend is built with node.js/express
app.use(function (req, _, next) {
  const orSessionToken = req.get('X-OpenReplay-SessionToken');
  if (orSessionToken) {
    Sentry.setTag("openReplaySessionToken", orSessionToken);
  }
  next();
})
So when next time a backend error occurs Sentry will collect the details of the error and send to OpenReplay. This way you never have to leave OpenReplay dashboard and can view all errors from backend and frontend on the OpenReplay dashboard.
Conclusion
The ability to replay the activities taken by your users that lead to unexpected consequences is a tool that every developer should add to their arsenal. In this article, I’ve shown how to set up OpenReplay and Sentry to replay events on the frontend and see errors from the backend.
OpenReplay also has an amazing Slack community that you can consult if you run into any errors.