
Introduction to Simple-Peer: A WebRTC Library

WebRTC (Web Real-Time Communication) is an open-source endeavor that allows for real-time communication (RTC) via user-friendly APIs on web browsers and mobile applications. It allows for direct peer-to-peer connection, facilitating audio and video communication within web pages, without the need for message relaying servers. Additionally, WebRTC is free to use.
Several JavaScript APIs are part of WebRTC:
- getUserMedia - accesses the user’s microphone and camera
- RTCPeerConnection -permits peer-to-peer audio and video transmission.
- RTCDataChannel - enables for direct peer-to-peer data transfer
Applications like video conferencing, file sharing, and real-time messaging can be created with WebRTC. Most contemporary browsers support it, including Apple Safari, Mozilla Firefox, and Google Chrome.
Have you ever considered how to create a video conferencing app quickly and without stress? Use Simple-Peer at your convenience. A JavaScript library called Simple-Peer enables you to create peer-to-peer connections in a web browser. It establishes a connection between two or more browsers using WebRTC (Web Real-Time Communication), enabling direct data exchange without the involvement of a server.
Building applications for file sharing, real-time messaging, and video conferencing is simple using Simple-Peer. It offers methods for sending and receiving data together with a straightforward API for setting up and managing peer-to-peer connections.
Simple-Peer is a popular choice for developing [peer-to-peer](https://developer.mozilla.org/en-US/docs/Glossary/P2P#:~:text=P2P%20(Peer%2Dto%2Dpeer,privileges%20and%20share%20the%20workload.) programs in the browser because it is small and straightforward to use, and we’ll be building a video chat application with it later in this article. It frequently works with other frameworks or packages, such as WebSockets or React.
Why use Simple-Peer?
If you’re developing a browser-based peer-to-peer application and looking for a compact, user-friendly solution, you might want to consider using Simple-Peer. It is made explicitly for developing peer-to-peer apps in the browser. If you’re seeking a quick and effective method of transferring data directly between peers, Simple-Peer is another excellent option. The direct peer-to-peer links it creates allow for data’s speedy and effective movement.
Here’s a brief overview of how Simple-Peer works:
- One of the peers develops an offer using the RTCPeerConnection API, outlining the different media and data types it can exchange.
- The other peer receives the offer using a signaling server, which is used to communicate the metadata required to create the connection. Any approach, including WebSockets or HTTP, can be used to implement the signaling server.
- The other peer accepts the offer and uses the RTCPeerConnection API to construct a response. The answer explains the different media and data kinds it can interchange.
- The response is relayed to the initial peer using the signaling server.
- After exchanging offers and answers, the two peers can connect and exchange media and data directly.
Companies utilizing Simple-Peer
Several companies are utilizing Simple-Peer around the world, and for me, one of its main cool reason is that it’s super easy to implement. Below is the list of companies utilizing Simple-Peer:
- RTCCat
- PeerNet
- PusherTC
- lxjs-chat
- Whiteboard
- Whiteboard
- TalktoMe
- CDNBye
- Detox
- WebCat
- oorja.io
- Peer Ca
- Netsix
- Metastream
- Zencastr
- TalktoMe
- CDNBye
- Stealth
Benefits
- Simple API: Simple-Peer offers an easy-to-use and user-friendly API that makes it simple and quick to get started developing peer-to-peer apps.
- Lightweight: Because Simple-Peer is a lightweight library, your application won’t be burdened by much extra overhead. If you’re developing a real-time application that must be effective, this can be very crucial.
- browsers support: The majority of contemporary browsers, including Apple Safari, Mozilla Firefox, and Google Chrome, as well as portable electronic devices, support Simple-Peer.
Drawbacks of Simple-Peer
- Limited browser support: Most current browsers, but not all, support WebRTC, which Simple-Peer uses to create peer-to-peer connections. As a result, Simple-Peer might not function properly on older browsers.
- Complexity: Even though Simple-Peer provides a simple API, creating peer-to-peer apps can be challenging. It might call for a solid grasp of WebRTC and additional technologies, like signaling servers and NAT traversal.
- Security: Since Simple-Peer connections are not encrypted by default, it is crucial to ensure that any sensitive data exchanged over them is protected.
Getting Started
In this section, we’ll learn more about Simple-Peer. We’ll review some of the previously mentioned fundamental events and how to install and configure Simple-Peer.
Installations
In this section, I’ll go over numerous different implementations for Simple-Peer. It is not difficult to put this into action. Simple-Peer can be installed with npm or yarn.
    npm install simple-peer

    yarn add simple-peer
You can then include Simple-Peer in your project by importing it:
ES6 Import
import SimplePeer from 'simple-peer';Node js:
const SimplePeer = require("simple-peer")For the sake of this article, Simple-Peer will be used in projects involving Standard HTML, CSS, and JavaScript. Please enter the node modules folder and copy the simple-peer folder out of it once you have finished installing simple-peer in the project folder with node.js. Alternatively, you can simply navigate to the Simple-Peer inside the node modules folder by performing the following:
    <script src="/node_modules/simple-peer/simplepeer.min.js"></script>
    const p = new SimplePeer({
          initiator: location.hash === '#1',
          trickle: false
    })
Before learning how to use Simple-Peer to construct a video-conferencing application, let’s first discuss using JavaScript to access media devices.
Accessing Media Devices (Video & Voice)
In JavaScript, you may utilize the navigator to access media devices such as cameras and microphones. API for mediaDevices. This API is supported by current browsers and allows you to get a list of media devices connected to the device and access the stream of media data produced by the devices.
Here’s an example of how the navigator can be used. To obtain a list of the media devices that are attached to the device, use the mediaDevices API:
    navigator.mediaDevices.enumerateDevices().then(function (devices) {
      devices.forEach(function (device) {
        console.log(device.kind + ": " + device.label + " id = " + device.deviceId);
      });
    });
Output:
This will return a list of the media devices connected to the device, with each item in the list providing information about the device, such as its category and unique device ID. Please keep in mind that your computer may interpret this differently, and both the output and the ID may be different.
The getUserMedia() method of the navigator.mediaDevices object can be used to obtain the stream of media data produced by a specific device. This function accepts a constraint object that specifies which media devices to access and what type of media data to obtain from them. Here is an example of how you can use the **getUserMedia()** method to get a video stream from the device’s front-facing camera:
    navigator.mediaDevices.getUserMedia({
      audio: false,
      video: { facingMode: "user" }
    }).then(function(stream) {
    });
This will request the user for permission to view the camera. If the user accepts permission, it will return a stream object that you can use to display the video stream on a website using a video element.
Understanding Events in Simple-Peer:
To use Simple-Peer successfully, you must first grasp the basic events. These events are relatively easy to use. Let’s work on this together.
Peer.on
The Peer class provides an on method to register event listeners for various events that can occur during a WebRTC connection. These events include receiving data from the peer, connecting to the peer, and detaching from the peer. Here’s an example of how to use the ‘on’ method to register an event listener for the “connect” event, which is produced when a WebRTC connection is formed with a peer:
    const peer = new SimplePeer({ ... })

    peer.on('connect', () => {
      console.log('Connected to peer!')
    })
You may also use the on method to register event listeners for other events like ‘data,’ ‘close,’ and ‘error’. For instance:
    peer.on('data', (data) => {
      console.log('Received files and, messages from peer:', data)
    })

    peer.on('close', () => {
      console.log('Connection with peer closed :(')
    })

     peer.on("error", (err) => console.log("error", err));
Peer.signal
The ‘Peer’ class provides a signal function that is used to convey signaling data to the peer. Signaling is the mechanism by which two peers create a WebRTC connection. It entails transferring information such as network addresses and device capabilities across a signaling channel, which is commonly accomplished using a server-based signaling protocol.
The signal function is used to transmit signaling data to the peer, which can be used to negotiate WebRTC connection settings such as the type of codecs to use and connection configuration. The signaling data is often a string or a JSON object and is supplied as an argument to the ‘signal’ method. Here’s an example of how to transmit signaling data to a peer using the ‘signal’ method:
    const peer = new SimplePeer({ ... })

    peer.signal(data)
The signal method, in conjunction with the on method, can be used to register event listeners for various events that may occur throughout the signaling process. You can utilize the ‘signal’ event to get signaling data from the peer:
    peer.on('signal', (data) => {
      console.log('Hey! gotten signal data', data)
    })
Peer.send
The ‘Peer’ class includes a send function for sending data to the peer via the WebRTC connection. The ‘send’ method only accepts one argument: the data to be sent to the peer. This information can take the form of a string, an array buffer, or a typed array. Here’s an example of using the send method to transmit a string to a peer:
    const peer = new SimplePeer({ ... })

    peer.on('connect', () => {
      peer.send('Hello, World!')
    })
You can also send an array buffer or a typed array using the send method:
    const arrayBuffer = new ArrayBuffer(10)
    peer.send(arrayBuffer)

    const typedArray = new Uint8Array(10)
    peer.send(typedArray)
Keep in mind that the send method may only be used after the WebRTC connection with the peer has been established. The Peer instance’s ‘connect’ event can be used to identify when the connection is ready to deliver data.
Peer.addStream
The addStream function of the ‘Peer’ class is used in ‘simple-peer’ to add a media stream to the peer connection. This can be used to communicate audio and video data to the peer using WebRTC.
Here’s how to use the addStream method to add a media stream to a ‘Peer’ instance:
    const peer = new SimplePeer({ ... })

    navigator.mediaDevices.getUserMedia({
      audio: true,
      video: true
    }).then((stream) => {
      peer.addStream(stream)
    })
This will obtain a media stream from the user’s device containing audio and video data and add it to the peer connection. The stream’s media data will subsequently be transmitted to the peer over the WebRTC connection. To receive media data on the other end of the connection, you must also use the ‘addStream’ method on the peer’s end to add the stream to the peer connection.
Peer.removeStream
The SimplePeer library’s peer.removeStream method removes a stream from a peer connection. It accepts a stream as an argument and deletes it from the list of streams sent via the peer connection. This is handy if you wish to cease sending a stream to the peer or replace it with another stream. Here’s an example of how peer.removeStream might be used:
    //Add a stream
    peer.addStream(stream);

    //Remove stream
    peer.removeStream(stream);
Consider that ‘peer.removeStream’ will only delete the stream from the local peer connection. You must also remove the stream from the remote end to prevent the peer from receiving the stream.
Peer.removeTrack
The Peer.removeTrack method in the Simple-Peer library allows a user to remove a track from a peer connection. This function accepts a MediaStreamTrack object as input and removes it from the peer connection. This can be beneficial if a user wishes to delete a specific audio or video track from the peer connection or if they want to cease sharing a track entirely. To utilize this function, the user must first establish a peer connection using the Simple-Peer library and then call the peer.removeTrack method with the relevant MediaStreamTrack object as an argument.
Peer.destroy
The method peer.destroy of the simple-peer library destroys a peer connection, and it kills the connection and releases any resources associated with it when called.
Here’s an example of how to use peer.destroy:
    const simplePeer = require('simple-peer')

    const peer = new simplePeer({
      initiator: location.hash === "#1",
      trickle: false
    })

    // establish a connection...
    // .....
    // cLOSE PEER .....
    peer.destroy()
The connection will be terminated, and any resources connected with the ‘peer’ object will be released.
Peer.WEBRTC_SUPPORT
The Peer.WEBRTC_SUPPORT is a property of the ‘simple-peer’ library that shows whether or not WebRTC is supported in the current context. It is a Boolean value that is true if WebRTC is supported and false if it is not. Here’s an example of how Peer.WEBRTC SUPPORT can be used:
    if (simplePeer.WEBRTC_SUPPORT) {
      console.log('WebRTC is supported in this browser')
    } else {
      console.log('WebRTC is not supported in this browser')
    }
Before attempting to use WebRTC, this helps determine whether it is supported.
Session Replay for Developers
Uncover frustrations, understand bugs and fix slowdowns like never before with OpenReplay — an open-source session replay tool for developers. Self-host it in minutes, and have complete control over your customer data. Check our GitHub repo and join the thousands of developers in our community.
Catching Errors in Simple-Peer:
In this section, we’ll go through the well-known error status presented in the console if errors occur while using simple-peer.
I recommend understanding error handling before using Simple-Peer to build a project so you can simply detect and correct errors.
ERR_CREATE_OFFER
The ERR_CREATE_OFFER is an error that can occur while connecting using simple-peer. It means there was a mistake when creating the offer, which is the initial message in the connection handshake. This error can occur for a number of reasons, including a problem with the user’s webcam or microphone or because the user’s browser does not support WebRTC. To troubleshoot this problem, take the following steps:
- Ensure the user’s webcam and microphone are correctly configured and operational.
- Verify that the user’s browser supports WebRTC.
- Confirm that the user has granted the program permission to use their webcam and microphone.
- Review the documentation for ‘simple-peer’ for any known issues or workarounds.
If none of these procedures resolve the problem, you may need to debug it further by inspecting the error message and any relevant logs.
ERR_WEBRTC_SUPPORT
When there is an issue with WebRTC support, the simple-peer library may produce the error ‘ERR WEBRTC SUPPORT’. Since Simple-Peer uses WebRTC to establish peer-to-peer connections, the browser must support WebRTC for it to function correctly. If the browser does not support WebRTC, the ‘ERR WEBRTC SUPPORT’ error will be emitted. Check for the existence of the RTCPeerConnection constructor to see if the browser supports WebRTC:
    if (window.RTCPeerConnection) {
      console.log('WebRTC is supported')
    } else {
      console.log('WebRTC is not supported')
    }
If your browser does not support WebRTC, you must use another means to achieve real-time communication (such as a library that uses WebSockets instead of WebRTC).
ERR_CREATE_ANSWER
The error ‘ERR_CREATE_ANSWER can occur while using the ‘simple-peer’ library to create a WebRTC connection. It shows that there was a mistake in generating the response to a remote peer’s offer during the connection negotiation procedure. This error can occur for several reasons, including the closure of the RTCPeerConnection object or a problem with the local network. Add an error event listener to your ‘SimplePeer’ object to handle this error:
    peer.on('error', (err) => {
      console.error(err)
    })
Then, look for the ERR_CREATE_ANSWER error and take appropriate action, such as attempting to rebuild the connection or informing the user of the mistake.
    peer.on('error', (err) => {
      if (err.code === 'ERR_CREATE_ANSWER') {
        // Handle the error
      }
    })
ERR_ICE_CONNECTION_FAILURE
The ERR_ICE_CONNECTION FAILURE is a possible issue that could occur when attempting to establish a WebRTC connection with the simple-peer library. The connection failed due to a failure in the Interactive Connectivity Establishment (ICE) protocol, which is used to establish a direct connection between two peers.
Many things could have contributed to this error, including:
- A firewall or network configuration obstructed the connection.
- The connectivity of one of the peers was lost.
To troubleshoot this problem, you can try the following steps:
- Examine the network connectivity of both peers.
- Check that the firewall or network configuration does not block WebRTC traffic.
ERR_SIGNALING
The error ERR_SIGNALING can arise when using the Simpleeer library. It shows a problem with the signaling data needed to connect two peers. The signaling data is exchanged between peers via the “signal” event. The link may not be made if there is an error in this data. This mistake could be caused by several factors, including:
- The signaling data was not properly formed.
- The other peer did not receive the signaling data.
To troubleshoot this problem, ensure the signaling data is successfully transferred between the peers.
ERR_DATA_CHANNEL
ERR_DATA_CHANNEL is an error message issued by SimplePeer when a data channel is created incorrectly. A data channel allows two SimplePeer objects to communicate with one another through a WebRTC connection. This error can occur due to a variety of factors, such as a lack of a peer connection or a closed data channel. To handle this error, listen for the “error” event on your SimplePeer object and look for the ERR_DATA_CHANNEL error message.
    peer.on('error', (err) => {
      if (err.message === 'ERR_DATA_CHANNEL') {
        console.error('Error creating data channel')
      }
    })
ERR_CONNECTION_FAILURE
The error code ‘ERR_CONNECTION_FAILURE’ may arise when using ‘simple-peer,’ which suggests that the connection between two peers could not be established. This error may be attributed to various factors, such as:
- The signaling data between the two peers were not appropriately transferred.
- One of the peers utilizes an out-of-date version of the simple-peer library.
- A network problem is preventing the connection from being established.
You can attempt the following actions to troubleshoot this error:
- Verify that the signaling data is being transferred successfully between the two peers. You may confirm this by logging the signaling data on both sides and comparing it to ensure it is identical.
- Make sure both peers use the same version of the ‘simple-peer’ library.
- Examine the network for any problems that may be preventing the connection from being established. This could involve problems with firewall settings, network routers, or other networking equipment.
If these methods do not help you address the mistake, you may need to look into the root cause of the problem. This may entail analyzing the code for errors, inspecting the signaling data for problems, or debugging the network connection.
How to Create a Video Chat Application Using Simple-Peer
In this section, we’ll illustrate how to make a basic video chat application using Simple-Peer. We’ll create a connection between two users in this section. This configuration is fairly straightforward, and we have covered most Simple-Peer-related events in this article. Now it’s time to develop a chat application using the knowledge we’ve gained in this article.
We’ll go over the following code, which is easy to use and understand:
    <html>
      <head>
        <style>
          #outgoing {
            width: 600px;
            word-wrap: break-word;
            white-space: normal;
          }
        </style>
      </head>

      <body>
        <form>
          <textarea id="incoming"></textarea>
          <button type="submit">submit</button>
        </form>
        <pre id="outgoing"></pre>
        <video src="" id="video"></video>
        <script src="/simple-peer/simplepeer.min.js"></script>
        <script>
          // This allows you to determine whether the microphone and camera are ready for use.
          navigator.mediaDevices.enumerateDevices().then(function (devices) {
            devices.forEach(function (device) {
              console.log(
                device.kind + ": " + device.label + " id = " + device.deviceId
              );
            });
          });

          navigator.mediaDevices
            .getUserMedia({
              video: false,
              audio: true,
            })
            .then((stream) => {
              const p = new SimplePeer({
                initiator: location.hash === "#1",
                trickle: false,
                stream,
              });
              p.on("error", (err) => console.log("error", err));
              p.on("signal", (data) => {
                console.log("SIGNAL", JSON.stringify(data));
                document.querySelector("#outgoing").textContent =
                  JSON.stringify(data);
              });
              document.querySelector("form").addEventListener("submit", (ev) => {
                ev.preventDefault();
                p.signal(JSON.parse(document.querySelector("#incoming").value));
              });
              p.on("connect", () => {
                console.log("CONNECT");
                p.send("whatever" + Math.random()); // Or Files
              });
              p.on("data", (data) => {
                console.log("data: " + data);
              });
              p.on("stream", function (stream) {
                let video = document.getElementById("video");
                video.srcObject = stream;
                video.play();
              });
            })
            .catch((error) => {
              console.log(error);
            });
        </script>
      </body>
    </html>
An incoming ID, a form, and a video element are all present in the previous HTML code section. When we press the submit button, offers and answers produced by simple-peer will be manually transferred into the form’s textarea. To implement this in a real-world app, you should use socket.io or pusher. However, I had to use the HTML form and textarea to carry out this data transmission to learn and complete this tutorial.
The JavaScript section above includes the code used to create a video chat application. First, we’ll use navigator.mediaDevices.getUserMedia to access the user’s camera:
    navigator.mediaDevices
      .getUserMedia({
        video: {
          facingMode: true,
        },
        audio: true,
      })
      .then((stream) => {
        // Simple Peer code goes in here
      })
      .catch((error) => {
        console.log(error);
      });
The code above allows us to access the user media detailed earlier in this article. To establish the stream after both browsers connect, we simply use ‘p.on(“stream”’):
    p.on("stream", function (stream) {
      let video = document.getElementById("video");
      video.srcObject = stream;
      video.play();
    });
The function is added as a second parameter to peer.on, and it returns the live stream that will be displayed on both users’ devices.
You can send messages, photos, PDFs, movies, and any other type of material with peer.send:
    p.on("connect", () => {
      p.send("whatever" + Math.random()); // Or Files
    });
Now that we’ve got the gist of the simple-peer code we pasted earlier in this section, here’s what happens when you run it on a live server.
Please be aware that you are free to use any method to run it.
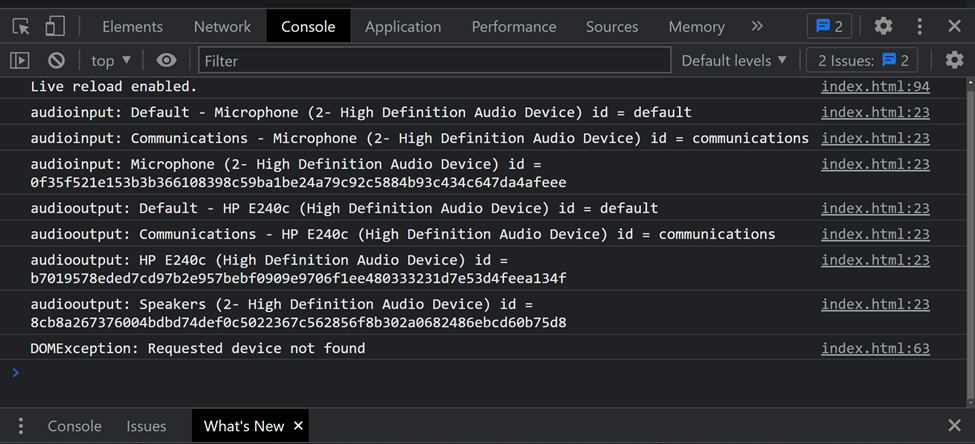
If you can’t discover the JSON data printed on your screen, ensure your camera and microphone are properly connected and installed. Run the code below to see if your computer’s camera and microphone are ready to use.
// This allows you to determine whether the microphone and camera are ready for use.
navigator.mediaDevices.enumerateDevices().then(function (devices) {
devices.forEach(function (device) {
console.log(device.kind + ": " + device.label + " id = " + device.deviceId);
});
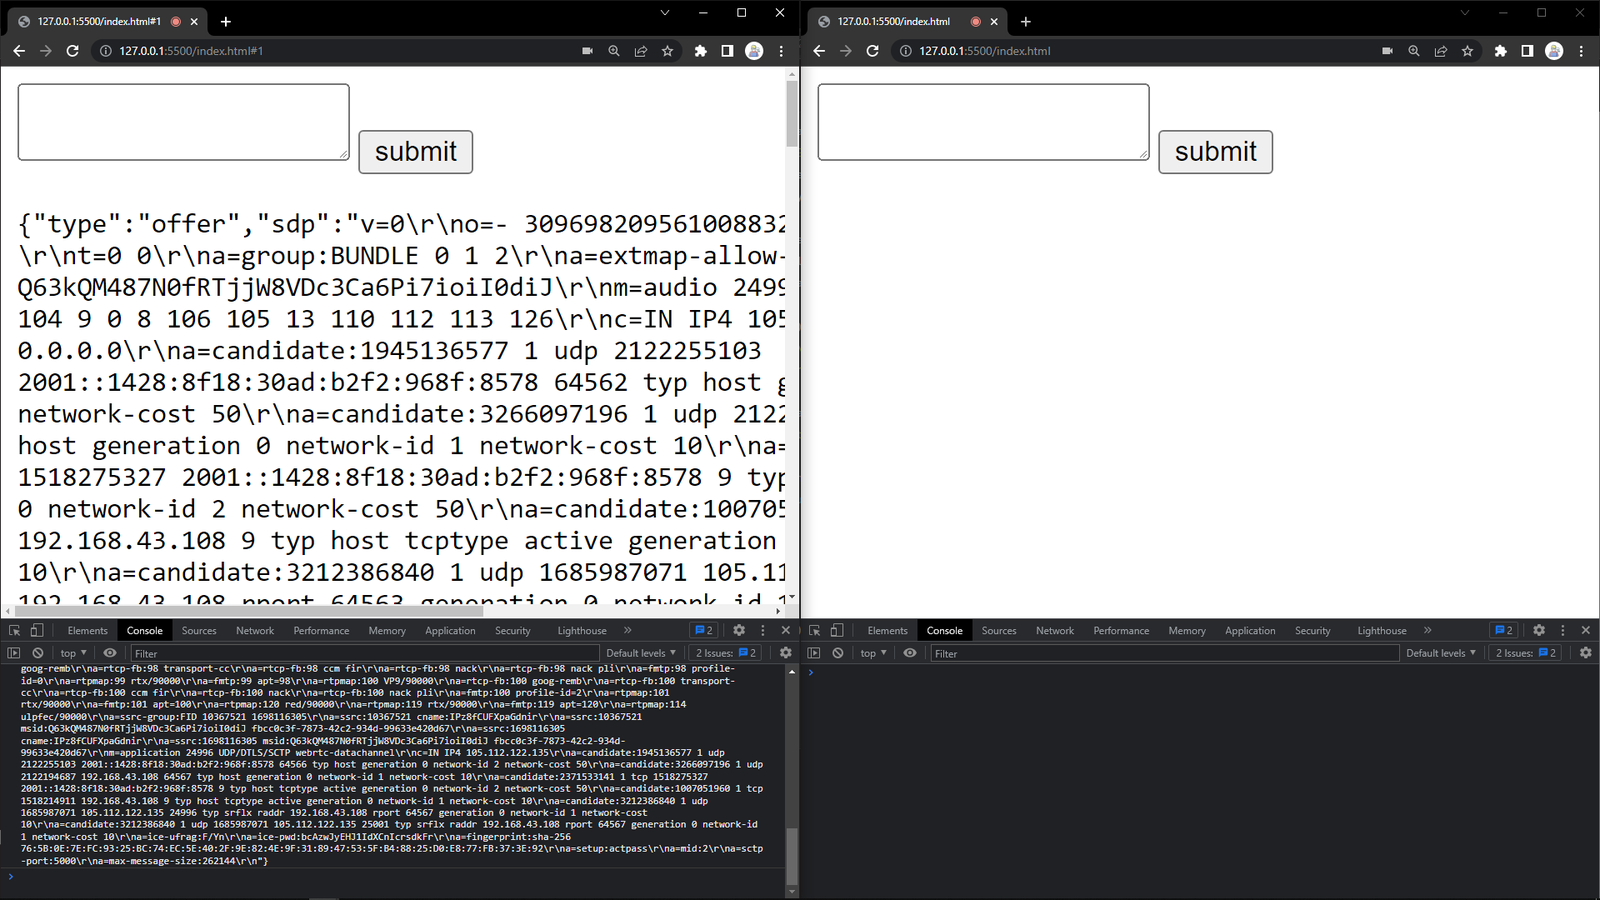
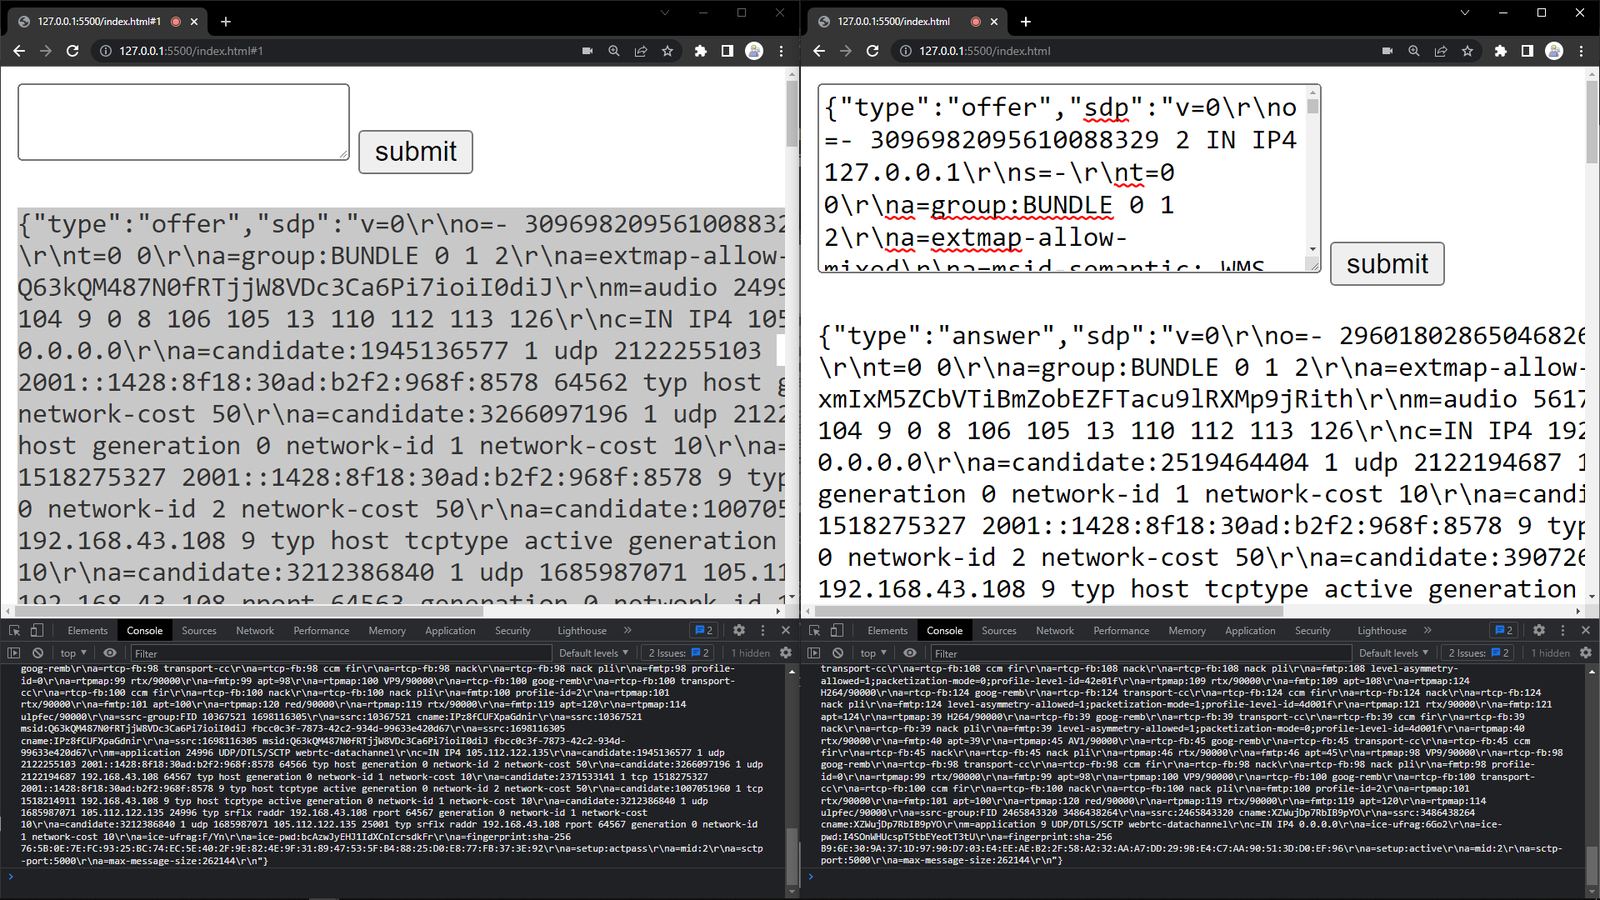
});As you can see from the above browser screenshot output, I spit out two browsers, allowing us to operate easily and test the peer’s connectivity. The left browser will be the video caller who will create an offer, and the right browser will be the receiver who will answer the video call. As you can see in the result above, the left browser will be producing an offer. To instruct the left browser to make the offer, I simply appended a hash (#1) to the end of the URL in the left browser — for instance, http://127.0.0.1:5500/index.html#1

Please be aware that the port number was generated by a live server.
Because the SimplePeer constructor expects an initiator, I just used the “location.hash” window’s property to check whether it matches #1.
    const p = new SimplePeer({
      initiator: location.hash === "#1",
    });
It’s time to send the offer you’re working on to the other right browser. Simply copy the offer that is being generated on the first browser (initiator) and paste it into the textarea that appears on the right browser (receiver) :
Please click the submit button after pasting the id into the textarea so that the second browser can easily answer to the offer.
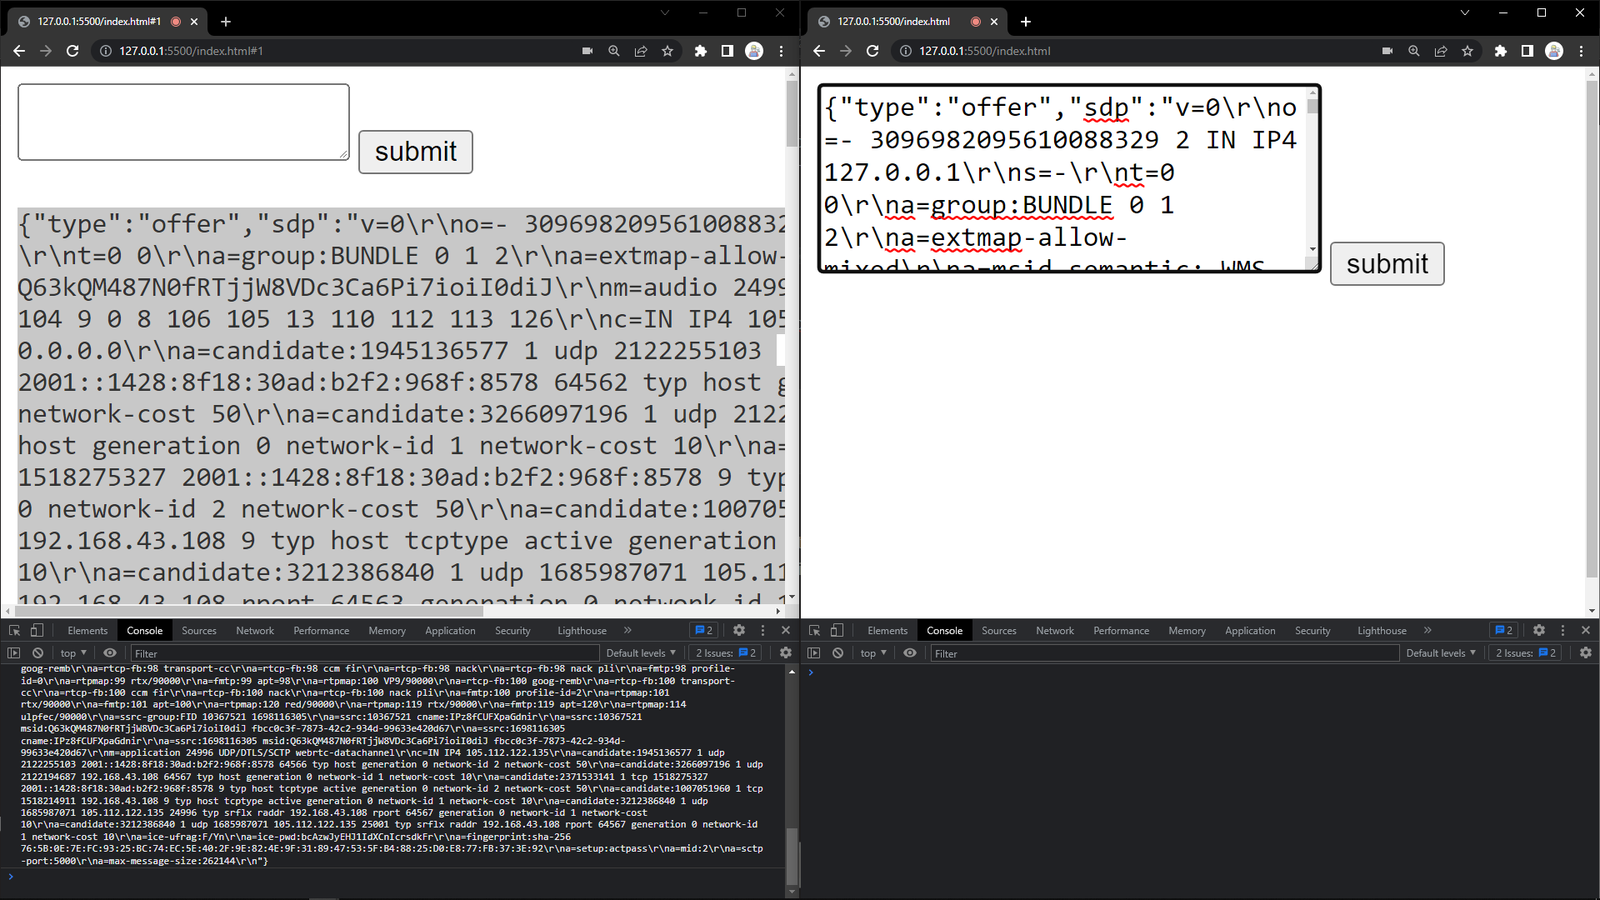
After clicking the submit button, you ought to see the following output:
When we click the submit button, an ID with the type answer is generated, as shown in the result above.
Please remember that the second URL browser lacks any hash, such as ‘#1’.
It’s time to inform the first left browser (the initiator) that the second browser has accepted its offer. Copy and paste the response ID generated by the second browser into the first browser:
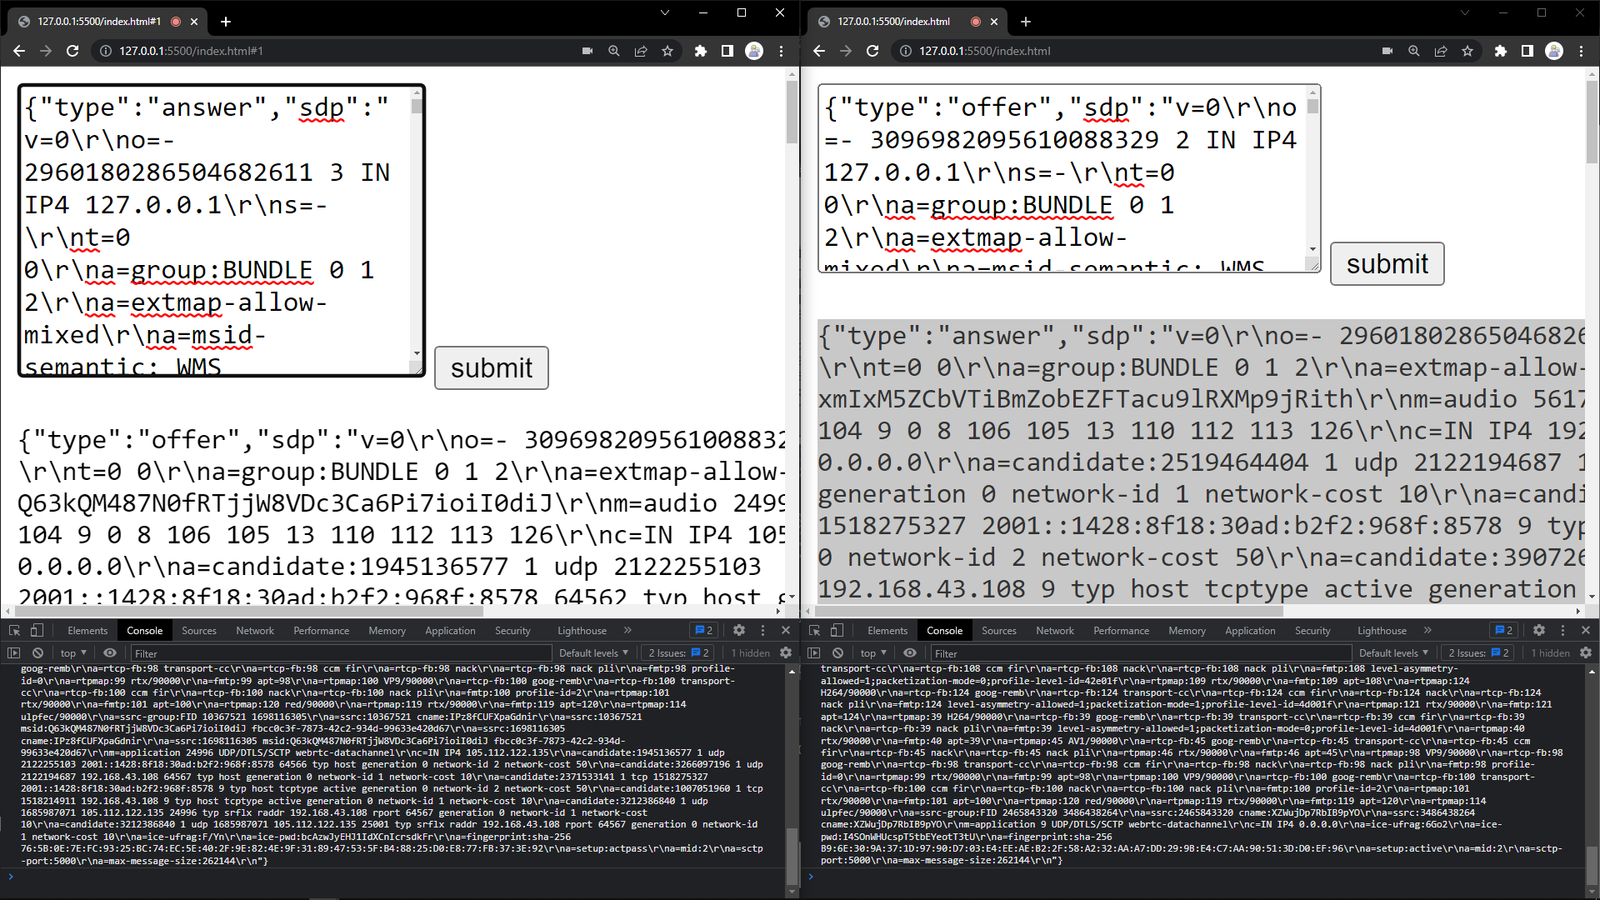
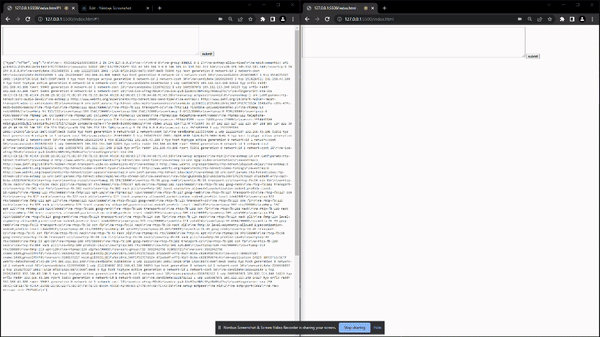
I pasted the answer ID generated from the second browser (receiver) to the first browser from the output above. Click the submit button on the left caller browser to start the video call. After you click the submit button, the video stream will begin sharing on two different browsers, which will appear at the bottom of your browser page:
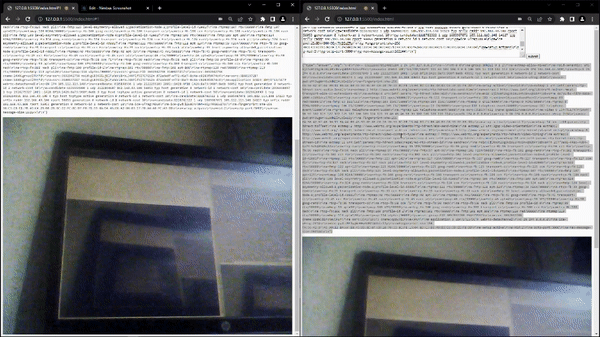
That’s OK if you followed the guidelines above to archive the output above, and it worked perfectly. You can still watch the video below to discover how I manually established the connection to obtain the live video broadcasting.
Please note that while testing the video application, I pointed my PC’s external camera at my monitor. Additionally, you may ensure that you test this properly on your end.
You can click here to view the GitHub repository of the video chat application.
Conclusion
I hope you found this article informative. It provides a comprehensive guide to help you start using SimplePeer, including how to install it. Additionally, we discussed the significance of handling errors in SimplePeer, which is a critical aspect of SimplePeer. The video chat application featured in this article can be used as a useful guide for developing more intricate video chat applications for your project.
Gain Debugging Superpowers
Unleash the power of session replay to reproduce bugs and track user frustrations. Get complete visibility into your frontend with OpenReplay, the most advanced open-source session replay tool for developers.
