Introduction to Tonic - the component framework
Produce beautiful user interfaces very quickly with the Tonic framework

Front end development changes frequently as frameworks spring up rapidly. Tonic is a front end framework that emerged in the last two years and is great for developing JamStack sites due to its small file size (5KB), making a good choice for websites with great load time. Using libraries to build high-performing web applications has become vitally important, front end frameworks and libraries have become an important aspect of web development.
In this article, we’ll discuss Tonic, a component-based framework that allows front end developers to create incredibly quick and beautiful user interfaces, as well as its properties, capabilities, use cases and its advantages over other component-based frameworks for building JAMstack sites. At the end of this article, readers will have an understanding of what Tonic is, how to use it when styling user interfaces, and also for handling events. This will enable them to build UI components without the use of any additional build tool or complexity. Also, we’ll demo a sample Tonic project on building our first functional component Tonic component.
What is Tonic?
Tonic is a stable and minimal component-based framework that enables front end developers to build blazing-fast JAMstack sites with amazing UI. It is a server-side rendering by default, it also uses event delegation by default and doesn’t require any build tool. It is a framework that enables you to write async web components.
Tonic leverages CSS variables to theme components which allow developers to use any CSS framework of their choice. This makes Tonic a design system(for building UI) and a web component framework. It has good examples of components built with Tonic in a separate repo available for use.
Prerequisites
You do not need to have any previous knowledge on Tonic before this article, however, it’s a plus if you are familiar with any component-based framework. You’ll need to be familiar with:
- Basic JavaScript because Tonic is a JavaScript framework
- Basic HTML and CSS.
Getting started with Tonic
To use Tonic, you have to import it:
import Tonic from '@socketsupply/tonic'Creating components in Tonic is similar to writing components in other component-based frameworks like React and Vue. To build a component in Tonic, you have to create a class or function. The class must have one method(at least) called render which returns a template literal of HTML.
class MyGreeting extends Tonic {
  render() {
    return this.html`
      <h1>Hello World</h1>
    `;
  }
}
After creating a component, we need to add the component to Tonic.
Tonic.add(MyGreeting)Next, you need to add your JavaScript file to your HTML.
<html>
  <body>
    <my-greeting> </my-greeting>
    <script src=”app.js”></script>
  </body>
</html>
Once you have successfully added your JavaScript file to your HTML, then you can use your component anywhere. Please note that custom tags (like my-greeting) require a closing tag even if they have no children.
Properties
If you have used other component-based frameworks like React, you should be familiar with props. Props are properties passed from one component to other components via HTML attributes. Props are passed to the component in the same way arguments are passed to a function.
When you add properties to a component, they appear on this.props object. Tonic uses this.html to pass complex values to a component.
The .reRender() method is used to manually update a component’s property, this method takes either a function or an object as an argument. The reRender method can also be called directly on a component.
this.reRender((props) => ({
  ...props,
  name: "John",
}));
Why Tonic?
There’re many advantages in using Tonic for your JAMstack applications over other popular frameworks like React and Vue.js.
A key reason why Tonic is ideal for building JAMstack sites is because of its size. It is only 5KB with 350 lines of code which makes your web application load faster. Tonic also doesn’t require any dependencies, build tool or rendering engine installed on the server-side.
Also, your component names can be viewed in the browser’s DOM of your website which makes it easy to debug production code. You also get the same developer experience as from other modern component-based frameworks.
UI styling in Tonic
Tonic is a framework that allows front end developers to create incredibly quick and beautiful user interfaces, it supports multiple approaches for styling components. We’ll go through the three approaches in styling Tonic components:
Inline styling
Just like adding CSS inside your HTML, we can add inline styles to any Tonic component we want to render. Tonic provides the styles() method that helps you safely inject inline styles to an HTML element.
class MyStyle extends Tonic {
  styles() {
    return {
      a: {
        color: blue,
        fontSize: "30px",
      },
    };
  }
  render() {
    return this
      .html`<p styles="a">${this.children}</p>`;
  }
}
Dynamic stylesheet
We use the stylesheet() method to add a dynamic stylesheet to our component. This way we can change an element dynamically in response to user events.
class MyStyle extends Tonic {
  stylesheet() {
    return `
          my-style p {
            color: ${this.props.color};
          }
        `;
  }
  render() {
    return this.html`<p></p>`;
  }
}
Then in our HTML file:
<my-style color=”blue”>Hello World!<my-style>Static styling
The static stylesheet() method is used to add a stylesheet to the document only once. The style is fixed and doesn’t change while the application is running, they are not dynamically generated.
class MyStyle extends Tonic {
  static stylesheet() {
    return `
          my-style p {
            color: red;
          }  `;
  }
  render() {
    return this.html`<p></p>`;
  }
}
Open Source Session Replay
OpenReplay is an open-source, session replay suite that lets you see what users do on your web app, helping you troubleshoot issues faster. OpenReplay is self-hosted for full control over your data.

Start enjoying your debugging experience - start using OpenReplay for free.
Tonic’s component state
A component can be one of two types. It can be either a function component or a class component.
this.state is a plain-old javascript object whose value is persisted if the component is re-rendered. The state is a built-in object used to store data of the component that is to be rendered. Any component that uses state must have an id property.
Creating your first component
Now let’s build a simple functional Tonic component. This project will be created in code pen. In this project, we will create a button that generates a random number from 1 to 10 whenever we click the button. This short demo will also introduce you to event handling and methods in Tonic. First, we need to import Tonic, let’s add the following code in the JavaScript file:
import Tonic from "https://cdn.skypack.dev/@socketsupply/tonic"Once we have successfully imported Tonic, then we can go ahead to create our first Tonic component.
In Tonic, web components require a name with two or more parts. So your class or function name should be CamelCased (starting with an uppercase letter). For example, RandomNumber becomes <random-number></random-number>.
class RandomNumber extends Tonic {
  constructor() {
    super();
    this.state.counter = 0;
  }

  click(e) {
    const trigger = Tonic.match(
      e.target,
      "button"
    );
    this.state.counter = Math.round(
      Math.random() * 10
    );
    this.reRender();
  }

  render() {
    return this.html`<p>Random Number ${
      this.props.name
    }: <button>${this.state.counter.toString()}</p>`;
  }
}

Tonic.add(RandomNumber);
The state object is initialised in the constructor. The constructor is a special method that is called once each time an instance of our component is created. Then we create and set the counter variable to zero.
The click event as you might have known is used to listen for clicks on the component. This is because we want the random number to be generated only when the button is clicked.
Tonic prefers the event delegation pattern to attach a single event listener rather than using multiple event listeners. Each event handler method will receive an event object that contains a target property, to target the exact element that was clicked. An event handler can be attached in any component.
Just like in React, we need a render function on the class that returns the inherited function this.html. This render function accepts a template literal containing the HTML element to be rendered. It can also render dynamic values. For example, name is a property of the component *<random-number>* with the value of the name set to "generator", it is accessed with this.props.name.
Lastly in our JavaScript file, we need to register our component with Tonic using Tonic.add() method.
Now we need to add our created component as an HTML element in our HTML file after we have linked our JavaScript file in our HTML. We added an id because as stated earlier, any component that uses state must have one.
<body>
  <random-number name="Generator" id="count"></random-number>
  <script src="index.js"></script>
</body>
That’s it. We have created our first functional Tonic component.
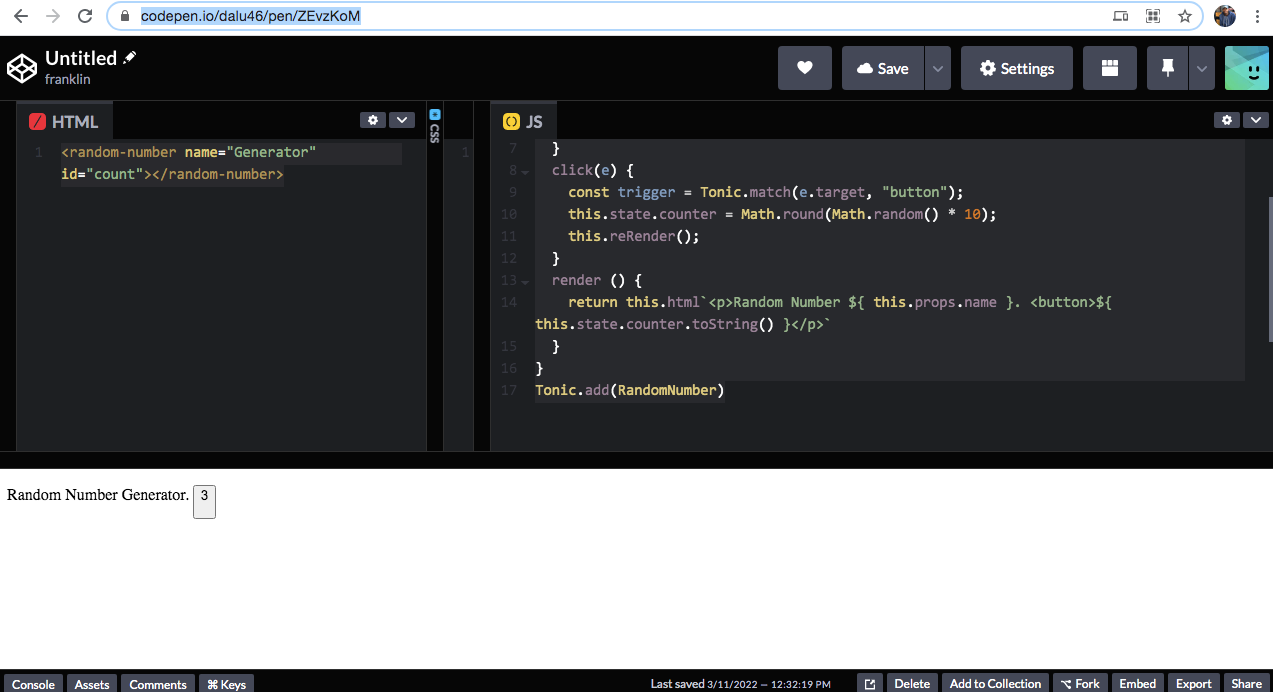
Here’s a link to the code-pen to see exactly how it works: https://codepen.io/dalu46/pen/ZEvzKoM
Conclusion
We’ve just scratched the surface of Tonic learning about its properties, event handling, component and a few others. Tonic offers the same developer experience as other component-based frameworks like React, the class approach is similar to writing class components in React. Smaller than other components in size, it makes your site load faster. Building your next static site, consider making use of Tonic to get a feel/experience of what building with it feels like.