

A mock refers to an object or component made to mimic another object’s behavior. Mocking is a fundamental aspect of unit testing used to simulate the behaviors of real functions and methods of external dependencies to create controlled environments for testing various parts of a software system, and this article will explain how to do this with Jest.

Discover how at OpenReplay.com.
A mock simulates the behavior of the real object. When mocking functions, we control the return values or customize the implementations of these functions. Understanding these controls is crucial to getting the concept behind mocking. Before we delve in deeply, I need you to take note of the following points: you should have previous use and knowledge of Jest and the React Testing Library (the tools that we’ll be using) and how to use assertions and matchers. I won’t be going through steps like installation of Jest and running of test scripts because I believe you should be familiar with those from your previous experience with Jest.
Why do We Control Return Values in Mock Functions?
Controlling return values enables us to create predictable test scenarios. With this, we can isolate the unit under test to ensure our code behaves as expected in different situations.
When we say we are isolating the unit under test, it means we are isolating the unit we are testing from external dependencies. This ensures that our test focuses only on the specific function we want to evaluate so that any errors are from the code rather than its dependencies.
These dependencies usually come in the form of modules and objects. Due to this fact, they have functions, components, methods, and properties.
Dependencies are a limitation to our testing environment, even though they are needed to make our code interactive. We mock these modules or objects and the specific functions, methods, or components we need from them. Picture an Axios get request as part of an asynchronous function. Axios is the dependency in this case. We mock the axios module and its get method.
This action of mocking dependencies keeps them within our immediate control and turns them into puppets of sorts, which makes them work seamlessly with the function of which they are a part.
Note: A “dependency” is an external resource, component, or module that a software component or system relies on to function correctly. Dependencies can take various forms, such as libraries, frameworks, databases, APIs, or other software components.
The Need for Mocks
Mocks are needed to observe how a function works without any external influences. This helps our all-around work in the future, such that when a problem arises after adding external dependencies, it will make our debugging process clearer.
Mocking functions or methods usually starts with mocking the module or object they are a part of. Below are some functions and methods we will mock when testing and why.
-
HTTP Request Methods: We Know that real server data can change over time, leading to inconsistent test results. Mocking
axios, a dependency, and its methods to send Hypertext Transfer Protocol (HTTP) requests or thewindow.fetchwhich sends the same request, ensures our test is on some consistent data. This makes it easier to fix issues in our code. -
Timers: we mock the
setTimeoutorsetIntervalfunctions during testing. This ensures our code behaves correctly under various time-related conditions. This also helps with faster test execution, preventing unnecessary delays. ThesetTimeoutandsetIntervalare methods of thewindowobject, but we mock them differently from otherwindowobject methods because Jest has its own timer mocks. -
Window Object Methods: When testing components or functions that interact with the browser’s
windowobject, a dependency in this case, it is important to isolate the code being tested from the actual browser environment. Mocking allows us to focus on the specific behavior of our code without relying on the real browser context. Also, different browsers may have different implementations ofwindowmethods. Mocking helps us ensure consistent behavior across different browser environments in our tests. -
React Components: Rendering React components can be slow and resource-intensive, especially in a large test suite. Mocking components allows for faster test execution because we are not rendering and managing actual React components. This makes it easier to test specific states or actions.
-
External Node Modules: A tool like Jest allows us to create mock implementations for external modules, making writing effective and reliable tests for our Node.js applications easier. Node modules can include various types of dependencies, such as libraries, frameworks, and utilities.
-
Callbacks: Callbacks often handle different scenarios, such as success, failure, or edge cases. Mocking them lets you simulate these scenarios easily to test how your code handles different outcomes.
Steps To Mocking
Whenever you want to mock functions or a module, there are certain things to do. The following steps will help you a great deal.
- Export the functions from the file or module.
- Import into the test file, with or without destructuring.
- Mock the module and the functions and methods.
- You can change the name of the mocked function. Not compulsory, though.
- Call the mock function to simulate execution. This calling of the mock function is usually achieved by calling the function of which the mock is a part.
- Make assertions.
The Three Core Methods
Mocking with Jest primarily involves three methods, namely, jest.fn, jest.mock and jest.spyOn. Most other methods are brought in to complement or solve the shortcomings and inadequacies of these methods. We will now have brief discussions of the three methods named above.
jest.fn
This method is used in Jest to create a mock function to replace real functions in our code during testing. With this, we can then assert whether the mock function was called with some specific arguments and the number of times it was called. This can be expressed as:
let mockFunc = jest.fn();Where mockFunc is the mock function created from jest.fn().
jest.mock
It is used to mock entire modules or dependencies, thereby replacing the actual implementation of the specified module with a mock or stub.
The jest.mock method takes one to three arguments(the second and third are optional).
First is a string of the path to the module that we want to mock.
jest.mock('path/to/module');The second is optional; it is a factory function normally written as an anonymous arrow function.
jest.mock('path/to/module', factory);The factory function returns an object that defines the mock functions of the mocked module’s exports. See the illustration below.
jest.mock("path/to/module", () => {
  return {
    moduleFunctionA: jest.fn(),
    moduleFunctionB: jest.fn(),
  };
});
It can also be written like below.
jest.mock("path/to/module", () => ({

    moduleFunctionA: jest.fn(),
    moduleFunctionB: jest.fn(),

}));
In the code above, moduleFunctionA & modulefunctionB, previously functions in the module we mocked, now have their mocks created in the factory function.
jest.spyOn
This is used to spy on methods of an object or modules in a function. The effect of this is that we can monitor function calls and gather information about them without replacing the original module or object implementation.
Jest creates a wrapper function around the function we are spying on. This wrapper function keeps track of when the function is called, how often it is called, and what arguments are passed to it. We can then use this information to verify that the function was called as expected in our tests.
To achieve this, we place a spy on the method through the object that it is bound or we place the spy on the function through the module in which it is defined. See the illustration below.
let spy = jest.spyOn(myModule, "myFunction");Or
let spy = jest.spyOn(myObject, "myMethod");Problems, Solutions, and Behaviors When Mocking With Jest
We have learned about the three basic mock methods. We will now be taking a look at some of the problems, solutions, and behaviors arising from the use of these methods. See them listed below.
- The undefined issue and custom implementation.
- Unintended interactions between tests.
- ECMAScript Modules (ESM) problems with
jest.mock. - The automock feature.
- The spy behavior.
- Cross-checking information about our mock function.
- Retaining some implementation.
We will now expound on them, look at the methods leading to them, and how to solve the problems arising to have effective mocks.
The Undefined Issue and Custom Implementation
We know that when we want to mock a function, we use the jest.fn method like below.
let mockFunc = jest.fn();Where mockFunc is
the mock function created from jest.fn().
Example: Suppose we aim to mock a callback function that multiplies the first argument in the main function by 2 when called.
To begin:
- Create a file, name it
script.js. - Create the test file, name it
script.test.js. - Write this code in your
script.jsfile.
let mainFunction = (value, callback) => {
    callback(value * 2);
  };
module.exports={mainFunction}- Write this code in the
script.test.jsfile.
const { mainFunction } = require("./script");
test("should mock a simple callback function", () => {
  // Creating a mock callback function
  const mockCallback = jest.fn();

  // calling the mock callback with the main function
  mainFunction(5, mockCallback);

  //make assertions
  expect(mockCallback).toHaveBeenCalledWith(10);
});
But there is a problem. Mocking a function with jest.fn(), without adding some explicit logic, will return undefined. For example, if we add the following assertion to our test, it will fail.
expect(mockCallback()).not.toBe(undefined);Code asserting that the mock function is not undefined is added to the last line of the code below. This will fail the test because it is supposed to be undefined since we did not add a custom implementation.
const { mainFunction } = require("./script");

test("mocking a simple callback function", () => {
  // Creating a mock callback function
  const mockCallback = jest.fn();

  // Using the module function with the mock callback
  mainFunction(5, mockCallback);

  // Expecting the mock callback to have been called with the expected value
  expect(mockCallback).toHaveBeenCalledWith(10);
  expect(mockCallback()).toBe(undefined);
  expect(mockCallback()).not.toBe(undefined);
});
Failure here.
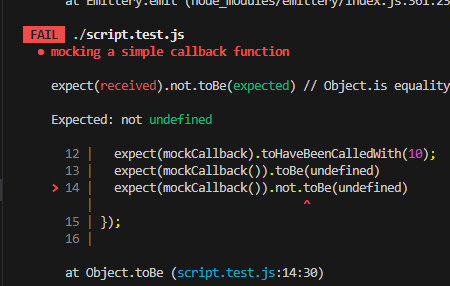 image showing error from test failure
We will now see the solution to this undefined issue.
When working with mocks in Jest, we want everything to be within our control. This is the basic concept behind mocking.
The mockImplementation, mockReturnValue, and mockResolvedValue are direct methods of the mock function, used to customize the mock to our will, and are very important as far as mocking is concerned. The mockResolvedValue sets return values when mocking asynchronous functions.
Whenever we mock a function without some custom logic using the mockReturnValue or mockImplementation, our mock function returns undefined. We will now see a case in code where we add a mockImplementation.
let mockSum = jest.fn();
mockSum.mockImplementation((x, y) => {
  return x + y + 2;
});

describe("should confirm arguments and assert calls", () => {
  //call the mock
  mockSum(3, 7);
  mockSum(6, 7);

  test("should confirm number of calls as 2", () => {
    //make assertions
    expect(mockSum).toHaveBeenCalledTimes(2);
  });
  test("should confirm expected arguments", () => {
    expect(mockSum).toHaveBeenCalledWith(3, 7);
    expect(mockSum).toHaveBeenCalledWith(6, 7);
    expect(mockSum(3, 7)).toBe(12);

    expect(mockSum(6, 7)).not.toBe(undefined);
  });
});
What we did above was create a mock function and add a custom implementation using the mockImplementation. We called the mock function. Finally, we made assertions, including checking that the undefined issue was not present, which passed. This is because of the custom implementation added to jest.fn().
expect(mockSum(6, 7)).not.toBe(undefined);The assertion passed
We can also see a scenario where we add a specified value that we want our mockSum to return. See the code below.
let mockSum = jest.fn();
mockSum.mockReturnValue(8);

describe("should confirm arguments and assert calls", () => {
  //call the mock
  mockSum(3, 7);
  mockSum(6, 7);

  test("should confirm number of calls as 2", () => {
    //make assertions
    expect(mockSum).toHaveBeenCalledTimes(2);
  });

  test("should confirm  return value as 8 in each call", () => {
    expect(mockSum(3, 7)).toBe(8);

    expect(mockSum(6, 7)).toBe(8);
  });
});
We can see from the code above that even though we called mockSum twice with changing arguments; we always expect our return value to be 8 in our second test suite. This is only possible when we set a mockReturnValue on our mock function.
Also check for mockReturnValueOnce and mockImplementationOnce.
Unintended Interactions Between Tests
When using Jest to write tests for our JavaScript code, we may create mock functions to simulate certain behaviors. When we finish these tests, we might need to ensure a clean slate for subsequent tests.
Sometimes, we might want to track the number of times our mock function was called. This test scenario might occur when we have multiple test suites in a describe block. See the code below.
let mockFunc = jest.fn();
describe("should have been called ", () => {
  test("should have been called ", () => {
    mockFunc(3, 5);
    mockFunc(5, 3);
    expect(mockFunc).toHaveBeenCalledWith(3, 5);
    expect(mockFunc).toHaveBeenCalledWith(5, 3);
  });
  test("should have been called once", () => {
    mockFunc(4, 7);
    expect(mockFunc).toHaveBeenCalledWith(4, 7);
    expect(mockFunc).toHaveBeenCalledTimes(1);
  });
});
In the code above, we made two calls in our first test block, which were recorded. When we reached our second test block, these two calls were still on record. Another call was made in the second test block. When our last assertion was made, we had made three calls, but we were expecting 1 because we were thinking of only the second test block, but it doesn’t work that way. So, the test failed; see the image below.
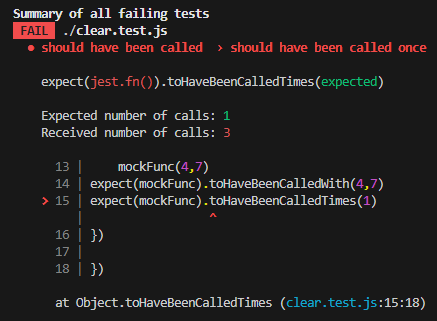
The solution to this is using the jest.clearAllMocks method. This method is handy for clearing all mock data, like the number of times a mock function was called and the arguments it was called with.
The jest.clearAllMocks method is usually placed in a setup or teardown(beforeEach, afterEach, etc.) at the beginning of the test suite to reset all mocks. This ensures that all mock functions are reset before each test, and any call history or other mock states are cleared. This helps prevent unintended interactions between tests.
Example: We will see how we can utilize it below.
let mockFunc = jest.fn();

describe("should have been called with changing arguments and certain times ", () => {
  beforeEach(() => {
    jest.clearAllMocks();
  });

  test("should have been called twice with different arguments", () => {
    mockFunc(3, 5);
    mockFunc(5, 3);
    expect(mockFunc).toHaveBeenCalledWith(3, 5);
    expect(mockFunc).toHaveBeenCalledWith(5, 3);
    expect(mockFunc).toHaveBeenCalledTimes(2);
  });

  test("should have been called once with a set of arguments", () => {
    mockFunc(4, 7);
    expect(mockFunc).toHaveBeenCalledWith(4, 7);
    expect(mockFunc).toHaveBeenCalledTimes(1);
  });
});
In the code above, we have a function mockFunc, which we mocked. We made a test suite wherejest.clearAllMocks() was used in the beforeEach block to clear up everything done in a test block. In our first test block, we called mockfunc() two times with changing arguments. We made our assertions, which all passed. When our second test block was about to run, the previous calls had all been cleared courtesy of jest.clearAllMocks() in the beforeEach block. In the second test block, we made one new call with new arguments, which was recorded. We made assertions to this effect, and the tests passed.
ESM Problems With jest.mock
While trying to mock modules in JavaScript with ECMAScript Modules (ESM), several issues have been raised over the years. The bottom line is that ESM evaluates static import statements before looking at code. They are called static because they are resolved and evaluated before the script is executed. For this reason, the hoisting of jest.mock calls that work in common JavaScript (CJS) won’t work in ESM.
The hoisting behavior means we can call jest.mock at the top of our test file even before the import statement.
- This will work!!
jest.mock(path / to / myModule);

const myModule = require("path/to/myModule");

test("some test", () => {
  // tests here
});- This won’t work!!
jest.mock(path / to / myModule);

import myModule from "path/to/myModule";

test("some test", () => {
  // tests here
});- Do these instead
ESM mocking is currently supported through
jest.unstable_mockModule. It is currently an experimental feature used with the dynamicimport(). Dynamic import is a feature that allows us to asynchronously import a module or script. To use it, set the following configuration.
- Create a file in the root of the folder in your IDE.
- Name it
jest.config.js. - Write the code below.
export default {
    transform:{}
}
The transform property is usually configured to ensure Jest can handle specific features or syntax used in our code. In our case, we are not specifying any transformations.
- You should have Jest installed. The
"test"and"type"fields and values in yourpackage.jsonshould look like below.
{
  "scripts": {
    "test": "node --experimental-vm-modules node_modules/jest/bin/jest.js"
  },
  "type": "module"
}- Your test file should follow the format below.
import { jest } from "@jest/globals";

//mock the whole module
jest.unstable_mockModule("path/to/module", () => ({
  yourFunction: jest.fn(),
}));
//dynamic import
const { yourFunction } = await import("path/to/module");

test("should test", () => {
  //test logic
});
Below is an example of how to use the dynamic import().
Example:
Create two files, func.js and func.test.js. Write the following code in each respectively.
export function greet() {
  return "hi";
}
import { jest } from "@jest/globals";
//mock the whole module
jest.unstable_mockModule("./func", () => ({
greet: jest.fn(),
}));
const { greet } = await import("./func");
console.log(greet);
test("should be", () => {
greet();
expect(greet).toHaveBeenCalled();
expect(greet()).toBe(undefined);
});You can see the await import line written in the code. That is how dynamic imports are
done.
You must always use a factory function when using jest.unstable_mockModule.
See Jest docs for more on this feature and other alternatives.
The Automock Feature
The entire module will be mocked automatically whenever we use jest.mock without a second argument.
jest.mock("path/to/module") //automockingBy default, Jest will mock the entire module. This means all functions and methods of the specified module are replaced with mock functions by default. We see an example below.
Example: See some code to prove it below.
To begin:
- Create a file, name it
func.js. - Write the following code.
exports.greet = () => "hi";- Create another file, name it
func.test.js. - Write the following code.
let { greet } = require("./func");

//mock the whole module
jest.mock("./func");
console.log(greet); //automocked

test("should be", () => {
  greet();
  expect(greet).toHaveBeenCalled();
  expect(greet()).toBe(undefined);
});
Above, we imported the func module for mocking. The module has a function named greet. We did not explicitly mock greet anywhere in the code. But when we log greet, we get a mock function. See the image below.
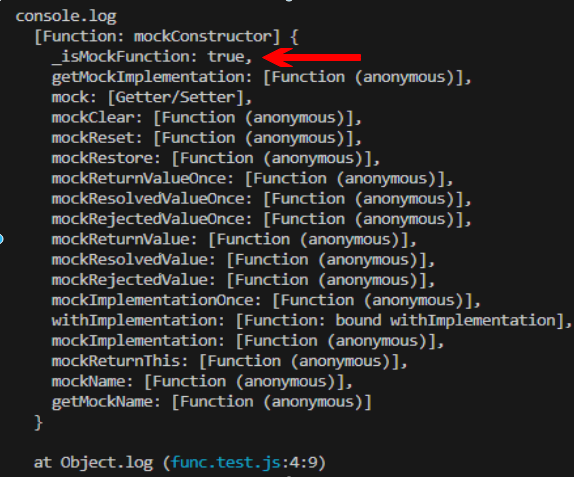
In the image above, we can see that greet is a mock function. The red arrow points to one of its properties, _isMockFunction, which has a true value. We can see all other properties and methods of mock functions which it also possesses.
The jest.mock("./func") line ensures that greet is replaced with a mock function. We were able to make our assertions. Among one of our assertions, the return value of greet() is expected to be undefined. This is because we didn’t set any custom logic in the mock.
However, we can disable this feature using jest.disableAutomock. In your func.test.js, write the following code.
let { greet } = require("./func");

//disable mock
jest.disableAutomock();

test("should be", () => {
  //original implementation
  expect(greet()).toBe("hi");
});
Also, create a jest.config.js file in your root folder, and ensure automock is true. If this is not set, thejest.disableAutomock won’t work. Write the code below.
const config = {
    automock: true,
  };

  module.exports = config;
When we ran our test, we found out that it passed. Even though we expect the return value from the original greet function, “hi,.” This is because we disabled automock, making the function maintain its original implementation.
The Spy Behavior
Whenever we use the jest.spyOn method, the spy remains in place, potentially affecting subsequent tests or parts of the code that rely on the original unmocked behavior. This results in interference with other parts of the codebase. Below is an example.
Example: Below, We will see what happens when we don’t remove this spy behavior and what happens when we do.
To begin:
- Create a file, name it
spies3.js, and add the following code.
const sayHello = (hello) => {
    console.log(hello);
  };
module.exports = { sayHello };- Create another file and name it
spies3.test.js. Write the following code.
// Import the module
const index = require("./spies3");

describe("should have greetings as arguments", () => {
  let spyGreet;

  beforeEach(() => {
    // Set up the spy before each test
    spyGreet = jest.spyOn(index, "sayHello");
  });

  test("should be called with Good morning", () => {
    index.sayHello("Good morning");

    expect(spyGreet).toHaveBeenCalled();
    expect(spyGreet).toHaveBeenCalledWith("Good morning");
  });

  test("should be called with Good afternoon", () => {
    index.sayHello("Good afternoon");

    expect(spyGreet).toHaveBeenCalled();
    expect(spyGreet).toHaveBeenCalledWith("Good afternoon");
    expect(spyGreet).toHaveBeenCalledTimes(1);
  });
});
When we run the above test, it fails, as seen in the image below.
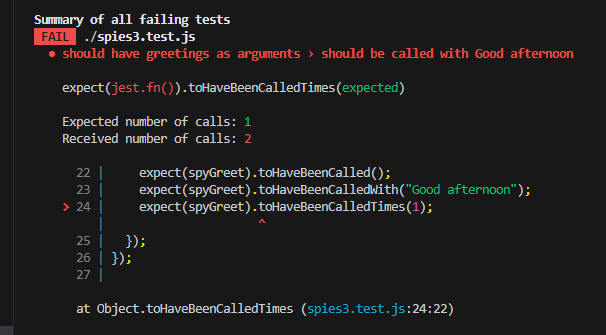
This is because we asserted that our function must have been called one time in our second test suite, but in reality, two calls are on record. This is because we did not clean up after the first test suite. To clean up this behavior, we bring in the mockRestore method.
- mockRestore: Similar in functionality to the
clearAllmocksmethod. The only difference is that this only works wherejest.spyOnwas used.
We will be adding it to our code. We will then run our tests once more to confirm its effect.
We will be adding it in an afterEach block to the bottom of our code, like below.
// Import the module
const index = require("./spies3");

describe("should have greetings as arguments", () => {
  let spyGreet;

  beforeEach(() => {
    // Set up the spy before each test
    spyGreet = jest.spyOn(index, "sayHello");
  });

  test("should be called with Good morning", () => {
    index.sayHello("Good morning");

    expect(spyGreet).toHaveBeenCalled();
    expect(spyGreet).toHaveBeenCalledWith("Good morning");
  });

  test("should be called with Good afternoon", () => {
    index.sayHello("Good afternoon");

    expect(spyGreet).toHaveBeenCalled();
    expect(spyGreet).toHaveBeenCalledWith("Good afternoon");
    expect(spyGreet).toHaveBeenCalledTimes(1);
  });

  afterEach(() => {
    // Clean up the spy after each test
    spyGreet.mockRestore();
  });
});
When we run the test again, all our assertions pass.
It is very important to remove the spy behavior with the mockRestore after using jest.spyOn, as seen from our example above.
Cross-checking Information About Our Mock Function
Whenever we create a mock function in Jest, it comes with a mock property that contains information about how the function was called and the value returned. It comes in handy when asserting how the mock function was interacted with. See the illustration below.
let mockFunc = jest.fn();
mockFunc.mock;
Sometimes we might want to make assertions about how many times a function was called and with what arguments in what order. The mock property makes this possible. This helps with bringing another perspective to the way we previously made assertions like:
expect(mockFunc). toHaveBeenCalledWith(x,y)
expect(mockFunc). toHaveBeenCalledTimes(n)
This mock property has several other properties that could be chained to it. We will look at the use of the calls and results properties in this section.
- The Calls Property: A mock function’s
mock.callsproperty provides an array of all the calls made to that function. Each element in the array represents a call.
For instance, a mock function called twice with arguments (‘x1’,‘x2’) and (‘x3’,‘x4’) would have a mock.calls array in the format below.
[
  ["x1", "x2"],
  ["x3", "x4"],
];
When we create a mock function using jest.fn(), Jest keeps track of every call made to that function and also records the arguments used for each call.
Example:
We want to track call arguments and the length of call of our mock function. Since mock.calls returns an array.
To begin:
Create a file and name it calls.test.js. Write the code below in it.
const mockAdd = jest.fn();
mockAdd.mockImplementation((a, b) => {
  return a + b;
});

describe("track calls and arguments", () => {
  mockAdd(2, 5);
  mockAdd(2, 3);

  test("should have been  called two times", () => {
    expect(mockAdd.mock.calls).toHaveLength(2);
  });

  test("should give 3 for second argument of second call", () => {
    expect(mockAdd.mock.calls[1][1]).toBe(3);
  });
});
We made a mock function to simulate the addition between two arguments.
We called it twice and asserted that its mock.calls property has a length of 2. Since .calls returns the calls in an array. We asserted that the second call has a second argument of 3. In the code, we used to form our last assertion above, expressed below.
mockAdd.mock.calls[1][1]The first square bracket after mock.calls represents the call index, and the second represents the argument index. So, we have a call index of 1 for the code, which means a second call since array counts start from index 0. Then, we have argument index 1, which is the second argument.
- The Results Property: Written as
mock.results, It outputs the result of our calls in an array. The first call is the position of the first element, and every other call takes its position according to calls. It returns an array of objects.
Example: We want to mock a function, call it, and see the results in an array.
function add(a, b) {
  return a + b;
}

const mockAdd = jest.fn();
mockAdd.mockReturnValueOnce(8); //change value for first call
test("should return 8 and 5 as results of calls", () => {
  mockAdd(2, 5);
  mockAdd(2, 3);
  //expecting two results
  //The first return value we changed  for the first call
  //and normal value for second call
expect(mockAdd.mock.results).toBe([8, 5]);
});
We wrote the function we wanted to mock in the test file. So we didn’t import. We mocked the function, setting a mockReturnValueOnce(8). This automatically takes the place of the first call. We called the function twice. Even though the first call is supposed to return 2 + 5, which is 7, it returned 8 the first time because we set the return value with mockReturnValueOnce(8). The second call added 2+3, which is 5. We asserted that our mockAdd.mock.results array will have 8 and 5 as values.
See also contexts property and instances property.
Retaining Some Implementation
This is a scenario where we don’t want to replace the entire implementation of the mocked module. We can access a module’s original implementation after mocking it using jest.mock. We can achieve this using a method named jest.requireActual
The official Jest documentation refers to it as mocking partials. We use it to return parts of the original module that will maintain their original implementation without mocking. Below is an example.
Example: In this example, we maintain the original implementation for some code in the module after mocking.
To begin:
- Create a file, name it
actual.js. - Write the code below in it.
let getPlace = () => "Los Angeles";
let getBill = () => "10 dollars";
let manager = "steve";
module.exports = { getPlace, getBill, manager };- Create another file, and name it
actual.test.js. - Write the code below in it.
jest.mock("./actual");

let { getPlace, manager } = jest.requireActual("./actual");

let getBill = jest.fn(() => "50 dollars");

test("getPlace should maintain original behaviour", () => {
  //call
  getBill();
  expect(getBill).toHaveBeenCalled();
  expect(getPlace()).toBe("Los Angeles");
  expect(manager).toBe("steve");
});
It can also be written this way:
const { getPlace, getBill, manager } = require("./actual");

jest.mock("./actual", () => ({
  ...jest.requireActual("./actual"),
  getBill: jest.fn(() => "50 dollars"),
}));

test("getPlace should maintain original behaviour", () => {
  getBill();
  expect(getBill).toHaveBeenCalled();
  expect(getPlace()).toBe("Los Angeles");
  expect(manager).toBe("steve");
  expect(getBill()).toBe("50 dollars");
});Mock Examples on Specific Test Cases
Now that we have understood what mocking is about, we will see how to use it with the types of functions we will most definitely need to mock to test.
We previously listed some types of functions mocked in real situations under the “Types of Functions We Mock and Explanations Why” section.
These functions, methods, and modules are dependencies incompatible with our test environment. To be able to test functions which they are a part of, we mock these dependencies. Below we show in code how to mock those that we previously listed.
HTTP Requests With Axios
Axios is a JavaScript library used to make HTTP requests. Written as axios, it is often listed as a dependency in a project’s package.json file. We will mock axios to simulate a get request. Before that, we will send an actual get request in our test file and assert that we received the real response.
- Hitting the API!!! We will use this Burger API to illustrate.
To begin:
- Create a file and name it
burger.js. - Install
axios. In your terminal, run any of the commands below, according to your package manager.
npm install axios
yarn add axios- Write the following code in it.
const axios = require("axios");
let url = "https://my-burger-api.herokuapp.com/burgers/1";
let fetchData = async () => {
  const response = await axios.get(url);
  return response.data.name;
};
module.exports = fetchData;- Create another file and name it
burger.test.js. - Write the code below in it.
const fetchData = require("./burger");
const axios = require("axios");
test("test fetch with axios", async () => {
  const result = await fetchData();
  console.log(result);
  expect(result).toBe("Pulled Mooshie");
});
In our burger.js file, we made a get request using axios to return response.data.name from the url. We exported our async function fetchData and imported it into our test file. Finally, we asserted that the result returned by fetchData() is the actual one from the URL. We can see so from the console.log(result) value.
But there are several issues when doing it the way we did. Our API could be down, and even though our code is okay, it could fail for this reason. We also could be testing a PUT request and mistakenly editing something we didn’t mean to. So what do we do to solve this? We mock axios.
- Mock Axios
We mock
axios, the external dependency for this request. In this scenario, we bring in themockResolvedValue, which we discussed under the ‘Adding Custom Implementation’ section. See how:
Clear out the code in your burger.test.js file and write the code.
const fetchData = require("./burger");
const axios = require("axios");

jest.mock("axios", () => {
  return {
    get: jest.fn().mockResolvedValue({ data: { name: "mocked data" } }),
  };
});
test("test request with mocked axios", async () => {
  const result = await fetchData();
  expect(result).toBe("mocked data");
});
In the above file, we imported axios and our fetchData function then mocked axios. We mocked get, by specifically setting a resolved value for axios.get which we named mocked data. We used the mockResolvedValueto achieve this. Finally, we asserted that the result returned by fetchData is mocked data. Since the axios request was made in the fetchData function.
- Reject Promise
We can also configure the
axios.getmock to reject the promise on a particular condition.
const fetchData = require("./burger");
const axios = require("axios");

jest.mock("axios", () => {
  let mockCount = 0;
  return {
    get: jest.fn().mockImplementation(() => {
      if (mockCount === 0) {
        mockCount++;
        return Promise.resolve({ data: { name: "mocked data" } });
      } else {
        return Promise.reject(new Error("boundary error"));
      }
    }),
  };
});

describe("test for promise resolved and rejected", () => {
  test("test request with mocked axios success", async () => {
    const result = await fetchData();
    expect(result).toBe("mocked data");
  });

  test("test request with mocked axios error", async () => {
    await expect(fetchData()).rejects.toThrow("boundary error");
  });
});
Still maintaining the burger.test.js file. In this example, we created a counter called mockCount and initialized it at 0. We used this count to form conditions for our promise. Based on this, Axios is configured to resolve the promise on the first call when mockCount is 1 and reject the promise on the second call when mockCount is 2. When mockCount is 0, it increments and resolves the promise. Any subsequent increments will be rejected.
HTTP Requests With window.fetch
The fetch method is a window object method that we use to get server data. Even though we will explore more on window object methods and deal with one more window object later, I want to talk about the fetch method since it sends HTTP requests.
window.fetch() is a web API and is not available in our test environment. We must install JSDOM to mock browser-related functionality. Run any of the commands according to your package manager.
npm install jsdom
yarn add jsdom
Example:
We aim to mock window.fetch to return the same value returned from the Burger API, which we did with Axios.
To begin:
Create a file, and name it windfetch.js. Add the following code to it.
let url = "https://my-burger-api.herokuapp.com/burgers/1";
async function fetchData() {
  try {
    const response = await window.fetch(url);
    const data = await response.json();
    return data;
  } catch (error) {
    console.error("fetch error", error);
  }
}
module.exports = fetchData;
Create another file and name it windfetch.test.js. Add the following code to it.
//jsdom config for browser
const { JSDOM } = require("jsdom");
const dom = new JSDOM("<!doctype html><html><body></body></html>");
global.window = dom.window;

const fetchData = require("./windfetch");

//mock the fetch
global.window.fetch = jest.fn();
let mockedResponse = { data: "mocked data" };
global.window.fetch.mockResolvedValue({
  json: jest.fn().mockResolvedValue(mockedResponse),
});
test("test fetch with mocked window.fetch", async () => {
  let result = await fetchData();
  expect(result).toEqual(mockedResponse);
});
In the code above, we exported the fetchData function that contains our window.fetch method as default. We simulated the browser environment with jsdom in our test file. Next, we imported the fetchData function. We mocked the global.window.fetch method to return a resolved promise, the mock value when the json method on the response object is called. We saved the value in a variable named mockedResponse.
Finally, we asserted that the result returned by fetchData() is mockedResponse, since window.fetch is called and executed within fetchData.
Timers
Certain parts of our code might have a setTimeout or setInterval. Calling jest.useFakeTimers will use fake timers for all tests within the file until the original timers are restored with jest.useRealTimers. We use this method to eliminate time wasting during our tests.
The jest.useFakeTimers when used in collaboration with jest.advanceTimersByTime makes us run our tests without waiting for the actual time our code would have needed to run. jest.advanceTimersByTime takes a single argument in milliseconds. This time in milliseconds is used to forward any pending setTimeout() delays in our test to fire immediately.
So in our original function, if we have a setTimeout(callback,delay) with a delay of 1000 milliseconds, we can make jest.advanceTimersByTime take an argument of 1000. It becomes jest.advanceTimersByTime(1000).
We also have a jest.useRealTimers, which instructs jest to restore the original implementations of the global date, performance, and timer APIs. See docs link for more.
Example:
We want to test a function with a setTimeout to assert that the callback provided is called after the specified period without actually waiting. So we use the jest.useFakeTimers and jest.advanceTimersByTime to mock the timer. We also mock the callback to achieve this.
To begin:
- Create a file and name it
timerFunction.js. - Write the code below in it.
let performTimeout = (callback) => {
  setTimeout(callback, 1000);
};
module.exports = { performTimeout };- Make another file and name it
timerFunction.test.js. - Write the code below in it.
let { performTimeout } = require("./timerFunction");
//start mocking timers
jest.useFakeTimers();
test("callback should have been called", () => {
  //mock callback
  let mockCallback = jest.fn();

  // call mockcallback when the function is called
  performTimeout(mockCallback);
  jest.advanceTimersByTime(1000);
  // make assertions
  expect(mockCallback).toHaveBeenCalled();
  // restore real time
  jest.useRealTimers();
});
In our code, we exported our function from the timerfunction.js file and imported it into our test file. We used the jest.useFakeTimers method to initiate mocking of our timer. Next, we mocked the callback and named it mockCallback. We then called the performTimeout function, thereby calling mockCallback().
We mocked the timer with jest.advanceTimers to fire immediately and not wait till after 1 second. We made our assertion and restored real-time.
Window Object Methods
For a very long time, as a beginner in tech who used some code playground on his phone to start, I never realized the difference between console.log() and window.alert() commonly written as alert(). Once, I wrote the sort of code below and ran it in my terminal Node.js environment.
let me="steve"
window.alert(me)
And in my terminal:
node indexI received the following error, where the arrow is pointing.
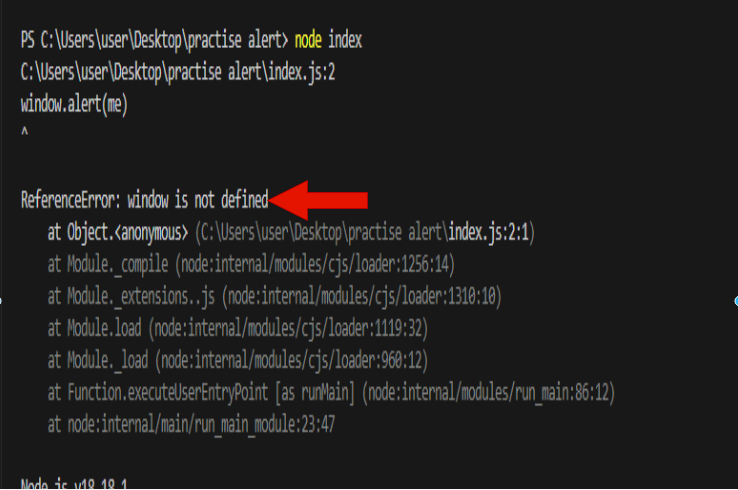
But when I put my index.js file as the value of the src attribute in the script tag of the index.html like below and ran it through my Chrome browser:
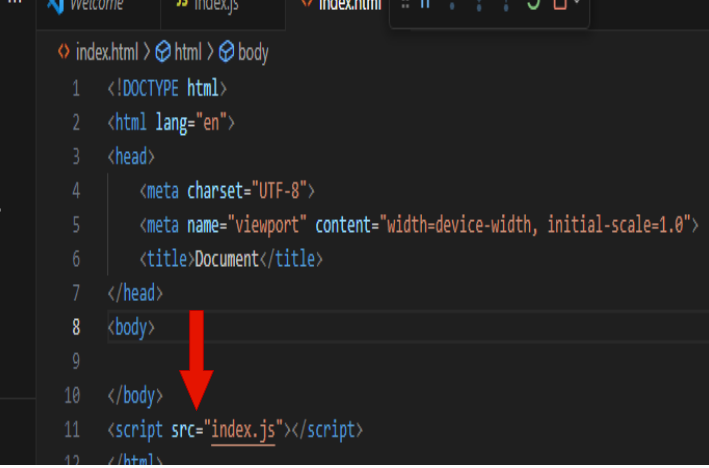
I get this.
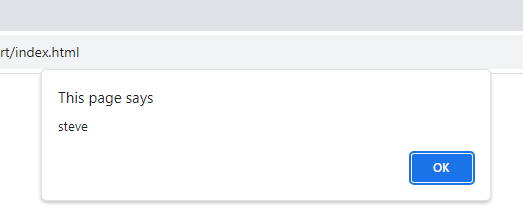
Summary: window.alert() will only work in a browser environment.
As previously said about testing components that deal with the browser’s window object, isolating the code being tested from the actual browser environment is important.
We installed jsdom to simulate the browser environment when we looked at “HTTP Requests With window.fetch()”.
Let us now see an example of isolating our code from the actual browser environment by mocking.
Example:
Here, we will be mocking the window.alert(), which can be used to pop up results via the browser.
To begin:
- Create a file, name it
windal.js. Write the following code.
function showAlertMessage(message) {
  window.alert(message);
}
module.exports = showAlertMessage;- Create another file, naming it
windal.test.js. Write the following code in it.
// jsdom config for browser
const { JSDOM } = require("jsdom");
const dom = new JSDOM("<!doctype html><html><body></body></html>");
global.window = dom.window;
const showAlertMessage = require("./windal");
// Mock window.alert
global.window.alert = jest.fn();

test("test showAlertMessage with mocked window.alert", () => {
  // Call the function that triggers the window.alert
  showAlertMessage("This is a mock alert message");

  // make assertion
  expect(global.window.alert).toHaveBeenCalledWith(
    "This is a mock alert message",
  );
});
Above, we exported the showAlertMessage as default. Next, we simulated the browser environment with jsdom in our test file.
We imported the showAlertMessage function and
mocked global.window.alert. We called the showAlertMessage function with an argument, which executed window.alert(message), thereby passing the argument to the message parameter.
We then asserted that the window.alert method should have been called with the same argument passed to the showAlertMessage function since window.alert also has the same message parameter. This call must have happened when showAlertMessage was called.
React Component
Recall that when testing React components, we usually call the render method on components to simulate component rendering. This returns an object with several methods which we can use to form assertions. Below is an illustration.
const obj = render(<Component />);
//obj has methods we form assertions with
To mock a React component, mock the file that exports it and replace it with a custom implementation.
In these React component mocks, we will see a mock- prefix in our returned JSX when testing. Writing<mock-element> is common in the React testing ecosystem. It helps to indicate that the element is a mock, especially used for testing purposes. Not to be used compulsorily, though. We will see some examples of specific scenarios. These examples will further cement our knowledge.
We check on how to handle our component, when it is a default export, and when it is a named export from its module.
- Default Export: The default export is usually the primary functionality or component from a module. As we know we can only have one per module.
To mock this component, we mock the module and return a component with a custom implementation. See the illustration below.
jest.mock("path/to/module", () => {
  return () => {
    return; //some  JSX
  };
});
Or this:
jest.mock("path/to/module", () => () => {
  return; //some JSX
});
Below, we look at an example where we mock a default export.
Example:
We have a file called Image.js, which displays an image element when it renders. However, fetching actual images during testing will slow down our test suite. So, we want to mock the component and assert that a mocked version of the <img/> element along with the alt attribute is in the rendered component. This alt attribute is very important for the visually impaired.
To begin:
- Create a file, name it
Image.js, and write the code below in it.
import React from "react";

const Image = () => {
  return (
    <div>
      <h1>Some Image</h1>
      <img src="../pics/automock arrow.png" alt="code image" />
    </div>
  );
};

export default Image;- Create another file, name it
Image.test.js, and write the code below in it.
import { render } from "@testing-library/react";
import Image from "./Image";

jest.mock("./Image", () => {
  return () => {
    return (
      <div>
        <mock-image data-testid="mocked-image" alt="mock code image" />
      </div>
    );
  };
});

describe("image should be accessible to all users", () => {
  test("alt text should be rendered for screen readers", () => {
    let utilObj = render(<Image />);
    let screenRead = utilObj.queryByAltText("mock code image");
    expect(screenRead).toBeInTheDocument();
  });

  test("image should be rendered", () => {
    let utilObj = render(<Image />);
    let fullImage = utilObj.getByTestId("mocked-image");
    expect(fullImage).toBeInTheDocument();
  });
});
Above, we imported our Image as the default component and mocked the module containing it. This mocking returned a functional component with a mock version of our <img/> JSX element. Now our <mock-image/> has an alt attribute and
a data-testid attribute, leveraging on the HTML data-* attribute. In our test suite, we called the render method on our component, which returned an object. We used this object’s methods to form our assertions. We used the getByTestId method to assert that the element with the data-testid attribute value of “mocked-image” is present in the rendered component. We also made an assertion using the queryByAltText method to assert that the mock value of the alt attribute is in the document.
- Named Export: The named export usually arises from having more than one component exported from a module. So when imported into another module, they are usually in a destructured format.
To mock these components. We mock their module and return them in an object as methods of the factory function. In this object, we create their custom implementations.
In the example below, we add another component to our Image component.
Example: Below, we export two components from our module.
- Create a file and name it
Multiple.js. Write the following code in it.
import React from "react";

export const Image = () => {
  return (
    <div>
      <h1>Some Image</h1>
      <img src="../pics/automock arrow.png" alt="code image" />
    </div>
  );
};

export const AnotherComponent = () => {
  return (
    <div>
      <p>Another Component from the Multiple module </p>
    </div>
  );
};
Create another file, and name it Multiple.test.js. Add the code below to it.
import { render } from "@testing-library/react";
import { Image, AnotherComponent } from "./Multiple";

jest.mock("./Multiple", () => {
  return {
    Image: () => {
      return <mock-image data-testid="image main" alt="mock code image" />;
    },
    AnotherComponent: () => {
      return (
        <div>
          <p>Another mocked component</p>
        </div>
      );
    },
  };
});

describe("dealing with named exports", () => {
  test("alt text should be rendered for screen readers", () => {
    let utilObj = render(<Image />);
    let screenRead = utilObj.queryByAltText("mock code image");
    expect(screenRead).toBeInTheDocument();
  });

  test("text should be in document", () => {
    let utilObj = render(<AnotherComponent />);
    expect(utilObj.getByText("Another mocked component")).toBeInTheDocument();
  });
});
In the code above, we added another component to the <Image/> component. We mocked the module they are contained in. Both mocks were returned as methods of the factory function. We called the render() on the individual components and performed our assertions with the resultant object methods.
- React Mocks and the ESM: We might want to write
__esModule:truewhen working with ES6. Like Below:
jest.mock("./Multiple", () => {
  return {
    __esModule: true,
    Image: () => {
      return <mock-image data-testid="mocked-image" alt="mock code image" />;
    },
    AnotherComponent: () => {
      return (
        <div>
          <p>Another mocked component</p>
        </div>
      );
    },
  };
});
This might not be necessary because,
many React components, especially those created with Create React App, rely on Babel and other build tools. These tools ensure consistent transpilation, ensuring features work within the test environment.
External Node Modules
Since the beginning of this article, almost everything we have done revolves around external node modules. When we import our modules to the test file to mock, they are external node modules.
From the mocking of Axios, HTTP, and our local files. These are all mocking of node modules. You can read more about node modules
here.
We will now take a module to emphasize a specialized case further.
- React Router DOM The React Router DOM is an external dependency and node module commonly used with React.js to navigate an application’s routes. It is commonly used for building single-page applications (SPAs) where the content changes based on the URL.
You can install it with a package manager like yarn or npm.
npm install react-router-dom
yarn add react-router-dom
After installation, we can import components from it into our React components. We will now see an example of mocking the react-router-dom.
Example:
The react-router-dom module, as a dependency, is not available in our test environment. So, we want to mock it along with the `BrowserRouter ’ component while checking that our React component renders successfully. The presence of text is used as an indicator of successful rendering.
To begin:
- Create a file, name it
MyComponent.js, and write the following code.
import React from "react";
import { BrowserRouter, Routes, Route } from "react-router-dom";

const SomeComponent = () => <div>Hello</div>;

const MyComponent = () => (
  <BrowserRouter>
    <Routes>
      <Route path="/somepath" element={<SomeComponent />} />
    </Routes>
  </BrowserRouter>
);

export default MyComponent;- Create another file, name it
MyComponent.test.js, and write the following code in it.
import React from "react";
import { render, screen } from "@testing-library/react";
import MyComponent from "./MyComponent";

jest.mock("react-router-dom", () => ({
  BrowserRouter: ({ children }) => {
    return <mock-routes>Mock hello</mock-routes>;
  },
}));

test("renders MyComponent", () => {
  render(<MyComponent />);

  let displayer = screen.getByText("Mock hello");

  expect(displayer).toBeInTheDocument();
});
Above, we mocked the react-router-dom module and its BrowserRouter component. The BrowserRouter takes {children}, this represents the components which it wraps. Since it often wraps the entire application. We mocked the BrowserRouter to return its children route components, among which render mock text. We used the screen.getByText function to find the text “Mock hello”. We then finally asserted that the element with the text Mock hello is present in the rendered output of the React component.
Callbacks
We have dealt with a few callback examples while dealing with mock methods and timers. But we will look at one more example where we deal with cases that we didn’t look at previously.
Example: We want to test for a typical edge case in a function involving a callback. This ensures our function behaves appropriately in different scenarios.
To begin:
- Create a file, name it
range.js, and write the following code in it.
function multiChecker(num, callback) {
  callback(num * 5);

  if (num > 10) {
    callback("number greater than 10 not allowed");
  }
}

module.exports = { multiChecker };- Create another file, name it
range.test.js, and write the following code in it.
const { multiChecker } = require("./range");

describe("check edge case and common case", () => {
  const mockCallback = jest.fn();
  test("should check common case", () => {
    let result = multiChecker(9, mockCallback);

    expect(mockCallback).toHaveBeenCalled();
    expect(mockCallback).toHaveBeenCalledWith(45);
  });

  test("should check edge case", () => {
    let result = multiChecker(11, mockCallback);

    expect(mockCallback).toHaveBeenCalled();
    expect(mockCallback).toHaveBeenCalledWith(
      "number greater than 10 not allowed",
    );
  });
});
Above, we have a function named multiChecker that takes a callback. This function has an edge case, i.e., when num is greater than 10. When this edge case is reached, the function invokes the callback with the message “number greater than 10 not allowed. We have a typical where num falls within the expected range, i.e., 10 or less. This ensures the function works for normal inputs. So, above, we mocked the callback while testing for both cases.
Conclusion
We have learned the reasons for mocking. We have seen how crucial it is to test certain parts of our code. We have seen the basics to get you started, like the three core mock methods. Practicing more with mocks will make you see and understand the patterns of mocks better.
The following links were very influential to my understanding of mocking. You can go through them to clarify aspects I may not have concentrated on.