Streamline Your Development Process: Creating Builds for Multiple Environments in React and AWS Amplify
Do web app development with separate environments


If your React application is hosted on multiple
AWS(Amazon Web Services) environments, it can be challenging to ensure your app variables work well with each environment. This article will explore environment variables and their importance in our applications, discuss the significance of creating builds for different environments, and look at how to configure Amplify build settings with our application.

Discover how at OpenReplay.com.
As a developer, you will, at a point in your career, need to define environment variables and use them in your React applications. There’s a neat solution to this - the env-cmd library. To begin, let’s quickly review what environment variables mean in a React app.
What is an Environment Variable?
Consider environment variables as those constant bits of information your React application needs, especially during deployment and build time. These variables provide a secure way to hide sensitive information from public view. They also add flexibility to our applications so we can avoid problems when changing variables.
By default, create-react-app gives you a NODE_ENV environment variable when you build applications. You can use it for production, development, and testing purposes.
To use this in your app, you need to run the following commands for each environment:
npm run buildnpm startnpm run testYou can also define custom variables in a .env file in your project’s root directory. Here’s an example:
const REACT_APP_ACCESS_KEY = 12644832xxxxxxxxxxxYou can then integrate these variables into your React application using this syntax;
const accessKey = Process.env.REACT_APP_ACCESS_KEY;This solves our problem, right? However, what if you must accommodate additional environments beyond the defaults provided by create-react-app, such as staging or QA environments?
How do we solve this?
We will need multiple deploys built across different environments in our application.
Why Do We Need Multiple Environment Builds?
Imagine a situation where your React app must be deployed on three different servers: development, QA, and production. These environments have a set of base URLs and domains. Managing different URLs in your code is impractical, especially with AWS Amplify.
The question then becomes: How can we ensure our code works well in different environments when we deploy the app?
We can do this by creating separate builds for each environment. To make React scripts work in different environments, we can use an NPM package called env-cmd.
First, we need to set up a new React environment.
Setting Up a New React Project
To set up a new project, we are going to use create-react-app. Create-react-app is a simple way to start a new React project on your system.
You need to navigate to your preferred directory, open your command line, and run the below command;
npx create-react-app my-react-appWhen you use this command, it creates a new project structure called my-react-app. It also installs all the necessary packages for the app to run well. Using npx ensures we use the latest version of create-react-app to build our project.
Once that is complete, let’s install the required dependencies for this project.
Install Dependencies
The only package we need to install is env-cmd. This library allows you to group environment variables in a .env file and use them in your app by passing them as a script.
To install env-cmd, open your terminal and run the following command:
npm i env-cmdNext, navigate to your project directory and run the command below to start the application.
npm startYou can then access the application in your browser by visiting http://localhost:3000.
Set Up Multiple Environments in AWS Amplify
If you’ve already set up your amplify environments and just want to start creating builds, you can skip this section. However, if your environments are not yet set up, you can do so by following these steps:
Install the AWS Command Line Interface
You need to install the AWS CLI globally on your local machine by running the command;
npm install -g @aws-amplify/cliThen, you can configure it with your AWS credentials by running:
aws configureInitialize Your Amplify App
Next, you need to initialize your new Amplify app in your project directory by following the below command;
amplify initCreate Multiple Environments in Amplify
To create multiple environments on Amplify (e.g., development, QA, production), you can use the Amplify CLI to add the different environments you want:
amplify env addYou will be prompted to provide a name for each environment (e.g., dev, QA, prod) and configure the backend environment accordingly. This process will generate distinct AWS CloudFormation stacks for each environment.
AWS CloudFormation stacks simplify the management and automation of AWS resources and their configurations.
Amplify makes it easy for us by streamlining the setup. We don’t have to create or configure any cloud formation templates. You just have to follow the prompts so Amplify knows what features you want for your app.
Deploy to Different Environments
Once you’ve set up your environments and configured your Amplify project, you can deploy your app to each environment individually using the following command:
amplify publishYou can check out AWS Amplify’s documentation for a more detailed explanation of setting up an Amplify environment.
Now that we have our environments set up, we need to get the variables that we need to configure from AWS.
Get all Important Environment Variables for Your React Project
Suppose you manage three environments in your AWS profile: dev, prod, and QA. For example, if you build the APIs using AWS Lambda and API Gateway, you will likely have distinct base URLs. So, to get all the values you need, go to your API gateway. Collect the relevant values for all three environments. Then, paste them in a notepad.
Setting Up Environment Files in Your React Application
To maintain environment-specific data, create four env files in your project root directory.
.env
.env.dev
.env.prod
.env.qa
The .env file should contain only values shared across all three environments, while the other three .env files will contain environment-specific data.
For example, your .env file might contain the following;
REACT_APP_REGION = us-east-1While your .env.dev file could be structured like this;
REACT_APP_PROJECT_BUCKET= project_dev_-0329xxxxxxx
REACT_APP_PROJECT_BASE_URL= https://xxxxxxxdev.execute-api.us-east-1.amazonaws.com
.env.prod would include values such as;
REACT_APP_PROJECT_BUCKET= project_prod_-0329xxxxxxx
REACT_APP_PROJECT_BASE_URL= https://xxxxxxxprod.execute-api.us-east-1.amazonaws.com
And for the QA environment:
REACT_APP_PROJECT_BUCKET= project_qa_-0329xxxxxxx
REACT_APP_PROJECT_BASE_URL= https://xxxxxxxqa.execute-api.us-east-1.aeven mazonaws.com
With these variables in place, the next step is to create the necessary build commands for each environment.
Creating Build Commands
With different environments requiring distinct configurations, creating these build commands allows you to customize the build process for each environment, tailoring it to its specific needs or configurations.
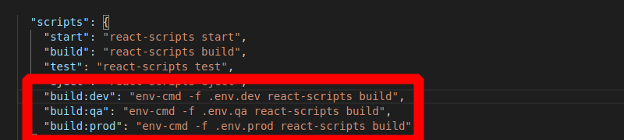
To achieve this, add the following commands in your package.json scripts section;
"scripts": {
   "start": "react-scripts start",
   "build": "react-scripts build",
   "test": "react-scripts test",
   "eject": "react-scripts eject",
   "build:dev": "env-cmd -f .env.dev react-scripts build",
   "build:qa": "env-cmd -f .env.qa react-scripts build",
   "build:prod": "env-cmd -f .env.prod react-scripts build",
}
Finally, to initiate builds for the different environments, simply execute these commands:
npm run build
npm run build:dev
npm run build:prod
npm run build:qa
Local Environment Simulation
Simulating local environments for different build configurations is crucial. It allows you to test your application under various conditions before deploying it to environments like dev, QA, and production. For example, if you encounter a bug in the QA environment but not in dev, you’ll need an easy way to switch between them to fix the bug.
So, here’s how you can simulate these builds in a local environment:
In your project, add the following lines to your package.json scripts:
"start:prod": "env-cmd -f .env.prod react-scripts start"
"start:dev": "env-cmd -f .env.dev react-scripts start"
"start:qa": "env-cmd -f .env.prod react-scripts start"
To initiate the production, qa, and dev environments, run the commands as follows:
Production
npm run start:prod
Development
npm run start:devQA
npm run start:qaIntegrating Environment Variables with AWS Amplify
Since we are working with AWS Amplify, we must ensure that our environmental variables are also in sync with the Amplify environment. This integration allows you to coordinate frontend-specific settings with the backend infrastructure. It also ensures a consistent environment for your application and makes it easier to maintain and scale as your application grows.
To achieve this for this project, navigate to AWS Amplify, access the environment variables section, and click manage variables. Here, you can introduce your ENVIRONMENT variable and set its value as the desired environment name. Don’t forget to specify your preferred branch.
For our dev environment, the environment variables table on AWS Amplify looks like this;
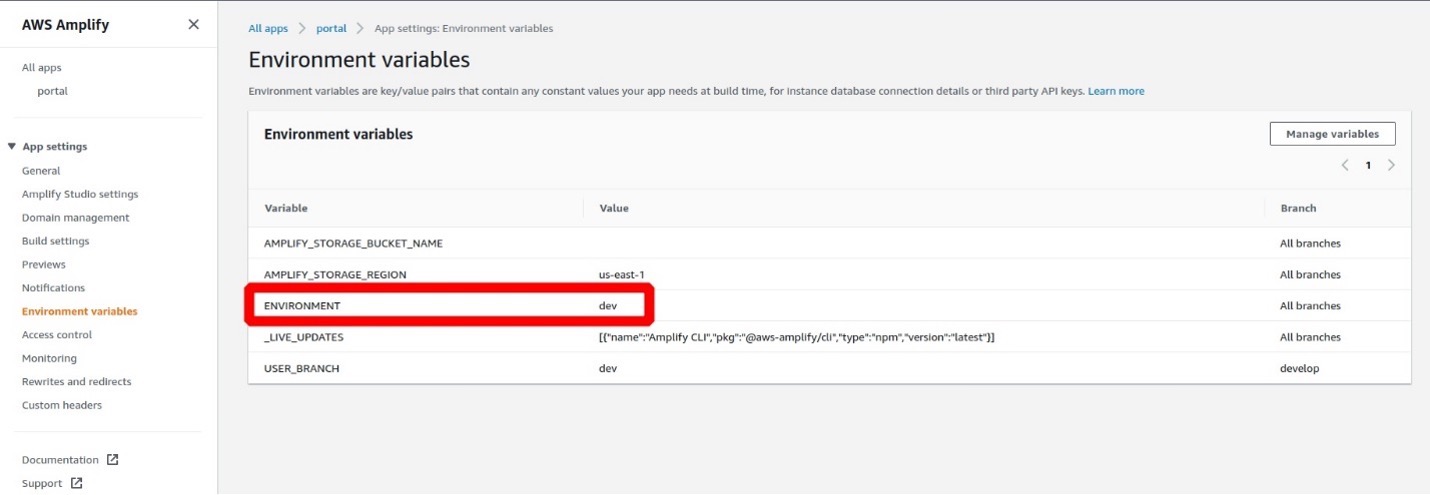
If we are in the production environment on AWS, the value here will be prod. The same is also applicable to the QA environment.
Configuring Build Settings in AWS Amplify
The final step is to modify the build settings to dynamically match all the builds in your local environment and AWS Amplify.
Head to build settings on the left-hand side, where you’ll find the amplify.yml file. This file contains different build commands and settings that Amplify uses to run the builds for our front-end application.
Include the line below in the YAML file like this:
npm build:$ENVIRONMENTfrontend:
phases:
build:
commands:
- npm run build:$ENVIRONMENTWhen you deploy your app through AWS Amplify, it automatically identifies your app’s framework and builds settings by inspecting the repository’s package.json file. The script values defined earlier come into play at this stage.
Amplify detects the $ENVIRONMENT and dynamically runs the npm build specified in the amplify.yml file based on the detected environment variable.
This is why it’s important to include the command below in the amplify.yml file;
npm build:$ENVIRONMENTThis command will assume the $ENVIRONMENT value based on the account the script runs in, which can either be the prod, dev, or QA account on AWS.
Conclusion
Using environment variables when deploying our apps gives us the flexibility to work in different settings. This means we don’t have to make separate codebases for each environment.
By using tools like env-cmd and AWS Amplify, developers can easily work with environment-specific settings, making it easier to manage and deploy their applications.
The methods highlighted in this article encourage smooth development and deployment processes, ensuring that applications work in different environments without issues.
Gain control over your UX
See how users are using your site as if you were sitting next to them, learn and iterate faster with OpenReplay — the open-source session replay tool for developers. Self-host it in minutes, and have complete control over your customer data.
Star on GitHub12k