Understanding Redux-Thunk for React: The Big Picture
How to use Redux-Thunk to work with Redux in React.


What does “thunk” mean? Let’s find out, then. Sincerely: When you first learn about Redux Thunk, you might find it very perplexing. I believe the word “thunk” is the main culprit. So let’s clear that up first.
Thunk is a logical programming concept in which you deal with a function commonly used to postpone the computation or evaluation of any activity, and React-Thunk effectively functions as a separate thread to your application.
Redux Thunk is a middleware that allows Redux to return functions rather than actions. This allows you to work with promises while delaying actions.
The primary applications of this middleware include handling potentially asynchronous actions, such as sending a GET request using Axios.
We can dispatch those actions asynchronously and complete each promise that is returned thanks to Redux Thunk.
A thunk is another word for a function. However, this is not just any old function. It’s an uncommon and unique name for a function that returns data from another. such as
function teach_thunk() {
  // this one is a "thunk" because it defers work for later:
  return function thunk() {   // it can be named, or anonymous
    console.log('what is a thunk?');
  };
}
You already know this pattern. You just don’t call it “thunk.” If you want to execute the “What is thunk?” part, you have to call it teach_thunk()()—calling it twice. We’ll see how to use them below.
For you to enjoy this tutorial, you must have previous knowledge in
- Html
- CSS
- JavaScript (ES6+)
- It is assumed that you are familiar with React and Redux before reading this post. If you’re starting with Redux, you can consult the official documentation.
- To follow along with this tutorial, you’ll need first to clone the stater file from my GitHub Repository
The simple shopping cart application that records items and adds them to the cart serves as the foundation for this course.
We can assume that Redux and React-redux have previously been installed and that create-react-app was used to establish a new React application.
Setting Up Work Environments
After cloning the repo from Github, let’s navigate to the cloned project directory and run the command below in our terminal to initialize yarn for the project and also run the development server.
Redux Thunk can be installed by running npm install redux-thunk --save or yarn add redux-thunk on the command line.
Because it is a Redux tool, you will also need to have Redux set up.
Once installed, it is enabled using applyMiddleware():
import { createStore, applyMiddleware } from 'redux';
import thunk from 'redux-thunk';
import rootReducer from './reducers/index';

const store = createStore(
  rootReducer,
  applyMiddleware(thunk)
);
Why Redux Thunk?
If you’re familiar with Redux, you’ll know that it’s got a few main concepts: there are “actions”, “action creators”, “reducers”, and “middleware.”
The Redux store only allows for synchronous dispatch actions, and a Redux store doesn’t have any async logic knowledge of its own.
It just understands how to dispatch activities in sync and update the state.
Do note that Reducer is a pure function; hence cannot be used to handle API calls. It should not cause side effects and should not directly mutate the state.
In React, you should not modify it directly. Instead, a new object should be created to set the state using setState.
Redux uses actions and reducers to update your app’s state. Using these two allows people to easily tell how data flows and when your state is changing.
Reducer should copy the state first, then overwrite the value in the state you want to change.
return {
  ...state,
  zip: M0R0O0
}
The answer is right here!
To put it simply, Redux-thunk is a middleware that enables users to use asynchronous functions in place of API calls.
Despite what the document stated, redux-thunk can delay actions or impose conditions.
The action object should be returned since “action” is an object. Redux-thunk allows an action creator to return a function! We can now do any asynchronous work.
Redux-Thunk is a tiny piece of code, as you can see below:
function createThunkMiddleware(extraArgument) {
  return ({ dispatch, getState }) => next => action => {
    if (typeof action === 'function') {
      return action(dispatch, getState, extraArgument);
    }
return next(action);
  };
}
const thunk = createThunkMiddleware();
thunk.withExtraArgument = createThunkMiddleware;
export default thunk;
What Exactly Is The Thunk Middleware?
Redux Middleware enables you to intercept every action sent to the reducer and modify or cancel the action.
Middleware assists you with logging, error reporting, asynchronous requests, and more.
import React from "react";
import ReactDOM from "react-dom";
import { createStore } from "redux";

const reducer = (state = 0, action) => {
  switch (action.type) {
    case "INCREMENT":
      return state + action.payload;
    case "DECREMENT":
      return state - action.payload;
    default:
      return state;
  }};

const store = createStore(reducer);

store.subscribe(() => {
  console.log("current state", store.getState());
});

store.dispatch({
  type: "INCREMENT",
  payload: 1
});

store.dispatch({
  type: "INCREMENT",
  payload: 5
});

store.dispatch({
  type: "DECREMENT",
  payload: 2
});
The function createStore takes three arguments:
- The first argument is a function known as a reducer - this is a required argument.
- The second argument is the state’s initial value - an optional argument.
- The third argument is an optional middleware argument.
Even though middleware is the third argument to the createStore function, the second argument (the initial state) is optional.
As a result of the specific syntax of nested functions, the createStore function automatically determines that the passed argument is a middleware based on the type of arguments.
LoggerMiddleware appears as follows:
const loggerMiddleware = (store) => (next) => (action) => {
  console.log("action", action);
  next(action);
};
If you check the console, you will see the following output:
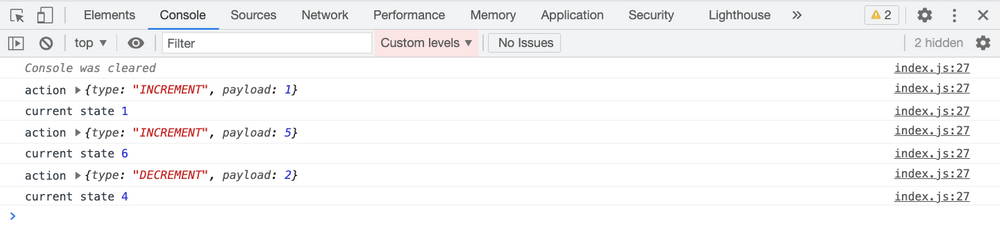
As we can see from the console, the middleware is executed before the action is dispatched to the store.
Because we’re passing the action to the following function inside the loggerMiddleware, the reducer is also executed, resulting in the change in the store.
When handling asynchronous actions with redux-thunk, the action reaches the innermost function, actionFunction, which is in charge of carrying out the action.
But unlike the dispatch from the createStore, which has listeners and sends the values to the reducer, this dispatch is something we create in the middleware.
From its parent function, nextFunction, the reducer is dispatched.
Session Replay for Developers
Uncover frustrations, understand bugs and fix slowdowns like never before with OpenReplay — an open-source session replay tool for developers. Self-host it in minutes, and have complete control over your customer data. Check our GitHub repo and join the thousands of developers in our community.
How to Use Redux Thunk: Build a shopping cart
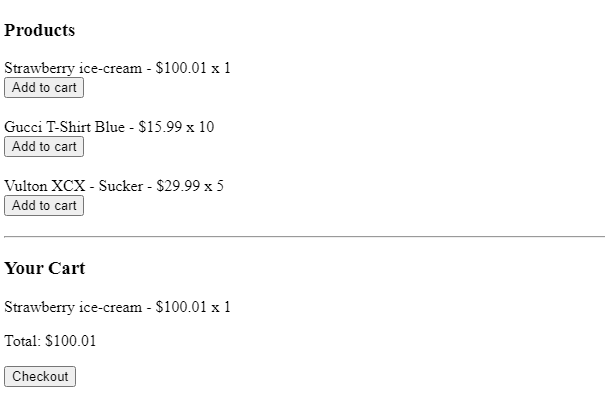
In this tutorial, we will develop a simple shopping cart in Redux Thunk to better understand how the Thunk concepts work. Let’s get it started.
To connect to the Redux store in the products.json file, we will first add some fictitious data to our Redux store, as follows:
//products.json

[
  {"id": 1, "title": "Strawberry ice-cream", "price": 100.01, "inventory": 2},
  {"id": 2, "title": "Gucci T-Shirt Blue", "price": 15.99, "inventory": 10},
  {"id": 3, "title": "Vulton XCX - Sucker ", "price": 29.99, "inventory": 5}
]
Once Redux Thunk has been installed and included in your project with applyMiddleware(thunk), you can start dispatching actions asynchronously.
A simple object is an action, and Redux requires that out-of-the-box actions be simple objects and possess a type property.
Aside from that, they can contain whatever you want—anything you need to describe the action you want to perform.
We cannot make API calls or perform dispatch actions from within a reducer because they are not supposed to change anything outside of their scope (i.e., they are “pure”).
The code for an action must reside inside a function if you want it to perform a task. This function (the “thunk”) involves a lot of work.
If an action creator could return that function—the compilation of work—instead of an action object, that would be nice.
Let’s begin by developing actions for the shopping cart.
This is how actions appear in the codebase below:
import shop from '../api/shop'
import * as types from '../constants/ActionTypes'

const receiveProducts = products => ({
  type: types.RECEIVE_PRODUCTS,products
})

export const getAllProducts = () => dispatch => {
  shop.getProducts(products => {
    dispatch(receiveProducts(products))
  })}

const addToCartUnsafe = productId => ({
  type: types.ADD_TO_CART,productId
})
export const addToCart = productId => (dispatch, getState) => {
  if (getState().products.byId[productId].inventory > 0) {
    dispatch(addToCartUnsafe(productId))
  }}

export const checkout = products => (dispatch, getState) => {
  const { cart } = getState()

  dispatch({
type: types.CHECKOUT_REQUEST })
  shop.buyProducts(products, () => {
    dispatch({
      type: types.CHECKOUT_SUCCESS, cart
    }) })
}
And since it’s kind of annoying to write those objects by hand all the time (not to mention error-prone).
Redux has the concept of “action types/creators” to stamp these things out:
export const ADD_TO_CART = 'ADD_TO_CART'
export const CHECKOUT_REQUEST = 'CHECKOUT_REQUEST'
export const CHECKOUT_SUCCESS = 'CHECKOUT_SUCCESS'
export const CHECKOUT_FAILURE = 'CHECKOUT_FAILURE'
export const RECEIVE_PRODUCTS = 'RECEIVE_PRODUCTS'
You call the function, which returns the object, instead of creating the action object yourself.
Writing action creators will make your life easier if you need to dispatch the same action multiple times throughout your app.
Additionally, types should be assigned to the objects for simpler code maintenance and debugging.
We start by importing every action and hook. Next, we dispatch to actions and then access data in the store as follows:
import { createStore, applyMiddleware } from 'redux'
import { Provider } from 'react-redux'
import { createLogger } from 'redux-logger'
import thunk from 'redux-thunk'
import reducer from './reducers'
import { getAllProducts } from './actions'
import App from './containers/App'
const middleware = [ thunk ];

if (process.env.NODE_ENV !== 'production') {
  middleware.push(createLogger());
}

const store = createStore(
  reducer,
  applyMiddleware(...middleware)
)

store.dispatch(getAllProducts())

render(
  <Provider store={store}>
    <App />
  </Provider>,
  document.getElementById('root')
);
Make sure you wrap thunk in the applyMiddleware call, or it won’t work.
After this, you’re all set: you can now dispatch functions that do whatever you need.
How Redux-Thunk Works Behind The Scene
The entirety of the redux-thunk library is this code right here:
function createThunkMiddleware(extraArgument) {
  return ({ dispatch, getState }) => next => action => {
    // This gets called for every action you dispatch.
    // If it's a function, call it.
    if (typeof action === 'function') {
      return action(dispatch, getState, extraArgument);
    }

    // Otherwise, just continue processing this action as usual
    return next(action);
  };
}

const thunk = createThunkMiddleware();
thunk.withExtraArgument = createThunkMiddleware;

export default thunk;
After installing redux-thunk and applying the middleware, all actions you dispatch will go through this piece of code above.
When an action is a function, it is called (and whatever is returned is returned), but otherwise it is passed to the next middleware or to Redux itself (which is what the following action does).
Summing Up
Congratulations on making it this far! In this tutorial, you learned:
- Redux-Thunk fundamentals
- How to Make a Simple Shopping Cart Using Redux-Thunk
- How Thunk operates in the background
In this tutorial, you looked at adding a Redux thunk to a React application to enable asynchronous action dispatch.
This is helpful when using a Redux store and depending on external APIs.
I urge you to expand this app as much as you like; just remember to include the features listed below:
- Include lovely designs.
- Once we have a product in the cart, the button should change to “Edit”, and for sure, it should work
- Put together a 404 error page.
- Create an about page
Although your imagination is the only restriction, these are the only features I can think of right now.
A TIP FROM THE EDITOR: For an alternative, check out State Management In Next.Js With Redux Toolkit.
Gain Debugging Superpowers
Unleash the power of session replay to reproduce bugs and track user frustrations. Get complete visibility into your frontend with OpenReplay, the most advanced open-source session replay tool for developers.