
One major problem with traditional web applications is that they require a stable internet connection to function properly, leaving users stranded when they’re offline or in areas with poor network coverage. PWA’s (Progressive Web App), leveraging service workers addresses this issue by caching essential resources like HTML, CSS, JavaScript, and even data from API calls, which enables the app to work offline or in low-network conditions, and this article will show you how to build them with Vue3.

Discover how at OpenReplay.com.
Aside from this, PWA also offers solutions for many problems like lack of user engagement outside the browsing context, cost of developing cross-platform compatible apps, manual updates needed in native apps to get the latest features, etc.
These benefits position PWAs as a forward-looking solution to the challenges faced by developers, businesses, and users alike.
Prerequisite
To follow along with this tutorial, you should have a basic knowledge of service workers, the Cache API, and Vue3. You should also have Vue CLI installed on your system.
Introduction to PWA
A Progressive Web App (PWA) is a type of web application that leverages modern web technologies and best practices to provide a user experience similar to that of native apps. Like a web app, PWAs can work on various platforms, including desktops, smartphones, and tablets, with a single codebase. It can be installed on the device and operated while offline.
PWAs are built with common web technologies like HTML, CSS, and JavaScript along with Service workers and Web app manifest, which are commonly associated with PWAs. Service workers are the center of the PWA. They are JavaScript files that run in the background, separate from the main thread, and act as a proxy between the web app and the network. They enable key PWA features such as offline functionality, background sync, and push notifications by intercepting and controlling network requests.
PWAs bridge the gap between web and native apps by providing a consistent and reliable user experience, regardless of network availability.
Key concepts of PWA
Progressive Web Apps (PWAs) are built around several key concepts that distinguish them from traditional web applications. These concepts aim to enhance the user experience, improve performance, and provide a more app-like feel to web applications. Below are the key concepts of a PWA:
-
Offline availability: PWAs can work offline or in low-network conditions using service workers to cache essential resources. This ensures that users can access at least some content or functionality when they are offline.
-
Responsive design: PWAs adapt seamlessly to different screen sizes and orientations, offering a consistent experience on various devices.
-
Installable: Users can install a PWA on their device’s home screen or app menu. This provides quick access to the app, just like a native app, without the need to go through an app store.
-
App-like feel: PWAs aim to provide an app-like user experience. This includes smooth animations and navigation patterns that resemble native mobile apps.
-
Web app manifest: PWAs have a web app manifest (usually named manifest.json) that provides metadata about the app, such as its name, icons, theme colors, etc. The manifest allows users to add the PWA to their home screen or app menu and customizes its appearance when launched.
-
Service workers: Service workers are a critical component of PWAs, which take the form of a javaScript file. It acts as a proxy between the web app and the network, allowing us to intercept requests and modify responses, replacing them with data from its cache.
Pros and Cons of PWA
Below are some of the pros of a PWA:
-
Works on various devices, including desktops, smartphones, and tablets, reducing the need for separate development for each platform.
-
Can be installed directly from the browser, eliminating the need for users to install it from the app stores.
-
Updates of features reflect immediately without having users manually download updates from the app store.
-
The Cost for development and maintenance is less compared to developing separate native apps for different platforms.
-
Push notifications can be sent to users to re-engage them with the app even when it’s not open.
Below are the cons of a PWA:
-
Limited iOS support for PWA functionalities and capabilities such as push notifications.
-
Limited storage space for caching data, which is imposed by the browser and inconsistent between browsers.
-
The Initial page load of a PWA is a little slow due to caching or resources.
-
Managing offline content can be complex and requires careful implementation.
Build a food recipe PWA with Vue3
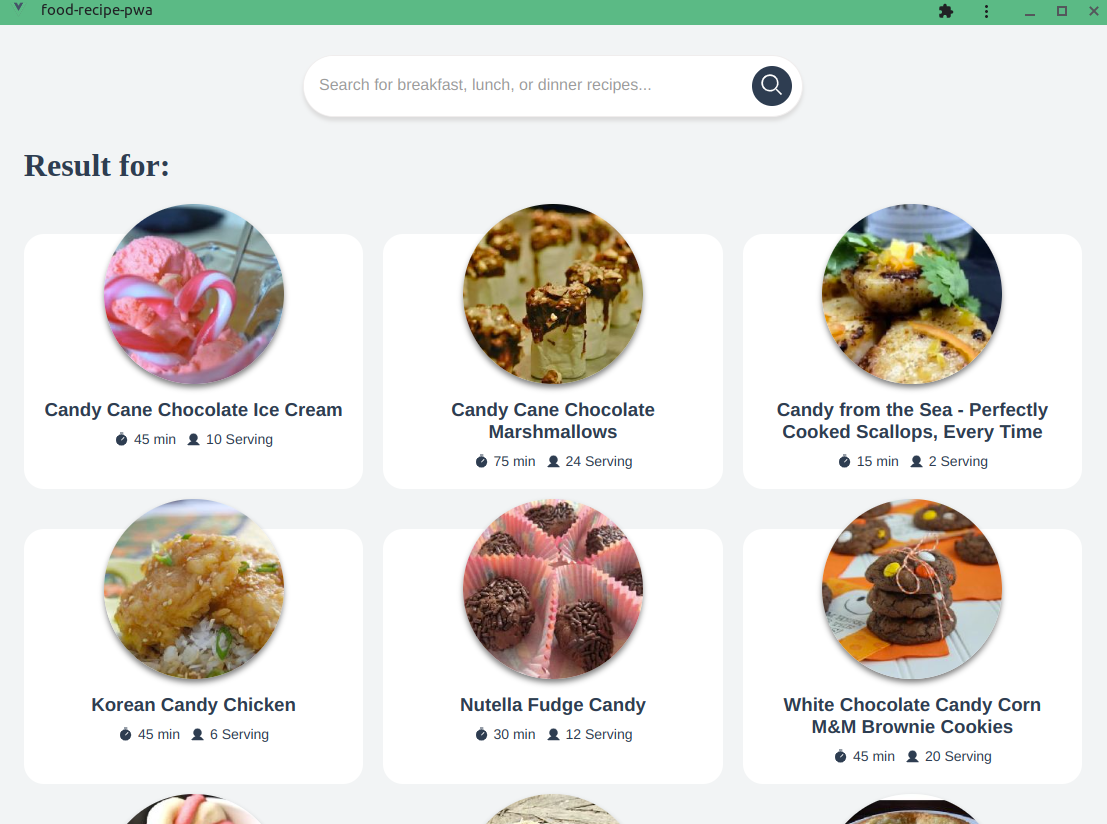
In this section, we will be building a food recipe PWA, which allows us to search for and view instructions for a recipe. The app will contain a popular and recently viewed section containing recipes, which will be cached and available for users offline.
The completed app looks like this:
Home page

Recipe detail page

Search Page
Cloning the starter Vue app
I have already created a recipe app that we will use to focus on the PWA aspect, which is the focus of this tutorial. You can clone the app and install its dependencies using the following command:
git clone -b starter https://github.com/Priyesco/food-recipe-pwa.git
cd food-recipe-pwa
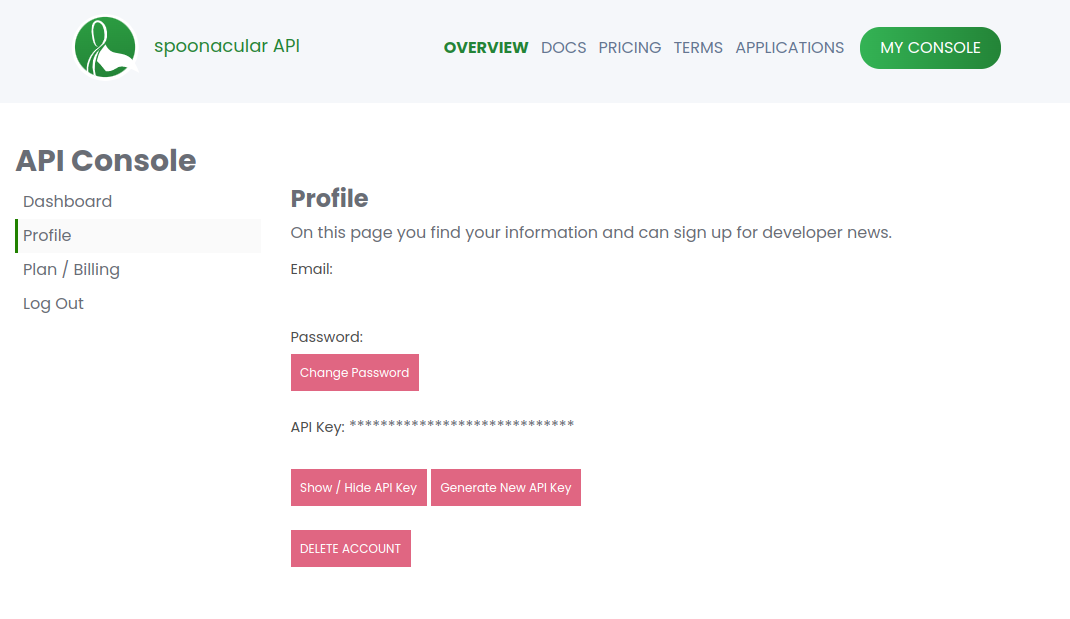
npm iFor getting recipe data, we are using the spoonacular API, which requires an API key. To get the API key, create an account following the required steps; then in the dashboard, click the MY CONSOLE button at the top-right, then click on Profile in the sidebar and you will see your API Key.
Copy the API key, head over to your project and create a .env.local in the root directory. Define the following variable and supply the API key.
VUE_APP_API_KEY = <your-api-key>Now, we can start the app using npm run server.
Converting the recipe app into a PWA
To convert the recipe app into a PWA, we will be using @vue/cli-plugin-pwa, which adds the needed files and configurations to convert our app to a PWA. It integrates Google’s Workbox under the hood to handle service workers and caching functionality. Workbox simplifies common service worker tasks and offers pre-built caching strategies. You don’t need to worry if you are not familiar with Workbox yet; we will explain in detail each of its APIs and modules used in this tutorial.
The @vue/cli-plugin-pwa can be added to an existing app or when creating a new app. Either way is straightforward.
For our use case, we will be adding it to our existing recipe add. To do so, navigate to the project in the terminal and enter the following command:
vue add pwaYou can learn how to add the plugin to a new app in the following section.
After the installation is complete, a registerServiceWorker.js file will be added in the src directory which looks like the following:
/* eslint-disable no-console */

import { register } from 'register-service-worker'

if (process.env.NODE_ENV === 'production') {
  register(`${process.env.BASE_URL}service-worker.js`, {
    ready () {
      console.log(
        'App is being served from the cache by a service worker.\n' +
        'For more details, visit https://goo.gl/AFskqB'
      )
    },
    registered () {
      console.log('Service worker has been registered.')
    },
    cached () {
      console.log('Content has been cached for offline use.')
    },
    updatefound () {
      console.log('New content is downloading.')
    },
    updated () {
      console.log('New content is available; please refresh.')
    },
    offline () {
      console.log('No internet connection found. App is running in offline mode.')
    },
    error (error) {
      console.error('Error during service worker registration:', error)
    }
  })
}
This file plays the primary role of registering the service worker for a PWA. It also handles various events and states related to service worker registration and its lifecycle. Each of the above functions runs based on the state of the service worker.
For example, when the service worker has been registered, the registered function runs, and when resources have been cached, cached runs.
These functions can be used to provide feedback and guidance to users based on the state of the service worker, such as Prompt users to refresh the app to apply the updates when new content is available, notify users that the app is running in offline mode, etc.
The service worker is added and only enabled in a production environment (when we run npm run build) by the Vue CLI PWA plugin. This means our app will function like a regular web app in development and production like a PWA. This is so in order not to lead to a situation when previously cached assets by the service worker are used, and the latest local changes are not reflected.
Based on this, to test the PWA, we must first build the site and then serve it. This can be done either by hosting our app in any of the hosting providers, such as Netlify, Vercel, Heroku, etc., or running a simple HTTP server from the build directory locally.
As you might have deduced, testing the PWA locally using an HTTP server is best since it saves minutes that will be spent waiting for the app to deploy on a hosting provider.
Now, let’s see how we can test our recipe PWA. Navigate to the project in the terminal and enter the following commands:
npm install -g serve
npm run build
serve -s dist -l 4000
This will install an HTTP server globally, build our app to the dist folder, and serve it on port 4000. If we expand the dist folder, we will see that the service worker and Web app manifest have been added.
Now, when we go to http://localhost:4000 in the browser, we will notice we can now install our app.
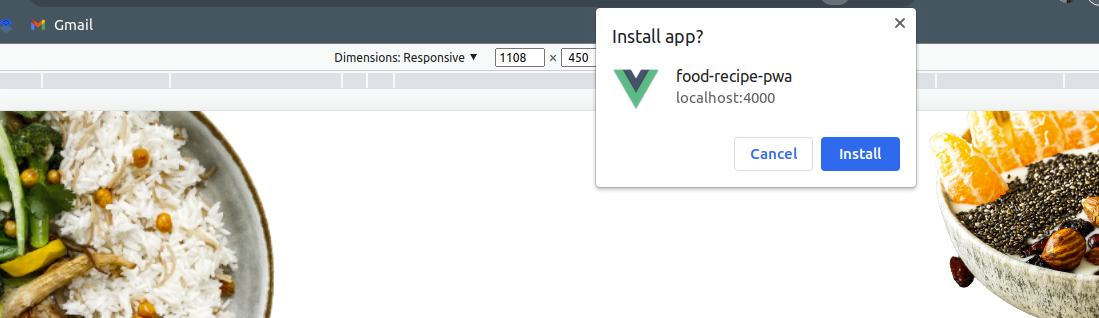
Awesome! It can also be installed on any platform, including smartphones and tablets with a standards-compliant browser.
We can view the status of the service worker from the browser dev tool by n
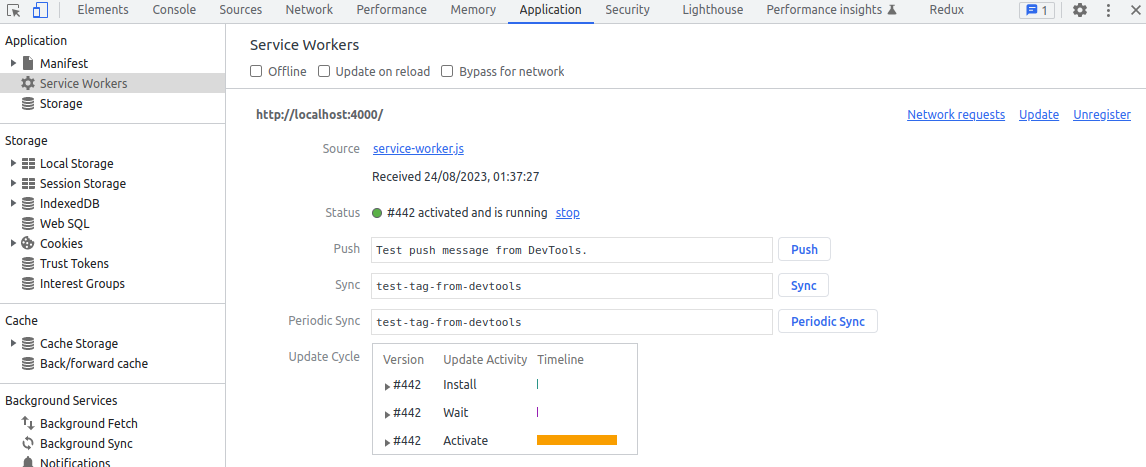
To simulate the offline behavior of our app, we can check the offline checkbox.

Note if network requests are not sent even when the offline checkbox is unchecked. In the dev tool, navigate to the Network, click on the Throttling dropdown, and select No throttling.

Right now, we will notice that although we have not written any code to precache our assets, but somehow it has been done. This is done by the Workbox generateSW mode. We learn more about this later on in this article.
Creating a new PWA app with Vue CLI
This section specifically teaches how to add the PWA Vue CLI plugin to a new app.
Enter the following command in the terminal:
vue create vue-pwaWhen prompted to select preset, select Manually select features. Use the arrow key to move to the option.

Press enter. Next, when prompted to check the needed features, check Progressive Web App (PWA) support along with other features if needed using the space bar.
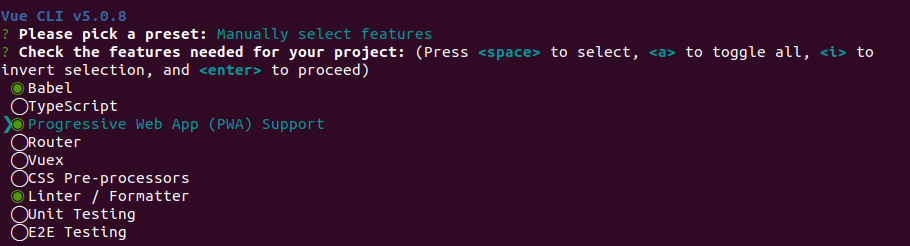
Press enter. For the other prompts, you can select the options that best suit your use case.
After the installation is complete, you will see the following:

Brief overview of Workbox
Before we dive into how we can cache popular and recently viewed recipes, let’s learn about the Workbox modules and methods we will be using.
As mentioned earlier, Workbox is a set of tools that makes the implementation of service workers easier. Workbox includes several modules, some of which are:
-
workbox-routing: Allows us to define rules for handling network requests based on URL patterns. It is commonly used to route requests to different strategies (e.g., cache-first, network-first),
-
workbox-strategies: Includes pre-defined caching strategies that determine how requests are fulfilled, whether by fetching from the cache or making a network request. These strategies include:
- CacheFirst: A strategy that serves the request from the cache if available; otherwise fetches it from the network and updates the cache.
- NetworkFirst: A strategy that attempts to fetch the request from the network and falls back to the cache if the network request fails.
- StaleWhileRevalidate: A strategy that serves the cached response while updating it with a network request in the background.
- NetworkOnly: As the name implies this strategy always fetches resources from the network and doesn’t use the cache.
- CacheOnly: Unlike NetworkOnly, this strategy exclusively serves resources from the cache and does not make network requests.
-
workbox-precaching: Used for caching files during the service worker installation phase. This is often called “precaching”. Precaching involves caching important static assets like HTML, CSS, JavaScript, and other resources so that they are available offline.
-
workbox-expiration: Allows us to set when cached resources should be considered outdated and the number of items to be stored in the cache.
When working with Workbox, we must use either the generateSW or injectManifest method of Workbox build tools.
generateSW is the simplest method to work with Workbox. It generates a complete service worker file for us based on configuration options. It’s a quick way to set up a service worker without writing one manually. Although, it is less flexible because we have less control over the service worker code.
injectManifest is a more advanced method. It allows us to manually write and customize our service worker code but at the cost of simplicity. This method is preferable if you have complex requirements, such as advanced routing, custom caching strategies, etc.
For this tutorial, generateSW will suffice for our use case, but we will also demonstrate how injectManifest can be used.
You can learn more about these methods in the Workbox docs on The ways of Workbox.
Implementing caching with Workbox
Here, we will be caching the popular and recently viewed section of the recipe app so that it will be available to users offline.
Now, the question is which strategy should we use for caching. The right strategy to use depends on the kind of behavior to be achieved. For a recipe app, the popular recipes probably wouldn’t change for a couple of days or weeks, and the recently viewed recipes will always be the same until another recipe is viewed. Based on this, the CacheFirst strategy is the best option for both sections.
To implement this, we will need to specify our configurations via the pwa property of either the vue.config.js file or the vue field in package.json as stated in the PWA plugin doc.
In the root directory, modify the vue.config.js file to the following:
const { defineConfig } = require('@vue/cli-service')

module.exports = defineConfig({
  transpileDependencies: true,
  pwa: {
    workboxOptions: {
      runtimeCaching: [
        {
          urlPattern: new RegExp('https://api.spoonacular.com/.*&sort=popularity'),
          handler: "CacheFirst",
          options: {
            cacheName: 'popular-recipes',
            expiration: {
              maxAgeSeconds: 7 * 24 * 60 * 60
            },
          }
        },
        {
          urlPattern: new RegExp('https://api\\.spoonacular\\.com/recipes/\\d+/information.*'),
          handler: "CacheFirst",
          options: {
            cacheName: 'recently-viewed',
            expiration: {
              maxEntries: 8
            },
          }
        }
      ]
    }
  }
})
In the above code, in pwa.workboxOptions, we have specified the options to be passed to the underlying Workbox method. Since the PWA plugin’s default method is generateSW, these options will be passed to the generateSW config. Check out the PWA plugin docs linked above to see the list of options that can be passed to the pwa property.
Here is a breakdown of what was done in the above code:
- In the
runtimeCachingproperty, we have specified two routes to be handled by the service worker. One for popular recipes and the other for recipe details. - Passed the regular expressions, which will be used to match both routes to the
urlPatternproperty. - Specified the caching strategy to be used in the
handlerproperty. - Finally, specify the options that will be used to configure the cache in the
optionsproperty. For the popular recipe route, the cache name is ‘popular-recipes’, and the expiration date is one week, and for recipe details, the cache name is ‘recently-viewed’, and only eight (8) items can be added to the cache.
With these configurations, when there is a request to get popular recipes or view a recipe detail, it will be handled using the CacheFirst strategy. Their responses will be stored in their respective cache with the specified cache names.
Right now, although popular recipes are been cached, we won’t be able to view a popular recipe’s details offline unless it has been stored in the recently viewed cache. Let’s fix this. Also, instead of displaying and storing recently viewed recipes in the local storage as it is currently done in our app, let’s make use of the ones stored in the cache. Although it is not a bad practice to use cached API and local storage in the same app, to demonstrate how we can use cached resources stored by the service worker in our app, we will be modifying this.
Head over to src/views/HomeView.vue and replace this line of code:
const recentlyViewed = JSON.parse(localStorage.getItem('recently-viewed'));With the following:
const recentlyViewed = ref([]);

(async () => {
  if ('caches' in window){
    const cache = await caches.open('recently-viewed')
    const responses = await cache.matchAll()
    if(responses.length) {
      const responsesData = await Promise.all(responses.map(async (response) =>
        await response.json()
      ))
      recentlyViewed.value = responsesData
    }
  }
})();
The above code gets the recently viewed recipes from the cache and stores them in the recentlyViewed variable.
Next, head over to src/views/RecipeView.vue and add the following lines of code after the route variable:
const checkedPopularRecipes = ref(false);

(async () => {
  if ('caches' in window){
    const cache = await caches.open('popular-recipes')
    const responses = await cache.matchAll()
    if(responses.length) {
      const responsesData = await Promise.all(responses.map(async (response) =>
        await response.json()
      ))
      recipe.value = responsesData[0].results.find((recipe) => recipe.id === Number(route.params.id))
      checkedPopularRecipes.value = true
    }
  }
})();
The above code checks the popular recipes cache for the recipe to be viewed and stores it in the recipe variable if it exists. It also modifies the checkedPopularRecipes variable to true after the check is done.
Next, add the following import:
import {watch} from 'vue'Next, modify this block of code:
(async () => {
  const recentlyViewed = JSON.parse(localStorage.getItem('recently-viewed')) || []
  let storageRecipe = recentlyViewed.find((recipe) => recipe.id === Number(route.params.id))
  if(!storageRecipe) {
    const res = await axios.get(`https://api.spoonacular.com/recipes/${route.params.id}/information?apiKey=${process.env.VUE_APP_API_KEY}`)
    if(res.data) {
      recipe.value = res.data
      if(recentlyViewed.length === 8) recentlyViewed.pop()
      localStorage.setItem('recently-viewed', JSON.stringify([res.data, ...recentlyViewed]))
    }
  }else recipe.value = storageRecipe
})()
With the following:
watch([recipe, checkedPopularRecipes], async ([newRecipe, newCheckPopRecipes]) => {
  if(newCheckPopRecipes && !newRecipe) {
    const res = await axios.get(`https://api.spoonacular.com/recipes/${route.params.id}/information?apiKey=${process.env.VUE_APP_API_KEY}`)
    if(res.data) recipe.value = res.data
  }
})
The above code sends a request to fetch a recipe’s details only when it is not available in the popular recipes cache.
This sent request will be intercepted by the service worker and will be handled using the CacheFirst strategy as we have specified in the vue.config.js file.
Finally, head over src/registerServiceWorker.js and add a window.location.reload() to the cached() function:
cached () {
  console.log('Content has been cached for offline use.')
  window.location.reload()
},
This is done to reload the page after the service worker has been activated for it to be able to intercept the popular recipes request, which is sent before the activation of the service worker.
With this, when we build and serve our app and then update the service worker if it’s not the first installation, the popular and recently viewed recipes will now be cached and served from the cache.
Here is a GIF showing how the app works offline:
Working with Workbox using injectManifest
To use injectManifest rather than generateSW, we will need to explicitly specify it in the vue.config.js file along with the service worker file to be used.
const { defineConfig } = require('@vue/cli-service')
module.exports = defineConfig({
  transpileDependencies: true,
  pwa: {
    workboxPluginMode: 'InjectManifest',
    workboxOptions: {
      swSrc: './src/service-worker.js',
    }
  }
})
Then, create a service worker file in the specified location and add the following line of code to it which enables the service worker to precache assets.
import {precacheAndRoute} from 'workbox-precaching';

precacheAndRoute(self.__WB_MANIFEST);
This code is required when using InjectManifest or else the build process will fail.
The self.__WB_MANIFEST string in the above code is a placeholder that Workbox replaces with the list of files that should be precached by a service worker when it is installed, which is called the precache manifest.
After this, you then start writing your service worker logic from scratch or utilizing the Workbox modules, which is best.
Customizing the PWA
At build, the PWA plugin also creates a Web app manifest (manifest.json) with default configurations as specified in the PWA plugin docs.
These defaults can be overridden to suit our preferences by defining them in the vue.config.js or package.json file.
For example, if we want to change the PWA name and theme color configurations, vue.config.js will be similar to this:
module.exports = defineConfig({
  // ...
  pwa: {
    name: "RecipeRelish",
    themeColor: "#f1f3d8",
  }
})
Check out the PWA plugin docs for the list of all properties that can be customized.
Prompt users to install the PWA
In addition to the provided installation experience by the browser, we can add a custom in-app installation flow to prompt users that our app is installable.
The JavaScript event that makes this possible is the beforeinstallprompt. This event is fired by the browser if our PWA meets the required installation criteria.
Some common approaches used to prompt users our PWA is installable include adding an option in the sidebar, a button in the header, or using a popup, etc.
Below is an example of how a button can be used to trigger the installation of the PWA:
<template>
  <button @click="pwaInstall">Install</button>
</template>

<script setup>
import {onBeforeMount} from "vue"

let pwaInstallEvent;

onBeforeMount(() => {
  window.addEventListener('beforeinstallprompt', (e) => {
  e.preventDefault();
  pwaInstallEvent = e;
  })
})

const pwaInstall = async () => {
  pwaInstallEvent.prompt()
  const { outcome } = await pwaInstallEvent.userChoice;
  if (outcome === 'accepted') {
    // Take extra actions if the user opted for installation.
  } else {
    // Take extra actions if the user cancels.
  }
}
</script>
The above code listens to the beforeinstallprompt event and then stores it in a variable when it fires. Then, in the pwaInstall, which will be called when the button is clicked, the variable is used to open the installation prompt and get the outcome of the user’s action.
To learn more about the in-app installation flow, you can check out this post on how to provide your own in-app install experience.
Conclusion
PWA offers a seamless blend of web and native app capabilities, providing features that make it beneficial to businesses, developers, and users alike. In this tutorial, we have learned about PWA, its key concepts, and how we can build a PWA.